Thermo Recorder TR-7wb/nw Series
Introductory Manual
© Copyright T&D Corporation. All rights reserved. 2020.06 16508120013 (3rd Edition)
tandd.com/
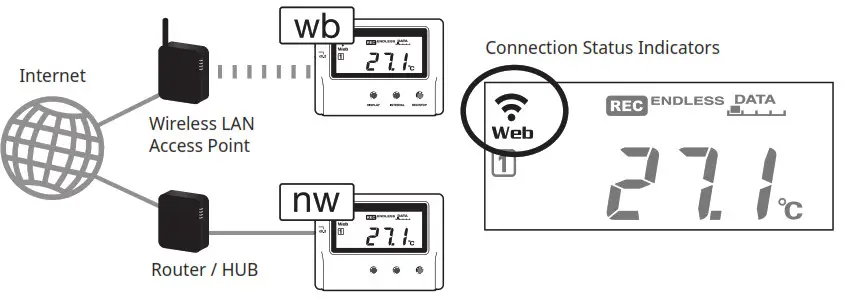
The TR-7wb/nw series data loggers can be used in the following ways.
wb: TR-71wb, TR-72wb, TR-75wb
nw: TR-71nw, TR-72nw, TR-75nw
Via Cloud: Automatic Data Upload By using wireless LAN ( wb) and wired LAN (nw ), the logger automatically uploads the recorded data to the cloud. It enables the viewing of uploaded data and the changing of settings on your PC, smartphone and tablet.
Via PC: Setup and Download See reverse side.
Make settings and download data by USB communication between the PC and wb or nw.
Via Smartphone: Setup and Download (wb only) See reverse side.
Make settings and download data by connecting to a smartphone or tablet via Bluetooth®.
| Power ON/OFF | Press-and-hold the <PWR> button. (Cannot power OFF when a recording is in progress.) | |
| Start/Stop Recording | Press-and-hold the <REC/STOP> button. | |
| Recording Interval [REC] / Upload Interval [upload] | Press the <INTERVAL> button (display mode) Press-and-hold the <INTERVAL> button (setting mode) | |
| Transmit Data and Settings to “T&D WebStorage Service” | Press the <REC/STOP> button. | |
| Cancel Communication | Press the <PWR> button. | |
| Channel on Display (Fixed or Alternating Display) | Press the <DISPLAY> button to switch the display: Ch1 →(fixed) Ch2→ (fixed) Ch1&2 (alternate) | |
| nw | Display Last Used IP Address | Press-and-hold <PWR> and <DISPLAY> together. EX: When the IP address was 11.22. 33.44,each part will appear for two seconds as follows: [11 → 22 →33 → 44]. When DHCP is ON but failed to obtain an IP address, [ —-→—→—-→—] will appear. |
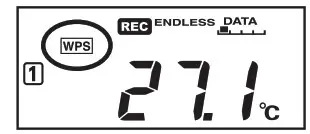
| wb | Wireless LAN Settingsusing WPS | Press-and-hold <PWR> and <DISPLAY> together. |
| TR-75wb TR-75nw | Display Sensor Type | Press-and-hold the <DISPLAY> button. |
- Press-and-hold” means to hold the button down for about two seconds.
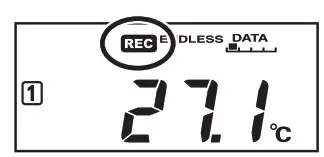
Marks on LCD Screen
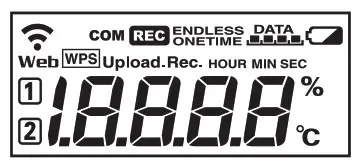
| Wireless LAN (wb only) ON: Connected to the wireless network. (Signal strength: 1 to 3 bars) BLINKING: Unable to connect to the wireless network. OFF: Wireless LAN settings not made. | |
Web | ON: Connected to the Internet. BLINKING: Unable to connect to the Internet. OFF: Auto-upload is set to “OFF”. |
12 | Displayed Measurement Channel |
wps | ON: Wireless LAN Setup using WPS Possible (wb only) |
COM | BLINKING: LAN, Bluetooth or USB communication in Progress |
REC | ON : Recording in Progress |
| ENDLESS ONETIME | ENDLESS: Upon reaching the logging capacity of 8,000 readings, the oldest data is overwritten and recording continues. ONETIME: Upon reaching the logging capacity of 8,000 readings, recording automatically stops. Cannot be set or changed using buttons on the logger. The factory default setting is “ENDLESS”. |
| Amount of Recorded Data in Device | |
| ON: Low Battery When the battery power becomes even lower after the battery warning mark appears, the auto-upload will stop. *Please change the batteries as soon as you see this mark. | |
| Upload | Auto Upload Interval |
| Rec. | Recording Interval |
Messages on LCD Screen
Sensor Error: No sensor connected, improper connection, damaged, etc.
Full Data: Upon reaching a capacity of 8,000 readings in “ONETIME” mode, this message appears and the recording automatically stops.
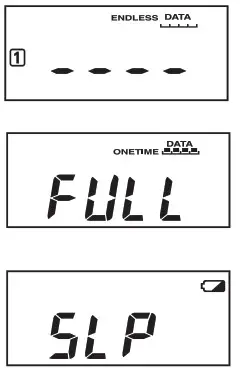
Sleep Mode: If you take no action after a battery warning mark appears and auto-upload stops, the logger will enter sleep mode and stop all operations to protect data.
*If the logger remains in sleep mode over one week without a change of batteries, all recorded data will be lost.
Thermocouple Sensor Type (TR-75wb/75nw only)
By pressing and holding the <DISPLAY> button, you can see which sensor type is currently set for each channel as below.
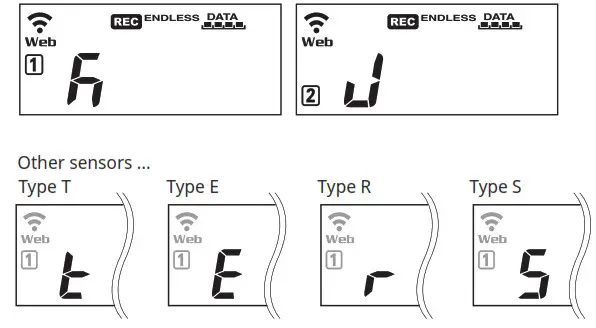
In the example shown left,
Channel 1 is set to Type K,
Channel 2 is set to Type J.
The factory default setting is “K” for both 12. Depending on the thermocouple type you’re going to use, make settings or changes using “T&D WebStorage Serviceor the software “TR-7wb/nw for Windows”.
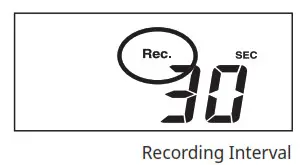
Recording Interval Setting (Common Operation)
Install the batteries and sensor(s) in the logger, and make sure the LCD is displaying measurements. The factory default setting for the recording interval is 10 minutes for TR-75wb/75nw and 1 minute for other TR-7wb/nw models. Follow the procedure below to change this setting.
- Skip this setting if you don’t need to change the recording interval.
- Upon the start of recording, all previously recorded data in the logger will be deleted.
- Note: When REC is ON (recording in progress), the logger cannot be turned off , nor can the recording interval be changed.
- When REC is ON, press and hold the <REC/STOP> button until REC turns OFF (recording stops).
- Press the <INTERVAL> button.
- while REC is displayed, press-and-hold the <INTERVAL> button until the interval time flashes.

- Press <INTERVAL> again to select the interval time. Each press changes the interval as follows:
Recording Intervals (REC ) 1, 2, 5, 10, 15, 20, 30 SEC / 1, 2, 5, 10, 15, 20, 30, 60 MIN - When you stop pressing the button, the display will return to the normal measurement mode, confiring that it is set.
Ref: Recording Intervals & Estimated Time until Logging Capacity is Reached - Press-and-hold the <REC/STOP> button until REC turns ON (recording restarts).
Automatic Data Upload to the Cloud
This function enables TR-7wb/nw series loggers to automatically upload recorded data to “T&D WebStorage Service” where uploaded data is available for viewing and settings can also be changed.![]() The following procedure has been written assuming the use of “T&D WebStorage Service” with TR-7wb/nw series loggers. Please read the “T&D WebStorage Service” License Agreement carefully before making settings. Making Auto-upload Settings indicates your acceptance of this Agreement.
The following procedure has been written assuming the use of “T&D WebStorage Service” with TR-7wb/nw series loggers. Please read the “T&D WebStorage Service” License Agreement carefully before making settings. Making Auto-upload Settings indicates your acceptance of this Agreement.
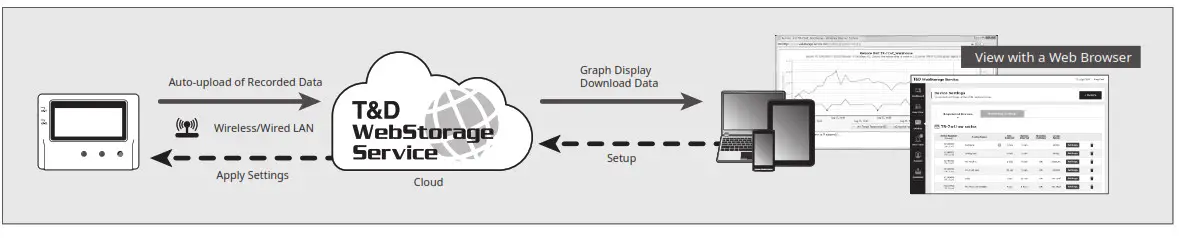
- This procedure requires Internet access via wireless or wired LAN.
- When the storage period in “T&D WebStorage Service” is exceeded, old data will be deleted. Please refer to the “T&D WebStorage Service” License Agreement for the service details.
webstorage-service.com/info/ - If you wish to select a server other than “T&D WebStorage Service” for auto upload of data, please use “T&D Data Server”. (See on the reverse side.)
If you wish to use a static IP address instead of DHCP, make network settings using the software.
See reverse side.
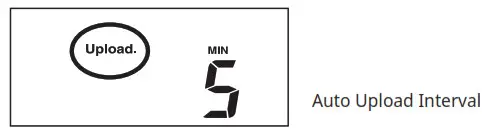
Auto-Upload Settings
- Press the <INTERVAL> button twice to display the auto-upload interval.
- While is displayed, press-and-hold the <INTERVAL> button until the interval time flashes.

- Press <INTERVAL> again to select the interval time. Each press changes the interval as follows:
Auto-upload Intervals (upload): OFF / 1, 2, 5, 10, 15, 20, 30 MIN / 1, 2, 3, 4, 6, 12, 24 HOUR The factory default setting is OFF (no auto-upload). - The interval time will stop fl ashing and the display will return to the normal measurement mode, confirming that it is set.
Ref: Auto-Upload Intervals & Corresponding Estimated Battery Life
In general, the shorter the upload interval, the shorter the battery life.
| model Interval | 1 min | 10 min | 1 hr | 12hrs or more |
| TR-71wb/TR-72wb | About 10 days | About 2 months | About 1 year | About 15 months |
| About 1.5 years | ||||
| TR-71nw/TR-72nw | ||||
| About 10 months | About 1 year | |||
| TR-75wb | ||||
| TR-75nw | About 7 months |
- All estimates are based on operations carried out with a new battery and are in no way a guarantee of actual battery life.
- When Auto-upload is used frequently on TR-71wb/71nw, the measurement of the internal sensor may rise by around 0.3°C.
Wireless LAN Settings
This step is not necessary for nw. Plug a LAN cable into a network hub or router, and go to.![]() Wireless LAN settings using WPS may not be possible depending on the support-ed features or settings of your wireless LAN access point.
Wireless LAN settings using WPS may not be possible depending on the support-ed features or settings of your wireless LAN access point.
In this case, make wireless network settings on PC or smartphone.
See reverse side.
The following information is required:
- Network Name (SSID)
- Security (WEP 64bit/128bit, WPA-PSK (TKIP), WPA2-PSK (AES))
- Password (Network Key)
- Press the <POWER> and <DISPLAY> buttons together until WPS appears on the LCD screen.

- Set your wireless LAN access point to “WPS” mode.
For details about Wireless LAN Access Point settings, refer to the user manual for that access point. - When the setup is successfully completed, the mark
 on the LCD display will turn ON.
Checking Connection Status
Place the logger in the desired measurement location.
Make sure Internet access is available.
Press the <REC/STOP> button to immediately send the recorded data to “T&D WebStorage Service” without waiting for the next transmission. If the transmission is successful, web will remain ON after com turning OFF.
WB | Unable to connect to the wireless network. Try changing the measurement location or adjusting the distance between the logger and the access point, and make the wireless LAN settings in step 2 again. |
| Web is blinking | Internet connection failed. Please check the network settings. |
Viewing Recorded Data
In order to view the recorded data on a web browser, it is necessary to register devices to “T&D WebStorage Service” in advance.
- Access “T&D WebStorage Service” from the web browser on your PC or mobile device. webstorage-service.com
- Click [Create Account] to go to the registration page, and follow the directions to complete the registration. If you already have your User ID, go to the next step.
- Log in by entering the registered User ID and Password.
- In the [Device Settings] window click [+Device].
- In the Add, a Device page, enter necessary information* and click [Add].
*The registration code can be found on the supplied Registration Code Label. - After data is sent to “T&D WebStorage Service” either by auto-upload or by pressing the <REC/STOP> button on the logger, the added device and its measurements will appear in the [Data View] window.
Troubleshooting Tips
If measurements are not displayed:
Check the screen of the logger and make sure REC is ON; If not, press <REC/ STOP> to start recording. See “Recording Interval Setting (Common Operation)” above.
If the display of measurements is not refreshed:
Try making the recording interval shorter. If the recording interval is set to longer than the upload interval, the same measurement is displayed until the next recording occurs and the new data is uploaded.
If you lose your registration code label:
Open the software “TR-7wb/nw for Windows” and connect your logger via USB to the computer. The connected logger and its information will appear in the left boxes of the main window. The registration code can be found here.
If you wish to save recorded data to PC:
Use “T&D Graph” that is available for download from the T&D Website. See on the reverse side.
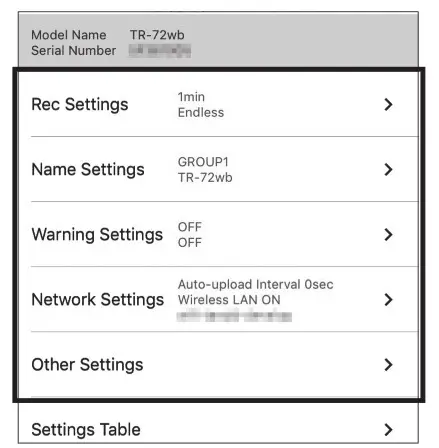
Changing Device Settings
It is possible to change device settings by using “T&D WebStorage Service”.![]() Note that the setting changes will not be actually applied until communication occurs between the logger and “T&D WebStorage Service”. By pressing the <REC/STOP> button on the logger, however, settings can be applied immediately.
Note that the setting changes will not be actually applied until communication occurs between the logger and “T&D WebStorage Service”. By pressing the <REC/STOP> button on the logger, however, settings can be applied immediately.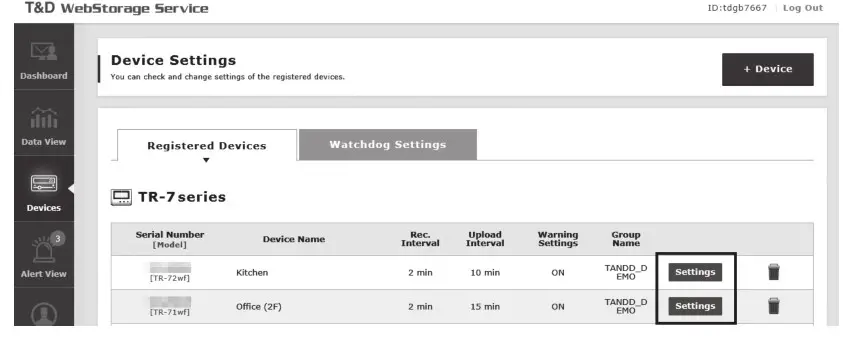 Setting Items that can be set or changed:
| Device Info | Device Name, Group Name, Recording Interval, Recording Mode, Auto-upload Interval, Channel Name, Time Difference, Unit of Temperature, Sensor Type (TR-75wb/75nw only) |
| Warning Settings | Lower Limit, Upper Limit, Sensor Warning, Judgement Time |
Setting via the cloud using the Mobile App
For the loggers that have been registered to “T&D WebStorage Service”, the settings can also be changed using the “T&D Thermo” App on your smartphone or tablet. See reverse side.
https://itunes.apple.com/us/app/thermoweb/id703327096?l=ja&ls=1&mt=8
https://play.google.com/store/apps/details?id=com.tandd.android.thermoweb&hl=en
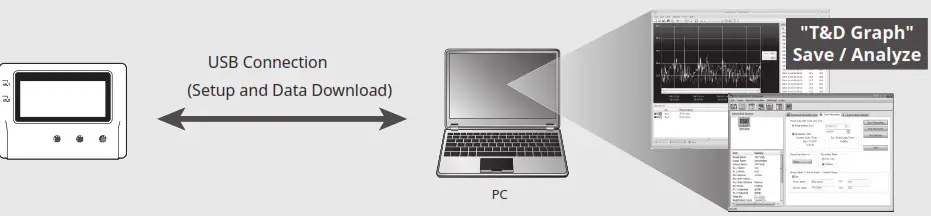
PC over USB: Setup and Download
![]() Using a USB connection between the logger and PC, make device settings and download recorded data via “TR-7wb/nw for Windows”.
Using a USB connection between the logger and PC, make device settings and download recorded data via “TR-7wb/nw for Windows”.
The software can be downloaded from the T&D website, but for those who prefer, a CD and USB cable set (SO-15C1) is available for purchase.
Software Download (free) >> tandd.com/software/
Primary features of “TR-7wb/nw for Windows” include :
- Start/Stop Recording
- Auto-upload Setting
- Network Settings (static IP address, etc.)
- Name Settings (device/group/channel)
- Downloading and Saving Recorded Data
- Warning Settings
- Time Settings
- Sensor Type Setting (TR-75wb/75nw only)
Device Settings
- Download and install “TR-7wb/nw for Windows” from the URL shown above.
- Connect the logger via USB to your computer.
* “TR-7wb/nw for Windows” will open automatically. (If not, please open it manually from the Windows Start Menu or Start Screen.) - Make the necessary settings from the tabs in the main window.
- After having completed all the settings, click [Start Recording] or [Send Settings] to send the setting contents to the logger.
Setting Items that can be set or changed:
| [Start Recording] Tab | Programmed Start, Immediate Start, Recording Interval, Recording Mode, Sensor Type (TR-75wb/75nw only), Group Name, Device Name, Channel Name |
| [Auto-upload Settings] Tab | Network Settings (DHCP, WB Wireless LAN Settings), Warning Settings, Time Settings, Data Destination, Upload Interval |
Downloading Data and Viewing in Graph
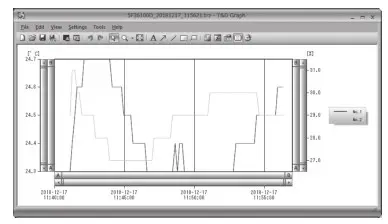
By using “T&D Graph”, it is possible to view data downloaded from the logger in graph form.
- Download and install “T&D Graph” from the URL shown above.
- Connect the logger via USB to your computer.
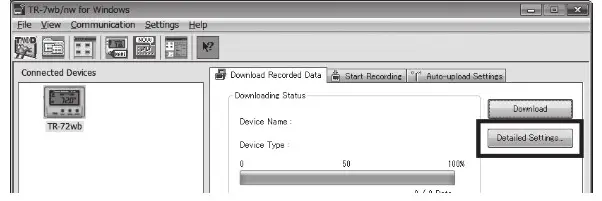
- Open “TR-7wb/nw for Windows”, click the [Download Recorded Data] tab and proceed with the download.
* Before downloading, settings for “Graph Display” and “File Name” can be viewed and changed under [Detailed Settings].
- Upon completion of the download, “T&D Graph” will open and display the graph.

* For details about software operations, please see the “Help” menu in each software.
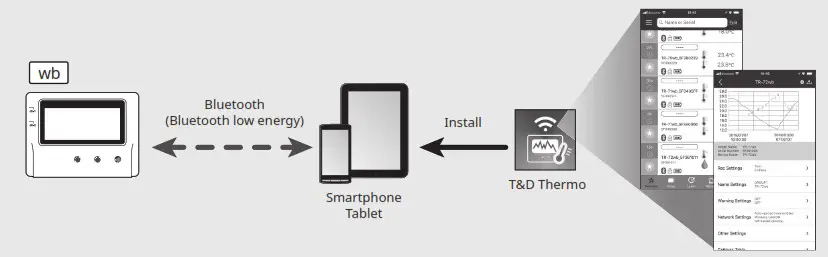
Smartphone over Bluetooth ®: Setup and Download TR-7wb Series
By using the “T&D Thermo” App with wb, it is possible to make device settings download recorded data, and view recorded data directly from your smartphone or tablet via Bluetooth. The app supports Android OS and iOS.
Primary features of “T&D Thermo” include :
- Start/Stop Recording
- Auto-upload Interval Setting
- Name Settings (device/group/channel)
- Warning Settings
- Graph Display
- Downloading, Saving and Uploading Recorded Data
- Network Settings
- Time Settings
Device Registration
- Install “T&D Thermo” to your smartphone or tablet.
* “T&D Thermo” is available on the Apple Store for iOS devices and the Google Play Store for Android devices. - Open the app.
- On the top screen, tap [ Add] to open the Add Device screen.
- By selecting the desired device in the list of Nearby Bluetooth Devices, its serial number will be entered automatically. Enter the registration code manually, then tap [Apply].
- Repeat the same for all devices you wish to add, then tap <to return to the top screen.
Graph Display and Device Settings
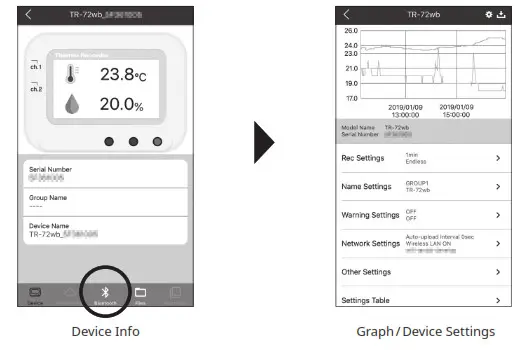
- Tap the device in the list to open the device info screen.
- By tapping [ Bluetooth] in the tab bar, the device settings screen will open and display downloaded data in the graph.

Graph Operations
| Zooming in and out | Pinch in/out to change the scale. |
| Full-screen display | Hold the smartphone horizontally. |
| Checking time and temperature at the specified point | Tap and hold on to the graph (in full-screen mode). |
Saving and Sharing Recorded Data
Data download can be saved to a file and shared by using “T&D WebStorage Service” whenever needed.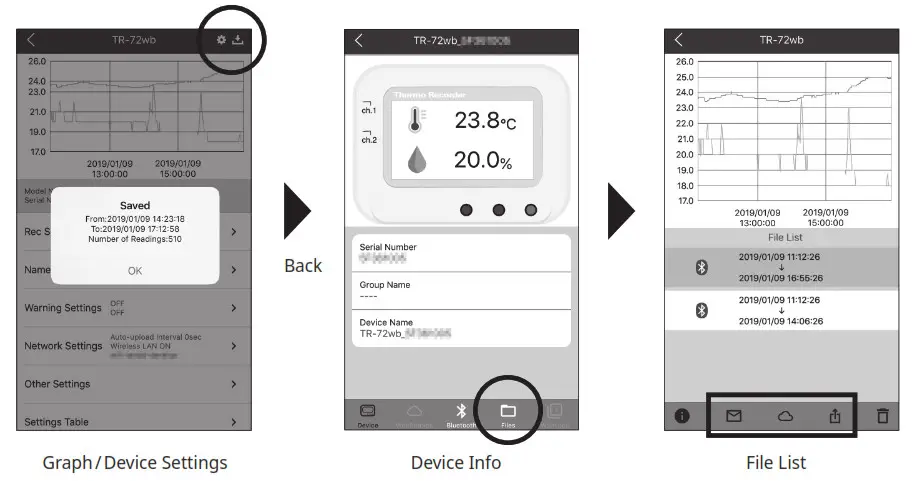
- Tap [
 Save] at the upper right of the graph to save graph data.
 - Tap [
 Files] in the tab bar at the bottom of the device info screen to open the fi le list.
 - Select a file and tap the desired icon in the toolbar.
* The icons in the toolbar allow you to take actions on the selected data file such as sending to “T&D WebStorage Service”, sending via email, sharing in SNS, and saving directly to your smartphone.
For details about “T&D Thermo”, refer to the online help.
tandd.co.jp/support/webhelp/tdthermo/eng/

https://www.tandd.co.jp/support/webhelp/tdthermo/eng/
Tips
Sensors
Optional Sensors
We off er a wide range of Temperature and Temperature-Humidity sensors, sensor extension cables, AC adaptors, etc. For details see the Optional Products information on the Product Page.
tandd.com/product/tr7wbnw_series.html
Thermocouple Sensors (for TR-75wb/75nw)
We do not handle the sale of Thermocouple sensors. Please purchase separately.
External Power Supply
It is possible to use USB bus power, AC adaptor (AD-05A2 or AD-05C2: sold separately), or PoE ( only) as a power source. When using an external power supply, installing batteries will make it possible to continue recording in the event of a power outage.![]() Important Notice for Using an External Power Supply
Important Notice for Using an External Power Supply
When using external power, the data logger itself generates heat and the internal sensor of the TR-71wb/71nw will report a higher temperature than actual; we recommend using an external temperature sensor. Also, when an external sensor is used near the TR-7wb/nw Series, it may be affected by the heat from the logger.
T&D WebStorage Service
“T&D WebStorage Service” is a free web-based cloud storage service provided by T&D Corporation. By uploading recorded data to “T&D WebStorage Service”, it is possible to access your important data from any place in the world at any time you wish.webstorage-service.com
Useful features include automatic transmission of current readings & recorded data, graph display, settings, etc.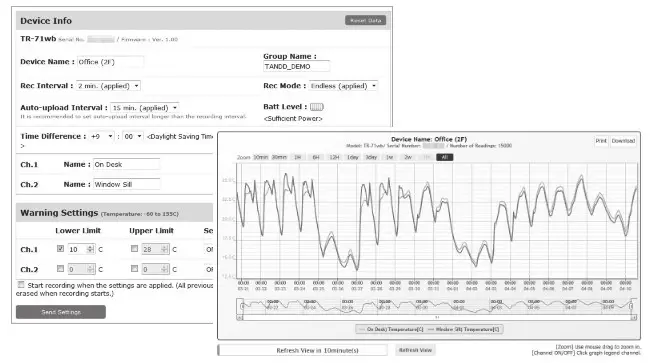
Time Settings
The time difference setting can be changed via “T&D WebStorage Service”, “TR-7wb/nw for Windows”, or “T&D Thermo”. The default time difference is as follows:
wb GMT +1:00 (for serial number “No.4XXXXXXX”)
GMT -8:00 (for serial number “No.3XXXXXXX”)
nw GMT +0:00 (for all serial numbers)
Software for TR-7wb/nw Series
T&D Graph
“T&D Graph” is a software program that enables the viewing of recorded data in graph form, whether the data is stored on a local computer or at “T&D WebStorage Service”. Even if the data you wish to view is divided into multiple files, it is possible to merge them into one graph by specifying the device name and/or time period. The graph data can be saved as a graph file (.trg) or a text file (csv).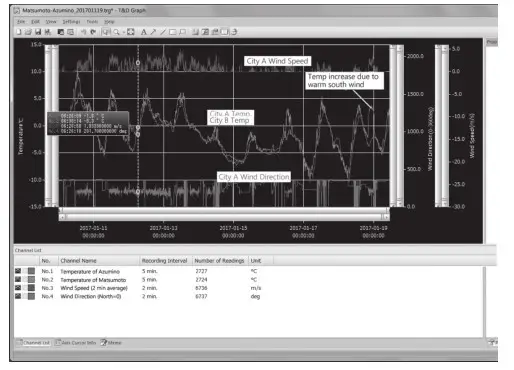
T&D Data Server
The PC on which “T&D Data Server” has been installed can act as a server that receives and stores data recorded by TR-7wb/nw Series data loggers to the user-specifi ed folders. The stored data can be viewed in the graph using “T&D Graph” or monitored using a web browser. When you wish to have recorded data automatically uploaded to your server rather than “T&D WebStorage Service”, please use this software.
Monitoring / Graph Window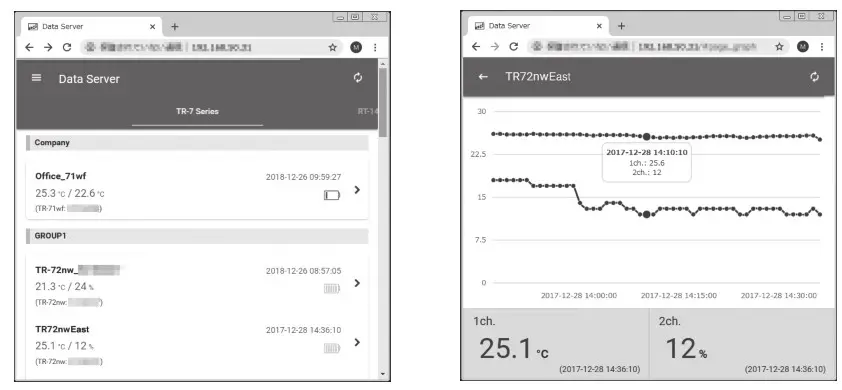
T&D Software and Applications Available for Free Download: tandd.com/software/
Product Support
Please contact your local distributor. tandd.com/purchasing/