szbecen Flat LED Par 6-IN-1 Battery Powered+Wireless DMX+2.4G Wi-Fi Control User Manual

OPERATING INSTRUCTIONS…SKEMATIC DIAGRAM
- Power + on Power on
- Power + off Power off
- Signal + on Wireless DMX512 ON
- Signal + off Wireless DMX512 OFF
- WI-FI+ on WI-FI ON
- WI-FI + off WI-FI OFF
- Turn on both “power” and “signal” two switches when you are using it
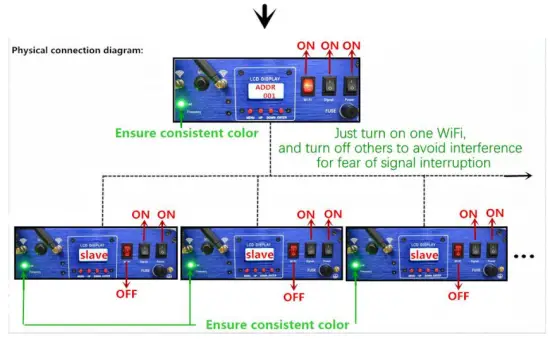
Note: Remember to turn of power (power + off) when you are not using them in order to avoid power consumption. When you are using 2.4G WIFI Control by mobile phone, please turn on the WIFI in only one light and keep the other lights “WIFI +OFF” to avoid signal interference. - Please turn off lights (power + off) when they are under charged, the lights will be charged automatically.
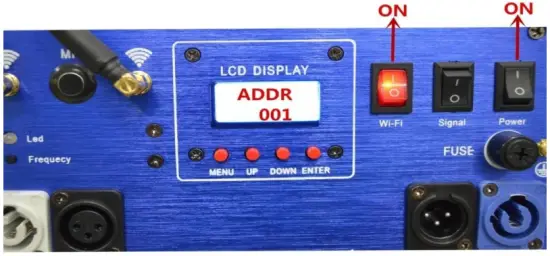
LCD DISPLAY
| [ESC]: | MENU |
| [UP]: | + |
| [DOWN]: | _ |
| [ENTER]: | CONFIRM |
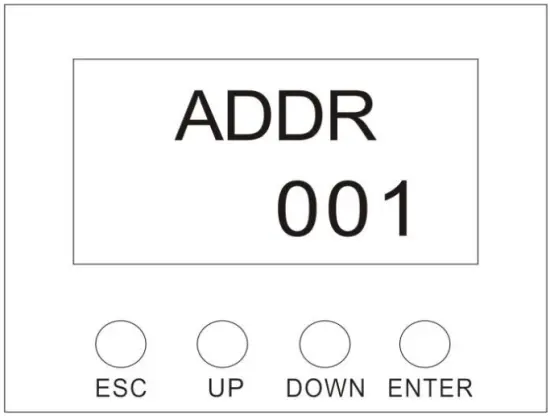
- ADDR 6
6CH mode, DMX512 international general signal control, use UP and DOWN to adjust address code. - ADDR 9
9CH mode, DMX512 international general signal control, use UP and DOWN to adjust address code. - JUMP
Colorful color jump changing of auto running, use up and down to adjust speed of the fastest auto running, 1 is the slowest. - GCHANGE
Gradual magic changing of auto running, use up and down to adjust speed of the auto running. - PULSE
Colorful color pulse changing of auto running, use up and down to adjust speed of the auto running. - SOUND
Sound activated mode, use up and down to adjust sensitivity of sound activated. 99 is the highest sensitivity, 1 is the lowest sensitivity. - COLOR(R255)
Red, use up and down to adjust brightness. 255 is the brightest, 001 is the darkest. - COLOR(G255)
Green, use up and down to adjust brightness. 255 is the brightest, 001 is the darkest. - COLOR(B255)
Blue, use up and down to adjust brightness. 255 is the brightest, 001 is the darkest. - COLOR(W255)
White, use up and down to adjust brightness. 255 is the brightest, 001 is the darkest. - COLOR(Y255)
Amber, use up and down to adjust brightness. 255 is the brightest, 001 is the darkest. - COLOR(P255)
Purple, use up and down to adjust brightness. 255 is the brightest, 001 is the darkest. - COUIOMET
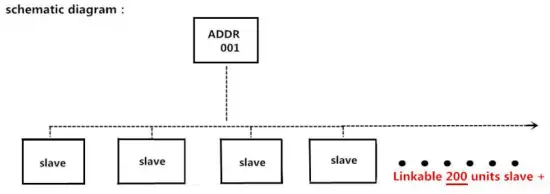
Percentage of existing power storage capacity. - LIGHT SLAVE
Slave mode. To facilitate the use of infrared remote control operation and avoid signal interference, it is recommended to use only one light as master, the rest of the lights are set to slaves. - CHARG
Being charged. It is showed only in the case of being charged.
DMX512
| 6CH | 9CH | Function | Descriptions |
| CH1 | Dimmer | R, G, B, W, A, P dimmer, linear, dark →bright | |
| CH2 | Strobe | R, G, B, W, A, P strobe, slow →fast | |
| CH3 | Sound | Sound activated | |
| CH1 | CH4 | Red | R dimmer, linear, dark →bright |
| CH2 | CH5 | Green | G dimmer, linear, dark →bright |
| CH3 | CH6 | Blue | B dimmer, linear, dark → bright |
| CH4 | CH7 | White | W dimmer, linear, dark → bright |
| CH5 | CH8 | Amber | A dimmer, linear, dark → bright |
| CH6 | CH9 | Purple | P dimmer, linear, dark → bright |
SPECIFICATIONS
- Voltage: AC90-245V, 50/60HZ
- IP Rate: IP44
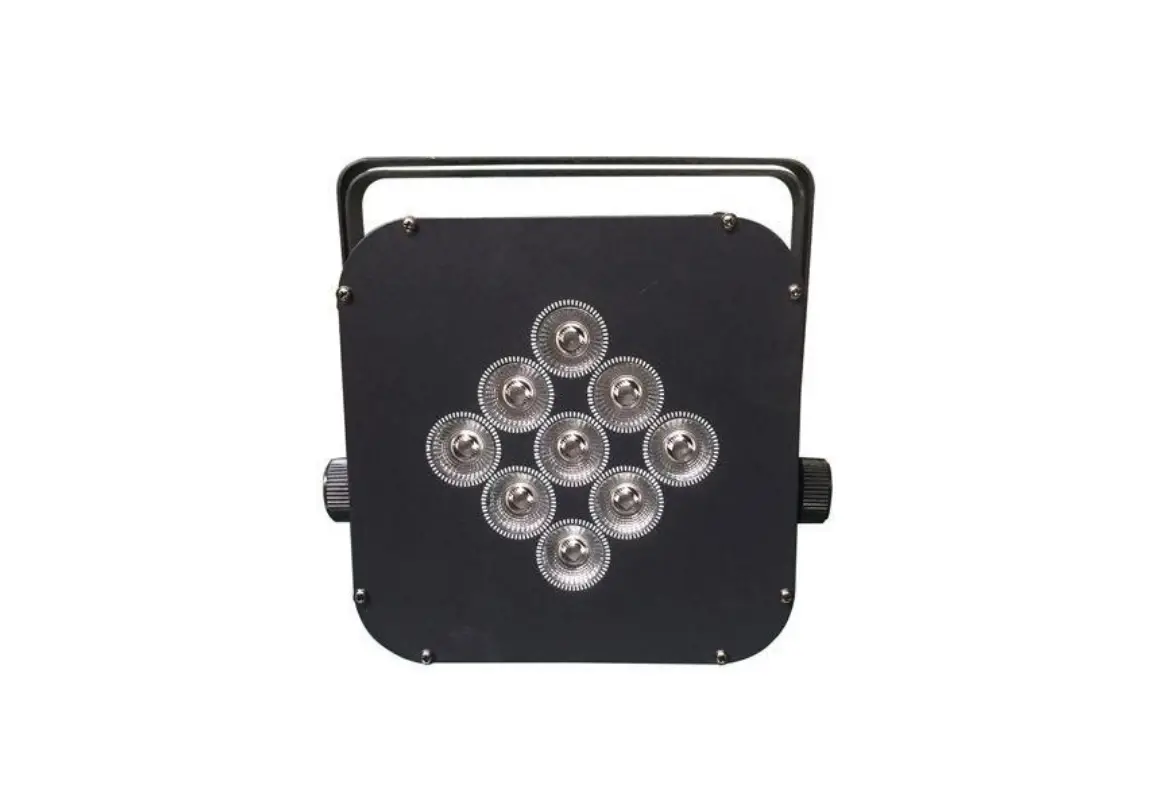
- Light source: 9*15W 6-IN-1 LEDs
- LED life time: 100000 hours
- High-effect environmental protection Lithium battery module, battery charging time: 6 hours
- Battery working time: 10 hours
- Net weight: 5kg
- Dimension: 29CM*19CM*27CM
- Beam angle: 25°, 45° (optional)
WIRELESS CONTROL
- LED DISPLAY
- 126 frequency band without interference automatically selected to ensure communication reliability.
- 7 groups of ID codes are settable, the user can use seven groups of separated wireless networks in one place without any interference.
- Communication distance Diameter: 500M (open area)
- Working frequency: 2.4G ISM, 126 full-band
- Maximum transmit power: 20dBm
- Receiver sensitivity: -94dBm
OPETATING INSTRUCTIONS:
- ID code and LED color corresponding relationship:
- RED……………………………RED
- GREEN………………………GREEN
- RED+GREED………………YELLOW
- BLUE…………………………BLUE
- RED+BLUE…………………PURPLE
- GREEN+BLUE………………CYAN
- RED+GREED+BLUE………WHITE
- Press the button to display the current ID setting, and then you can do ID setting. You press it one time, ID value will plus 1.
- Working status:
- LED ON: NO DMX OR WIRELESS SIGNAL
- RED LED FLASH:SENDING
- GREEN LED FLASH:RECEIVING
- Radio frequency ……………………… 2.400-2.525G, total is 126 frequency bands, they will be selected automatically without setting.
- ID codes …… “1-7” groups of ID codes, press “frequency” to adjust them. Only the transceivers with the same ID codes can be communicated with each other.
ESTABLISHMENT OF COMMUNICATION:
- The transceivers are electrified.
- Press “frequency” to set the transceivers which are needed to be communicated to the same ID. If you want to use more than one group of wireless network in one place, the ID codes should be different for each network.
- When the transceivers receive DMX signal they will select frequency without interference to send data and red LED will flash. The receivers will change the communication bands upward until it receives correct data with the same ID code and the green LED will flash, DMX data changed faster, the LED flash faster.
- Then the communication will be established.
2.4G WIFI CONTROL BY BOTH IOS AND ANDROID SYSTEM MOBILE PHONE
IOS(APPLE)system
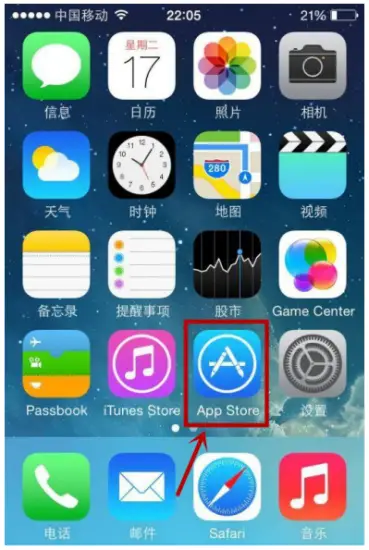
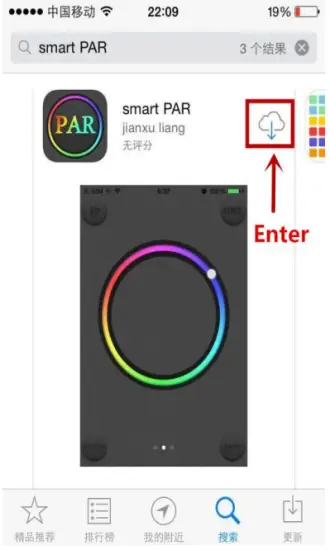
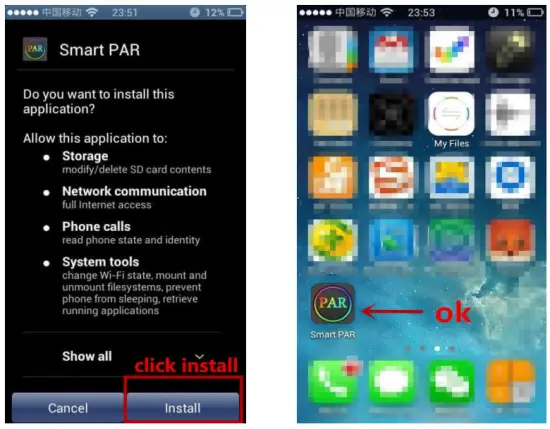
- Figure(1)Open App store

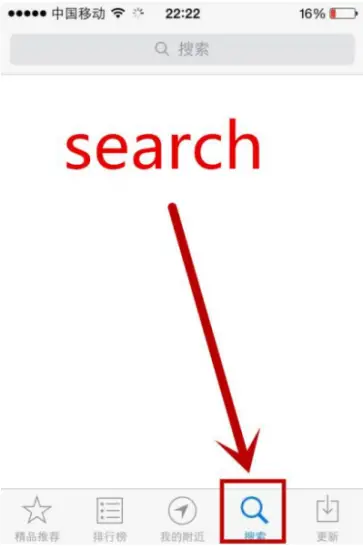
- Figure(2)Then search

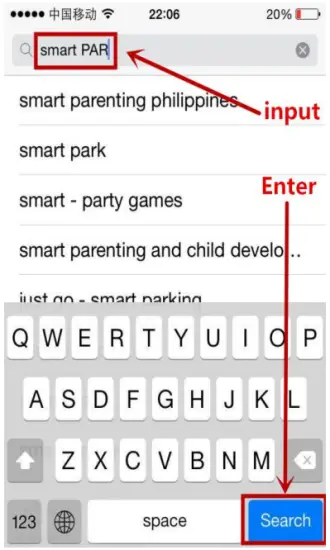
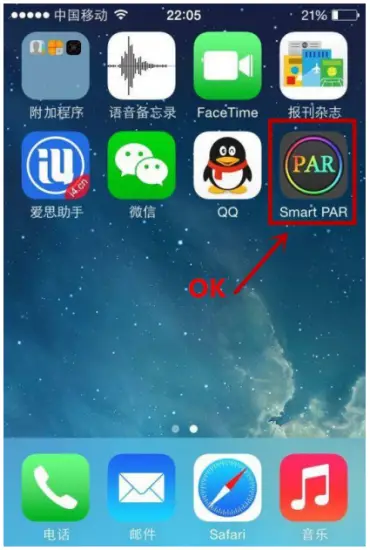
- Figure(3)

- Figure(4)
- Figure(5)

- Figure(6)
Note: The next steps are the same with Figure (7), Figure(8)and Figure(9)for Android system.
Android system
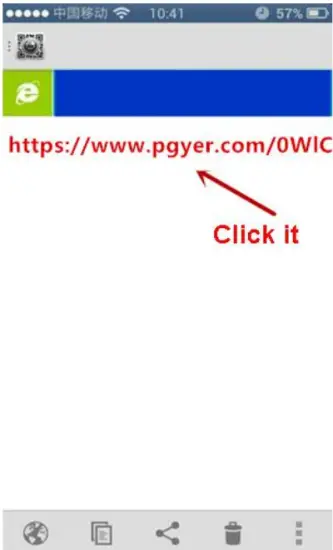
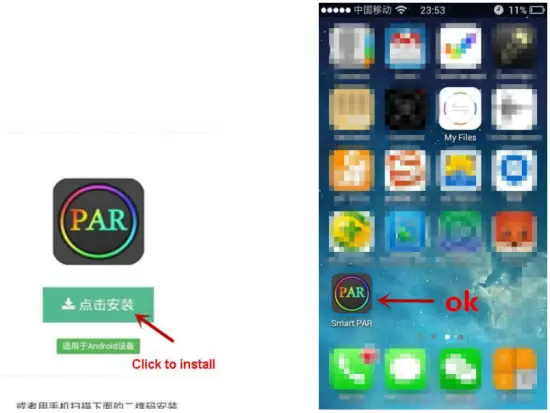
- Method1:

Use your mobile phone to scan the QR code

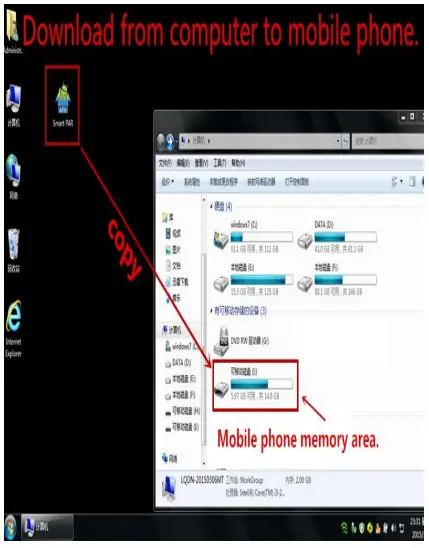
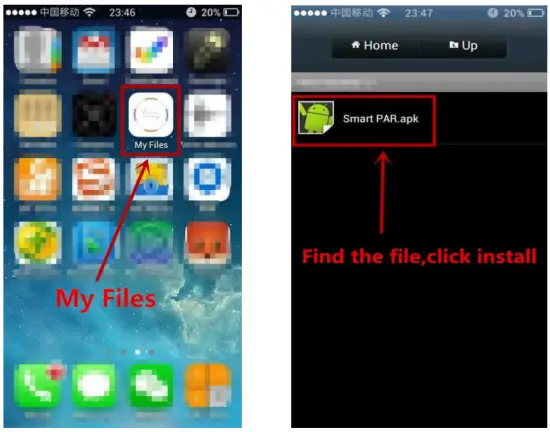
- Method 2:


APP Operating Instruction
Single control mode
- Figure(1)Please turn on both switches on the Figure (1) below

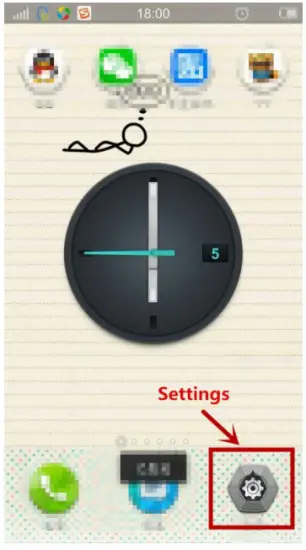
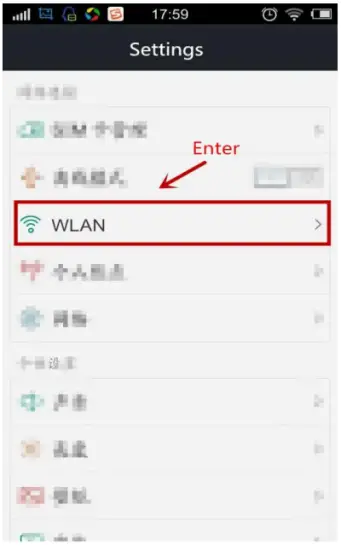
- Figure(2) Open “Setting” in your phone

- Fugure(3)Open WLAN setting

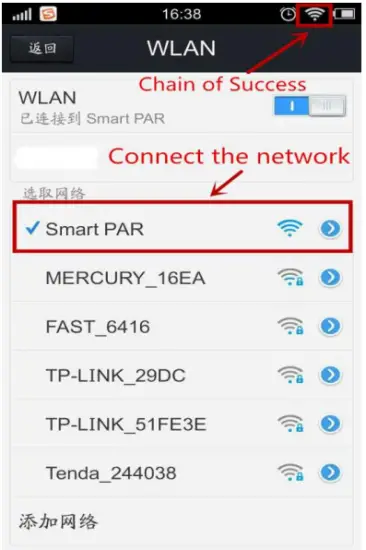
- Figure(4) Connect to Smart PAR

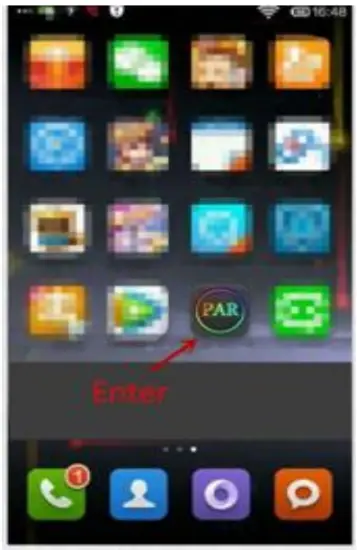
- Figure(5)Click to open Smart PAR

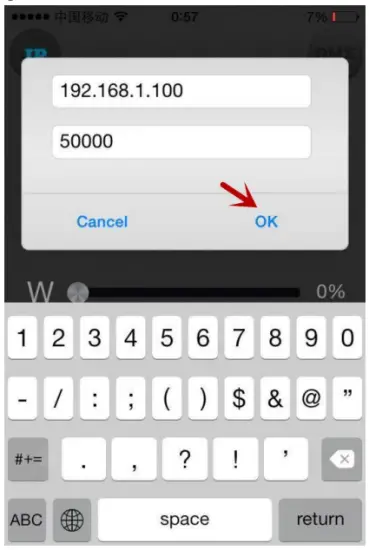
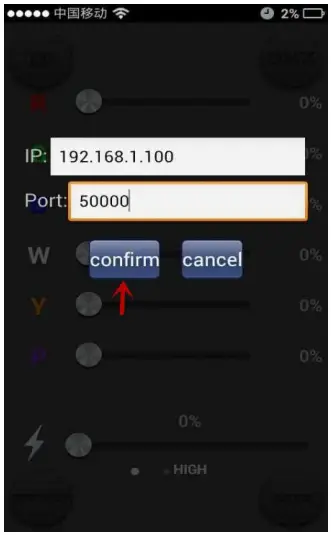
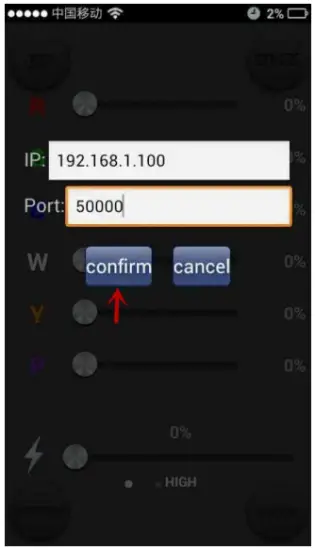
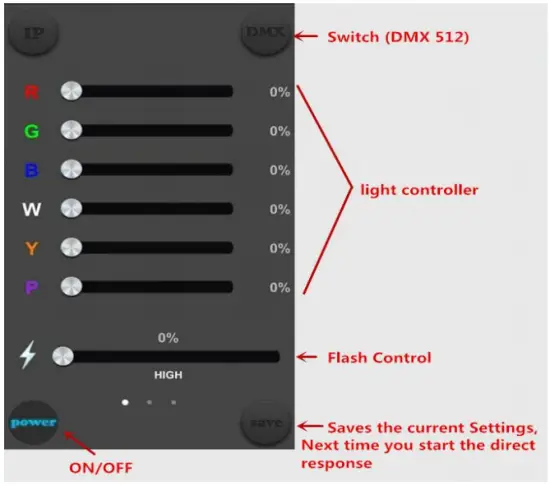
- Figure(6)Input the IP number “192.168.1.100” and Port “50000”, then click “confirm”.

- Figure(7)Page 1, Click “power” to turn on the light

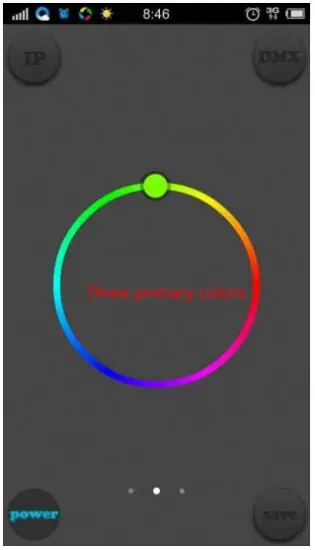
- Figure(8)Page 2
- Figure(9)Page 3


Master-slave configuration
On-line mode