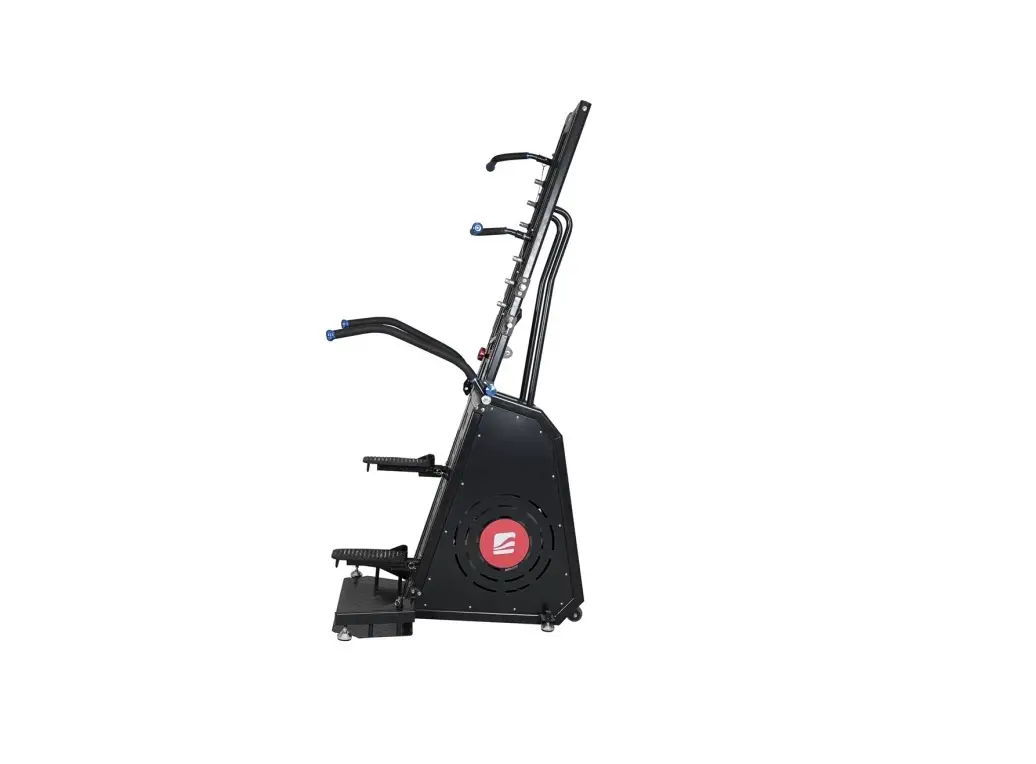
insportline IN 21965 Verticon Profi User Manual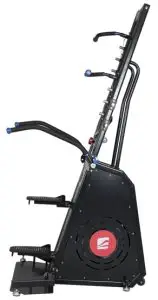
SAFETY INSTRUCTIONS
- Read the manual carefully before first use and assembly and keep it for future reference.
- Only assemble the device on a flat and clean surface so as not to affect its functionality.
- Clean the device regularly. Metal parts can easily rust.
- Talk to your doctor about your medical condition before using the device. This is especially important if you suffer from health problems or limitations.
- Exercise carefully and do not overextend yourself. Exercise must match your physical capabilities. If you feel pain or you are fainting, stop exercising immediately.
- Before each exercise, make sure that all bolts and nuts are tight (properly tightened). Replace damaged or worn parts immediately. If sharp edges appear on the device, do not use it. Also, do not exercise if the device makes atypical sounds.
- Do not use the device outdoors.
- No adjustable part should protrude so as not to restrict the user’s movement.
- Keep children and pets away from the device. Do not leave children unattended close or near the device.
- Do not put your hands, feet, or hair near moving parts. Only place your hands on the designated places.
- Exercise sensibly and prevent injuries.
- Use the device only in accordance with the manual. Do not use the device unless it is completely assembled. If you are unsure, contact a professional service.
- Place the device on a flat and clean surface. For greater safety, keep a distance of min. 0.6 m from other room equipment.
- Wear suitable sportswear for exercise. Do not wear too loose clothes that get easily caught. Always wear closed shoes. Tighten the laces firmly.
- The device is not suitable for people who suffer from diseases or health complications. The device should not be used by people with reduced susceptibility, delayed reactions, or other limitations. People with insufficient exercise experience should also avoid using the device.
- The device is not suitable for pregnant women.
- The device may only be used by one person at a time.
- Do not place sharp objects on or near the device. Do not pinch or injure your hands during installation.If you hear abnormal sounds or the device is not working correctly, stop using the device immediately until the device is repaired.
- If the device is not working properly or is damaged contact your supplier.
- Use only original spare parts for repairs.
Weight limit: 170 kg
Category: SC – suitable for commercial and club use
WARNING! The heart rate monitoring system may not be accurate. Overextending during training can cause serious injury or death. If you feel nauseous, stop the exercise immediately!
PRODUCT DESCRIPTION
 | |
| 1. | Handles |
| 2. | Console |
| 3. | Resistance adjustment |
| 4. | Handles |
| 5. | Pedals |
| 6. | Support beam |
| 7. | Leveling feet |
| 8. | Transport wheels |
| 9. | Handle adjustment |
ASSEMBLY
- Make sure you have enough space before assembly.
- Place all parts in an empty area and remove all packaging material.
- Make sure you follow all instructions carefully.
- After assembly check that all bolts are tighten.
- Unpack all parts and check that none of the parts are missing.
Parts list:
- Leveling feet 2x
- Support beams 1x – left, 1x – right
- Pedals 2x
- Handles 1x – left, 1x – right
- Handles 1x – left, 1x – right
- Console 1x
- Tools 1x
Step 1
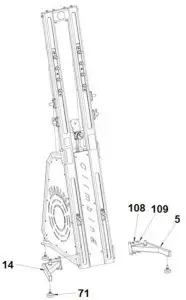
Attach the leveling feet (71) to the right and left support beams (5 and 14), and then attach the right and left support beams (5 and 14) to the main frame with the 4x bolts (109) and 4x washers (108). Level the device with the leveling feet.
The device should not sway and should stand firmly on the surface.
Step 2
Attach the right and left handles (3 and 13) to the main frame with plates (2 and 12), 4x bolts (109) and 4x washers (108).
Tighten the handles so that they do not move.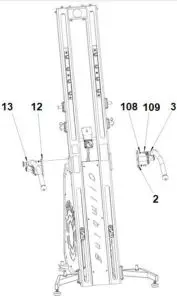
Step 3
Attach the handles (6 and 15) to the main frame with 2x pins (72).
Attach the pedals (7) with 2x pins (72).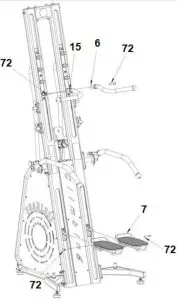
Step 4
Connect the console cables (20) to the main frame cables. Attach the console (20) using the 4x bolts (115).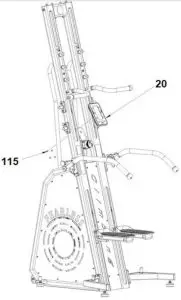
Step 5
Make sure that all parts are functional, and all bolts are properly tightened.
CONSOLE
Console is powered by 2x batteries.
Console has one display with 6x buttons.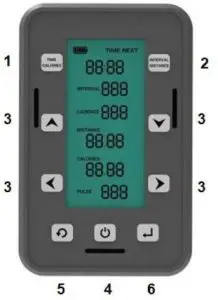
- TIME / CALORIES – You can setup countdown of time or burned calories.
- INTERVAL / DISTANCE – You can setup time values of interval training and distance countdown.
- With arrow buttons ← → you can choose which values you want to change, with buttons ↑ ↓ you can adjust the values by 1.
- START / STOP – use the button to launch the console or program. Press the button to pause the running program and press again to delete all data.
- RETURN – Return to previous settings. Hold to display all data and then enter wake-u interface, all data are cleared.
- ENTER – Press to confirm flashing dials.
Interval program: Press the INTERVAL / DISTANCE button to start the interval program. Set the training time and rest time (e.g. 10s training and 5s rest). Press the ENTER button to confirm and the 3 second countdown will start. The training countdown is displayed, as soon as the countdown reaches 0, 1 is displayed in the second line, indicating the first cycle, the rest countdown starts. After the rest countdown, the training time starts again. To end and view the data, press stop.
USE
The device is designed to copy the same movement as when climbing. You will exercise the upper and lower parts of your body, improve your metabolism, and burn more calories. Your body weight provides enough resistance for exercise.
Keep your feet on the pedals so that you feel the muscles in your buttocks and thighs engage during exercise. If you want to train your calf muscles, stand on the pedals closer to your toes. Grasp the adjustable handles and let your arms, shoulders, chest and back engage in your workout. If your shoulders hurt while exercising, place your hands on the firm handles. Make sure you keep your head straight and look ahead and avoid straining your neck while exercising. If you want to increase the intensity of the exercise, lift your legs higher or increase the frequency.
MAINTENANCE
- When assembling, tighten all screws properly and set the device to a horizontal position.
- Check for proper tightening after 10 hours of use.
- Wipe sweat after exercise. Clean the device with a cloth and mild detergent. Do not use solvents or aggressive cleaning agents on plastic parts.
- In case of increased noise, it is necessary to check the correct tightening of all connections.
- Place the product in a clean, ventilated, and dry room.
- Do not expose the device to direct sunlight.
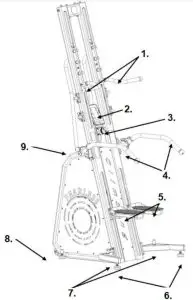
DIAGRAM
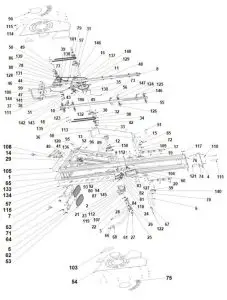
PARTS LIST
| No. | Name | Qty. | No. | Name | Qty. |
| 1 | Main frame | 1 | 36 | Rope bean | 2 |
| 2 | Right handlebar bracket | 1 | 37 | Pulley 105 | 4 |
| 3 | Right handlebar | 1 | 38 | Cog | 8 |
| 4 | Top plate | 1 | 39 | Magnet | 2 |
| 5 | Right support beam | 1 | 40 | Sensor holder | 2 |
| 6 | Right handlebar | 1 | 41 | Sensor | 2 |
| 7 | Leveling feet | 2 | 42 | One-way pulley bolt | 2 |
| 8 | Right rail | 2 | 43 | TZ-7022-0128B | 2 |
| 9 | Console bracket | 1 | 44 | TZ-7022-0128A | 1 |
| 10 | Cogs for chain | 2 | 45 | Reluctance adjustment seat | 1 |
| 11 | Chain cover | 1 | 46 | Magnetic block | 2 |
| 12 | Left handlebar bracket | 1 | 47 | Big cog | 1 |
| 13 | Left handlebar | 1 | 48 | Cog | 1 |
| 14 | Left foot support bracket | 1 | 49 | Central aluminium rod | 1 |
| 15 | Left handlebar | 1 | 50 | Aluminium sleeve 2 | 1 |
| 16 | Magnetic control assembly | 1 | 51 | Aluminium sleeve | 1 |
| 17 | Gear set | 2 | 52 | Transport wheels | 2 |
| 18 | Foot connection | 2 | 53 | Foot rubber | 2 |
| 19 | Gear set | 4 | 54 | Side covers | 2 |
| 20 | Console | 1 | 55 | Guide roller | 16 |
| 21 | Handrail decorative sheet | 1 | 56 | Side rail wheels | 12 |
| 22 | Armrest nylon sleeve | 2 | 57 | Front decoration cover | 1 |
| 23 | Armrest sleeve | 4 | 58 | Rear metal cover | 1 |
| 24 | Sleeve | 2 | 59 | Handrail aluminium ring | 2 |
| 25 | Safety lock | 2 | 60 | Console nylon sleeve | 2 |
| 26 | Spring | 2 | 61 | Handrail aluminium ring | 2 |
| 27 | Aluminium end cap | 2 | 62 | End cap | 2 |
| 28 | Aluminium end cap | 2 | 63 | Square end cap 20×20 | 2 |
| 29 | Metal plate | 1 | 64 | Square end cap 40×40 | 2 |
| 30 | Bearing seat | 2 | 65 | Base plate | 1 |
| 31 | Sprocket shaft | 1 | 66 | Aluminium handgrip end cap | 2 |
| 32 | Axis nylon spacer | 2 | 67 | Aluminium handgrip end cap | 2 |
| 33 | Bottom nylon cover | 2 | 68 | Rubber sleeve for handrail | 2 |
| 34 | Small cogs | 2 | 70 | Rubber sleeve for handgrip | 2 |
| 35 | Chain disk shaft sleeve | 1 | 71 | Leveling feet | 4 |
| 72 | Plug | 6 | 110 | Gasket Ф10 | 18 |
| 73 | Bolt | 1 | 111 | Nut M10x9 | 12 |
| 74 | Stopping block | 2 | 112 | Allen bolt M5x15 | 4 |
| 75 | Letter mark | 2 | 113 | Allen bolt M8x15 | 4 |
| 76 | Letter mark | 1 | 114 | Gasket Ф10xФ5.5Ф1.0t | 50 |
| 77 | Aluminium plate | 1 | 115 | Bolt M5x10 | 56 |
| 78 | Small sprocket | 1 | 116 | Allen bolt M10x120 | 2 |
| 79 | Chain | 1 | 117 | Allen bolt M10x12 | 4 |
| 80 | Resistance regulator cover | 1 | 118 | Bolt M4x8 | 5 |
| 81 | Collision gasket | 6 | 119 | Allen bolt M5x8 | 2 |
| 82 | TZ-7022-S32 | 1 | 120 | Allen bolt M12x60 | 2 |
| 83 | TZ-7022-S33 | 1 | 121 | Allen bolt M12x60 | 2 |
| 84 | Regulator shaft | 1 | 122 | Allen bolt M8x40 | 4 |
| 85 | Joint | 1 | 123 | Bearing 6000 | 16 |
| 86 | One-way pulley bolt | 1 | 124 | Spring Ø26 | 16 |
| 87 | Aluminium knob | 1 | 125 | Screw 8×12 | 12 |
| 88 | Nylon spacer | 2 | 126 | Nut M6x6 | 12 |
| 89 | Nail | 2 | 127 | Allen bolt M10x90 | 2 |
| 90 | Decoration label | 2 | 128 | Allen bolt M10x85 | 2 |
| 91 | Round label | 2 | 129 | Allen bolt M6x25 | 2 |
| 92 | Clamp hand label | 1 | 130 | Nut M8x7t | 5 |
| 93 | Warning label | 1 | 131 | Allen bolt M8x20 | 8 |
| 94 | Red warning label | 1 | 132 | Allen bolt M12x30 | 4 |
| 95 | Maintain label | 1 | 133 | Allen bolt M10x50 | 2 |
| 96 | Bar code | 1 | 134 | Nut M10x8t | 2 |
| 97 | TZ-7022-0214 | 1 | 135 | Allen bolt M6x12 | 8 |
| 98 | Chain TZ10 | 2 | 136 | Bolt M4x10 | 2 |
| 99 | Steel cable Ф6 – 1 | 1 | 137 | Screw M6x16 | 2 |
| 100 | Steel cable Ф6 – 2 | 1 | 138 | Screw M6x12 | 2 |
| 101 | Brake cable buckle | 1 | 139 | Shaft with retaining ring Ø35 | 1 |
| 102 | Wire protector | 1 | 140 | Screws M5x4 | 8 |
| 103 | Absorbent pad | 2 | 141 | Bearing 6001 | 2 |
| 104 | Winding pipe Ф10 | 1 | 142 | Gasket Ф22xФ13×1.5t | 1 |
| 105 | Anti-slip pad | 2 | 143 | Nut M12x11t | 1 |
| 106 | Spring 7022 | 1 | 144 | Space sleeve | 1 |
| 107 | Bearing 61804 | 4 | 145 | Bolt M4x25 | 1 |
| 108 | Gasket Ф16x Ф9×1.0t | 47 | 146 | Big washer Ф6 | 16 |
| 109 | Allen bolt M8x16 | 30 | 147 | Allen bolt M5x12 | 16 |
| 148 | Washer Ф3 | 1 | 150 | Stainless case | 1 |
| 149 | Allen bolt M8x40 | 4 | |||
ENVIRONMENT PROTECTION
After the product lifespan expired or if the possible repairing is uneconomic, dispose it according to the local laws and environmentally friendly in the nearest scrapyard.
By proper disposal you will protect the environment and natural sources. Moreover, you can help protect human health. If you are not sure in correct disposing, ask local authorities to avoid law violation or sanctions.
Don’t put the batteries among house waste but hand them in to the recycling place.
TERMS AND CONDITIONS OF WARRANTY, WARRANTY CLAIMS
General Conditions of Warranty and Definition of Terms
All Warranty Conditions stated here under determine Warranty Coverage and Warranty Claim Procedure. Conditions of Warranty and Warranty Claims are governed by Act No. 89/2012 Coll. Civil Code, and Act No. 634/1992 Coll., Consumer Protection, as amended, also in cases that are not specified by these Warranty rules.
The seller is SEVEN SPORT s.r.o. with its registered office in Strakonická street 1151/2c, Prague 150 00, Company Registration Number: 26847264, registered in the Trade Register at Regional Court in Prague, Section C, Insert No. 116888.
According to valid legal regulations it depends whether the Buyer is the End Customer or not.
“The Buyer who is the End Customer” or simply the “End Customer” is the legal entity that does not conclude and execute the Contract in order to run or promote his own trade or business activities.
“The Buyer who is not the End Customer” is a Businessman that buys Goods or uses services for the purpose of using the Goods or services for his own business activities. The Buyer conforms to the General Purchase Agreement and business conditions.
These Conditions of Warranty and Warranty Claims are an integral part of every Purchase Agreement made between the Seller and the Buyer. All Warranty Conditions are valid and binding, unless otherwise specified in the Purchase Agreement, in the Amendment to this Contract or in another written agreement.
Warranty Conditions
Warranty Period
The Seller provides the Buyer a 24 months Warranty for Goods Quality, unless otherwise specified in the Certificate of Warranty, Invoice, Bill of Delivery or other documents related to the Goods. The legal warranty period provided to the Consumer is not affected.
By the Warranty for Goods Quality, the Seller guarantees that the delivered Goods shall be, for a certain period of time, suitable for regular or contracted use, and that the Goods shall maintain its regular or contracted features.
The Warranty does not cover defects resulting from (if applicable):
- User’s fault, i.e. product damage caused by unqualified repair work, improper assembly, insufficient insertion of seat post into frame, insufficient tightening of pedals and cranks
- Improper maintenance
- Mechanical damages
- Regular use (e.g. wearing out of rubber and plastic parts, moving mechanisms, joints, wear of brake pads/blocks, chain, tires, cassette/multi wheel etc.)
- Unavoidable event, natural disaster
- Adjustments made by unqualified person
- Improper maintenance, improper placement, damages caused by low or high temperature, water, inappropriate pressure, shocks, intentional changes in design or construction etc.
Warranty Claim Procedure
The Buyer is obliged to check the Goods delivered by the Seller immediately after taking the responsibility for the Goods and its damages, i.e. immediately after its delivery. The Buyer must check the Goods so that he discovers all the defects that can be discovered by such check.
When making a Warranty Claim the Buyer is obliged, on request of the Seller, to prove the purchase and validity of the claim by the Invoice or Bill of Delivery that includes the product’s serial number, or eventually by the documents without the serial number. If the Buyer does not prove the validity of the Warranty Claim by these documents, the Seller has the right to reject the Warranty Claim.
If the Buyer gives notice of a defect that is not covered by the Warranty (e.g. in the case that the Warranty Conditions were not fulfilled or in the case of reporting the defect by mistake etc.), the Seller is eligible to require a compensation for all the costs arising from the repair. The cost shall be calculated according to the valid price list of services and transport costs.
If the Seller finds out (by testing) that the product is not damaged, the Warranty Claim is not accepted. The Seller reserves the right to claim a compensation for costs arising from the false Warranty Claim.
In case the Buyer makes a claim about the Goods that is legally covered by the Warranty provided by the Seller, the Seller shall fix the reported defects by means of repair or by the exchange of the damaged part or product for a new one. Based on the agreement of the Buyer, the Seller has the right to exchange the defected Goods for a fully compatible Goods of the same or better technical characteristics. The Seller is entitled to choose the form of the Warranty Claim Procedures described in this paragraph.
The Seller shall settle the Warranty Claim within 30 days after the delivery of the defective Goods, unless a longer period has been agreed upon. The day when the repaired or exchanged Goods is handed over to the Buyer is considered to be the day of the Warranty Claim settlement. When the Seller is not able to settle the Warranty Claim within the agreed period due to the specific nature of the Goods defect, he and the Buyer shall make an agreement about an alternative solution. In case such agreement is not made, the Seller is obliged to provide the Buyer with a financial compensation in the form of a refund.
CZ
SEVEN SPORT s.r.o
Registered Office: Strakonická 1151/2c, Praha 5, 150 00, ČR
Headquaters: Dělnická 957, Vítkov, 749 01
Warranty & Service: Čermenská 486, Vítkov 749 01
CRN: 26847264
VAT ID: CZ26847264
Phone: +420 556 300 970
E-mail: [email protected]
[email protected]
[email protected]
Web: www.inSPORTline.cz
SK
inSPORTline s.r.o.
Headquaters, warranty & service center: Električná 6471, Trenčín 911 01, SK
CRN: 36311723
VAT ID: SK2020177082
Phone: +421(0)326 526 701
E-mail: [email protected]
[email protected]
[email protected]
Web: www.inSPORTline.sk


