![]()
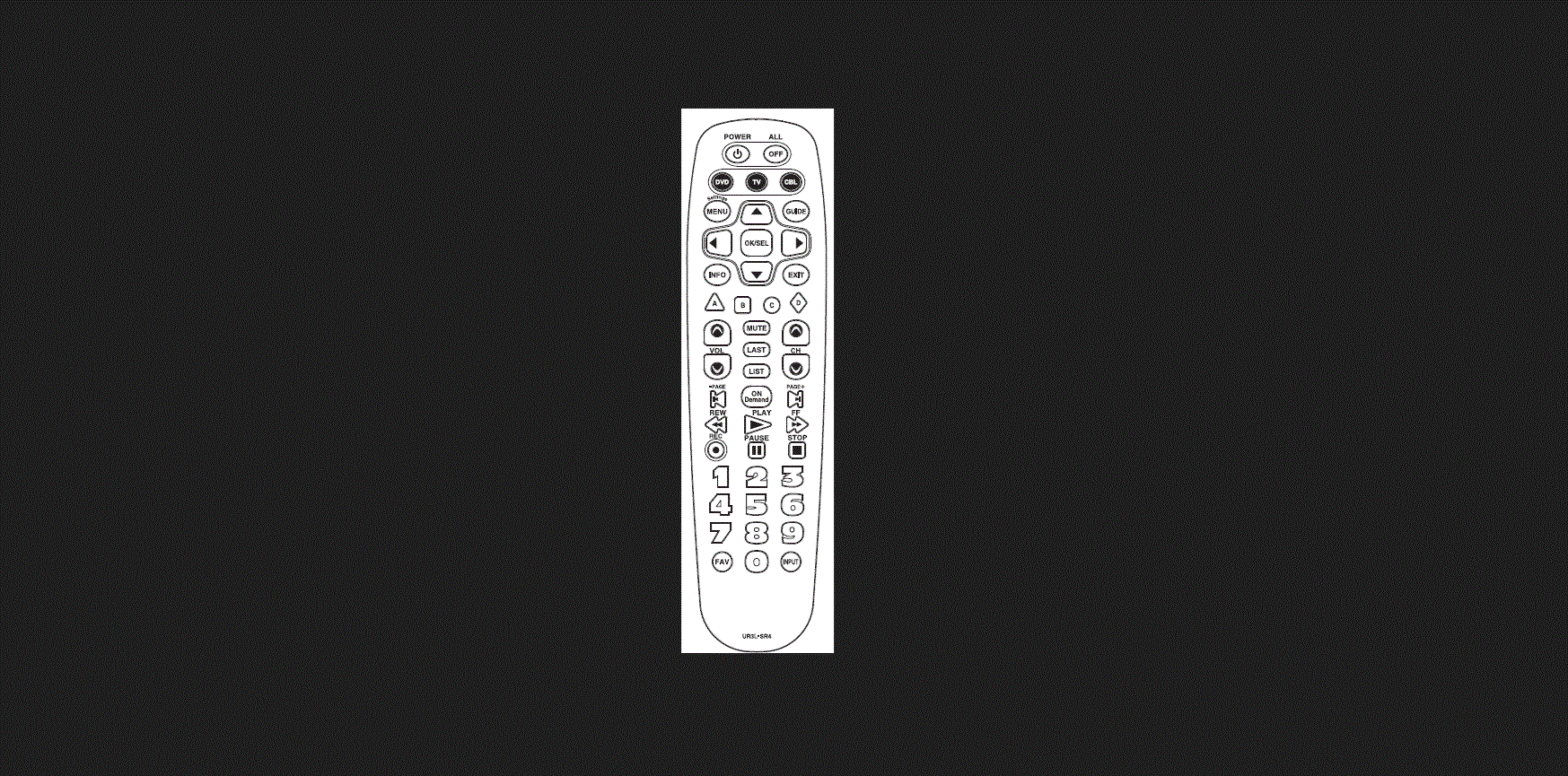
URC UR3L-SR4 Subscription Broadcast Remote Control
Introduction
This remote control is designed to operate most IPTV and DTA STBs as well as Digital and Analog Cable Boxes.
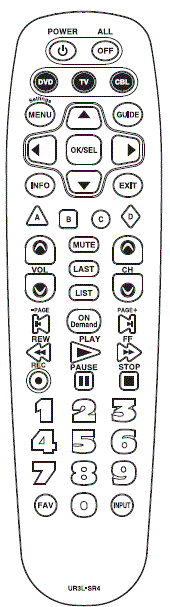
Replacing Batteries
Before you program or operate the remote control, you must install two new AAA alkaline batteries.
- STEP1 Remove the battery compartment cover from the back of your remote control.
- STEP2 Check battery polarity carefully, and install the batteries as shown in the illustration below.
- STEP3 Replace the battery compartment cover.

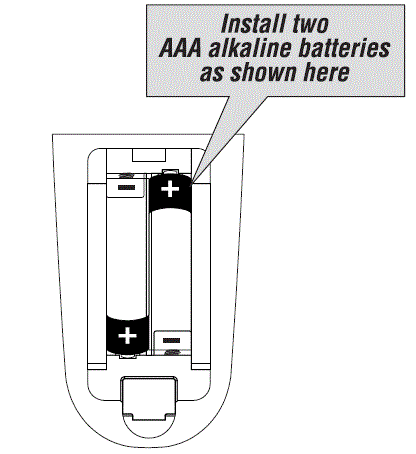
Button Functions 
Programming the Remote Control
*Note: In this section, when you are instructed to press a [DEVICEJ buton, that means you should press either the
CBL, TV, or DVD button, depending on which device you are programming the remote to operate.
Quick Set-Up Method
- STEP) Turn on the component you want to program. To program your TV, turn on the TV.
- STEP2 Press and hold the [DEVICE] key for 5 seconds until the Device LED will blink once and stays on. Continue to hold the [DEVICE] key and press the number key assigned to your brand in the Quick Set-up Code Table and release both [DEVICE] key and the number key to save the code. The Device LED will blink twice to confirm that the code is stored.
- STEP3 Point the remote control at the component.
- STEP4 Press the power button. If it
Repeat the steps above for all compo-nents. (CBL, TV, DVD).
BB.. QQuuiicckk SSeett–uupp CCooddee TTaabblleess
CBL
| Quick Number | Manufact urer/Brand |
| 0 | PACE DTA |
| 1 | SA/CISCO, SAMSUNG, PACE DIGITAL |
| 2 | MOTOROLA DIGITAL |
| 3 | MOTOROLA DTA |
| 4 | EVOLUTION DTA |
| 5 | CISCO IPTV |
| 6 | ADB IPTV |
| 7 | TECHNICOLOR |
| 8 | AMINO 140/540 IPTV |
| 9 | MOTOROLA IPTV |
TV
| Quick Number | Manufacturer/Brand |
| 0 | SANYO |
| 1 | SONY |
| 2 | SAMSUNG |
| 3 | LG |
| 4 | TOSHIBA |
| 5 | PANASONIC |
| 6 | PHILIPS |
| 7 | HITACHI |
| 8 | SHARP |
| 9 | VIZIO |
DVD
| Quick Number | Manufacturer/Brand |
| 0 | HITACHI |
| 1 | SONY |
| 2 | PHILIPS |
| 3 | SAMSUNG |
| 4 | PHILIPS MAGNAVOX |
| 5 | PANASONIC |
| 6 | LG |
| 7 | JVC |
| 8 | DENON |
| 9 | PIONEER |
Manual Program
The remote control can be programmed by entering a three-digit code number that corresponds to particular brands and models of equipment. The three-digit code numbers are listed in the code tables sections of this instruction manual.
- STEP1 Turn on the equipment that you want the remote control to operate (Cable Box, TV or DVD) .
- STEP2 Press the [DEVICE] button and the [OK/SEL] button simultane-ously for three seconds. The corresponding device LED will turn on indicating that it is ready to be programmed. The LED will remain on for 30 seconds. The next step must be entered while the LED is on.
- STEP3 Point the remote control toward the equipment and enter the three-digit code number assigned to your brand from the code tables. If there are more than one three-digit number listed for your brand, try one code number at a time until your equipment turns off.
- STEP4 Store the three-digit code by pressing the same [DEVICE] button once again. The device LED will blink twice to confirm that the code has been stored.
AUTO SEARCH METHOD
If none of the three digit code numbers assigned to your brand of equipment works, or the code table does not list your brand, you can use the Auto Search Method to find the correct three-digit code number for your equipment by following steps:
- STEP1 Turn on the equipment that you want the remote control to operate (Cable Box, TV or DVD).
- STEP2 Press the [DEVICE] button and the [OK/SEL] button simultaneously for three seconds. The device LED will turn on indicating that it is ready to be programmed. The LED will remain on for 30 seconds. The next step must be entered while the LED is on.
- STEP3 Press the [CH
 ] or [CH
 ] button one at a time or keep it pressed. The remote will emit a series of Power ON/OFF code signals. Release the [CH5] or [CH6] button as soon as the equipment turns off.
 - STEP4 Press the same [DEVICE] button to store the code. The Device LED will blink twice to confirm that the code has been stored.
To find the Three-Digit Code that Vwas Hogrammed using the Auto Search Method
- STEP1 Press the appropriate [DEVICE] button and the [OK/SEL] button simultaneously for three seconds. The device LED will turn on for 30 seconds. The next step must be performed while the LED is on.
- STEP2 Press the [INFO] button. The device LED will blink a number of times indicating the number of each digit for the code. Each digit is separated by a one second interval of the LED being off.
- STEP1) Press the [DVD] button andthe [OK/SELY button simutane- ously for 3 seconds. The DVD LED will turn on for 30 seconds. The next step must be performed while the LED is on.
- STEP2 Press the [TV] button.
- STEP3) Point the remote control toward the IV and enter the three-digit code for your TV from the TV codes table.
- STEP 4 Store the three-digit code by pressing the [DVDJ button. The device LED will blink twice to confirm that the code has been stored.
THE LEARNING METHOD
- STEP1 Press the [Device] button (CBL, TV or DVD) to be programmed and the [INPUT] buttons simultaneously for 3 seconds until the Device LED light turns on.
- STEP2 Line up the UR3L-SR4 to the other remote, head-to-head, 1 or 2 inches apart.
- STEP3 Press any button on the UR3L-SR4 that you want to teach a command to. For example, if you want to teach the [MUTE] button, press the [MUTE] button.
- STEP4 Press and hold the [MUTE] button on the other remote until the UR3L-SR4 Device LED light blinks twice.
- STEP5 Once you have completed teaching UR3L-SR4 all desired commands for that Device, save the learned commands by pressing the [Device] and [INPUT] buttons simultaneously until the Device LED blinks 3 times. Now test all the buttons to make sure they learned correctly.
Erasing a Single Learned Command
- STEP1) Press the [Device) and [INPUT] buttons simultaneously for 3 seconds until the Device LED light turns on.
- STEP2) Press and hold the button you want to erase for 3 seconds. The Device LED will blink twice to confirm the erasure.
- STEP3 To exit, press and hold both the [Device] and [INPUT] buttons simultaneously until the Device LED blinks 3 times.
Erasing AllLeamed Commands from One Device
- STEP) Press the [DEVICE] and
INPUT buttons simultan
ously for 3 seconds until the
The device LED ight turns on. - STEP2) Press and hold both the
DEVICE button you want to
erase and the [PAUSEJ button
for 5 seconds. The Device LED
will blink twice to confim the
erasure. - STEP3 To exit, press and hold both the
DEVICE] and [INPUTJ buttons
simultaneously until the Device
LED blinks 3times.
Programming the All OiH Bauton
This allows you to program the All Off button so t can send up to three power On/Off commands with one button press.
- STEP1) Press the [CBLJ button.
- STEP2) Press the [Al OFF| button and the OKSELI button simultaneously
- STEP3 Press the first [Device] button
- you want to store in the [ALL OFF] button and then the [POWER] button. Repeat this for other Device until you have stored all the desired power commands into the [ALL OFF] button.
- the power commands you stored. The [CBL] button will blink twice to confirm the Device have been saved. STEP4 Press the [CH] button to save
Programming for Advanced unctions.
If your remote model has custom-programmable Macro buttons are available, they can be programmed to act as a Macro’ or Favorite Channel button in CABLE mode. This allows you to program up to five 2-digit channels, four 3-digit channels or three 4-digit channels that can he ac. cessed with one button press.
- STEP1 Press the [CBL] button to select the CBL mode.
- STEP2 Press the [MACRO] button and [OK/SEL] button simultaneously for 3 seconds. The [CBL] button will turn on for 30 seconds.
- STEP3 Enter the 2, 3 or 4-digit code for the channel you want to be programmed first (for example, using the Number Pad, then press the [STOP] button. Then enter the code for the next channel (for example, 050), then press the [STOP] button. Repeat this process for the third channel. The [CBL] button will blink once for each channel entered.
- STEP4 Press the [CH5] button to store the channels that were selected. The [CBL] button will blink twice to confirm the storage of commands.
To access the programmed channels, press the [MACRO] button once. This will bring up the first channel. Press once again and it will bring up the second channel. Press again and it will bring up the third channel.
To erase the Macro programming and return to the original function:
- STEP1 Press the [CBL] button to select the CABLE mode.
- STEP2 Press a [MACRO] button and the [OK/SEL] button simultaneously for 3 seconds. The CBL device LED will turn on for 30 seconds. The next step must be performed while the LED is on.
- STEP3 Press the [CH5] button to erase the functions stored in the button. The CBL device LED will blink twice to confirm that the memory button has been erased.
Programming Volume Cantol
Volume and Mute control are factory-programmed to automatically transfer to the respective Device mode you select, as follows
CBL:TV TV:TV DVD:TV
If you wish to store the Cable volume control in CBLmode, use the following steps.
- STEP1) Press the [OK/SELJ bustton and CBLJ button simultaneously three seconds. The device LED will tum on for 30 seconds. The next step must be performed while the LED is on.
- STEP2 Press the [VOL ] button. The device LED will blink.
- STEP3 Press [CBL) button. The device LED will blink twice to confirm the programming.
Note: To return CBL device to TV volume repeat steps above replacing 1CBLI with [TV] in Step 3.
Programming Channel Control
Chanel controls are factory-programmed to automatically transfer to the respective Device mode you select, as follows:
CBL : CBL TV : CBL DVD : DVD
If you wish to store the TV channel controls in TV mode, use the following steps.
- STEP1 Press the [OK/SEL] button and [TV] button simultaneously for three seconds. The device LED will turn on for 30 seconds. The next step must be performed while the LED is on.
- STEP2 Press the [VOL] button. The device LED will blink.
- STEP3 Press [TV] button. The device LED will blink twice to confirm the programming.
Low Battery Warning
When the battery is low (2.3V-20V) and needs to be replaced with fresh batteries, device LED ill blink 2 times in sequence whenever a |DEVICEJ button is pressed to tum on equipment
Memory Lock System.
This remote control is designed to retain programmed memory for 10 years even after batteries are removed from the remote control. For additional information about your remote control, go to www.universaremote.com
Set-up Code Tables
CABLE TV
| CISCO/SA | EXPLORER Series | 001 007 |
| 8600X | 011 | |
| 8600 | 021 | |
| 8540,8570,8590 | 022 | |
| 8500 | 023 | |
| LogicTV | 209 | |
| U-VERSE | 251 | |
| MOTOROLA | DCT Series (DVR Model) | 002 |
| DTA100 | 206 | |
| U-VERSE, VIP1200, VIP1216, VIP1616T, VIP1910, VIP1920, VIP1960, VIP1970 | 253 | |
| GENERAL INSTRUMENT | DCT Series,DCH Series, CFT2200 | 008 |
| DL4,DQNV/DRX,DPBB,DPV/DP/DQN,DRZ | 027 | |
| JERROLD | BMC9012/BMC9022 | 006 |
| DSR470 | 005 | |
| CFT2000 | 012 | |
| DL4,DQNV/DRX,DPBB,DPV/DP/DQN,DRZ | 027 | |
| ADB | ADB Series | 254 255 |
| ADB5810WX | 315 | |
| ADB5810W, ADB5721WNX | 259 | |
| AMINO | Amigo 7X v2 | 235 |
| A125, A130, A530 | 256 | |
| A110 | 260 | |
| A140, A540, A550 | 219 | |
| Amulet, Kamai 7XM, Kamai 7B | 321 | |
| ARRIS | MG5225,MP2000,MP2050A,MP2150A | 172 |
| Frontier | 216 | |
| VIP5662W | 140 | |
| AT&T | U-VERSE | 251 |
| Bell Fibe | Slim 2 | 229 |
| BT Vision | Vbox Series, DIT Series | 232 |
| YouView | 960 | |
| Cincinnati Bell | ZTE B700-V3 | 220 |
| CISCO | U-VERSE | 251 |
| RNG200 | 313 | |
| CIS330, CIS430 | 316 | |
| COMCAST | RNG200 | 313 |
| XFINITY | 195 | |
| Cox Digital Cable | Mini Box | 223 |
| DIGEO | 2056-MSX | 153 |
| DigitalMultimediaTechnology | DMT-205HD | 222 |
| DIGITAL STREAM | DCS1000 | 180 |
| Dish Network | Hopper 3 | 122 |
| DREAM | DM7020S, DM7025, DM8000HD | 159 |
| Duoson | TotalPlay | 218 |
| ENTONE | Amulet IPTV Receiver | 258 |
CABLE TV
| 213 | ||
| Kamai 651 | 221 | |
| Kamai 500 | 210 221 | |
| Kamai 45x | 221 | |
| EVOLUTION FTA | X0-01 | 158 |
| EVOLUTION | UNIVERSAL SD DTA | 189 |
| UNIVERSAL HD DTA | 215 | |
| Foxtel | IQ3 | 228 |
| Horizon | Ziggo | 225 |
| Humax | 101-H | 231 |
| Innovative Systems | IPTV Receiver | 262 |
| KAON | Mini | 208 |
| Layer3 | C12516 | 226 |
| MOXI | MOXI MEDIA CENTER | 006 |
| MOXI HD DVR | 052 | |
| 2056-MSX | 153 | |
| MYRIO | IPTV Receiver | 254 255 |
| NAGRA | DCI-4136M | 211 |
| NAGRAVISION | HDDTA | 201 |
| NFUSION | NUVENIO SD PHOENIX, NUVENIO HD, SOLARIS, NOVA | 192 |
| NOW TV | NOW TV | 314 |
| Optimum | Altice One | 237 |
| Optimum | 236 | |
| PACE | 500 Series | 001 007 |
| TDC Series | 002 | |
| 510 | 004 | |
| DC60X | 206 | |
| IPH8005M | 217 | |
| RNG200 | 313 | |
| Pico Digital | VMX1, VMX3, HD-2 | 224 |
| PIONEER | VOYAGER Series | 001 007 |
| BA9000 | 013 | |
| SAMSUNG | OCAP MODELS | 001 007 |
| SiDMedia | DC7700X | 200 |
| SKY | SKY+HD | 230 |
| SKY HD | 204 | |
| Q | 240 | |
| AP HD, AP Jr | 241 | |
| Spectrum | Spectrum | 231 |
| TECHNICOLOR | 365 | |
| TELNET | RC-RW100 | 154 |
| Virgin Media | TIVO 6 | 959 |
| WEGENER | IPTV Receiver | 250 |
| WINDSTERAM | KINETIC | 212 |
| ZeeVee | ZvMXE | 227 |
TV
| ADMIRAL | 072 096 081 |
| ADVENT | 147 |
| AIWA | 141 145 |
| AKAI | 070 146 148 124 226 104 108 |
| AKIO | 103 |
| ALARON | 028 |
| AMARK | 112 |
| AMERICA ACTION | 043 |
| AMPRO | 073 |
| ANAM | 043 054 056 080 112 131 |
| AOC | 058 070 112 616 |
| APEX | 092 |
| APEX DIGITAL | 150 037 015 724 |
| AQUAVISION | 097 100 686 |
| AUDIOVOX | 076 103 043 035 078 224 |
| AUVIO | 689 |
| Avera | 761 |
| AVIELO | 090 |
| AVION | 223 |
| AXESS | 711 |
| BAYSONIC | 043 |
| BELL&HOWELL | 072 |
| BENQ | 234 |
| BRADFORD | 043 |
| BROKSONIC | 096 |
| CANDLE | 070 002 003 |
| CAPEHART | 058 |
| CARVER | 164 |
| CELEBRITY | 001 |
| CETRONIC | 043 |
| CIELO | 714 |
| Ciil | 732 |
| CINERAL | 103 120 |
| CITIZEN | 070 002 003 101 103 |
| CLASSIC | 043 |
| COBY | 640 641 598 |
| CONTEC | 043 051 |
| Continu-us | 161 746 747 |
| CRAIG | 043 054 028 |
| CROSLEY | 164 |
| CROWN | 043 |
| CURTIS MATHES | 070 101 011 072 120 164 081 |
| CXC | 043 |
| DAEWOO | 076 103 112 043 120 |
| DELL | 041 |
| DENON | 011 |
| DIGITAL PROJECTION | 090 |
| DUMONT | 073 |
| DWIN | 131 132 |
| DYNASTY | 043 |
| FISHER | 007 057 |
| ELECTROBAND | 001 |
| ELECTROHOME | 024 076 |
| ELEMENT | 110 622 690 |
| EMERSON | 005 028 043 048 076 096 155 051 153 121 |
| ENVISION | 070 |
| EPSON | 087 228 |
| ESA | 031 |
| Evervue | 755 |
| FREEMOTION | 688 |
| FUJITSU | 164 197 028 149 |
| FUNAI | 028 043 052 168 |
| FUSION | 642 |
| FUTURETECH | 043 |
| GATEWAY | 165 031 |
| GE | 070 073 008 009 034 056 074 155 120 081 |
| GEM | 031 |
| GIBRALTER | 073 |
| GOLDSTAR | 106 112 |
| GRUNPY | 028 043 |
| HAIER | 116 623 598 749 |
| HANNSPREE | 099 |
| HARLEY DAVIDSON | 028 |
| HARMAN KARDON | 164 |
| HARVARD | 043 |
| HISENSE | 198 021 619 630 598 752 749 |
| HITACHI | 011 598 007 009 072 010 012 023 158 174 670 749 |
| HP | 027 039 098 |
| HUMAX | 122 |
| HYPERION | 609 |
| HYUNDAI | 049 067 |
| ILO | 055 096 |
| INFINITY | 164 |
| INFOCUS | 046 215 225 233 726 733 |
| INKEL | 129 |
| INSIGNIA | 068 069 078 096 164 168 604 617 |
| INTEQ | 073 |
| JBL | 164 |
| JCB | 001 |
| JCPENNEY | 008 024 030 070 101 156 |
| JENSEN | 013 |
| JVC | 038 001 034 083 639 |
| KENWOOD | 070 001 |
| KLEGG | 220 |
| KLOSS | 002 059 |
| KREISEN | 202 |
| KTV | 070 043 |
| LG | 598 086 106 112 741 |
| LODGENET | 072 |
| LOEWE | 196 164 738 |
| LOGIK | 072 |
| LXI | 007 052 164 015 081 |
| MAGNAVOX | 070 003 022 059 060 061 164 094 056 028 035 211 205 218 050 138 232 |
| MAJESTIC | 072 |
| MARANTZ | 164 070 143 169 |
| MATSUI | 164 |
| MATSUSHITA | 080 |
| MAXENT | 165 |
| MEMOREX | 007 072 028 096 |
| MGA | 024 070 |
| MIDLAND | 073 |
| MINTEK | 077 |
| MINUTZ | 008 |
| MITSUBISHI | 024 040 146 028 124 200 235 081 |
| MOTOROLA | 081 |
| MTC | 070 101 |
| MULTITECH | 043 |
| NAD | 025 015 |
| NEC | 070 040 056 007 019 024 717 758 |
| NEXUS | 620 078 |
| NIKEI | 043 |
| NIKKO | 103 |
| NIKO | 175 |
| NORCENT | 211 |
| NTC | 103 |
| NUVISION | 084 |
| OLEVIA | 219 |
| ONKING | 043 |
| onn. | 898 |
| ONWA | 043 |
| OPTIMUS | 080 |
| OPTOMA | 029 |
| OPTONICA | 019 081 |
| ORION | 096 201 203 204 205 028 |
| PANASONIC | 080 164 190 034 056 230 248 524 607 664 801 |
| PEERLESS-AV | 723 763 |
| PHILCO | 070 003 024 056 059 060 164 |
| PHILIPS | 164 005 218 038 093 070 003 059 199 232 727 743 773 |
| PIONEER | 023 025 135 176 018 070 183 191 214 |
| PLANAR | 728 742 787 788 |
| POLAROID | 026 118 119 006 110 |
| PORTLAND | 103 |
| PRISM | 034 |
| PROSCAN | 722 |
| PROTON | 058 171 163 |
| PROTRON | 102 213 115 |
| PROVIEW | 110 |
| PROX | 092 |
| QUASAR | 034 056 606 |
| RADIO SHACK | 019 043 |
| RCA | 156 070 023 024 056 074 209 081 713 751 |
| REALISTIC | 007 019 |
| REVOLUTION HD | 220 |
| RUNCO | 072 073 216 697 |
| SAMPO | 070 058 165 |
| SAMSUNG | 192 184 185 101 133 089 105 070 655 |
| SANSEI | 120 |
| SANSUI | 096 078 762 |
| SANYO | 007 053 057 020 750 |
| SCEPTRE | 036 699 |
| SCOTT | 005 028 043 048 113 |
| Sealoc | 897 |
| SEARS | 007 028 030 057 094 052 164 015 |
| SEIKI | 690 |
| SEMIVOX | 043 |
| SEMP | 015 |
| SEURA | 704 797 |
| SHARP | 081 598 684 019 028 022 692 735 765 766 |
| SHERWOOD | 128 |
| SIGNATURE | 072 |
| Silo | 001 |
| Skyvue | 744 |
| Skyworth | 895 |
| SONY | 001 608 633 |
| SOUNDESIGN | 003 028 043 |
| SOYO | 163 |
| SPECTRICON | 112 |
| SQUAREVIEW | 052 |
| SSS | 043 |
| STARLITE | 043 |
| SUPRE MACY | 002 |
| SUPREME | 001 |
| SUNBRITE | 633 634 635 236 605 772 |
| SVA | 046 |
| SYLVANIA | 070 003 059 060 164 056 168 121 231 |
| SYMPHONIC | 052 168 |
| SYNTAX OLEVIA | 219 |
| TANDY | 081 |
| TATUNG | 056 |
| TCL | 705 749 |
| TECHNICS | 034 080 |
| TECHNOL ACE | 028 |
| TECHVIEW | 246 |
| TEKNIKA | 002 003 024 028 043 072 101 103 164 |
| TELERENT | 072 |
| TERA | 172 |
| THOMPSON | 166 |
| TNCI | 073 |
| TOSHIBA | 015 101 045 030 007 040 142 137 703 |
| TRUTECH | 212 |
| UNIVERSAL | 008 009 |
| UPSTAR | 708 |
| VENTURER | 721 |
| VIDEO CONCEPTS | 146 |
| VIDIKRON | 164 |
| VIEWSONIC | 210 211 720 |
| VIORE | 055 229 192 |
| VISCO | 110 |
| VIZIO | 236 031 624 625 |
| WARDS | 164 008 009 019 028 060 061 072 074 070 |
| W Box Technologies | 731 |
| WESTINGHOUSE | 076 036 221 222 001 690 695 |
| WINBOOK | 079 |
| Manufacturer/Brand | Set-Up Code Number |
| YAMAHA | 070 |
| YUPITERU | 043 |
| ZENITH | 011 072 073 095 103 096 |
| ZONDA | 112 |
| Manufacturer/Brand | Set-Up Code Number |
| ADCOM | 203 |
| AIWA | 210 |
| AKAI | 239 |
| APEX DIGITAL | 240 196 |
| ARCAM | 165 148 374 |
| BOSE | 244 245 |
| CAMBRIDGE AUDIO | 224 145 |
| COBY | 206 |
| CYBERHOME | 170 212 |
| DAEWOO | 170 |
| DENON | 226 225 358 |
| DURABRAND | 235 |
| EMERSON | 235 |
| ESA | 235 |
| FUNAI | 235 |
| GOLDSTAR | 182 194 |
| GO VIDEO | 228 182 252 253 254 |
| GRADIENTE | 243 |
| HARMAN KARDON | 217 |
| HITACHI | 181 |
| INSIGNIA | 235 085 182 178 349 385 |
| INTEGRA | 236 128 |
| JVC | 185 |
| KENWOOD | 166 |
| KISS | 237 |
| KLH | 230 |
| KOSS | 243 |
| KRELL | 218 |
| LEXICON | 216 |
| LG | 182 194 105 350 |
| MAGNAVOX | 178 191 195 235 386 |
| MARANTZ | 135 |
| MCINTOSH | 167 |
| MEMOREX | 222 |
| MERIDIAN | 200 |
| MINTEK | 240 196 |
| MITSUBISHI | 186 |
| MYRYAD | 211 |
| NAD | 198 182 353 |
| ONKYO | 207 236 128 |
| OPPO | 125 |
| OPTIMUS | 187 |
| ORITRON | 243 |
| PANASONIC | 076 219 103 104 379 |
| PHILIPS | 195 164 191 209 127 381 387 |
| PIONEER | 187 221 223 354 377 |
| POLAROID | 085 |
| RCA | 086 |
| SANSUI | 201 |
| SANYO | 215 |
| SAMSUNG | 183 228 205 073 152 241 380 |
| SENSORY SCIENCE | 254 |
| SHARP | 174 |
| SHERWOOD | 129 361 |
| SONY | 168 190 213 077 118 119 120 121 126 351 368 378 382 |
| SPECTRONIQ | 088 |
| SUPERSCAN | 235 |
| SV2000 | 235 |
| SYLVANIA | 235 |
| SYMPHONIC | 235 |
| TASCAM | 185 |
| TAG McLaren | 202 |
| THETA DIGITAL | 187 |
| TOSHIBA | 169 191 206 227 201 236 356 |
| TRUTECH | 151 |
| VENTURER | 229 |
| VINC | 220 087 |
| VIZIO | 375 |
| YAMAHA | 199 204 246 372 334 383 |
| ZENITH | 182 194 |
DVR(TIVO)
| Manufacturer/Brand | Set-Up Code Number |
| CHANNEL MASTER | 841 859 |
| DSTV | 786 787 788 241 800 |
| HUGHES | 817 |
| HUMAX | 817 |
| ICREALTIME | 111 816 |
| MOXI | 112 |
| PHILIPS | 790 817 785 |
| Manufacturer/Brand | Set-Up Code Number |
| RCA | 809 |
| REPLAY NETWORKS | 775 |
| SONY | 804 805 |
| Speco Technologies | 879 |
| TIVO | 790 817 858 |
| TOSHIBA | 817 |
| ZUUMMedia | 855 |


