![]()
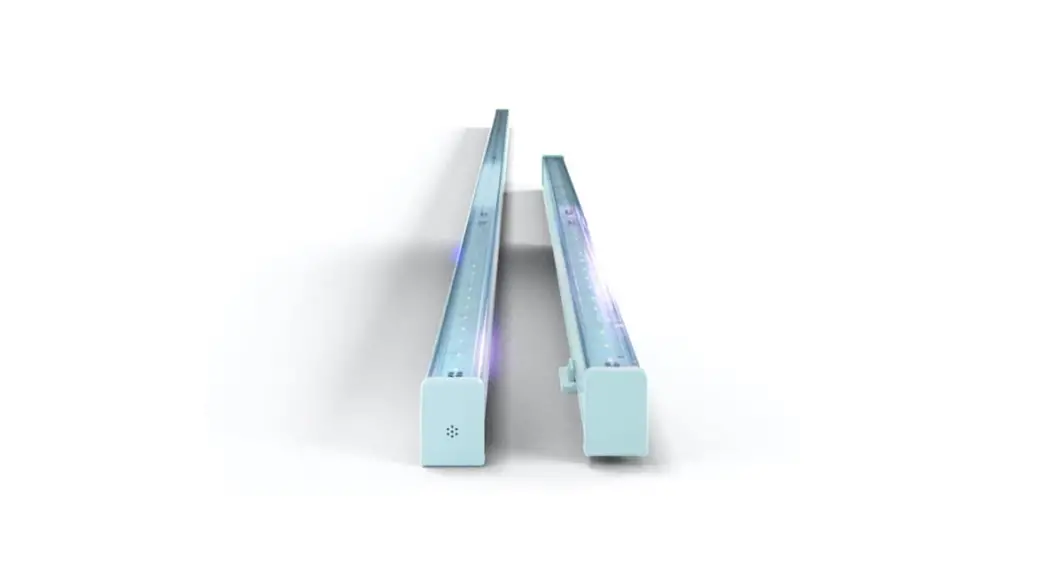
![]() 4ft LED Bar Light
4ft LED Bar Light
User Manual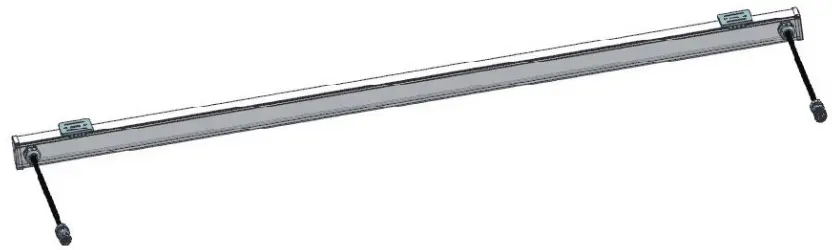
 BEFORE YOU BEGIN
Read these instructions completely and carefully.
For the latest North American install guides for your product go to: https://products.gecurrent.com/horticulture/arize-lynk
For the latest European install guides for your product go to: https://gecurrent.com/eu-en
Save These Instructions
Use only in the manner intended by the manufacturer.
If you have any questions, contact the manufacturer.
The light source of this luminaire is not replaceable; when the light source reaches its end of life the whole luminaire shall be replaced.
The external flexible cable or cord of this luminaire can not be replaced; if the cord is damaged, the luminaire shall be destroyed.
Prepare Electrical Wiring FOR UL ONLY![]() Electrical Requirements
Electrical Requirements
- Acceptable for use in dry, damp, and wet locations.
- Follow all National Electric Codes (NEC) and local codes.
This device complies with Part 15 of the FCC Rules. Operation is subject to the following two conditions: (1) This device may not cause harmful interference, and (2) this device must accept any interference received, including interference that may cause undesired operation.
CAN ICES-005 (A) / NMB-005 (A)
Note: This equipment has been tested and found to comply with the limits for a Class A digital device, pursuant to part 15 of the FCC Rules. These limits are designed to provide reasonable protection against harmful interference when the equipment is operated in a commercial environment. This equipment generates, uses, and can radiate radio
frequency energy and, if not installed and used in accordance with the instruction manual, may cause harmful interference to radio communications. Operation of this equipment in a residential area is likely to cause harmful interference in which case the user will be required to correct the interference at his own expense.
![]() WARNING
WARNING
RISK OF ELECTRIC SHOCK
- Turn the power off before inspection, installation, or removal.
- The electrical supply for each luminaire must always be connected to the male connector.
- Not to be submerged or used in a marine environment.
RISK OF FIRE
- Follow all local codes.
![]() RISK GROUP 1 – CAUTION
RISK GROUP 1 – CAUTION![]() RISK GROUP 2 – CAUTION
RISK GROUP 2 – CAUTION
*See table below for risk groups by model.
![]() These photobiological safety markings are based on testing the light output characteristic of a single horticultural luminaire. Increased exposure risk to facility personnel may be present depending upon the number of horticultural luminaires and their placement and/or positioning within the plant growth facility.
These photobiological safety markings are based on testing the light output characteristic of a single horticultural luminaire. Increased exposure risk to facility personnel may be present depending upon the number of horticultural luminaires and their placement and/or positioning within the plant growth facility.
It is the responsibility of the plant growth facility to address these risks at the facility level and to ensure that people entering the plant growth areas while the lights are on, are aware of these risks and that appropriate safeguards are in place.![]() Suitable for operation in an ambient temperature between 32°F (0°C) and 104°F (40°C).
Suitable for operation in an ambient temperature between 32°F (0°C) and 104°F (40°C).
Mechanical ventilation or cooling system is required to maintain the temperature within the growing space below 104°F (40°C) when the light module is in operation.
| Part Number | IEC 62471 UL Only | IEC 62778 CE/UKCA Only | |
| Risk Group | Risk Group | Min viewing distance (mm) | |
| GEHL48HPPR3 | RG2 (Lb, Eb) | RG1 | N/A |
| GEHL48HPPB3 | RG2 (Lb) | RG2 | 447 |
| GEHL48HPKR3 | RG1 | RG1 | N/A |
| GEHL48HPPF3 | RG2 (Eb) | RG2 | 352 |
| GEHL48HPKB3 | RG1 | RG2 | 390 |
| GEHL48HPKF3 | RG1 | RG1 | N/A |
| GEHL48HBRI3 | RG1 | RG2 | 359 |
| GEHL48HBRV3 | RG1 | RG2 | 420 |
| GEHL48HPPV3 | RG2 (Eb) | RG2 | 530 |
| GEHL96HPPR3 | RG0 | RG2 | 325 |
| GEHL96HPPB3 | RG2 (Eb, Lb) | RG2 | 432 |
| GEHL96HPKR3 | RG0 | RG2 | 257 |
| GEHL96HPKB3 | RG1 | RG2 | 390 |
| GEHL96HPPV3 | RG2 (Eb, Lr) | RG2 | 482 |
Please contact support at [email protected] with regard to applications other than horizontal. In these applications, luminaires should not be directly interconnected and the male connector (power input) should be in the upward orientation with the female end facing down.![]() Electrical products must not be thrown out with domestic waste. They must be taken to a communal collecting point for environmentally friendly disposal in accordance with local regulations. Contact your local authorities or stockist for advice on recycling. The packaging material is recyclable. Dispose of the packaging in an environmentally friendly manner and make it available for the recyclable material collection service.
Electrical products must not be thrown out with domestic waste. They must be taken to a communal collecting point for environmentally friendly disposal in accordance with local regulations. Contact your local authorities or stockist for advice on recycling. The packaging material is recyclable. Dispose of the packaging in an environmentally friendly manner and make it available for the recyclable material collection service.
Manufacturer:
Current Lighting Solutions LLC, 1975 Noble Road, Cleveland, Ohio 44112 USA Importer:
UK: Current Lighting Limited, 3rd Floor, 1 Ashley Road, Altrincham, UK, WA14 2DT
EU: Current Netherlands B.V., Programmeurstraat 6, 1033MT Amsterdam, Netherlands
Conforms to the following standards: IP66 rated![]() Visit LED.com
Visit LED.com
 https://products.gecurrent.com/horticulture/arize-lynk
Product Length
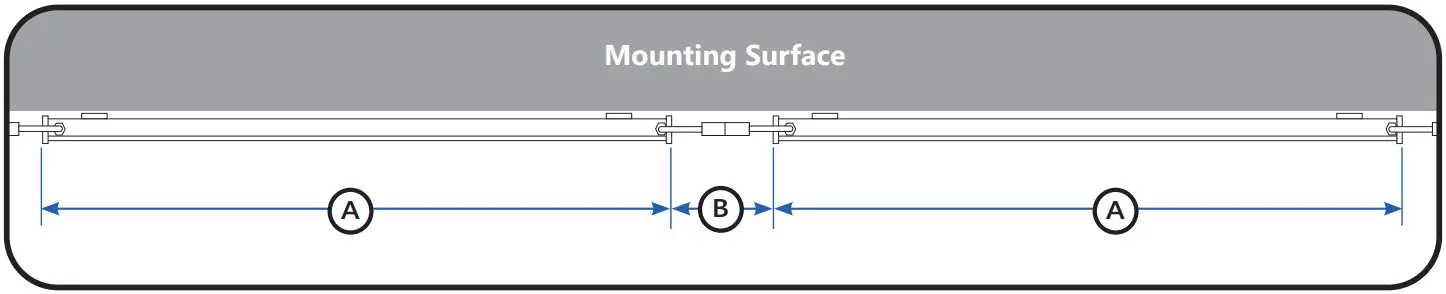
| A Luminaire length | B Minimum spacing / Leader cable length | |
| 4 ft. | 47.3” (120 cm) | 0.2″ (5 mm) / 23.6″ (600 mm) |
| 8 ft. | 95” (240 cm) | 0.2″ (5 mm) / 23.6″ (600 mm) |
Tools Required 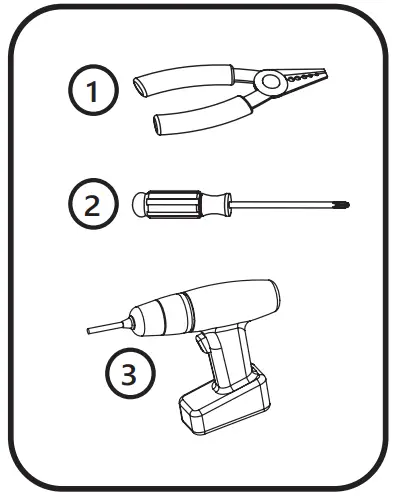
- Wire stripper/cutter
- Screwdriver
- Cordless drill with the driver bit
Components Required
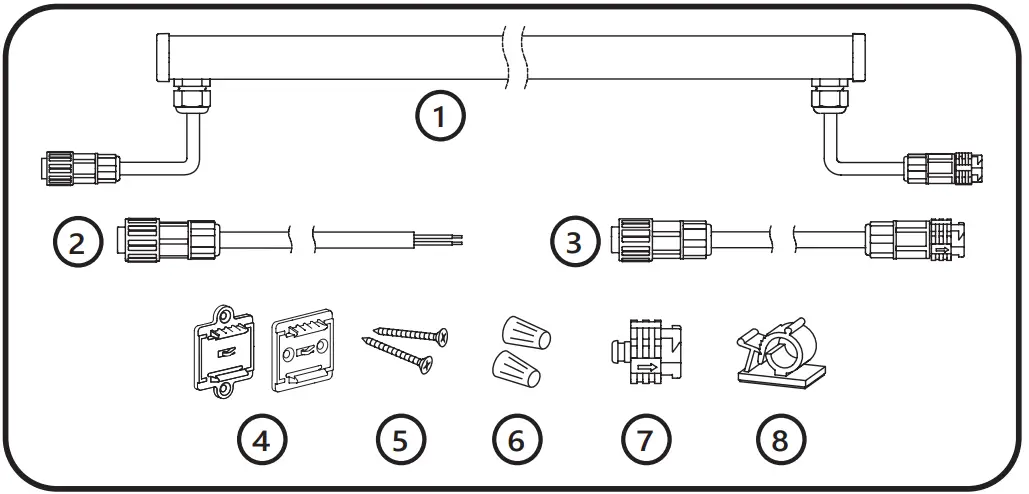
- Arize Lynk² fixtures (4 ft. or 8 ft.)
- Cable Accessories (GECAaabcc-deff), see page 7
- Optional – Jumper cable (93138395 – 2ft, with dimming wire)
- Mounting clips (88818 – standard) or (10734 – slim)
- #10 (M5) self-tapping flathead screws
- UL approved 18-14 AWG (0.82-2.08 mm²) wire connectors, in-line splice connectors or alternative approved connectors.
- End cap for connectors
- Optional – Cable clamps
METHOD 1 Single Luminaire Installation
Before starting:
Luminaires must only be mounted using Current’s standard or slim mounting clips (see Components Required on page 3).
Mounting instructions using Current’s standard and slim mounting clips.
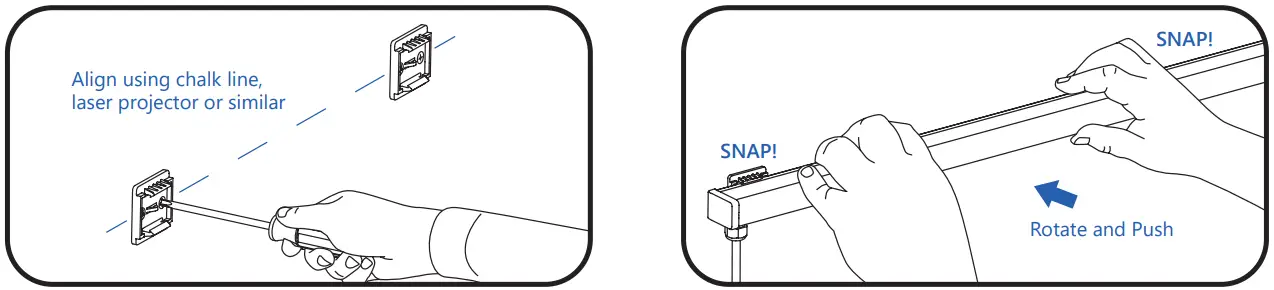 | |
| 1. Secure each luminaire mounting clip to a rigid flat mounting surface using two #10 (M5) self-tapping flathead screws along the intended run of the luminaire. To avoid stress and damage to the luminaire the entire mounting surface should be flat and the mounting clips are properly aligned. Refer to the table on page 11 for the required number of mounting clips per luminaire. | 2. Press the luminaire into its mounting clips so that the male connector is oriented towards the intended electrical supply. TIP: Align the luminaire on one side of the mounting clips; then rotate the luminaire until it snaps into another side of the mounting clips. (Only for single luminaire installation) Alternately: The required mounting clips may first be pressed onto the luminaire, then the luminaire mounting clip assembly may be mounted onto the mounting surface using two #10 (M5) self-tapping flathead screws per mounting clip. |
 | |
| 3. Place the luminaire on the surface with the male connector oriented towards the intended electrical supply. | 4. If not already covered, insert an end cap into the female connector, and twist the end cap clockwise to secure. |
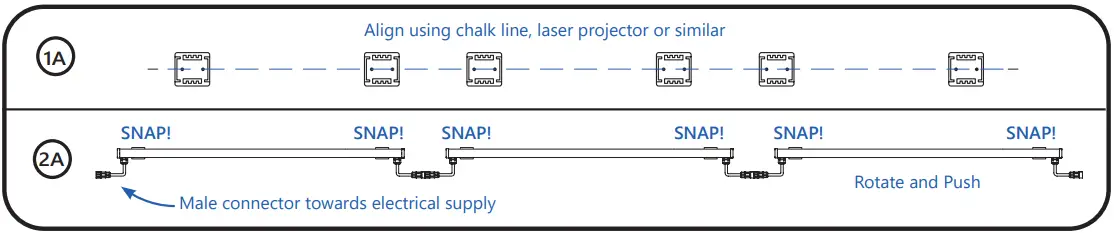
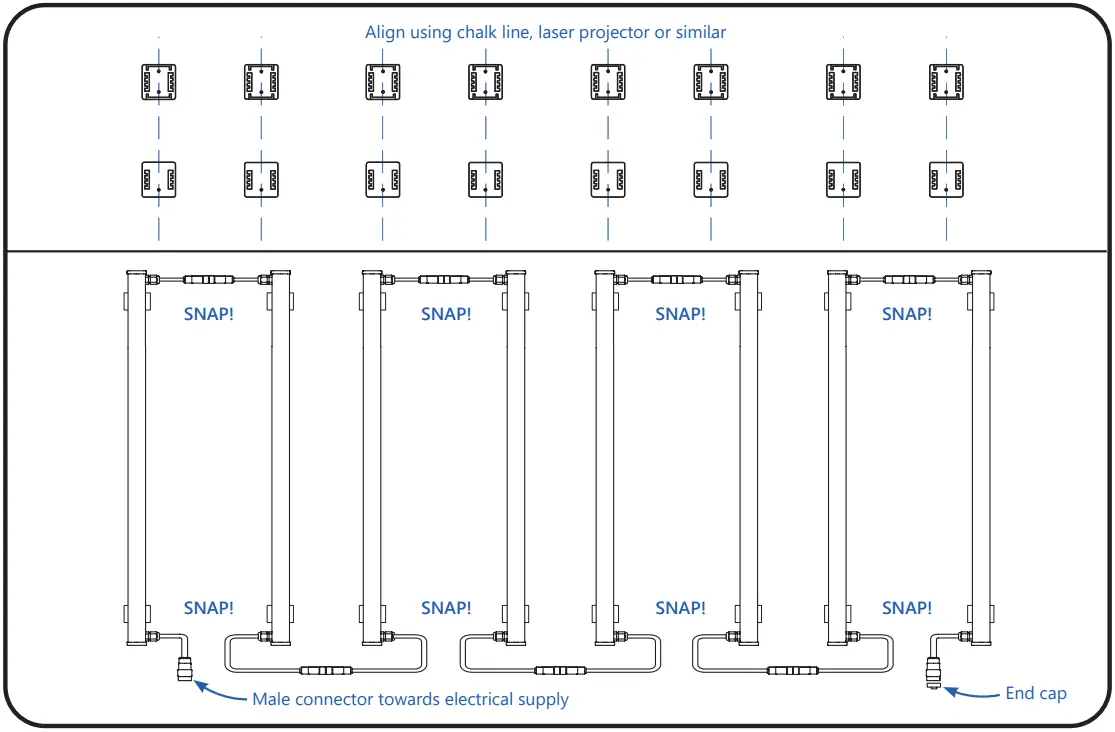
METHOD 2 Directly Interconnected Luminaires
Before starting:
See Multiple Bar Installation Details to ensure you won’t exceed the maximum run length per leader cable.
Luminaires must only be mounted using Current’s standard or slim mounting clips (see Components Required on page 3).
Linear Layout
NOTE: the recommended distance between two ends should be no more than 0.8″ (20mm) for better optical uniformity.
 Parallel Layout
NOTE: the recommended maximum space between parallel luminaires is 10″ (245mm) for better optical uniformity.
 | |
| 1. Secure each luminaire mounting clip to a rigid flat mounting surface using two #10 (M5) self-tapping flathead screws along the intended run of the luminaire. To avoid stress and damage to the luminaire the entire mounting surface should be flat and the mounting clips properly aligned. Refer to the table on page 8 for the required number of mounting clips per luminaire. | 2. Press the luminaire into its mounting clips so that the male connector is oriented towards the intended electrical supply. TIP: Align the luminaire on one side of the mounting clips, then rotate the luminaire until it snaps into another side of the mounting clips. |
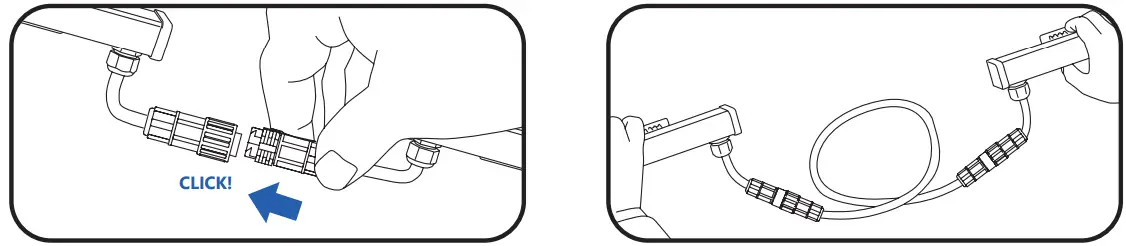 | |
| 3A. Remove the end cap from the female connector. Insert the male connector into the female connector. Make sure the connector is fully engaged as indicated by hearing a click. | 3B. Use a jumper cable to connect luminaires if the distance between them is too long. |
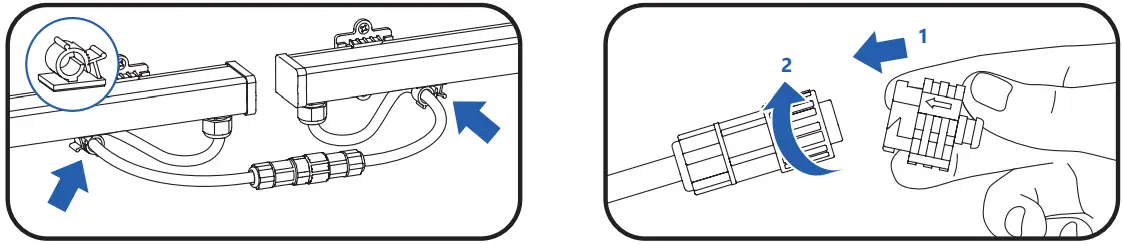 | |
| 3C. Optional: Secure the cables using the optional cable clamp accessory. | 4. Insert an end cap into the female connector on the last luminaire in the run, and twist the end cap clockwise to secure. |
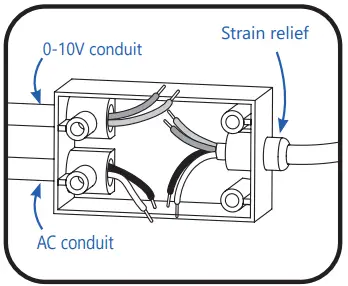
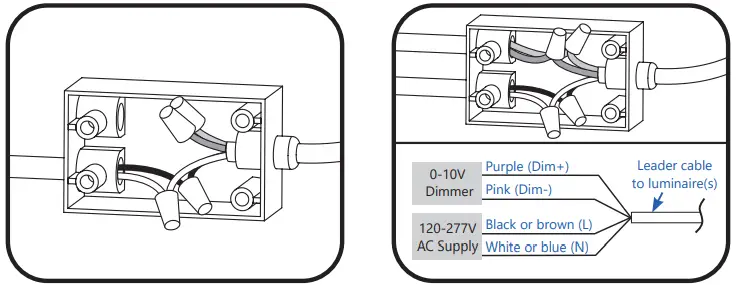
METHOD 3 Wiring Connections
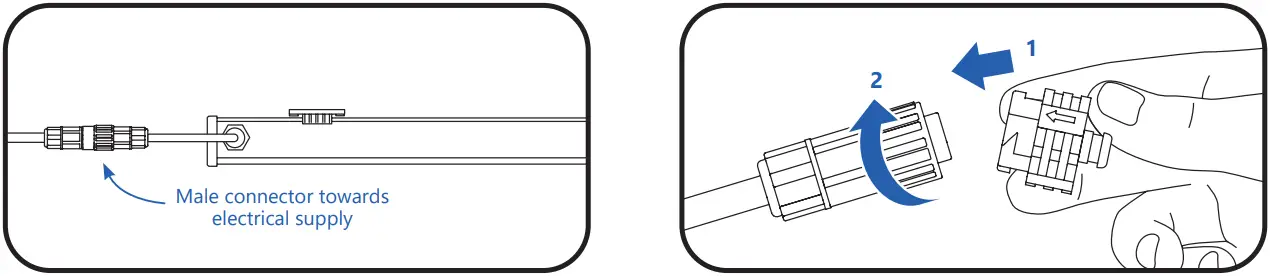
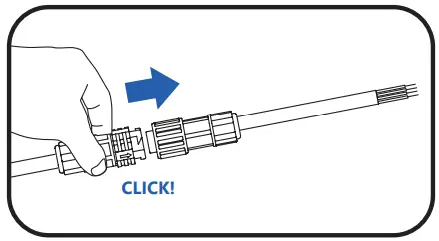
- Insert the female connector of the leader cable so that it fully engages the male connector of the first luminaire in the run as indicated by hearing a click.
NOTE: the male connector can be cut off if there is no leader cable.
See Multiple Bar Installation Details to not exceed the maximum run length for one leader.
To avoid damage, do not bend or otherwise exert excessive force on the connector during installation.
See Components Required on page 3 for leader cable part number.
- Insert lead wire into the junction box.

- Inside the junction box, connect the line and neutral wires of the AC supply source to the line (black or brown) and neutral (white or blue) wires of the leader cable using suitable wire nuts. If 0-10V dimming will not be used, cap the dimming wires (purple and gray) with suitable wire nuts. Do not connect the dimming wires together or to
line, neutral, or ground. If 0-10V dimming will be used, proceed to Step 4.
- Connect the DIM + (purple) to the incoming dimmer circuit +. Connect the Dim – (pink) to the incoming dimmer circuit –.
Warning: The class 2 0-10V dimming circuit must be separated from the AC circuit as required by the applicable electric code.
For UL Only IMPORTANT GUIDELINES
- Cables shall not be concealed or extended through a wall, floor, ceiling, or other parts of the building structure; located above a suspended ceiling or dropped ceiling; permanently affixed to the building structure.
- Cables shall be routed so that they are not subject to strain and are protected from physical damage; visible over their entire length; and used within their rated ampacity as determined for the maximum temperature of the installed environment specified in the instructions.
- Before applying power, ensure that any open female connectors in the installation are sealed with an end cap. (see Method 1, step 4)
METHOD 3
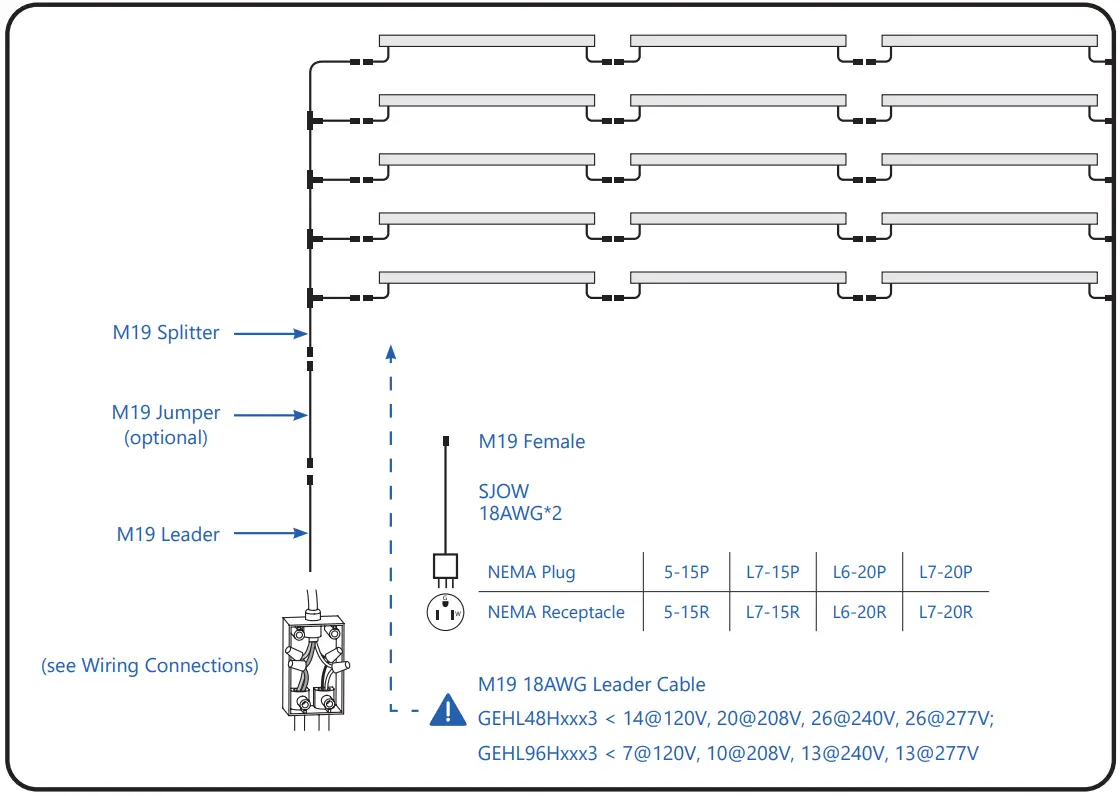
M19 Cable Accessories
| Accessory Type | SKU | Model | Description |
| M19 Leader Cable (NA) | 93142247 | GECA30A18-CC10B | 10ft (3.0m) Leader with dimming |
| M19 Leader Cable (EU/UK) | 93142232 | GECA30A18-BB06B | 6ft (1.8m) Leader |
| 93142234 | GECA30A18-BB10B | 10ft (3.0m) Leader | |
| 93142246 | GECA30A18-BC06B | 6ft (1.8m) Leader with dimming | |
| 93142248 | GECA30A18-BC10B | 10ft (3.0m) Leader with dimming | |
| M19 Leader Cable with Plug (NA) | 93142249 | GECA30A18-CD06B | 6ft (1.8m) Leader with 5-15P Plug |
| 93142250 | GECA30A18-CE06B | 6ft (1.8m) Leader with L6-20P Plug | |
| 93148137 | GECA30A18-CP06B | 6ft (1.8m) Leader with L7-15P plug | |
| 93142251 | GECA30A18-CK06B | 6ft (1.8m) Leader with L7-20P Plug | |
| M19 Jumper (NA/EU/UK) | 93142252 | GECA30A18-CF02B | 2ft (0.6m) Jumper with dimming |
| M19 Splitter (NA/EU/UK) | 93142256 | GECA30A14-CI04B | 4ft (1.2m) Splitter with 1 M19 male to 5 M19 female connectors with dimming. |
METHOD 3
M19 Cable Accessories Installation Example
 METHOD 3
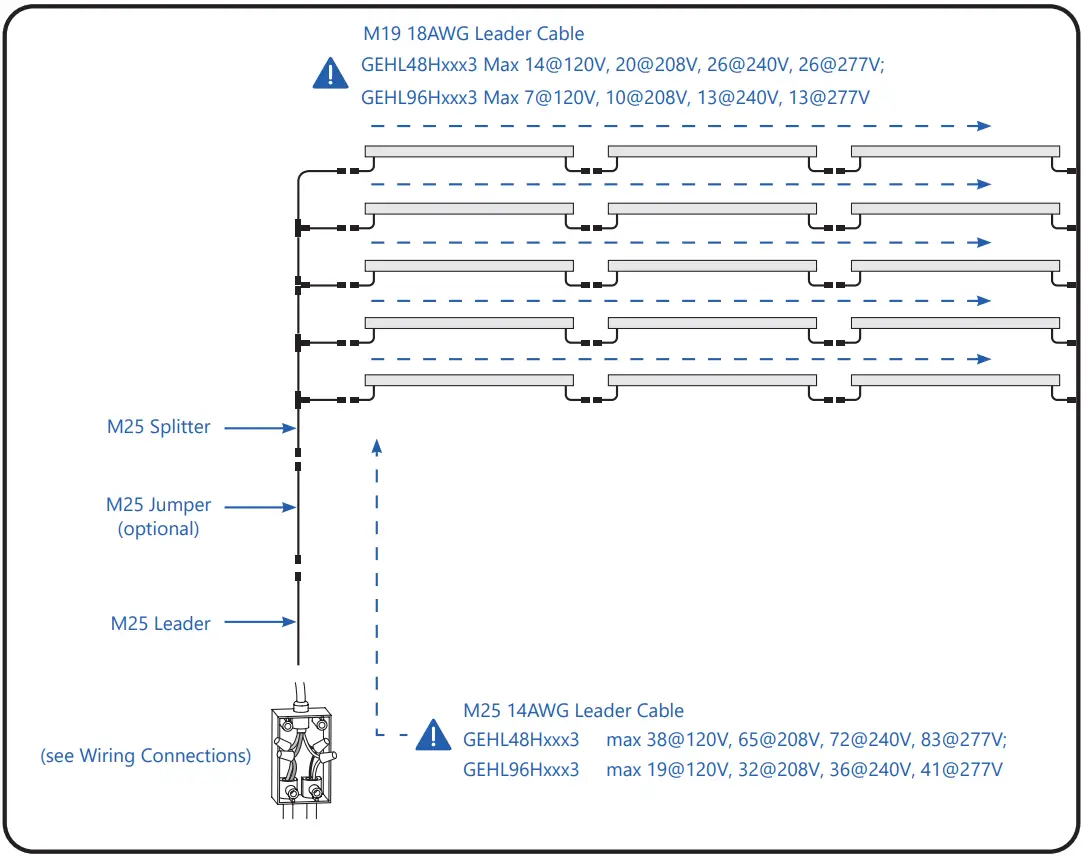
M25 Cable Accessories
| Accessory Type | SKU | Model | Description |
| M25 Leader (EU/UK) | 93142254 | GECA30A14-BG06B | 6ft (1.8m) Leader with dimming, 15A, EU |
| M25 Jumper (NA/EU/UK) | 93142255 | GECA30A14-CH02B | 2ft (0.6m) Jumper with dimming |
| M25 Splitter (NA/EU/UK) | 93142257 | GECA30A14-CJ08B | 8ft (2.4m) Splitter with 1 M25 male to 5 M19 female connectors with dimming. |
| M25 Leader (NA) | 93142253 | GECA30A14-CG06B | 6ft (1.8m) Leader with dimming, 15A, NA |
METHOD 3
M25 Cable Accessories Installation Example A
 METHOD 3
M25 Cable Accessories Installation Example B
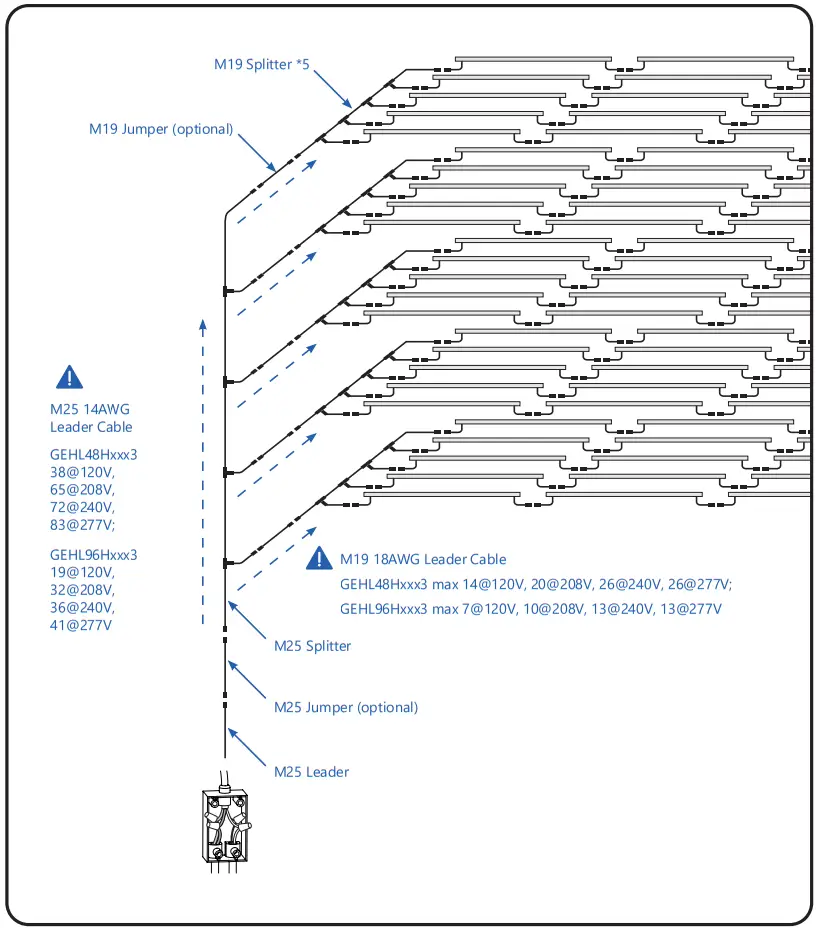
Multiple Bar Installation Details
Input voltage: 120VAC – 277VAC, 50/60Hz
| Lamp Length | Product Code (SKU) | Description Code | Maximum Bars Per M25 14AWG Leader Cable | Maximum Bars Per Interconnected run or M19 18AWG Leader Cable | Qty of Mounting Clips | Electrical Loading Detail Typical Current (A) | ||||||||||
| For 120VAC | For 208VAC | For 230VAC | For 277VAC | For 120VAC | For 208VAC | For 230VAC | For 277VAC | Plastic Clips | Metal Clips | For 120VAC | For 208VAC | For 230VAC | For 277VAC | |||
| 4 ft. | 93137762 | GEHL48HPPR3 | 38 | 65 | 72 | 83 | 14 | 20 | 26 | 26 | 2 | 2 | 0.30 | 0.17 | 0.16 | 0.14 |
| 93137763 | GEHL48HPPF3 | |||||||||||||||
| 93137764 | GEHL48HPPB3 | |||||||||||||||
| 93137765 | GEHL48HPPV3 | |||||||||||||||
| 93137936 | GEHL48HPKR3 | |||||||||||||||
| 93137937 | GEHL48HPKF3 | |||||||||||||||
| 93137938 | GEHL48HPKB3 | |||||||||||||||
| 93137939 | GEHL48HBRI3 | |||||||||||||||
| 93137940 | GEHL48HBRV3 | |||||||||||||||
| 8 ft. | 93137941 | GEHL96HPPR3 | 19 | 32 | 36 | 41 | 7 | 10 | 13 | 13 | 3 | 2 | 0.60 | 0.34 | 0.32 | 0.28 |
| 93137942 | GEHL96HPPB3 | |||||||||||||||
| 93137943 | GEHL96HPPV3 | |||||||||||||||
| 93137944 | GEHL96HPKR3 | |||||||||||||||
| 93137945 | GEHL96HPKB3 | |||||||||||||||
Product Codes
GEHLxxHyyz3
*Key for xx: 48=48 in., 96=96 in.
*Key for yy: PP=Purple, PK=Pink, BR=Broad Spectrum
*Key for z: Type “R”, “B”, “V”, “I”, “F”
Troubleshooting
| Symptom | Solution |
| All LED fixtures are not illuminated | • Check leader cable connection and/or check circuit breaker. • Check plug connectors on the LED fixtures for improper connections or short circuits. • Ensure leader cable is securely connected to the female plug connector on the first LED luminaire. |
| Some LED fixtures are not illuminated | • Check plug connectors on the LED fixtures for improper connections or short circuits. • Ensure any jumper cables are securely connected between the male/female plug connectors of the LED fixtures. |
METHOD 4
Replacement Instructions for Directly Interconnected Luminaires
1. Disconnect the connector on both sides of the luminaire.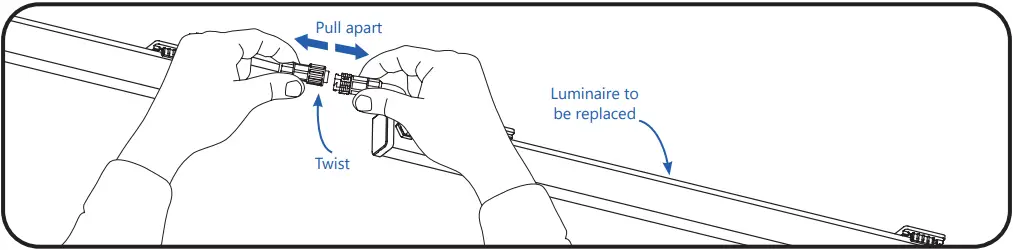 2A. Unscrew the mounting clips to completely remove the luminaire.
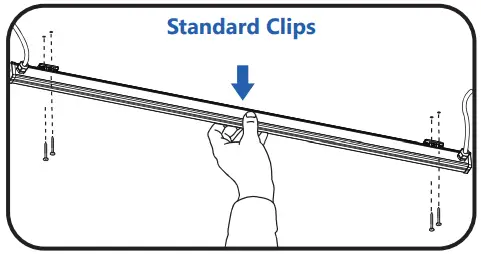 2B. Using a screwdriver, gently pry the luminaire out of the mounting clips.
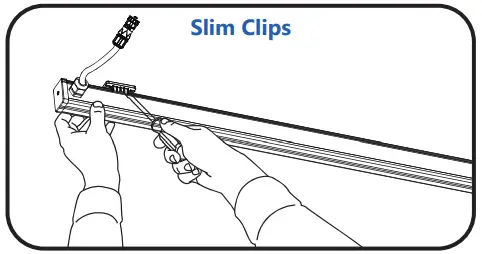 3. To insert a new luminaire, see Method 2.
To avoid damage, do not bend or other wise exert excessive force on the connector during installation.
Installing the Optical Lens
| Accessory Type | SKU | Model | Description | Qty./box |
| LENS | 93142258 | CLIP-LENS-LYNK2 | Clip lens for Batten Gen 3 | 100pcs/box |
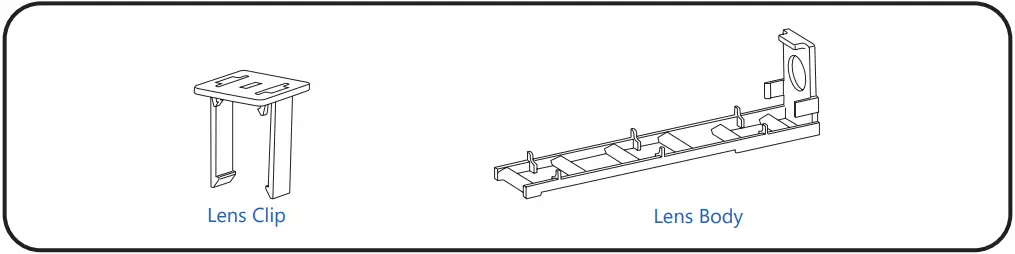 The optical lens has two parts: lens clip and lens body
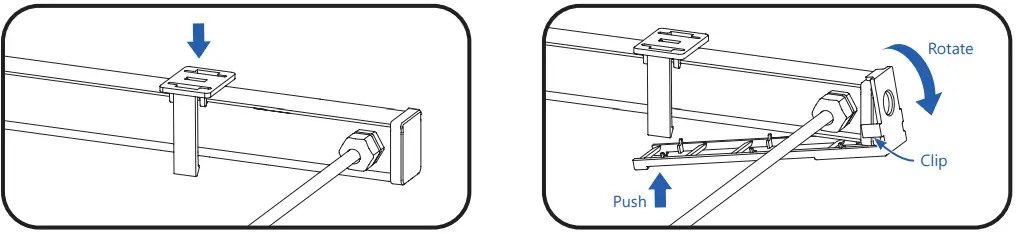 | |
| 1. Press the lens clip into the luminaire enclosure. | 2. Fix the lens on the end cap side first, then push the lens into the clip. |
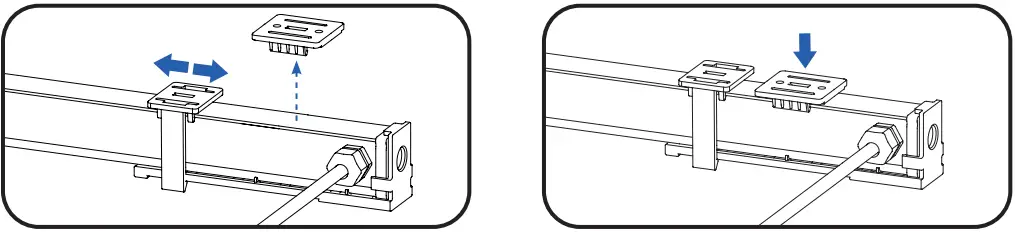 | |
| 3. Slide the clip to the proper position so it will not interfere with the mounting clip. | 4. Install the luminaire to the mounting clip. |
![]() www.gecurrent.com
www.gecurrent.com
© 2021 Current Lighting Solutions, LLC. All rights reserved. GE and the GE monogram are trademarks of the
General Electric Company and are used under license. Information provided is subject to change without
notice. All values are design or typical values when measured under laboratory conditions.
HORT145 (Rev 08/05/21) Enovia – A-1027542


