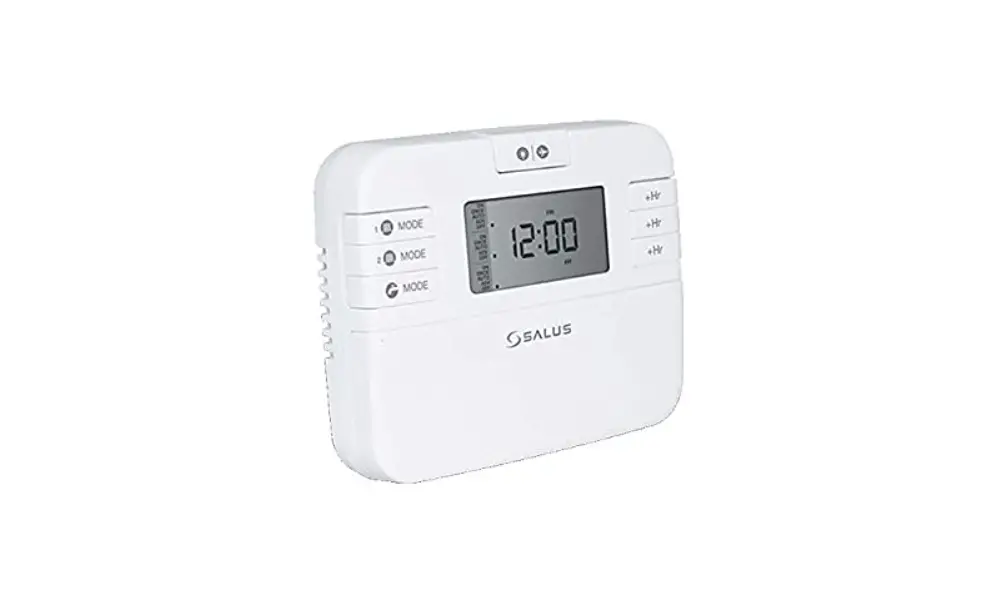
SALUS EP110/EP210/EP310 Electronic Programmable Timer Installation Guide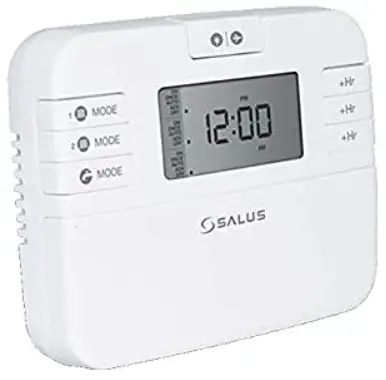
Introduction
A programmable controller is used to switch the heating system and/or the hot water in your home on and off as needed. It works by controlling the central heating and/or the hot water with programmed settings that take effect at different times of the day.
Go to www.salus-manuals.com for the full PDF version of the manual.
Product Compliance
EU Directives: 2014/30/EU, 2014/35/EU and 2011/65/EU. Please check www.saluslegal.com for the full information.
Safety Information
Use in accordance with the EU and national regulations.
For indoor use only.
Keep your device completely dry.
This product must be installed by a competent person and in accordance with all the EU and national regulations.
Difference between EP110/EP210/EP310
| EP110| CH or HW |  |
| EP210 CH and HW |  |
| EP310 2x CH and 1x HW |  |
The EP line will offer you the possibility to customize your central heating system and hot water system as desired.
EP110 is recommended for users that want to control only the Central Heating or the Hot Water system.
EP210 is designed to give you a full control with only one device of both your Central Heating and Hot Water system.
EP310 is the most versatile product of this line and lets you manage two different Central Heating zones and the Hot Water with only one controller.
- Input: 230V, 50Hz
- Output: 3A/ switch terminal
Installation
EP110 Volt Free application only
Note: Please remove red link wire for this application
| Terminal | Description | Backplate |
| N | Mains Neutral | 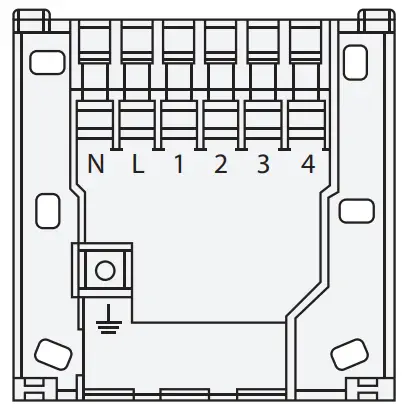
|
| L | Mains Live | |
| 1 | Not Used | |
| 2 | Not Used | |
| 3 | Volt Free Connection | |
| 4 | Volt Free Connection | |
 | Earth Parking (no electrical connection) |
EP110 – 230V Application Only
| Terminal | Description | Backplate |
| N | Mains Neutral | 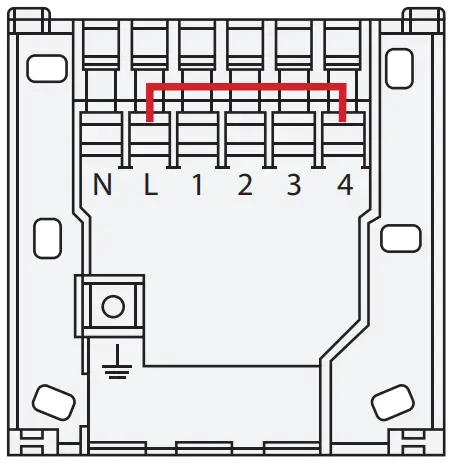 |
| L | Mains Live | |
| 1 | NC (Output) | |
| 2 | Not Used | |
| 3 | Switch Live (Output) | |
| 4 | 230V Common (via Link) | |
| Earth Parking (no electrical connection) |
EP210 – 230V Application
| Terminal | Description | Backplate |
| N | Mains Neutral |
|
| L | Mains Live | |
| 1 | Hot Water Off | |
| 2 | Central Heating Off | |
| 3 | Hot Water On | |
| 4 | Central Heating On | |
| Earth Parking (no electrical connection) |
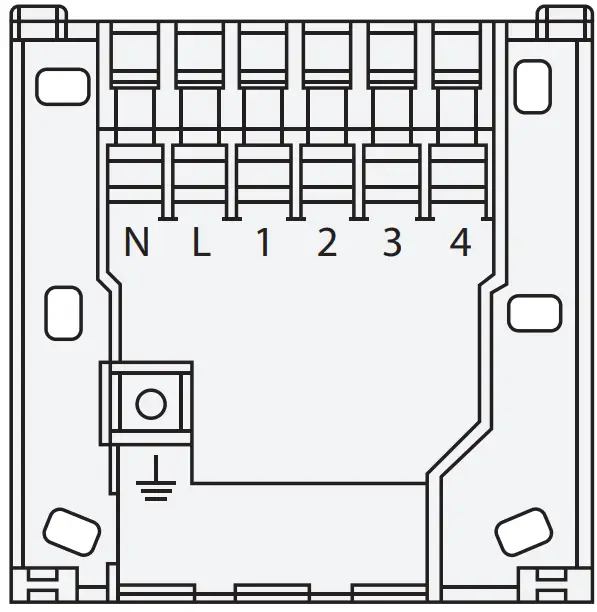
EP310 – 230V Application
| Terminal | Description | Backplate |
| N | Mains Neutral | 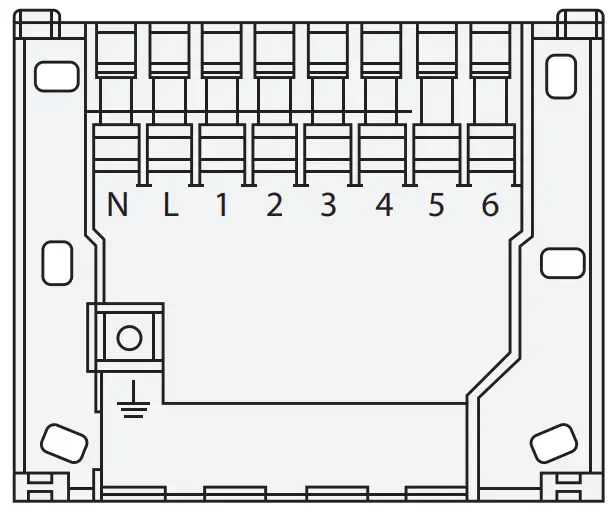
|
| L | Mains Live | |
| 1 | Hot Water Off | |
| 2 | Central Heating Off | |
| 3 | Hot Water On | |
| 4 | Central Heating 1 On | |
| 5 | Central Heating 2 On | |
| 6 | Central Heating 2 Off | |
| Earth Parking (no electrical connection) |
Jumper Settings
Changes to the jumpers settings should only be made by the Engineer carrying out the installation or other qualified person. The installer should select the jumper positions required if changes need to be made to the factory default settings.
These jumpers are found on the rear of the controller.
- EP110/EP310

- EP210

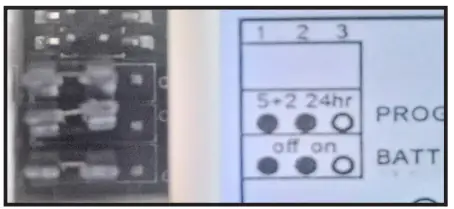
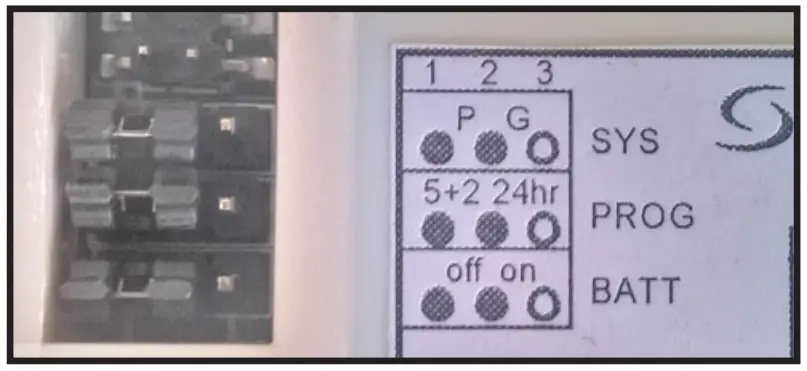
| EP110/ EP210/ EP310 Switching Bridges | |||||
| Switch | Feature | EP110/310 Settings | EP210 Settings | ||
| System | Fully pumped system(P*) or gravity-fed hot water system(G*) | NA | NA | P | G |
| Program | 5-2 days programme or 24h programme | 5-2 | 24H | 5-2 | 24H |
| Memory Backup | Disable/enable the internal backup battery | OFF | ON | OFF | ON |
- P – Fully pumped system for independent Central Heating and Hot Water.
- G – Gravity Hot Water system with Pumped Central Heating
First Power Up
- EP110

- EP210
- EP310


Backlight/ Holiday |
|
Mode | Select operating mode (ON, ONCE, AUTO, ADV, OFF) |
+1Hr | Activate/deactivate Boost function |
| Down | Decreases the selected setting |
| Up | Increases the selected setting |
| Select | Select a clock or programme setting |
| Set | Sets a clock or programme setting |
Reset | Reset to Factory settings |
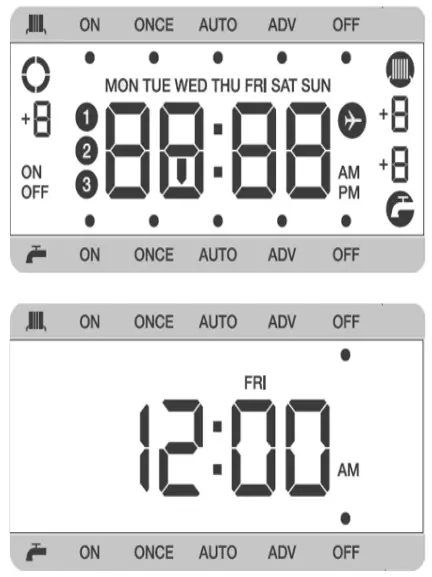
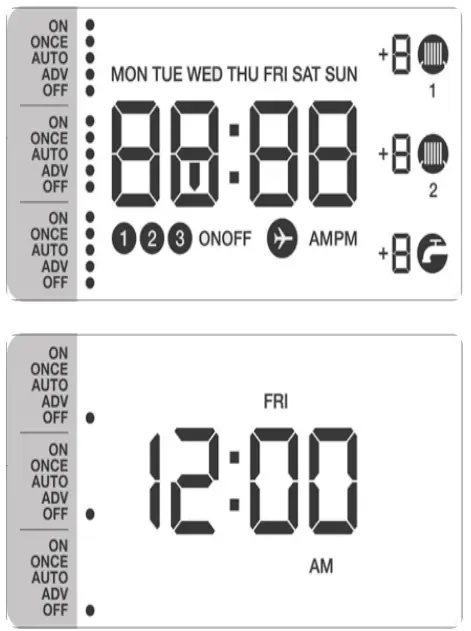
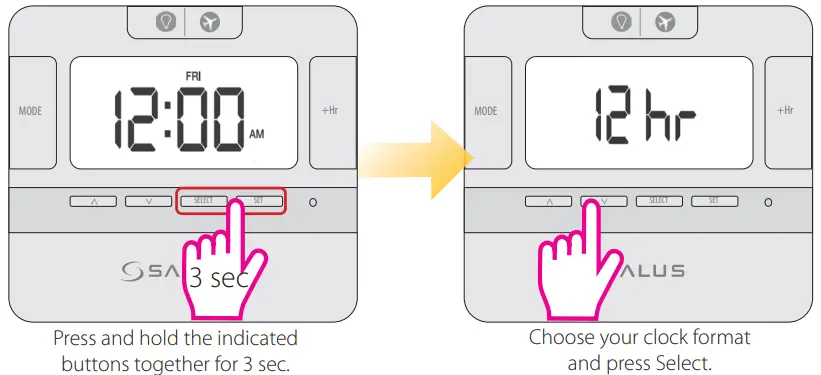
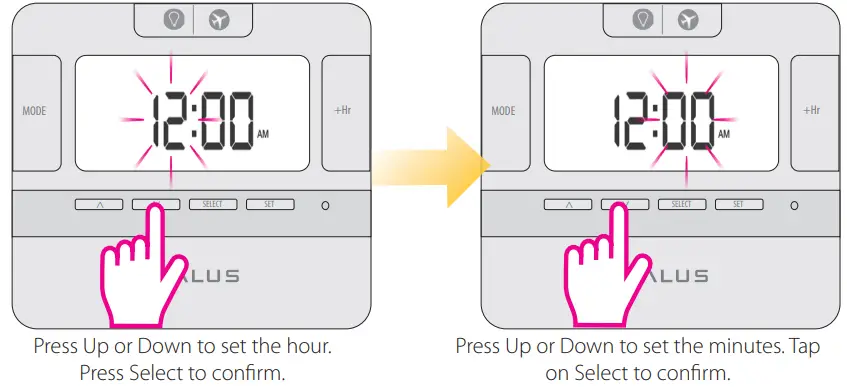
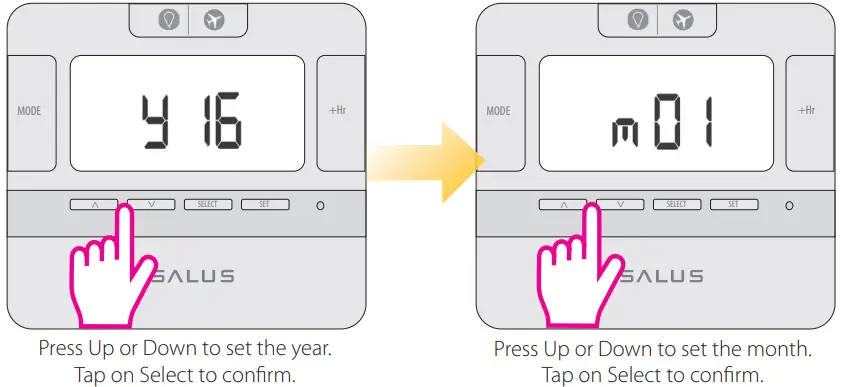
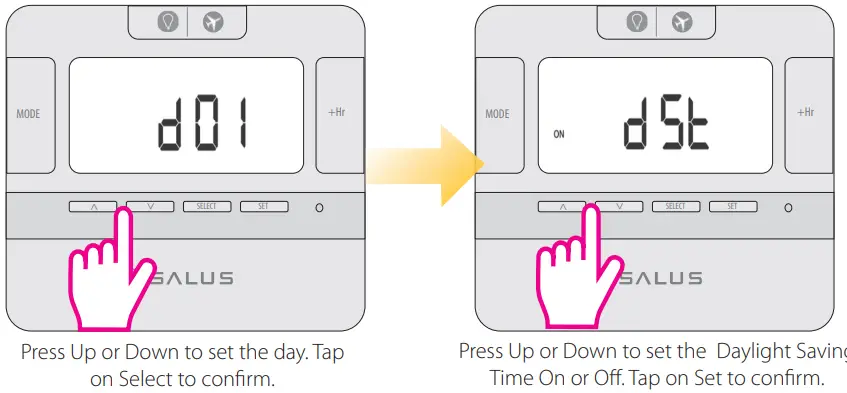
Setting date and time
Operating Modes
All three models have the following five Operating modes. You can select them by pressing the MODE button.
| Operating Mode | Function |
| ON | Continuously on |
| ONCE | On for 1 period a day, from Program 1 ON to Program 3 OFF |
| AUTO | Automatic program control |
| ADV | When device is in Auto or Once mode, press the MODE button for 3 sec for selecting Advance (ADV). This will move the unit into the next program. When the ADV function ends the device will return to normal program. |
| OFF | Continuously off |
Note: In ONCE or AUTO mode, by long pressing the MODE button, the controller will switch automatically to ADV. You can cancel the ADV by long pressing the MODE key. The device will then return to ONCE or AUTO mode.
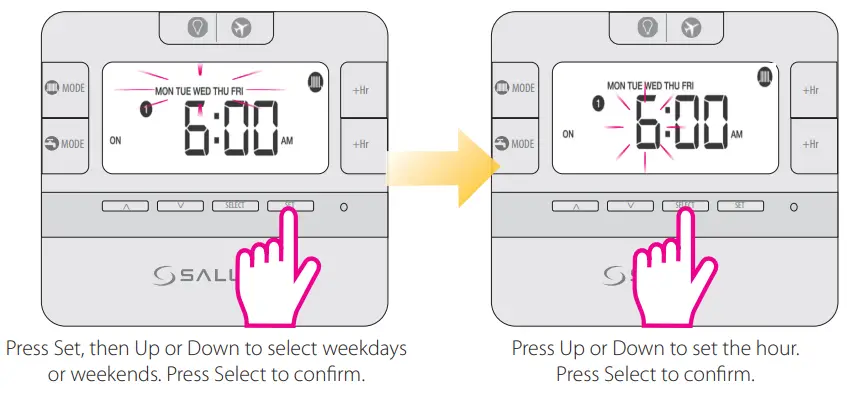
Programming the EP110; EP210; EP310
You can create personalized programmes for your controller. You have the option to choose between a 5-2 days programmes or a daily one by using the jumpers.
| 5-2 Days Programme | ||
| EP110 (1 Channel) | EP210 (2 Channels) | EP310 (3 Channels) |
| Weekdays 3 sets of time/channel Weekends 3 sets of time/channel | Weekdays 3 sets of time/channel Weekends 3 sets of time/channel | Weekdays 3 sets of time/channel Weekends 3 sets of time/channel |
| Total: 6 settings/week | Total: 12 settings/week | Total: 18 settings/week |
EP110
Please repeat the procedure for all the programmes and channels that are available for this model.
EP210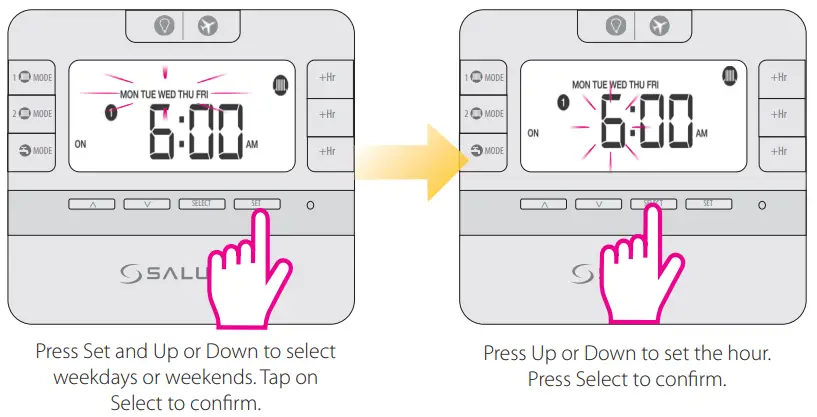
Please repeat the procedure for all the programmes and channels that are available for this model.
EP310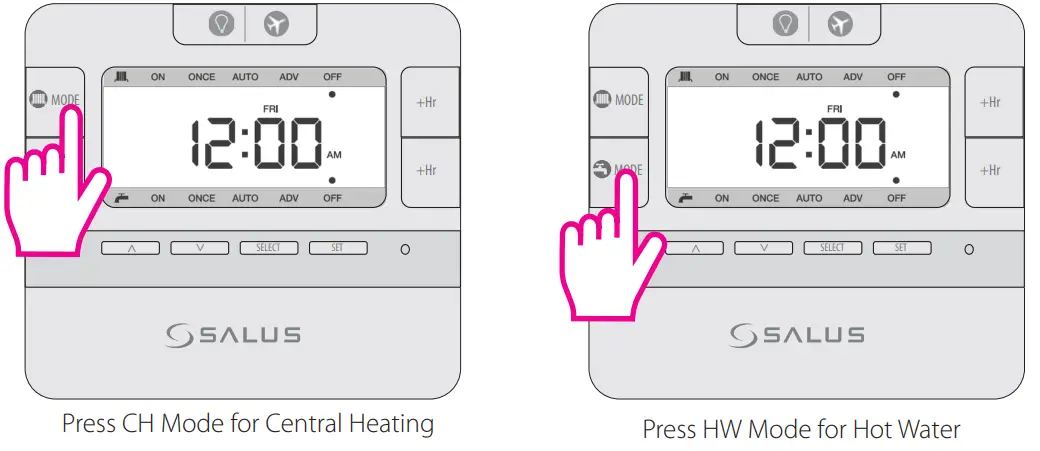
Please repeat the procedure for all the programmes and channels that are available for this model.
| Individual days programme | ||
| EP110 (1 Channel) | EP210 (2 Channels) | EP310 (3 Channels) |
| 1 Day 3 sets of time/channel Total: 21 settings/week | 1 Day 3 sets of time/channel Total: 42 settings/week | 1 Day 3 sets of time/channel Total: 63 settings/week |
Note: Don’t forget to move the jumpers to 24h in order to have the individual programme active. After that please follow the same instructions as for the 5-2 days programme.
he circle will be rotating for EP110 and for EP210/EP310 will remain ![]() steady when the relay output is ON. For EP210 and EP310 the and
steady when the relay output is ON. For EP210 and EP310 the and ![]() /
/ ![]() or icon will be visible on the screen.
or icon will be visible on the screen.
Change the channels for EP210/ EP310
For changing the channel of your device (CH and/or HW) press the Mode button with the desired channel. The procedure is the same for EP210/EP310.
Other Functions
- +Hr Program Override (Boost)
This function is available in ONCE/AUTO/ADV/OFF. After pressing the button, the function will be immediately applied. You can override the program for maximum 9 hours. For cancelling the Boost function, press the button repeatedly until the +8 hours disappears.
 - BL/Holiday function
Press the button once and the backlight will be turned on.
Press and hold the button for 3 seconds to activate the Holiday Mode.
Press or to select the number of days for the Holiday Mode and to confirm your choice.
Press and hold the button for 3 seconds to cancel the Holiday Mode. - Factory Reset
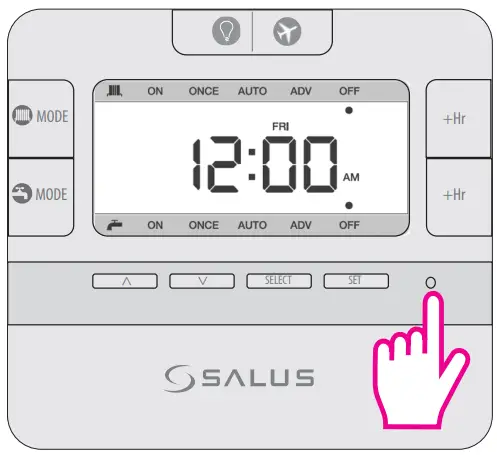
If you want to return to the factory settings please press the Reset button once (use a pin for this action)
Customer Support
E: [email protected]
T: +44 (0) 1226 323961