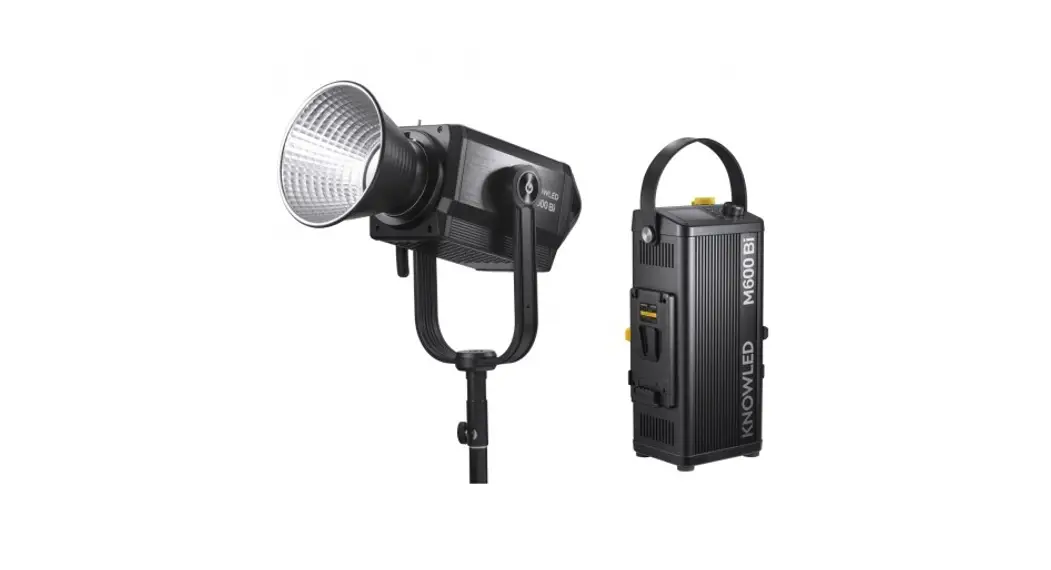
![]() M600BI Knowledge M600Bi Bi-Color LED Light
M600BI Knowledge M600Bi Bi-Color LED Light
Instruction Manual
Safety Instructions and Attentions
First of all, as the most basic principle: This product is a professional lighting set equipment and should be used by professional lighting engineers or under the guidance of professionals. Basic safety attention must always be followed during use, as follows:
- Before use, please read and understand these instructions and attention.
- Professional lighting is prohibited for children. When children are near, parents or accompanying persons must supervise closely to prevent children from a personal injury due to collision with lamps or private use of lamps.
- This lighting product is not an ordinary lighting product and cannot be used for general lighting. Anyone who has suffered eye damage or has sensitive eyes should avoid using this product.
- When the lamp is on, it must be used with care. Do not touch high-temperature parts, such as LED lamp beads, to avoid burns.
- When the lamp is on, it is forbidden to look directly at the lamp beads under any circumstances. Strong light should be used under the guidance of professional lighting engineers. Avoid prolonged exposure to strong light under any circumstances. If eye discomfort, please turn off the lamp in time, suspend use, and see a doctor immediately.
- If the lamp bead is damaged or deformed by heat, stop using this equipment, and contact the manufacturer, service agent, or qualified maintenance personnel to replace the lamp bead in time to avoid accidents.
- This product is only suitable for use in -20℃ to 40℃ operating environments and normal humidity environments.
- Do not use damaged equipment or accessories, and wait for professional maintenance personnel to check and repair them to confirm being normal before use.
- During use, if the casing of this product is broken due to being dropped, squeezed, or subjected to strong impact, please do not use it, so as to avoid electric shock injury due to contact with internal electronic components.
- If an extension cord is required, please use an extension cord with a current rating greater than or equal to that of the equipment. If an extension cord is rated less than the equipment, overheating may result.
- Some products have long power cords, please place the power cords properly and keep them in a safe place. Avoid contacting the power cord with overheating surfaces, and avoid improper placement that could cause pulling damage, or trip on-site personnel. Please use the certified power cord from the original manufacturer. If the product is damaged by using a non-certified power cord, it will not be repaired by our factory.
- Be sure to unplug equipment from the power outlet before cleaning and repairing. When not in use, do not pull the power cord to unplug the equipment. For normal power-off, please hold both ends of the plug of the equipment with your hands and pull the plug out of the power outlet. This equipment needs to be connected to a grounded outlet.
- This equipment is not waterproof, please keep it dry and do not immerse it in water or other liquids. The equipment should be installed in a dry and ventilated place, and avoid using it in rainy, humid, dusty, or overheated environments. Do not place any objects on the lamp or let the liquid flow into the lamp to avoid accidents.
- Do not disassemble the product without permission. If the product fails, it must be checked and repaired by authorized maintenance personnel.
- Before storing, make sure that the equipment has cooled down completely. For storage, unplug the power cord from the equipment. The equipment should be placed in the carrying case or in a ventilated dry place.
- Do not place equipment near flammable and volatile solvents such as alcohol and gasoline.
- Do not use accessories that are not recommended by our factory to avoid fire, electric shock, or personal injury.
- When cleaning, do not wipe it with a damp cloth, please use a dry cloth or a soft cloth to wipe the dirt off the equipment.
- Please take off the protective cover before using it.
- This product complies with ROHS, CE, and FCC certification, please refer to the relevant national standards for use and operation.
- The safety instructions are formulated according to the strict testing of the factory, and the design and specifications of the equipment are subject to change without prior notice. For the latest product information, please check the GODOX website and view the latest electronic instructions.
- Some products have built-in lithium batteries. Please use specified chargers, and use them within a proper range of the specified voltage and temperature according to the correct operating instructions.
- Some products are battery-powered. Do not use any batteries, power sources, or accessories not specified in the instructions for such products. Keep batteries and other accessories out of the reach of children and infants. In the instance that a child or infant swallows a battery or accessory, immediate emergency medical attention is required. If the battery leaks, becomes discolored or deformed, emits smoke, or emits an abnormal odor, remove it immediately. Be careful during removal to avoid burns.
Continued use could result in fire, electric shock, or burns. Do not use any deformed or modified batteries. Do not disassemble or modify this product or battery. Do not heat or solder the battery. Keep the battery away from fire or water. Do not incorrectly insert the positive and negative ends of batteries, or mix old and new batteries or batteries of different types together. - One-year warranty period, accessories such as consumable batteries, adapters, power cords, etc. are not covered by this warranty.
- If it is found that the equipment is repaired without authorization, the one-year warranty period will be canceled and relevant fees will be charged for maintenance.
- Machine failures caused by non-standard operation are not covered by the warranty.
keep these instructions!
Foreword
Thank you for purchasing!
Godox M600Bi is a LED Light product with superior performance. It has a separation design of light body and controller, high power, thousand-bit brightness adjustment, various dimming curves and 2800K-6500K CCT, quite suitable for large photo studios, broadcast studios, Outdoors or large-scale field scenes.
Main Features
- 600W input power to create bright light output.
- Brightness adjustment is accurate to 0.1%, controlling the brightness in subtle scenes.
- 4 dimming curves: linear, S-curve, exponential, and logarithmic.
- Wide CCT range from 2800K to 6500K.
- Bowens mount is perfectly compatible with more optical accessories.
- Various professional control methods: Bluetooth control/DMX512 remote control/2.4G wireless control.
- Super high color rendering index: CRI: ≥96, TLCI: ≥97
- 21simulated scenes light effects: flash, lightning, TV, broken bulb, candle, fire, firework, etc.
- Two power supply methods: AC power supply (100V~220V)and V-mount battery power supply (14.8V or 26V).
- The side with the yellow battery removal button supports the unilateral power supply.
- 2.4 inches TFT panel,4 buttons, 1 knob, clear UI interface.
![]() Warning
Warning
![]() Always keep this product dry. Do not use in rain or in damp conditions.
Always keep this product dry. Do not use in rain or in damp conditions.![]() Do not disassemble. Should repairs become necessary, this product must be sent to an authorized maintenance center.
Do not disassemble. Should repairs become necessary, this product must be sent to an authorized maintenance center.![]() Keep out of reach of children.
Keep out of reach of children.![]() As this product does not have a waterproof function, please take measures to waterproof in a rainy or damp environment.
As this product does not have a waterproof function, please take measures to waterproof in a rainy or damp environment.![]() Do not leave or store the product if the ambient temperature reads over 40°C.
Do not leave or store the product if the ambient temperature reads over 40°C.![]() Do not use the product in the presence of flammable gases, chemicals, and other similar materials.
Do not use the product in the presence of flammable gases, chemicals, and other similar materials.![]() CAUTION: Hot parts! When the product is always on and flickering, please do not touch the high-temperature part of the LED head.
CAUTION: Hot parts! When the product is always on and flickering, please do not touch the high-temperature part of the LED head.![]() When replacing product accessories, please turn off the LED light and perform a cold cut.
When replacing product accessories, please turn off the LED light and perform a cold cut.![]() The light source contained in this luminaire shall only be replaced by the manufacturer or his service agent or a similarly qualified person
The light source contained in this luminaire shall only be replaced by the manufacturer or his service agent or a similarly qualified person![]() The lamp shall be changed if it has become damaged or thermally deformed.
The lamp shall be changed if it has become damaged or thermally deformed.![]() The luminaire is intended for professional use only.
The luminaire is intended for professional use only.
Name of Body
Light Body
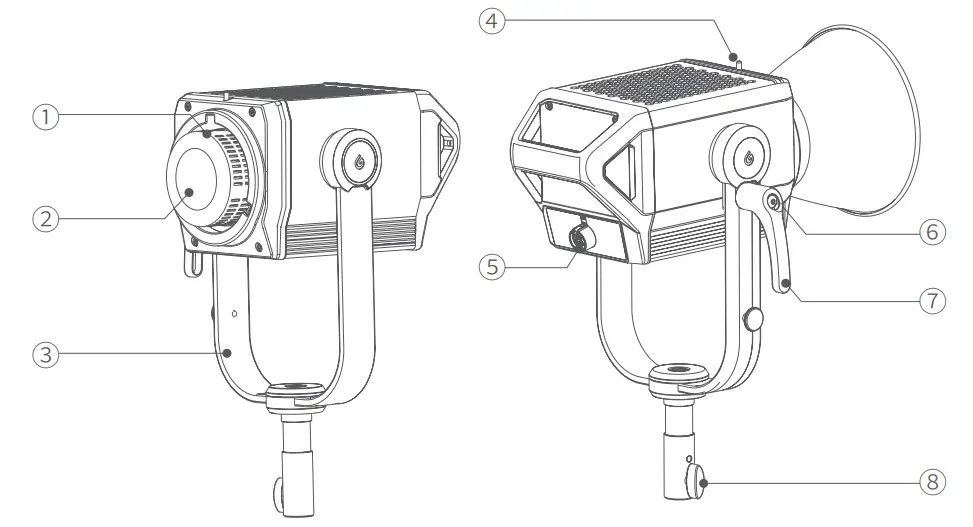
| 1. Bowens Mount | 5. DC INPUT Port |
| 2. LED Bead | 6. Handle Direction Adjustment Button |
| 3. Metal U-bracket | 7. Locking handle |
| 4. Mount Fixing Pusher | 8. Sleeve Knob |
Controller
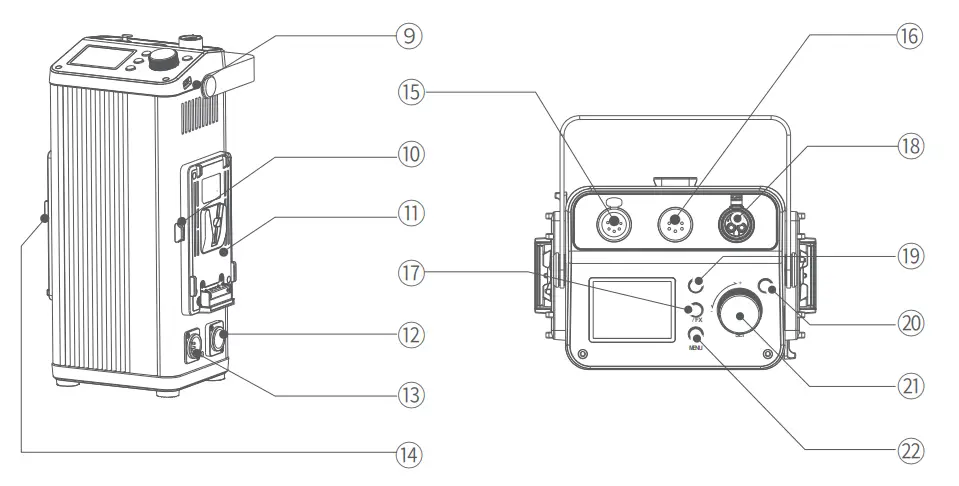
| 9. Type-A USB Port | 16. DMX IN XLR Port |
| 10. Black Battery Removal Button | 17. |
| 11. V-mount Battery Box | 18. DC OUTPUT Port |
| 12. AC INPUT Port | 19. Fan Switch Button |
| 13.48V DC Port | 20. Power Switch Button |
| 14. Yellow Battery Removal Button | 21. SET Adjustment Knob |
| 15. DMX OUT XLR Port | 22. Menu Button |
Remote Control (Separately Sold Accessory)
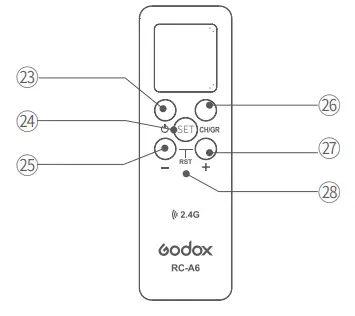
| 23. Power Switch Button | 26.CH/GR Button |
| 24. SET Setting Button | 27. Increase Button |
| 25. Reduction Button | 28. RST- Reset Mark (Press Reduction Button and Increase Button simultaneously to reset) |
What’s in the Box
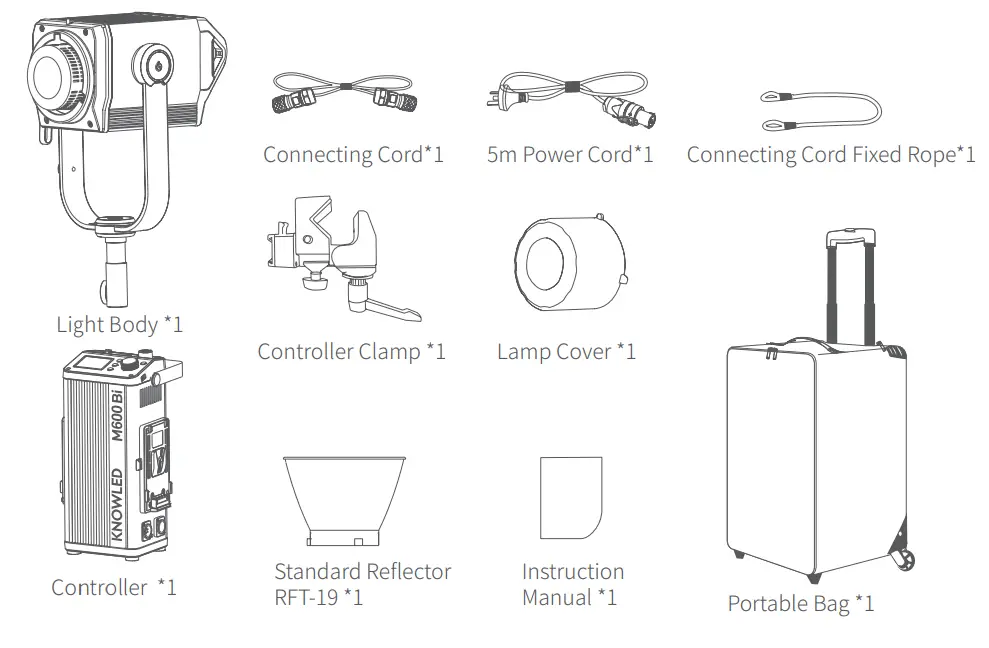
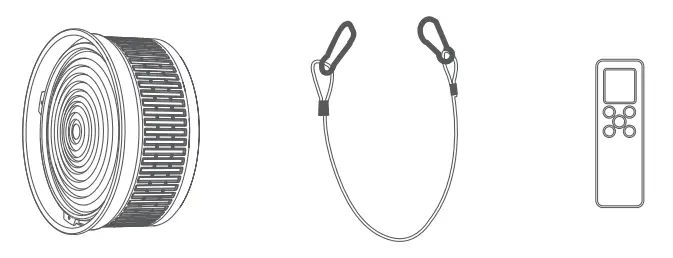
Separately Sold Accessories
Better shooting effects and using experience matched with following accessories:
Fresnel Attachment for COB LED lights FLS10, Safety Wire Rope, and RC-A6 Remote Control.
Installation and Disassembly Guide
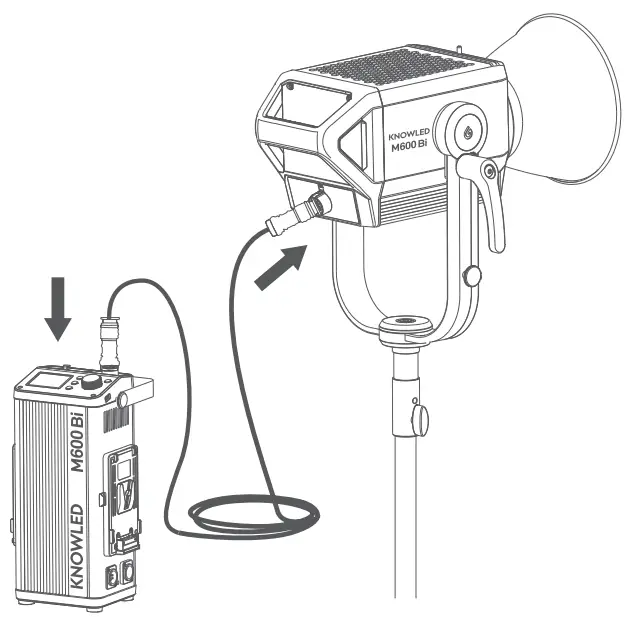
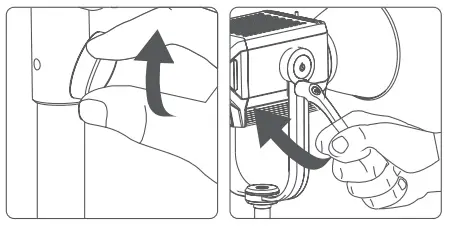
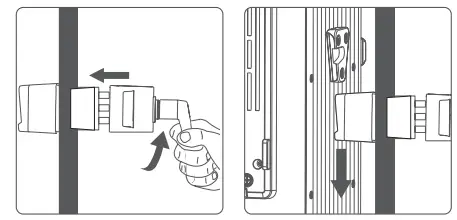
- Connect the controller and the light body
Press and hold the spring latch button of the connecting cord, and insert the connecting cord into the DC INPUT Port of the light body. Then continue to press and hold the button to insert the other end of the connecting cord into the DC OUTPUT Port of the controller to complete the connection.
- Mounted on the tripod
Adjust the light body to a proper angle, rotate the screw of the sleeve knob to install the light body on the tripod, then rotate the screw of the sleeve knob to fix the light body on the tripod. The inclination angle of the light body could be adjusted by loosening the bracket angle adjustment handle and then screwing down the handle afterward.
Note: The tripod belongs to separately sold accessories.
Tips: Press the handle direction adjustment button to adjust the handle by 360°.
- Mounted on the light stand
Loosen the handle of the controller clamp, then insert the light stand and rotate the handle to tighten. Finally, insert the V port of the controller into the clamp slot.
Tip: Press and hold the mount fixing pusher can easily remove the controller.
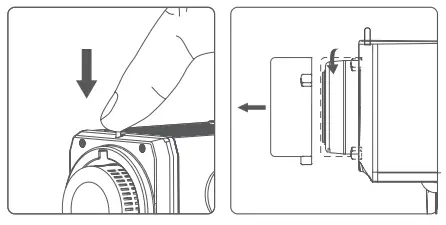
- Installation and disassembly the lamp cover
Installation: Press the Mount Fixing pusher top-down, put the lamp cover on Bowens Mount, and rotate clockwise to tighten it.
Disassembly: Press the Mount Fixing pusher top-down, then rotate counterclockwise to remove it.
Note: Make sure to remove the lamp cover before use to avoid overheating damage. Put on the lamp cover to protect the lamp when not in use.
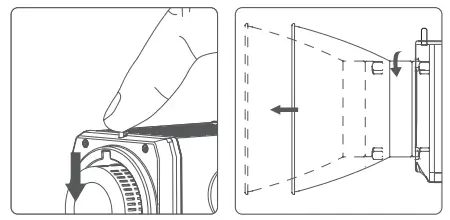
- Installation and disassembly of the standard reflector
Installation: Press the Mount Fixing pusher top-down, put the standard reflector on Bowens Mount, and rotate clockwise to tighten it.
Disassembly: Press the Mount Fixing pusher top-down, then rotate counterclockwise to remove it.
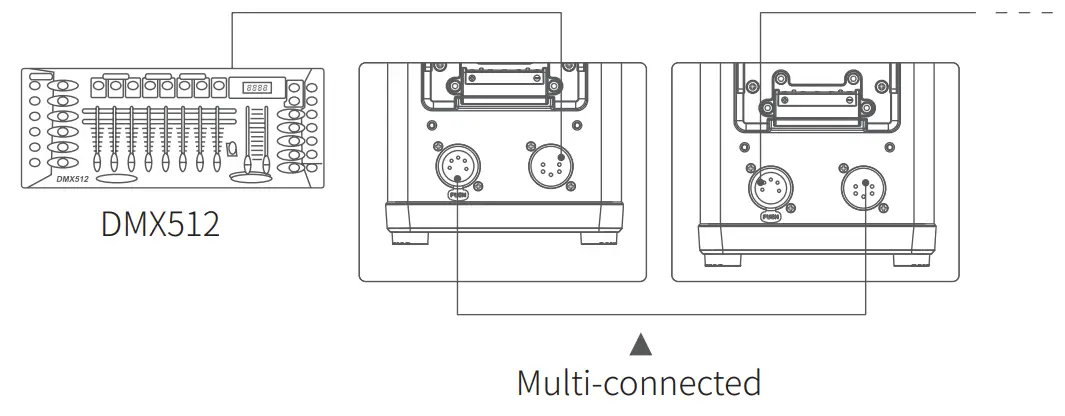
Connected to DMX Controller
The Connection operation diagram of the Controller and DMX Controller is as follows:
Power Supply
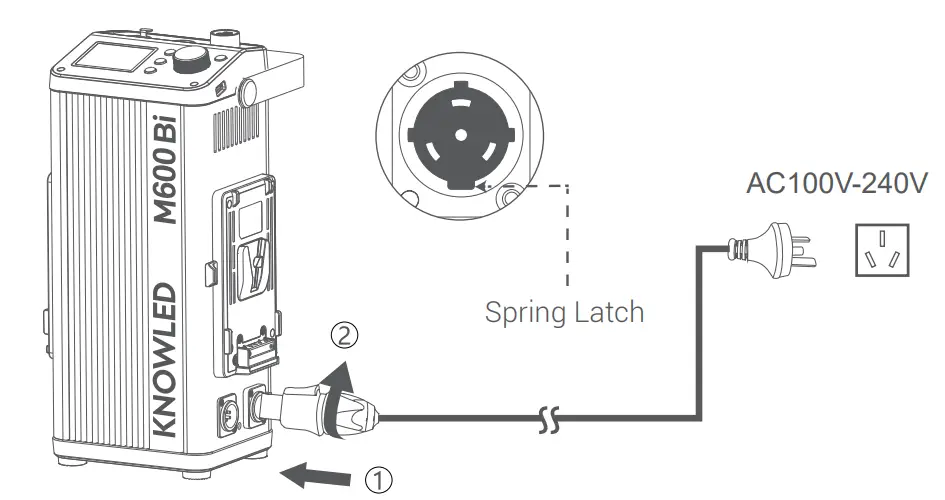
- AC Power Supply
 Note: Please press the latch button when installing or disassembling the power cord and connecting cord.
 - V-mount battery power supply

 Note: Please press the latch button when installing or disassembling the power cord and connecting cord.
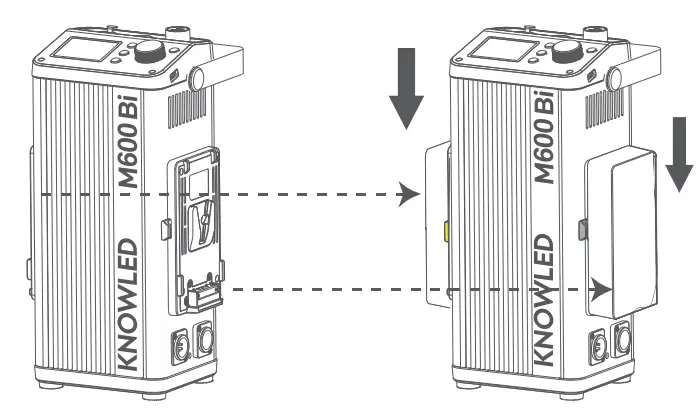
Note: The light can be supplied by a 14.8V or 26V V-mount battery. Only the side with the yellow battery removal button supports unilateral charging,. When it is powered by two batteries and one of which is low, the device still can’t work normally even if the other one is full. The corresponding battery icon will blink in low battery mode. It is recommended to check whether both batteries have sufficient power when using two batteries.
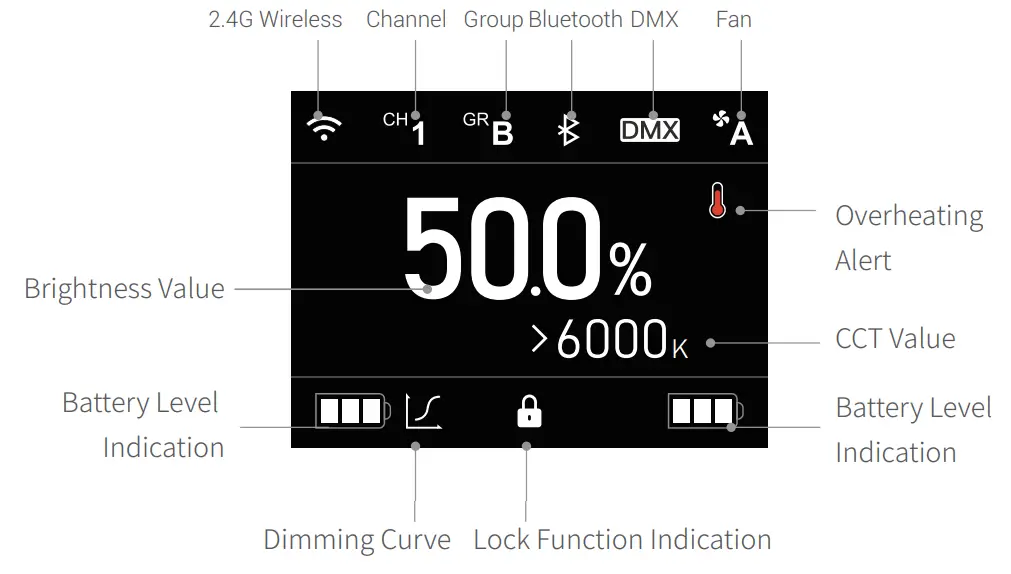
Display Screen
- Turn On/Off
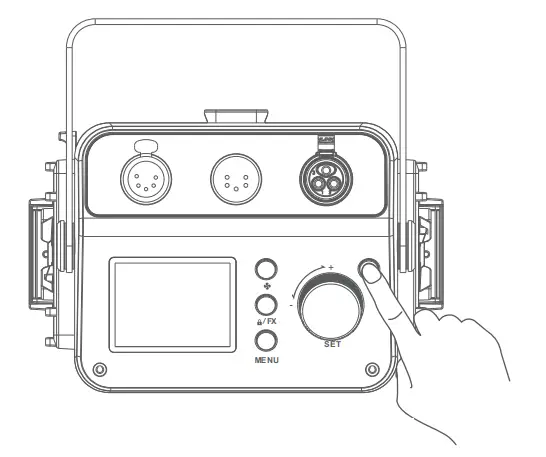
Press the controller < > Button for 1 second after connecting to the power supply to turn it on or off.
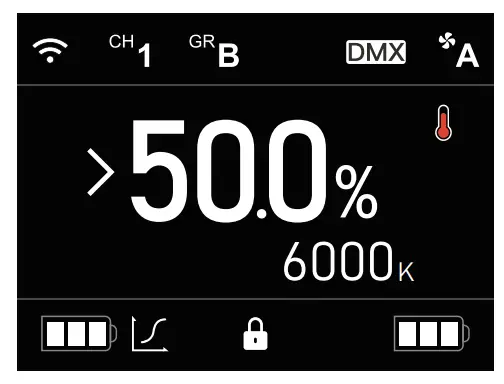
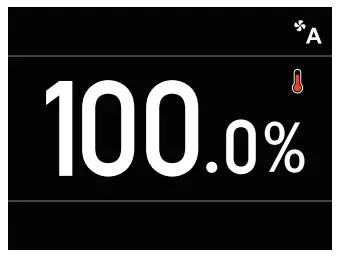
- Brightness Adjustment (thousand-bit adjustment)
Turn the SET adjustment knob on the main interface to adjust brightness from 0% to 100%, with an increment of 0.1% at each level. Rotate clockwise to increase brightness, and counterclockwise to decrease brightness. The brightness will increase or decrease by 0.1% per unit at a normal rotation speed, increase or decrease by 1% per unit at rapid rotation speed; and increase or decrease by 10% per unit if pressed and rotate.
- CCT Adjustment Short press the SET adjustment knob on the main interface to make the arrow aimed at the CCT value, then turn it to adjust CCT from 2800K to 6500K, with an increase or decrease of 100K in normal rotation speed and 500K in rapid rotation speed.
- Menu SettingShort press < MENU > Menu Button to enter the menu interface, displayed in order with Wireless, Bluetooth, DMX, Fan, Dimmer, Screen Bright, Language, Reset, Version & Update.
Turn and short-press the SET adjustment knob on the menu interface to select and enter the corresponding setting options interface.
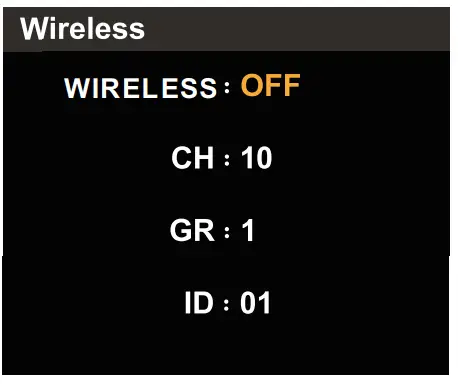
4.1 Wireless
The Wireless interface is displayed in order with Wireless, CH, GR, and ID.
Short press & turn the SET adjustment knob to complete the settings of Wireless Switch, Channel, Group, and ID. 4.2 Bluetooth
The Bluetooth Setting interface is displayed in order with Bluetooth, Reset, and MAC.
Short press & turn the SET adjustment knob to complete the settings of Bluetooth Switch and Bluetooth Reset.
 4.2 Bluetooth
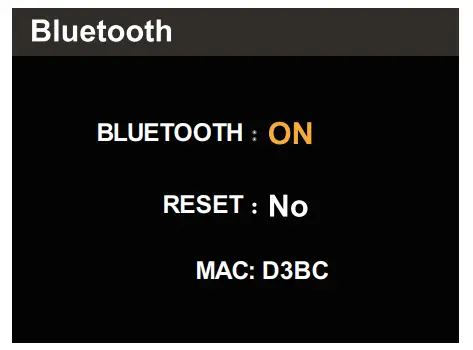
For more smartphone APP operations, please open the “help” in the “GodoxLight” APP to gain detailed guidance.
 http://www.guteleben.com/html/dl_app/c_ble/GodoxLight/index.html
Note: the APP can be used directly on the firstly installed device (smartphone or tablet). When changing to another mobile device, the light shall be reset before the normal usage of the APP.
4.3 DMX
The DMX Setting interface is displayed with Mode and Address. Short press the SET adjustment knob to choose between mode and address, then turn it to set mode and address.
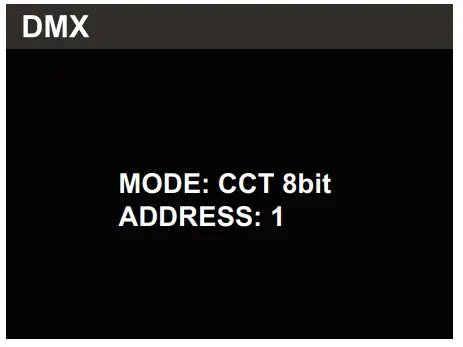
DMX Mode
| Mode | Channel | Function | DMX Value | Parameter |
| CCT 8bit | 1 | Brightness | 0 — 255 | 0% — 100.0% |
| 2 | Color temperature | 0 — 255 | 2800K — 6500K | |
| FX 8b : | 1 | Brightness | 0 — 255 | 0% — 100% |
| Light effect type | 0 — 36 | Flash | ||
| 37 — 73 | Lightning | |||
| 74 —109 | Broken Bulb | |||
| 110 —146 | TV | |||
| 147 —183 | Candle | |||
| 184 — 219 | Fire | |||
| 220 — 255 | Fireworks | |||
| 3 | Light effect level | 0-85 | i | |
| 86-171 | II | |||
| 172-255 | III | |||
| CCT 16bit | 1 | Brightness | 0 — 65535 | 0% — 100.0% |
| 2 | ||||
| 3 | Color temperature | 0 — 65535 | 2800K — 6500K | |
| 4 | ||||
| 1 | Brightness | 0 — 65535 | 0% — 100.0% | |
| 2 | ||||
| 3 | Light effect type | 0 — 36 | Flash | |
| 37 — 73 | Lightning | |||
| 74 —109 | Broken Bulb | |||
| 110 —146 | TV | |||
| 147 —183 | Candle | |||
| 184 — 219 | Fire | |||
| 220 — 255 | Fireworks | |||
| 4 | Light effect level | 0-85 | I | |
| 86-171 | II | |||
| 172-255 | III | |||
| ULTIMATE Bit | 1 | Brightness | 0 — 255 | 0% — 100.0% |
| 2 | Mode selection | 0 — 51 | CCT | |
| 52-255 | FX | |||
| 3 | Mode Parameter (refer to the table below) | |||
| 4 | ||||
| ULTIMATE 8bit Mode Parameter | Channel | Function | DMX Value | Parameter |
| CCT Mode Parameter | 3 | CCT | 0 – 255 | 2800K – 6500K |
| FX Mode Parameter | CO | Light effect type | 0 – 36 | Flash |
| 37 – 73 | Lightning | |||
| 74 -109 | Broken Bulb | |||
| 110 – 146 | TV | |||
| 147 – 183 | Candle | |||
| 184 – 219 | Fire | |||
| 220 – 255 | Fireworks | |||
| 4 | Light effect level | 0-85 | I | |
| 86-171 | II | |||
| 172-255 | III |
Mode | Channel | Function | DMX Value | Parameter |
| ULTIMATE 16bit | 1 | Brightness | 0-65535 | 0% – 100.0% |
| 2 | ||||
| 3 | Mode selection | 0 – 51 | CCT | |
| 52-255 | FX | |||
| 4 | Mode Parameter (refer to the table below) | |||
| 5 | ||||
| ULTIMATE 16bit Mode Parameter | Channel | Function | DMX Value | Parameter |
| CCT Mode Parameter | 4 | CCT | 0 – 65535 | 2800K – 6500K |
| FX Mode Parameter | 4 | Light effect type | 0 – 36 | Flash |
| 37 – 73 | Lightning | |||
| 74 – 109 | Broken Bulb | |||
| 110 – 146 | N | |||
| 147 – 183 | Candle | |||
| 184 – 219 | Fire | |||
| 220 – 255 | Fireworks | |||
| 5 | Light effect level | 0-85 | I | |
| 86-171 | II | |||
| 172-255 | III |
Calculation formula:
Brightness

CCT

4.4 Fan
Turn the SET adjustment knob on the Fan Setting interface to choose Cooling Mode, Off Mode, Low-Speed Cooling Mode, and High-Speed Cooling Mode.
Note: Enter mute mode when turning off the fan.

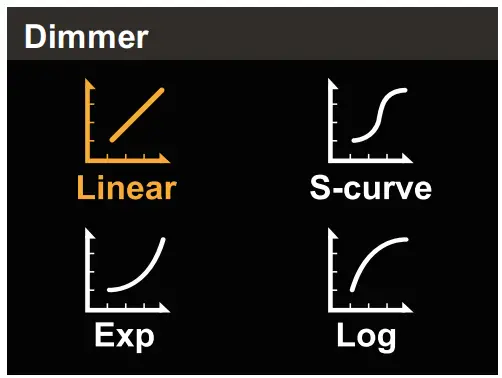
4.5 Dimmer
Turn the SET adjustment knob on the Dimming Curve Setting interface to choose linear/S-curve/exponential/logarithmic dimming curve.
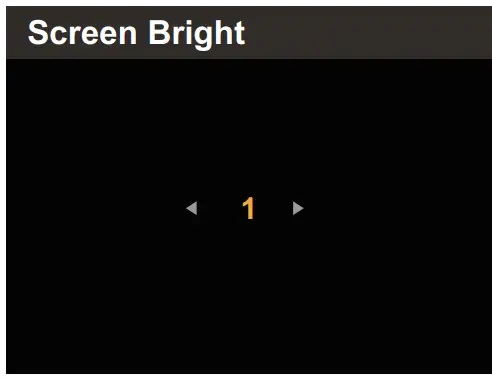
4.6 Screen Bright
Turn the SET adjustment knob on the Screen Bright setting interface to choose 1, 2, or 3 levels of screen brightness.
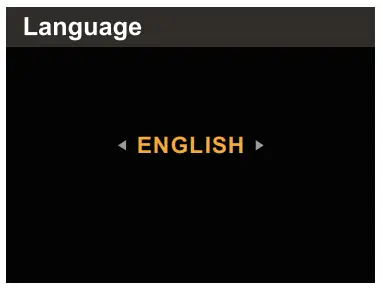
4.7 Language
Turn the SET adjustment knob on the Language Setting interface to choose English or Simplified Chinese.
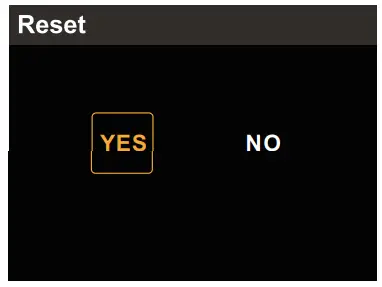
4.8 Reset
Turn the SET adjustment knob on the Restore Factory Setting interface to choose “Yes” or “No” and short press to confirm. If you choose “Yes”, the system will initiate the resetting program and the resetting progress bar is displayed on the screen, after which it will return to the main interface.
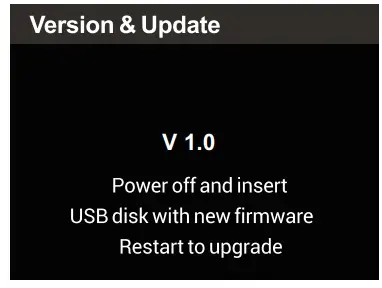
4.9 Version & Update
The Version Code displayed on the Version & Update interface is the firmware version of the product.
5. Light Effect Setting
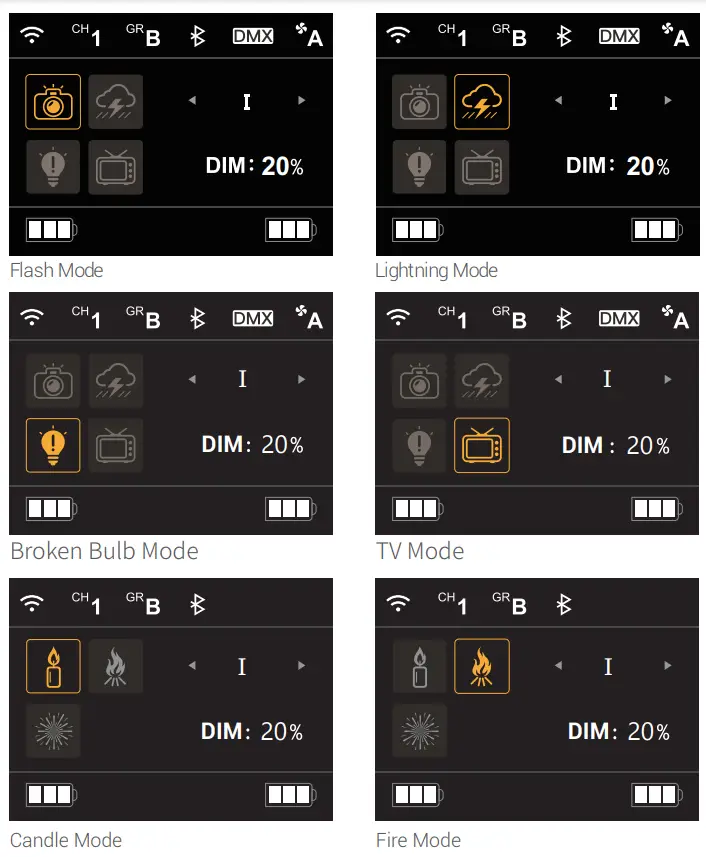
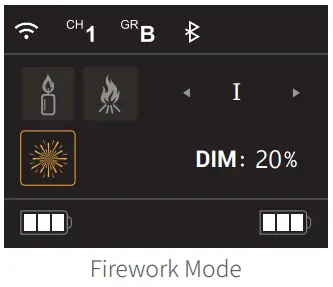
Short press the < ![]() /FX> button to enter the FX Light Effect interface, and turn the SET adjustment knob to choose among 21 effects: flash, lightning, broken bulb, TV, candle, fire, and firework.
/FX> button to enter the FX Light Effect interface, and turn the SET adjustment knob to choose among 21 effects: flash, lightning, broken bulb, TV, candle, fire, and firework.
Note: Short press the SET adjustment knob to change the rate and adjust brightness after choosing one of the above Light Effects.
 Tip: Long press <
 ![]() /FX> button for 3 seconds to lock or unlock.
/FX> button for 3 seconds to lock or unlock.
Status Description
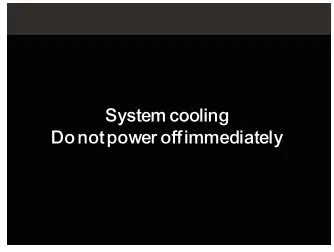
Long Term Use
- Do not cut off the power immediately when the product is turned off after a long period of operation. The controller will automatically enter a cooling state, and “System cooling, do not power off immediately ” is displayed on the panel. You can cut off the power after the system cooling is done and the screen turns black.
 Connecting Cord Issue2.
 - When the connecting cord is not correctly connected to the light or controller, a separate icon of connecting the cord and device is displayed on the panel. Please check the connecting ports of the controller and light.
 Switch from AC Power Supply to V-Mount Battery Power Supply
 - Unplug the power cord and install the V-mount battery then turn on the product.
 Connecting Cord Issue2.
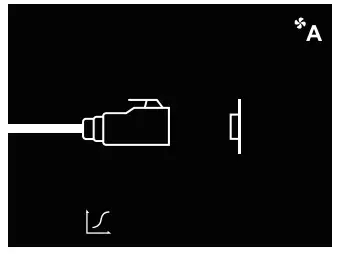 Switch from AC Power Supply to V-Mount Battery Power Supply
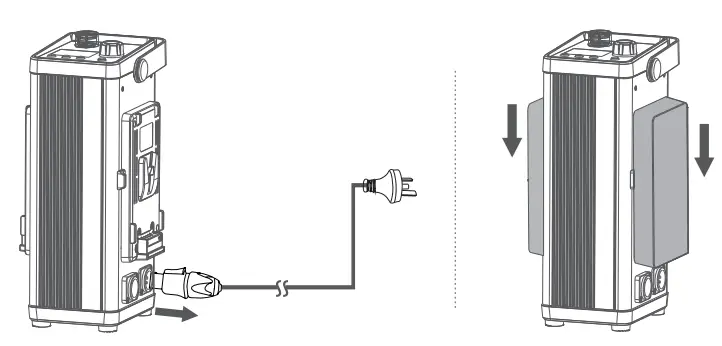
Note: If you install the V-mount battery before unplugging the power cord, and the brightness value is set higher than the maximum brightness that the battery can be turned on, then you switch to the V-mount battery power supply by unplugging the power cord, the light, and the controller will automatically power off. The machine can only resume normal operation after reboot.
Maximum Brightness in the Different States
CCT mode: Maximum Brightness (%) in Auto Cooling Mode or High-Speed Cooling Mode when supplied by a V-mount battery
| V-mount battery | linear | S-curve | exponential | logarithmic |
| 14.8V(single) | 20% | 30% | 50% | 4% |
| 14.8V(double) | 40% | 43% | 72% | 8% |
| 26V(single) | 30% | 38% | 63% | 5% |
| 14.8V+26V | 50% | 48% | 78% | 10% |
| 26V(double) | 60% | 50% | 84% | 15% |
CCT mode: Maximum Brightness (%) in Fan Off Mode when supplied by V-mount battery
| V-mount battery | linear | S-curve | exponential | logarithmic |
| 14.8V(single) | 20% | 30% | 50% | 4% |
| 14.8V(double) | 25% | 35% | 55% | 4% |
| 26V(single) | 25% | 35% | 55% | 4% |
| 14.8V+26V | 25% | 35% | 55% | 4% |
| 26V(double) | 25% | 35% | 55% | 4% |
CCT mode: Maximum Brightness (%) in Low-Speed Cooling Mode when supplied by V-mount battery
| V-mount battery | linear | S-curve | exponential | logarithmic |
| 14.8V(single) | 20% | 30% | 50% | 4% |
| 14.8V(double) | 40% | 43% | 72% | 8% |
| 26V(single) | 30% | 38% | 63% | 5% |
| 14.8V+26V | 50% | 48% | 78% | 10% |
| 26V(double) | 50% | 48% | 78% | 10% |
CCT mode: Maximum Brightness (%) in different Fan Mode when supplied by AC power
| Fan Mode | linear | S-curve | exponential | logarithmic |
| Auto Cooling | 100% | 100% | 100% | 100% |
| Off | 25% | 35% | 55% | 4% |
| Low-Speed Cooling | 50% | 48% | 78% | 10% |
| High-Speed Cooling | 100% | 100% | 100% | 100% |
FX mode: Maximum Brightness (%) in different Fan Mode when supplied by AC power
| Auto Cooling | 100% |
| Off | 25% |
| Low-Speed Cooling | 50% |
| High-Speed Cooling | 100% |
FX mode: Maximum Brightness (%) in different Fan Mode when supplied by V-mount battery
| V-mount battery | Auto Cooling | Off | Low-Speed Cooling | High-Speed Cooling |
| 14.8V(single) | 20% | 20% | 20% | 20% |
| 14.8V(double) | 40% | 25% | 40% | 40% |
| 26V(single) | 30% | 25% | 30% | 30% |
| 14.8V+26V | 50% | 25% | 50% | 50% |
| 26V(double) | 60% | 25% | 50% | 60% |
Note: The dimming curve is not adjustable in FX mode, it is linear in default.
The above data is based on a 26V 270Wh 10.5Ah battery and a 14.8V 150Wh 10.2Ah battery.
Software Upgrade
- Download the new firmware to the U disk from the official website (http://www.godox.com.cn/Downloads.html).
- Turn off the LED light. Insert the U disk with new firmware into the USB upgrade port.
- Turn on the LED Light, and it will automatically enter the upgrading interface..
- It will return to the main interface after completion.
Notes:
- New firmware must be downloaded from the official website, and keep only one BIN file in the root directory of the USB disk.
- The USB port can only support the firmware upgrade function.
Over-Temperature Protection
If the temperature of the light body is too high, the Over-Temperature Protection icon flashes on the main interface, and the light body can be used normally.
If the temperature of the light body exceeds the limit of Over-Temperature Protection, the Over-Temperature Protection icon flashes on the main interface, and the screen works properly after the light goes out in 3 seconds. When the temperature decreases to 50 ° C, the Over-Tem- perature Protection icon disappears, then the light body can resume working.
Fan Troubleshooting
If ![]() the icon appeared and blinked and the fan off icon also appeared on the display, It might be the fan failure. Please contact customer service.
the icon appeared and blinked and the fan off icon also appeared on the display, It might be the fan failure. Please contact customer service.
Maintenance
This product, except for consumables e.g. adapter and power cable, is supported with a one-year warranty.
Maintenance of the light must be performed by our authorized maintenance department which can provide original accessories.
Unauthorized service will void the warranty. If the product breaks down or gets wet, please do not use it until repaired by professionals. If there is anything abnormal during LED light’s working, please turn it off immediately and identify the reasons.
Illuminance Testing Data
| M600Bi | |||||
| CCT | Testing Condition | Illuminance Unit | lm | 3m | 5m |
| 2800K | Bare Light | lux | 16100 | 2010 | 804 |
| fc | 1500 | 187 | 75. | ||
| With Reflector | lux | 135000 | 12100 | 4200 | |
| fc | 12600 | 1120 | 390 | ||
| 3200K | Bare Light | lux | 19500 | 2400 | 953 |
| fc | 1810 | 223 | 89. | ||
| With Reflector | lux | 164000 | 14300 | 5050 | |
| fc | 15200 | 1330 | 469 | ||
| 4300K | Bare Light | lux | 22400 | 2750 | 1090 |
| fc | 2080 | 255 | 101 | ||
| With Reflector | lux | 186000 | 16500 | 5790 | |
| fc | 17300 | 1530 | 538 | ||
| 5600K | Bare Light | lux | 23900 | 2930 | 1160 |
| fc | 2220 | 272 | 108 | ||
| With Reflector | lux | 198000 | 17500 | 6170 | |
| fc | 18400 | 1620 | 573 | ||
| 6500K | Bare Light | lux | 23600 | 2870 | 1140 |
| fc | 2190 | 267 | 106 | ||
| With Reflector | lux | 192000 | 17100 | 6060 | |
| fc | 17900 | 1590 | 563 | ||
| Collocated with Fresnel lens FLS10 | |||||
| CCT | Testing Condition | Illuminance Unit | 1.5m | 3m | 5m |
| 2800K | Focusing | lux | 107000 | 27100 | 9360 |
| fc | 9910 | 2520 | 870 | ||
| Diffusing | lux | 36000 | 9540 | 3440 | |
| fc | 3340 | 886 | 319 | ||
| 3200K | Focusing | lux | 129000 | 32700 | 11300 |
| fc | 12000 | 3040 | 1050 | ||
| Diffusing | lux | 43500 | 11500 | 4160 | |
| fc | 4040 | 1070 | 386 | ||
| 4300K | Focusing | lux | 149000 | 37700 | 13100 |
| fc | 13800 | 3500 | 1210 | ||
| Diffusing | lux | 50400 | 13300 | 4810 | |
| fc | 4690 | 1240 | 447 | ||
| 5600K | Focusing | lux | 159000 | 40100 | 14000 |
| fc | 14700 | 3730 | 1300 | ||
| Diffusing | lux | 53500 | 14200 | 5130 | |
| fc | 4970 | 1320 | 476 | ||
| 6500K | Focusing | lux | 155000 | 39400 | 13700 |
| fc | 14400 | 3660 | 1270 | ||
| Diffusing | lux | 52500 | 13900 | 5020 | |
| fc | 4880 | 1290 | 466 | ||
All the above tests are based on the condition of 100% brightness.
Technical Data
| Mode | M600Bi |
| Power | 730W (Max) |
| Controller Power Input | AC 100-240V 50/60Hz 7.5 (Max.) |
| Light Head Input | 48V 13A |
| V-mount battery (optional) Specifications | 14.8V, 150Wh / 26V, 260Wh |
| Channel | 32(1-32) |
| Group | 16(09, A—F) |
| ID | 1-99, OFF |
| Color-Temperature | 2800K-6500K |
| CRI | a96 |
| TLCI | z97 |
| Working Environment Temperature | -20°C-40°C |
| FX Light Effect | 21 kinds within 7 types |
| Controlling Method | Support DMX512, 2.4G Wireless Control, Bluetooth APP |
| Dimming Curve | 4 types: linear/S-curve/exponential/logarithmic |
| Mute Mode | YES |
| 2.4G Wireless Control Distance | z-60m |
| Bluetooth Transmission Distance | .,–30m |
| Display Screen | 2.4 inches |
| Light Body Dimension | 481.3*242.8*152.9mm |
| Controller Dimension | 332.4*121.6*179.2mm |
| Light Body Weight | 4.96kg |
| Controller Weight | 3.74kg |
| 2.4GHz Transmission Frequency | 2412MHz-2464.5MHz |
| Bluetooth Transmission Frequency | 2402.00-2480.00MHz |
| Maximum Transmit Power | 5dbm |
Maintenance
This product, except consumables e.g. cable, is supported with a one-year warranty.
Avoid sudden impacts and the product should be deducted regularly.
Maintenance of the flash must be performed by our authorized maintenance department which can provide original accessories.
Unauthorized service will void the warranty.
If the product had failures or was wetted, do not use it until it is repaired by professionals.
Changes made to the specifications or designs may not be reflected in this manual.
FCC Statement
This device complies with part 15 of the FCC Rules. Operation is subject to the following two conditions: (1) This device may not cause harmful interference, and (2) this device must accept any interference received, including interference that may cause undesired operation.
Any changes or modifications not expressly approved by the party responsible for compliance could void the user’s authority to operate the equipment.
Note: This equipment has been tested and found to comply with the limits for a Class B digital device, pursuant to part 15 of the FCC Rules. These limits are designed to provide reasonable protection against harmful interference in a residential installation.
This equipment generates uses and can radiate radio frequency energy and, if not installed and used in accordance with the instructions, may cause harmful interference to radio communications. However, there is no guarantee that interference will not occur in a particular installation. If this equipment does cause harmful interference to radio or television reception, which can be determined by turning the equipment off and on, the user is encouraged to try to correct the interference by one or more of the following measures:
- Reorient or relocate the receiving antenna.
- Increase the separation between the equipment and receiver.
- Connect the equipment to an outlet on a circuit different from that to which the receiver is connected.
- Consult the dealer or an experienced radio/TV technician for help.
The device has been evaluated to meet the general RF exposure requirements.
The device can be used in portable exposure conditions without restriction.
Declaration of Conformity:
GODOX Photo Equipment Co, Ltd. hereby declares that This equipment is in compliance with the essential requirements and other relevant provisions of EU Directive 2014/53/EU. They are allowed to be used in all EU member states.
For more information on DoC, Please click this web link:
https://www.godox.com/DOC/Godox_M600Bi_DOC.pdf
Warranty
Dear customers, as this warranty card is an important certificate to apply for our maintenance service, please fill in the following form in coordination with the seller and safe- keep it. Thank you!
| Product Information | Model | Product Code Number |
| Customer Information | Name | Contact Number |
| Address | ||
| Seller Information | Name | |
| Contact Number | ||
| Address | ||
| Date of Sale | ||
Note: This form shall be sealed by the seller.
Applicable Products
The document applies to the products listed on the Product Maintenance information (see below for further information). Other products or accessories (e.g. promotional items, giveaways, and additional accessories attached, etc.) are not included in this warranty scope.
Warranty Period
The warranty period of products and accessories is implemented according to the relevant Product Maintenance information. The warranty period is calculated from the day(purchase date) when the product is bought for the first time, And the purchase date is considered as the date registered on the warranty card when buying the product.
How to Get the Maintenance Service
If maintenance service is needed, you can directly contact the product distributor or authorized service institutions. You can also contact the Godox after-sale service call and we will offer you service. When applying for maintenance service, you should provide a valid warranty card. If you cannot provide a valid warranty card, we may offer you maintenance service once confirmed that the product or accessory is involved in the maintenance scope, but that shall not be considered our obligation.
Inapplicable Cases
The guarantee and service offered by this document are not applicable in the following cases: ①. The product or accessory has expired its warranty period; ②. Breakage or damage caused by inappropriate usage, maintenance, or preservation, such as improper packing, improper usage, improper plugging in/out external equipment, falling off or squeezing by an external force, contacting or exposure to the improper temperature, solvent, acid, base, flooding, and damp environments, etc; ③. Breakage or damage caused by the non-authorized institution or staff in the process of installation, maintenance, alteration, addition, and detachment; ④. The original identifying information of the product or accessory is modified, alternated, or removed; ⑤. No valid warranty card; ⑥. Breakage or damage caused by using illegally authorized, nonstandard, or non-public released software; ⑦. Breakage or damage caused by force majeure or accident; ⑧. Breakage or damage that could not be attributed to the product itself. Once met these situations above, you should seek solutions from the related responsible parties and Godox assumes no responsibility. The damage caused by parts, accessories, and software that are beyond the warranty period or scope is not included in our maintenance scope. The normal discoloration, abrasion, and consumption is not breakage within the maintenance scope.
Maintenance and Service Support Information
The warranty period and service types of products are implemented according to the following Product Maintenance Information:
| Product Type | Name | Maintenance Period(month) | Warranty Service Type |
| Parts | Circuit Board | 12 | The customer sends the product to designated site |
| Battery | 3 | The customer sends the product to designated site | |
| Electrical parts e.g.battery charger, power cord, sync cable, etc. | 12 | The customer sends the product to designated site | |
| Other Items | Flash tube, modeling lamp, lamp body, lamp cover, locking device, package, etc. | NO | Without warranty |
Godox After-sale Service Call 0755-29609320-8062
 http://weixin.qq.com/r/vEPI0F7ERgM5rRqz9xau
GODOX Photo Equipment Co., Ltd.
Add.: Building 2, Yaochuan Industrial Zone, Tangwei Community, Fuhai Street, Bao’ a District, Shenzhen 518103, China Tel: +86-755-29609320(8062) Fax: +86-755-25723423 E-mail: [email protected]
www.godox.com
Made in China 705-M600BY-00
![]()


