![]()
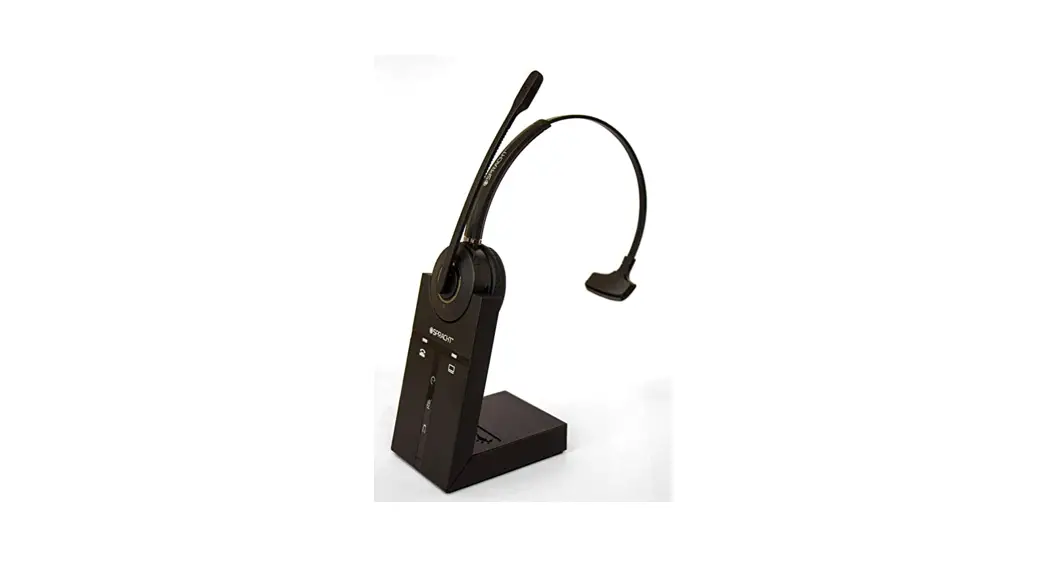
ZūM Maestro Combo
USB/DECT™
Wireless Headset with up to 350′ of Range
USER GUIDE
Thanks for purchasing the Zūm Maestro Combo USB/ DECT™ Headset. This comfortable headset allows you to take and make phone calls wirelessly with your Deskphone, but also to use it as a Softphone on your PC/ Mac via USB.
Headset Features:
- Volume and mute controls on the headset.
- Wideband audio for exceptional sound quality.
- Intuitive headset multi-function button for easy call handling.
- LED and audio indicators.
- Advanced hearing protection to cut out sudden loud volumes.
- Noise-canceling microphone.
Base Unit Features:
- Headset recharge docking cradle.
- Visual call status indicators.
- Visual wireless connection status indicators.
- Mute indicators.
- Battery indicators.
- Voice-prompted configuration.
- Volume adjustment.
- Port for an EHS cable. You can install a remote handset lifter if your phone doesn’t have EHS capability. Both are available separately on our website, www.spracht.com.
- Work with Deskphone & as Softphone (Skype for Business and other VoIP apps) with PC/Mac.
Package Contents
Headset
➊ Mic Mute
➋ Headset Volume Up
➌ Noise Canceling Microphone
➍ Headset Status LED
➎ Multiple Function Button
➏ Headset Volume Down

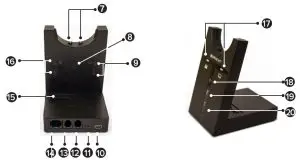
Base Back and Front
| 7. Charging Contacts | 14. AUX Port for EHS Cable |
| 8. Page Switch | 15. Dial Tone Switches |
| 9. Mic Volume UP/DOWN | 16. Headset Volume UP/DOWN |
| 10. Mini USB Port | 17. Deskphone / USB Mode LEDs |
| 11. Power Adapter Jack | 18. Audio Link Indicator |
| 12. Handset Port | 19. Mute Indicator |
| 13. Telephone Port | 20. Battery Status |
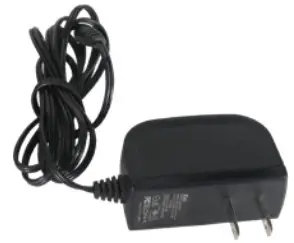 Power Adapter Power Adapter |  Mini-USB Cable Mini-USB Cable |  Telephone Cable Telephone Cable |
Setup
Connecting to a Deskphone
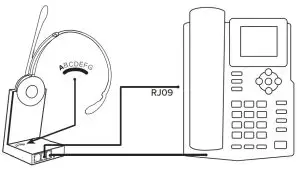
 Phone With a Headset Port
 Phone With a Headset Port
Check whether your Deskphone has a dedicated headset port (usually at the back of the phone). These phones typically have a button on the front panel for switching
between handset and headset.
- Plug the supplied telephone cable into the port marked
 on the base.
 - Connect the telephone cable to the headset port on the Deskphone.

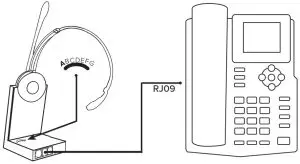
- Plug the supplied telephone cable into the port marked on the base.
- Connect the telephone cable into the handset port on the Deskphone.
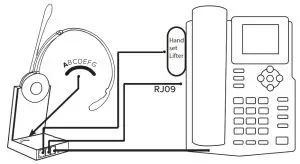
Deskphone With a Remote Handset Lifter
If you have a Handset Lifter which physically lifts the Deskphone handset to make or answer a call, check the mounting instructions in the documentation that came with the Handset Lifter.
- On the Deskphone, unplug the handset cable from the phone body.
- Connect the handset cable to the port marked
 on the base.
 - Plug the supplied telephone cable into the port marked on the base.
- Connect the telephone cable into the handset port on the Deskphone.
- Connect the Handset Lifter cable into the port marked AUX on the base.
Deskphone With an Electronic Hook Switch (EHS)
An EHS adapter enables an incoming call to be answered or ended by the headset Multi-Function button. EHS cables are sold separately for certain phones. Please check the Spracht website for more information.
- Connect the EHS adapter as shown in the documentation supplied with the EHS. On some phones the telephone cable will also need to be connected.
- Call your connected Deskphone using another phone to activate the EHS adapter. Wait 10 seconds before answering the phone.
Powering the Base
- Plug the power adapter into the DC jack marked + on the base.
- Connect the power adapter to a wall power outlet.
Connecting to a Computer
- Plug the Mini-USB end of the cable into the base and the USB into a port in your computer: PC or Mac.
- Open the VoIP application you want to use, ie. Skype for Business. Choose Zūm Maestro Combo USB/ DECT™ in settings. This should allow you to answer and end Softphone calls from the Multi-function button on your headset.
Docking the Headset/Charging/Pairing with Base
- Press the Multiple Function button on the Headset; after the LED lights up for 2 seconds, it will be powered on.
- Press the Multiple Function button again, or dock the headset and re-lift it, you will see that the Audio Link indicator LED is on, which confirms the connection between the headset and base is set up correctly.
- If docked correctly, the headset battery will begin charging, if needed (the LED will flash while charging). Charge for 20 minutes or until the battery indicator LED shows steady green.
- If you want to clear the pairing of the headset with the base, press the R+ button on the back of the base. The battery charging LED will flash 3 times.
- To re-pair the base with the headset, press the PAIR button for 5 seconds: the Paired light on the base will flash to indicate it’s searching for the headset. On your headset, press and hold the MUTE button until you see the headset’s Status LED flash. This will indicate the headset and base are paired. The LEDs on the headset and base will shut off at the same time.
Alternating Between Deskphone and Computer
When you connect the base to the power adapter, Zūm Maestro Combo USB/DECT™ will be in default mode, which is Deskphone. The LED in the front of the base will indicate Deskphone mode.
To switch to Softphone mode with your computer, connect the USB cable to the base and your computer. Press the PAGE button on the back of the base. The LED on the front of the base should indicate Computer mode.
Your computer should automatically recognize your headset and install whatever drivers might be needed. To switch back to Deskphone mode, press the PAGE button on the back of the base again; the LED on the front of the base should indicate Deskphone.
Configuring the Deskphone Audio
Due to the large variety of Deskphone brands/models, you will need to set a clear dial tone before using ZūM Maestro Combo USB/DECT™ for the first time. Setting a clear dial tone will enable the device to function correctly with your specific Deskphone. It is also important to customize the microphone and receiver volume for your optimal sound quality.
Adjust for clear dial tone
- Put the Headset on.
- Get a dial tone by pressing the headset button on the Deskphone, or by lifting the Deskphone’s handset.
- Using the Dial Tone switches at the back of the Base, compare the dial tones after rotating the switch from A through to G.
- Choose the best switch position. Choose the position with loud, clear and undistorted dial tone.
- When you have set the best tone, press the headset button on your Deskphone or replace the phone’s handset.
Adjust for Microphone and Receiver volume
- Put the Headset on.
- Get a dial tone by pressing the headset button on your Deskphone or by lifting the Deskphone handset.
- Make a test call. Call a co-worker or friend to test your microphone and receiver volumes. Ensure the person you called does not adjust the volume on their end. 6. Adjust the microphone volume using the Microphone Volume +/- buttons on the back of the Base (see item 9 on page ii), based on what the person on the other end says about the volume.
- Adjust the Receiver volume using the Receiver Volume +/- buttons on the back of the Base (see item 16 on page ii), if the volume in your headset is too loud or too low for you.
- After you’re done configuring your headset, end the call.
Headset Features and Functions
(see diagram on page ii)
The Multi-Function button allows you to answer and end calls from the headset.
| Function | Tap | Press |
| Answer incoming call | ☑ | |
| End call | ☑ | |
| Power On | ☑ | |
| Power Off | ☑ |
(see diagram on page ii)
You can Mute and Mute Cancel the Headset microphone.
| Function | Tap | Press |
| Microphone Mute | ☑ | |
| Mute Cancel | ☑ | |
| To use for Pairing with base | ☑ |
Headset LED Indicators
| Headset mode | LED Indicator |
| Power On | On for 2 sec |
| Power Off | On 100ms, Off 100ms, Flash 3s |
| Pairing | On 250ms, Off 250ms, Flash |
| Standby | On 250ms, Off 8s, Flash |
| Connected | Steady On |
| Online | Steady On |
| Incoming Call | On 300ms, Off 700ms, Flash |
| Headset Docked | On 3s, Off 5s, Flash |
| Low Battery | On 300ms, Off 100ms, On 300ms, Off 500ms, Flash |
Base Visual Indicators
The Zūm Maestro Combo USB/DECT™ base unit has 5 LEDs to indicate battery, call status, and events.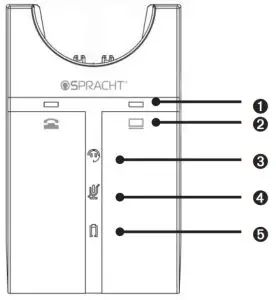
➊ LEDs to indicate which is active, Deskphone or PC/Mac
➋ Deskphone and Computer icons
➌ Indicates link is active between Headset and base; Blinking indicates searching for headset
➍ Microphone Mute On/Off LED
➎ Battery indication: Flashing means charging, Solid on means fully charged, Not lit means unknown status
Call Management
Making Calls, Answering and Ending Calls
For Phones Without a Headset Port/ Handset Lifter/EHS Cable
Make a Call
- Press the Multi-Function button or lift the headset from the docking cradle.
- Pick up the phone’s handset and set it on the desk.
- Dial the phone number through the Deskphone keypad.
Answer a call
- Press the Multi-Function button or lift the headset from the docking cradle.
- Pick up the phone’s handset and set it on the desk.
End a Call
- Set the phone’s handset back on the Deskphone.
- Press the Multi-Function button or return the headset to the docking cradle.
For a Phone With a Headset Port
Make a call
- Press the Multi-Function button or lift the headset from the docking cradle.
- Press the headset button on your Deskphone.
- Dial numbers through the Deskphone keypad.
Answer a call
- Press the Multi-Function button or lift the headset from the docking cradle.
- Press the headset button on your Deskphone.
End a call
- Press the headset button on your Deskphone.
- Press the Multi-Function button or dock the headset.
For a Phone With a Handset Lifter or EHS Cable
Make a call
- Press the Multi-Function button or lift the headset from the docking cradle.
- Press the headset button on your Deskphone.
- Dial numbers through the Deskphone keypad.
Answer a call
- Press the Multi-Function button or lift the headset from the docking cradle.
End a call
1. Press the Multi-Function button or dock the headset.
Switch Between Phone and Headset
For Phones Without a Headset Port/ Handset Lifter/EHS Cable Switch from Deskphone to headset
- Lift the headset from the docking cradle.
- Leave Deskphone handset off the phone body, as returning it will hang up the call.
Switch from Headset to Deskphone
- Lift the Deskphone handset.
- Dock headset or press the Multi-function button.
- You may need to refer to your specific Deskphone’s documentation. In some cases a button must be pressed on the Deskphone, while in others the switch from
handset to Deskphone will be automatic.
Conference Calling with Multiple Headsets
The Zum Maestro DECT™ is able to pair with a total of four Headsets for conferencing: one Primary and three Secondary Headsets.
Connecting the second and additional Headsets
- Using the Primary Headset which is already linked with the Base, press the PAGE switch on the Base for 5s. The Base starts searching for a Headset to pair to. Press the second Headset’s Mute button until the Headset status LED on the Base flashes, indicating the Headset is in pairing mode. Connection will be successful when the LEDs turn off at the same time.
- Repeat the above to connect the 3rd and 4th Headsets.
Making a Conference Call
1. Press the Multi-Function button to connect the headsets; the audio will shared by all the headsets.
2. You can now make your conference call from the Primary Headset.
Ending or leaving the conference
The Primary Headset user can end the conference by hanging up on the call. The call is ended for all Headsets. The Secondary Headset users can leave a conference by pressing the multi-function button on their headsets, or by docking the Headset with the base. The Conference call is still active for the other Headset(s).
Technical Specifications
- Operating environment: 32°F – 104°F (0°C – +40°C); Humidity up to 95% Rh non-condensing.
- Call control: Multi-Function button supports answer/end call; docking operations also answer/end calls.
- Volume Control and Microphone Mute: button controls on Headset.
- Visual indicators: LEDs indicate call status, pairing status and other events.
- Audio indicators: Tones indicate incoming calls, low battery, volume level, microphone muting and other events.
- Sound quality: DSP noise reduction; echo cancellation; tone control; wideband and narrow band audio.
- Headset Recharge: While docked in the Base.
- Wireless standard: (CAT – IQ) European DECT and U.S. DECT.
- DECT range: For U.S. DECT, up to 350 feet from Base to Headset. For European DECT, up to 120 meters from Base to Headset.
- DECT frequencies: US DECT: 1.92 – 1.93 GHz., EU DECT: 1.88 – 1.90 GHz.
- Wearing-styles: Headband and Over-the-ear
- Microphone boom arm style: Long boom arm
- Speaker(s): Wideband speaker.
- Microphone: noise-canceling microphone.
Headset Battery
- Battery type: Lithium-ion polymer.
- Battery capacity: 300 mAh standard.
- Battery talk time: Up to 8 hours.
- Battery life: Minimum recharging 1000 times.
- Battery standby time: At least 36 hours.
- Operating temperature range: -20°C – +60°C.
- Battery charging time: Less than 20 minutes to charge 20%. Less than 45 minutes to charge 50%. Fully charged in less than 3 hours.
- Battery storage life: Headset battery holds charge for six months in OFF State.
Base
- Dimensions: 3.8″ x 3″ x 4.7″ (97mm x 75 mm x 120 mm)
- Wireless standard: (CAT – IQ) European DECT and U.S. DECT.
- Operating environment: 32° – 104°F (-0° – +40°C); Up to 95% Rh non-condensing.
- Deskphone connections: RJ-11 for handset, RJ-11 for phone body (or headset port), RJ-45 for AUX (for EHS Cable or lifter).
- Clear Dial Tone and microphone volume switch: Electromechanical switches. Clear Dial Tone switch and microphone volume level set manually.
Important Safety Instructions
Please dispose of the Headset according to local regulations and recycle when possible.
- Do not dispose as household waste.
- Use only the power cord and battery indicated in this manual.
- Do not dispose of batteries in a fire. They may explode.
- Check with local codes for disposal and/or recycling instructions.
RF Warning Statement: This equipment complies with FCC radiation exposure limits set forth for an uncontrolled environment. This transmitter must not be co-located or operating in conjunction with any other antenna or transmitter.
FCC Declaration
This device complies with Part 15 of the FCC rules. Operation is subject to the following two conditions: (1) This device may not cause harmful interference, and (2) this device must accept any interference received, including interference that may cause undesired operation.
Warning: Changes or modifications to this equipment not expressly approved by Spracht could void your warranty and your ability to operate the equipment.
Note: This equipment has been tested and found to comply with the limits for a class B digital device, pursuant to Part 15 of the FCC rules. These limits are designed to provide reasonable protection against harmful interference in a residential installation. This equipment generates, uses and can radiate radio frequency energy and, if not installed and used in accordance with the instructions, may cause harmful interference to radio communications. However, there is no guarantee that interference will not occur in a particular installation. If this equipment does cause harmful interference to radio or television reception, which can be determined by turning the equipment off and on, the user is encouraged to try to correct the interference by one or more of the following measures:
- Reorient or relocated the receiving antenna.
- Increase the separation between the equipment and the receiver.
- Connect the equipment into an outlet on a circuit different from that to which the receiver is connected.
- Consult the dealer or an experienced radio/TV technician for help.
Warranty
Spracht warrants its products against defects or malfunctions in material and workmanship under normal use and service, with the exceptions stated below. This warranty lasts for one year from the original date of purchase. Coverage terminates if you sell or otherwise transfer the product. In order to keep this warranty in effect, the product must have been handled and used as prescribed in the instructions accompanying the product. Spracht shall (at its option) repair or replace a defective unit covered by this warranty, or shall refund the product purchase price. Repair, replacement with a new or reconditioned unit, or refund, as provided under this warranty, is your exclusive remedy. This warranty does not cover any damages due to accident, misuse, abuse, or negligence. Spracht shall not be liable for any incidental or consequential damages. Some states do not allow limitation or exclusion of incidental or consequential damages, so the above limitation or exclusion may not apply to you. Implied warranties of merchantability and fitness for a particular purpose are limited in duration to the duration of this warranty. Some states do not allow limitations on how long an implied warranty lasts, so the above limitation may not apply to you.
To make a warranty claim, the purchaser must obtain a return authorization number (RA) from Spracht (serial number and purchase date required), and then return the product to Spracht at purchaser’s expense. A copy of the original dated receipt or shipping document must accompany the product. To obtain a return authorization, see Warranty on our website www.spracht.com, e-mail [email protected], or contact us at:
Spracht
974 Commercial Street, Suite 108
Palo Alto, CA 94303 USA
Tel.: 650-215-7500 Fax: 650-485-2453
For repair or replacement of a failed product, allow 4 to 6 weeks for processing and shipment. This warranty gives you specific legal rights, and you may also have other rights which vary from state to state.
Certifications


