![]()
H-992
MONARCH 1136
TWO LINE LABEL GUN
1-800-295-5510
uline.com
INSTRUCTIONS
CHANGING THE INK ROLLER
- Pull the latches back and swing the cover open completely. You should hear a click.
 NOTE: Do not force the cover past the click position.
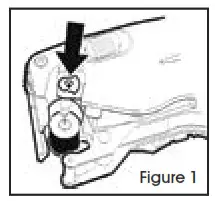
 - Hold the labeler sideways over a trash can while pushing the button to release the ink roller. (See Figure 1)

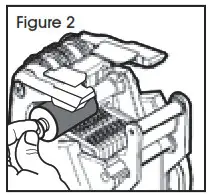
- Hold the new ink roller by the stem. (See Figure 2)
- Slide it onto the post, snapping it into place. (See Figure 2)

- Close the cover completely.
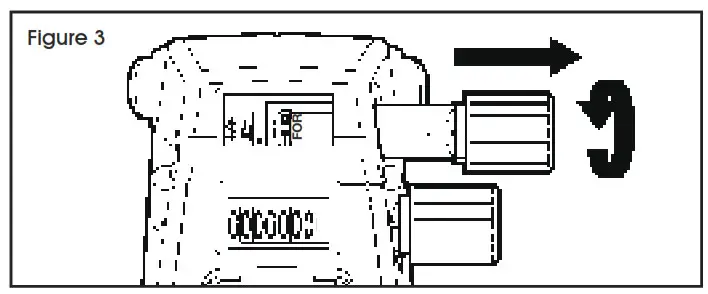
SETTING PRINT CHARACTERS
- Pull the knob until the indicators are on the desired band.

- Turn the knob until the desired character appears black on a white background between the indicators. To print a blank, select the blank space for that band. (See Figure 3)
- Repeat steps 1-2 for each band.
- Push in the knob when you are done.
LOADING LABELS
- Pull the latches back and swing the cover open completely. You should hear a click. (See Figure 4)
 NOTE: Do not force the cover past the click position.
 - For loading a new roll of labels, tear off and discard the first 10 inches of label and liner.
- To prevent jamming, peel the first 12 labels from liner and discard.

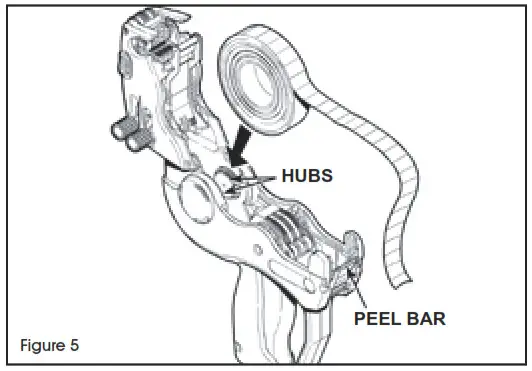
- Place the label roll between the hubs and click into place. (See Figure 5) NOTE: Do not thread label strip through any rollers.
- Drape the supply across the labeler and center it over the peel bar. The supply should hang out 5-6 inches past the peel bar.
- Close the cover.
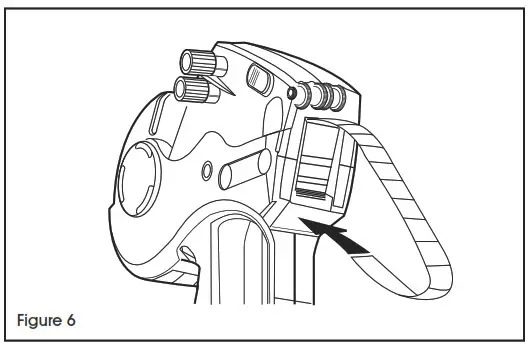
- Squeeze and hold the trigger while feeding the label strip under the roller and into the large slot above the arrow until it stops/hits the back. (See Figure 6)
- Hold the strip in place and squeeze the trigger eight times or until the label strip feeds through the rear exit.
- Remove any loose labels.


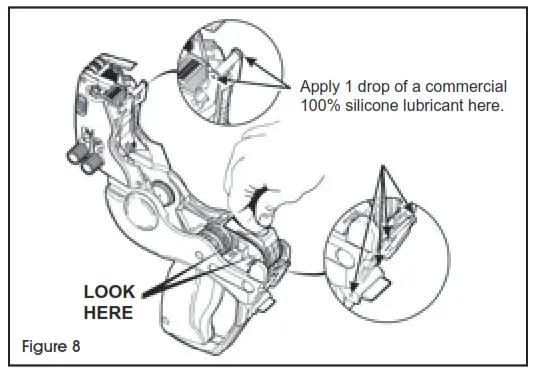
CLEARING LABEL JAMS, CLEANING AND LUBRICATION
- Open the cover and remove the label roll.

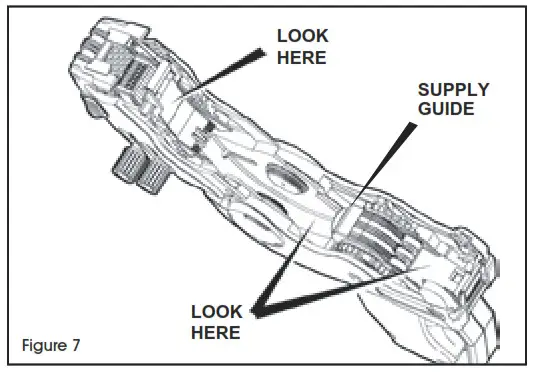
- Remove any loose labels from the inside of the labeler. (See Figure 7)
- Pull up on the supply guide to expose the backing paper path and remove loose labels. (See Figure 8)
- Snap the supply guide back into place.

- Use a commercial adhesive solvent to clean adhesive buildup.
- Remove the ink roller to expose the print bands and brush them off with a toothbrush.
- Reload, then close the cover.
CHARACTER KEY
Regular Font (3 MM) 1st Line
| KNOB POSITION | |||||||
| 1 | 2 | 3 | 4 | 5 | 6 | 7 | 8 |
| . | . | . | . | . | . | . | . |
| 1 | 1 | 1 | 1 | 1 | 1 | 1 | 1 |
| 2 | 2 | 2 | 2 | 2 | 2 | 2 | 2 |
| 3 | 3 | 3 | 3 | 3 | 3 | 3 | 3 |
| 4 | 4 | 4 | 4 | 4 | 4 | 4 | 4 |
| 5 | 5 | 5 | 5 | 5 | 5 | 5 | 5 |
| 6 | 6 | 6 | 6 | 6 | 6 | 6 | 6 |
| 7 | 7 | 7 | 7 | 7 | 7 | 7 | 7 |
| 8 | 8 | 8 | 8 | 8 | 8 | 8 | 8 |
| 9 | 9 | 9 | 9 | 9 | 9 | 9 | 9 |
| 0 | 0 | 0 | 0 | 0 | 0 | 0 | 0 |
| $ | $ | $ | $ | $ | $ | +TX | +TX |
| WAS | WAS | WAS | WAS | WAS | WAS | , | , |
| FOR | FOR | FOR | FOR | FOR | FOR | OFF | OFF |
| C | C | C | C | C | C | EA | EA |
| / | / | / | / | / | / | 1/2 | 1/2 |
| – | – | – | – | – | – | ||
| KNOB POSITION | |||||||
| 1 | 2 | 3 | 4 | 5 | 6 | 7 | 8 |
| 1 | 1 | 1 | . | 1 | 1 | LB | |
| 2 | 2 | 2 | 1 | 1 | 2 | 2 | EACH |
| 3 | 3 | 3 | 2 | 2 | 3 | 3 | FOOT |
| 4 | 4 | 4 | 3 | 3 | 4 | 4 | YARD |
| 5 | 5 | 5 | 4 | 4 | 5 | 5 | DOZ |
| 6 | 6 | 6 | 5 | 5 | 6 | 6 | PAIR |
| 7 | 7 | 7 | 6 | 6 | 7 | 7 | PKG |
| 8 | 8 | 8 | 7 | 7 | 8 | 8 | BOX |
| 9 | 9 | 9 | 8 | 8 | 9 | 9 | CASE |
| 0 | 0 | 0 | 9 | 9 | 0 | 0 | SET |
| $ | $ | $ | 0 | 0 | +TX | +TX | OFF |
| FOR | FOR | FOR | / | / | EACH | OFF | +DEP |
| / | / | / | – | – | +TX | ||
![]()
1-800-295-5510
uline.com


