Contents hide
NiTHO MLT-DP20-K Drive pro
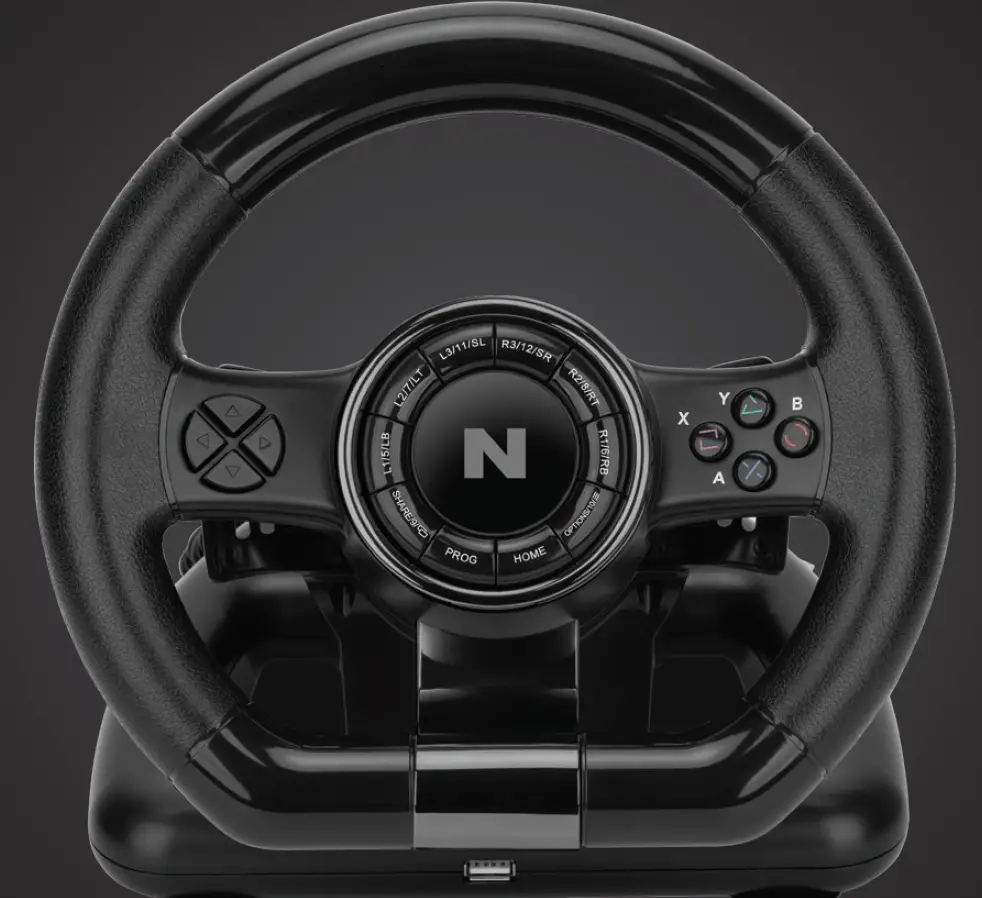
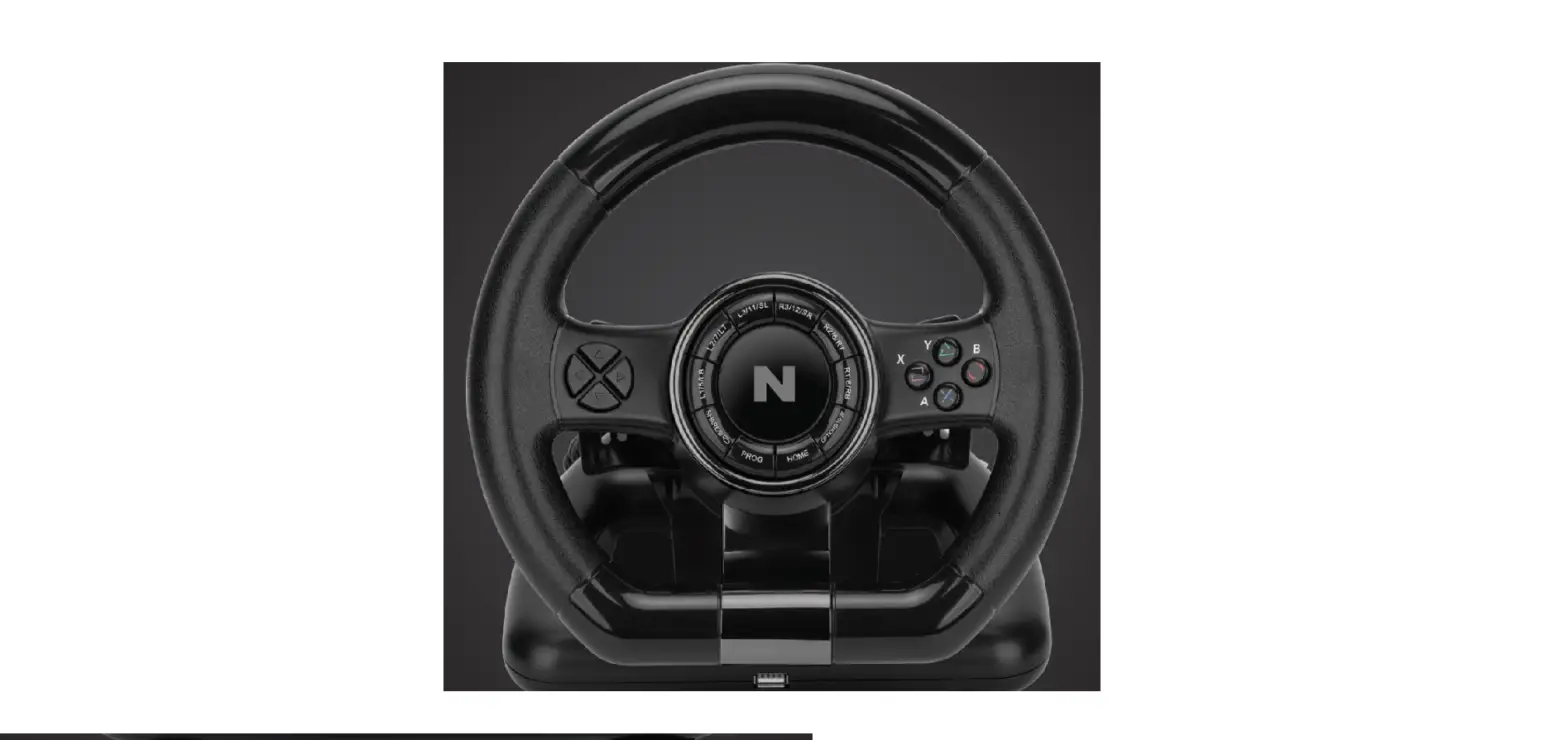
SPECIFICATIONS
THANK YOU FOR BUYING NITHO DRIVE PRO WHEEL. WE WOULD LIKE TO INTRODUCE ITS SPECIFICATIONS :
- Compatible with Windows® VISTA®/7/8/10, PS3®, PS4®, XBOX ONE®, SWITCH® and supports US, EU, Japan versions` consoles
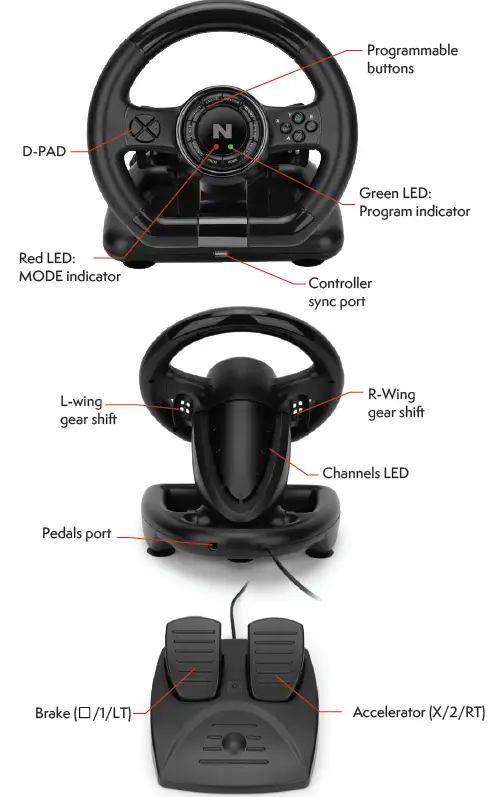
- Home button to enter into Settings on PS3®, PS4®, XBOX ONE® consoles
- It`s provided with 2 axis a D-pad and 12 action buttons
- 6 programmable buttons:
- Left Wing (L2/7/LB),Right Wing (R2/8/RT),Accelerator Pedal (X/2/RT),
- Brake Pedal (□/1/LT),L3/11/SL,R3/12/SR
- 4 suction cups to keep the wheel stable
- 180 degrees wheel rotation, lock to lock
- Three selectable sensibility levels
- Spring loaded pedals
- X-INPUT & D-INPUT modes selector (X-INPUT mode as default)
FUNCTION KEYS
| Mode | PS3® | PS4® | XBOX ONE® | PC (X-INPUT) | PC (D-INPUT) | SWITCH® |
|
Action Key | X | X | A | A | 2 | B |
| ○ | ○ | B | B | 3 | A | |
| □ | □ | X | X | 1 | Y | |
| △ | △ | Y | Y | 4 | X | |
| R1 | R1 | RB | RB | 6 | R | |
| L1 | L1 | LB | LB | 5 | L | |
| R2 | R2 | RT | RT | 8 | ZR | |
| L2 | L2 | LT | LT | 7 | ZL | |
| R3 | R3 | SR | SR | 12 | R3 | |
| L3 | L3 | SL | SL | 11 | L3 | |
| D-PAD | UP | UP | UP | UP | UP | UP |
| DOWN | DOWN | DOWN | DOWN | DOWN | DOWN | |
| LEFT | LEFT | LEFT | LEFT | LEFT | LEFT | |
| RIGHT | RIGHT | RIGHT | RIGHT | RIGHT | RIGHT | |
| Function Key | START | OPTIONS | Menu | START | 10 | + |
| SELECT | SHARE | View | BACK | 9 | – | |
| Direction | LX | LX | ←/→ | ←/→ | ←/→ | LX |
| L-Wing | L2 | L1 | LB | LB | 7 | ZL |
| R-WING | R2 | R1 | RB | RB | 8 | ZR |
| L-Pedal | □ | L2 | LT | LT | 1 | B |
| R-Pedal | X | R2 | RT | RT | 2 | Y |
| Mode | HOME | HOME | X-Guide | X-Guide | 13 | HOME |
FUNCTION INTRODUCTION
PROGRAM FUNCTIONS
You can assign to some buttons (Programmable) functions of other buttons (Default)
- Here below are the DEFAULT buttons (the ones you can assign to other functions): /1/X, ○/3/B, △/4/Y, X/2/A, L1/5/LB, L2/7/LT, R1/6/RB, R2/8/RT
- Here below are the PROGRAMMABLE buttons (the ones you can setup): L-Wing (L2/7/LB), R-Wing (R2/8/RB), Accelerator Pedal (X/2/RT), Brake Pedal /1/LT), L3/11/SL, R3/12/SR
PROGRAM SETUP
- Press & hold PROG for 3 seconds until the green LED turns on
- Press the PROGRAMMABLE button until the green LED starts blinking
- Press the DEFAULT button until the green LED turns off
CLEAR SINGLE PROGRAM
- Press & hold PROG for 3 seconds until the green LED turns on
- Press the programmed button until green LED will start blinking
- Press the programmed button again and the green LED will turns off
CLEAR ALL PROGRAMS
- Press & hold PROG for 3 seconds until the green LED turns on
- Press & hold “OPTIONS/10/Menu” for 4 seconds until the green LED turns off. All the programmed buttons are cleared
Note: All settings will NOT be cleared when the wheel is powered off
PROGRAM PEDALS AS Y-AXIS
- Press & hold PROG for 3 seconds untill the green LED is on
- Press D-PAD LEFT, the green LED will turn off
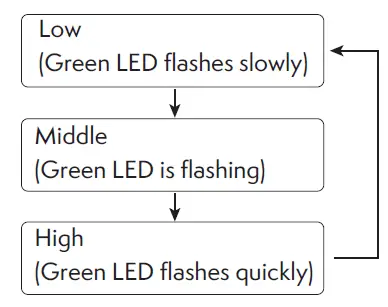
WHEEL SENSIBILITY ADJUSTMENT (3 LEVELS)
- Press & Hold “SHARE/9/View” + “OPTIONS/10/Menu” for 3 seconds until the green LED turns on
- Press “SHARE/9/View” again until the current sensitivity is displayed 3、Press “SHARE/9/View” to select sensitivity level
It cycles as in the scheme:
PLATFORMS
PS3® GUIDE
- Connect the wheel to PS3® console and connect the pedal to the wheel
- During PS3® gameplay, press the HOME button once to enter the XBM window
- Press & hold the HOME button to enter in the MENU setup window
PS4® GUIDE
- Connect the wheel to PS4® console then connect the pedal to the wheel
- Connect the wheel to original PS4® controller with the original USB cable (or a cable with data function)
- After the connection has been established, the RED LED on the wheel will turn on then press the HOME button on the wheel to start the game
- During PS4® gameplay, press the HOME button once to enter the XBM window
XBOX ONE® GUIDE
- Connect the wheel to XBOX ONE® console then connect the pedal to the wheel
- Connect the wheel to original XBOX ONE® controller with the original USB cable (or a cable with data function)
- After the connection has been established, the RED LED on wheel will be on
- During XBOX ONE® gameplay, press the HOME button to enter the main menu
SWITCH® GUIDE
- Connect the wheel to SWITCH® console then connect the pedal to the wheel.
- After the connection has been established, the RED LED on the wheel will turn on
To screenshot :
Press“SELECT/SHARE/9/VIEW/-” and “START/OPTIONS/10/MENU/+”
PC GUIDE
X-INPUT
- The wheel is set on X-INPUT as default
- Press & hold HOME for 3seconds to switch to D-input then the LED will switch off and switch on again after 0.5seconds
TEST
- Enter Test interface to check buttons and axis functions
- Enter Calibration interface to calibrate the axis
DRIVER UNINSTALL
- Start→ Control Panel→ programs/Function
- Find the driver you want to remove in the Interface ”current installed programs”
Click “Remove” and follow the instructions to get the successful uninstall
TROUBLESHOOTING
- If the connection LED is not on, please re-connect to the controller again and retry.
- If the wheel do not give any response, turn off and on again the console and procees the wheel setup once again
PRECAUTIONS
- Read carefully the user manual before using the wheel
- Do not disassemble or modify
- Avoid to store in a smoky, humid or dusty place


