![]() Overview of National Geographic gimbal cam features
Overview of National Geographic gimbal cam features
Active tracking mode
Use Active tracking mode to track moving or specific objects in AI tracking mode.
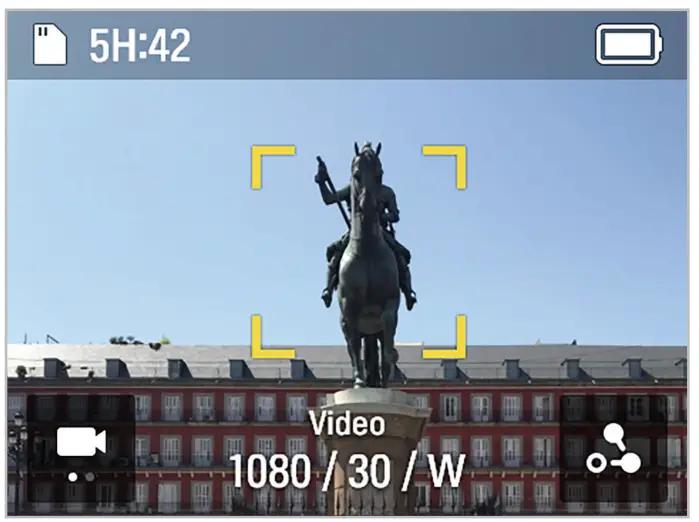
In AI tracking mode, touch a specific target you want to record twice, then a square, yellow border will be created and active tracking mode will start.![]() To end tracking, touch the square, yellow border.
To end tracking, touch the square, yellow border.
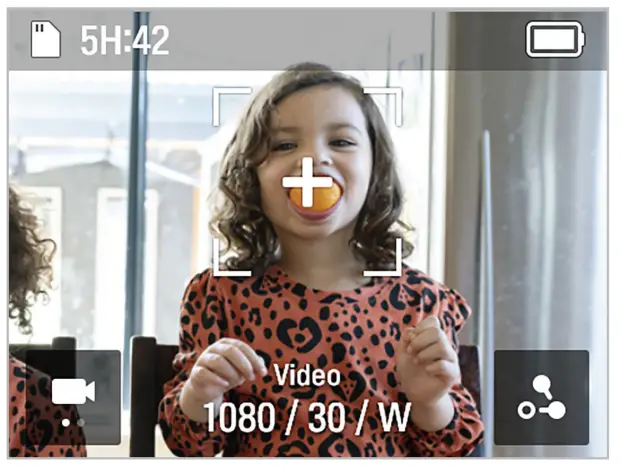
3.2 Face tracking mode
Face tracking mode recognizes and tracks a person’s face.
Face tracking mode
- Swipe left on the preview screen to open the gimbal quick settings, then change the tracking mode to Face tracking mode.
- Face recognition mode will start in Face tracking mode. When a subject’s face is detected, a square, white border is created around their face.

- If you touch the inside of the square, white border, it turns yellow and tracking starts.
 To end tracking, touch the yellow square border.
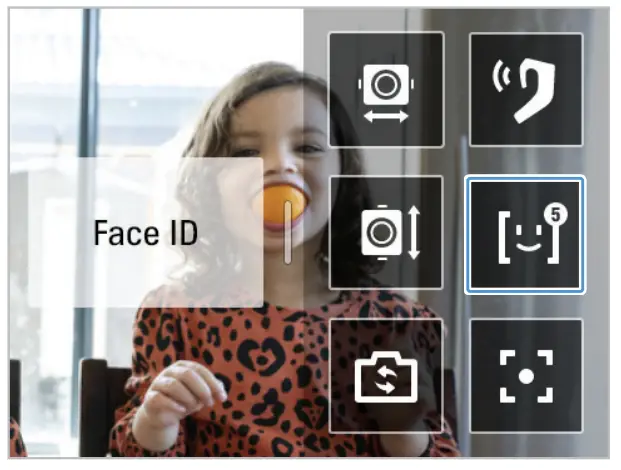
3.3 Using Face ID
Once you register people’s faces on Face ID, the faces will be automatically recognized and tracked based on the camera angle without requiring any actions.
Face ID registration
- Swipe left on the preview screen to open the gimbal quick settings, then touch the tracking button to activate the Face ID feature.

- Start recording the person you want to register for Face ID. When the product recognizes a face, a white square border will be created around the face and the + button inside the box will become activated.

- Touch the + button > Confirm to complete Face ID registration. • The product tracks who has the highest registration priority.
• You can register up to five Face IDs.
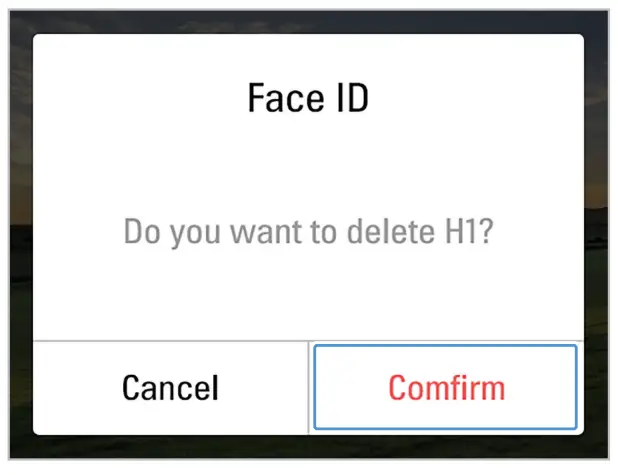
Check/delete Face ID
- Touch Settings(
 ) > System Settings > Recording Settings > Face ID to check the registered people by registration rank.
 - Touch the Face ID you want to delete, then press
 on the top right to delete the Face ID.
3.4 Using dynamic motion recording mode
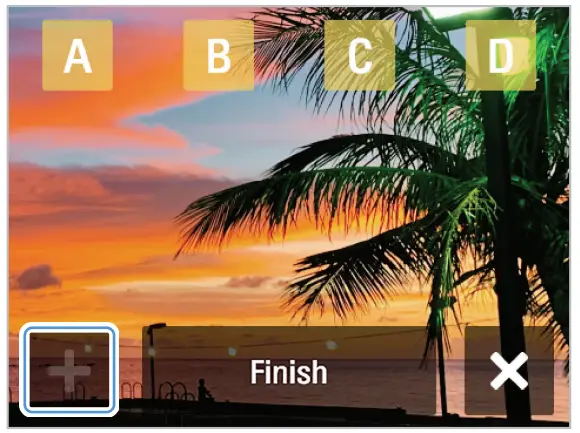
With the dynamic motion function, you can specify up to 4 recording points and set the path and time to record before recording.
Dynamic motion recording mode
- On the Video preview screen, touch the (
 ) button to open the motion settings.
 - Set the time to record. The video length is automatically calculated and displayed based on the video settings value (speed, interval).
- After setting the recording time, touch the (
 ) button to return to the Motion Settings screen, and then touch the (
 ) button in the upper-right corner to move to the Route Settings screen.
 - Use the joystick to move to the desired shooting points and press the + button to designate up to four shooting points (A-D).

- Press the
 button on the product. The product will shoot the selected points. • The route can be set up to 4 points (A-D).
• Touching the End button on the Settings screen will move you to the End Selection screen, and at the end, it will delete all location information and move to the Motion Settings screen.
• While recording, all locations set as routes are displayed on the preview screen, and the route completed, the route being recorded, and the route to be recorded are displayed as images to help you recognize the route.
Recording in Repeat mode
You can set two shooting points and take continuous and repeating shots at set time intervals. With the joystick, select two recording points by pressing the + button, press the Repeat mode ( ![]() ) button, and press the
) button, and press the ![]() button on the product.
button on the product.![]() You cannot use the repeat mode if you set more paths than two recording points.
You cannot use the repeat mode if you set more paths than two recording points.
3.5 Updating the firmware
For optimal operation of the product, ensure that you keep the firmware up to date.
- Visit www.thinkware.com/support.
- Save the downloaded firmware file to the product’s memory card.
- Insert the memory card with the firmware to start updating the firmware. • For more information on product updates, visit www.thinkware.com/support.
• If you save the firmware to the SD card and update the product at the same time, the update will proceed in the order of system firmware and gimbal firmware.
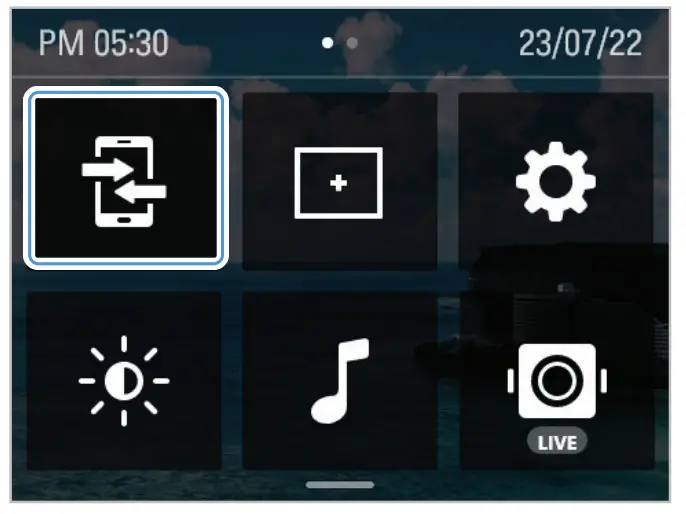
Using the National Geographic gimbal cam app
You can use various functions of the product by connecting the product to the National Geographic gimbal cam app.
4.1 Connecting the National Geographic gimbal cam app
- On your smartphone, search for the National Geographic gimbal cam app in the Google Play Store or Apple App Store, or scan the QR code below to download and install the app.

http://m.site.naver.com/0V306
- Open the installed National Geographic gimbal cam app.
- On your smartphone, turn on the Bluetooth and Wi-Fi features.
- Swipe down on the preview screen to open the settings menu, then touch Settings( ) > Connection Settings > National Geographic App > Use connected device switch to activate it.
- In the National Geographic gimbal cam app, touch the Connect a camera button, find and connect to a product name that starts with NC-200. • The Wi-Fi password is 12345678.
• If the product is connected to the head tracker, tap Connect via Wi-Fi to connect.

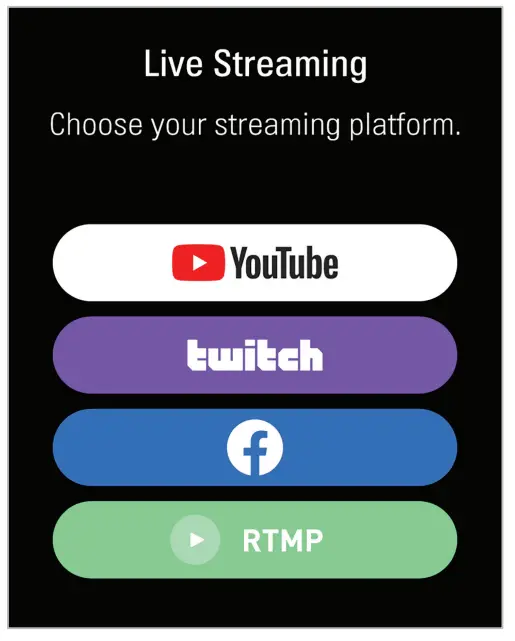
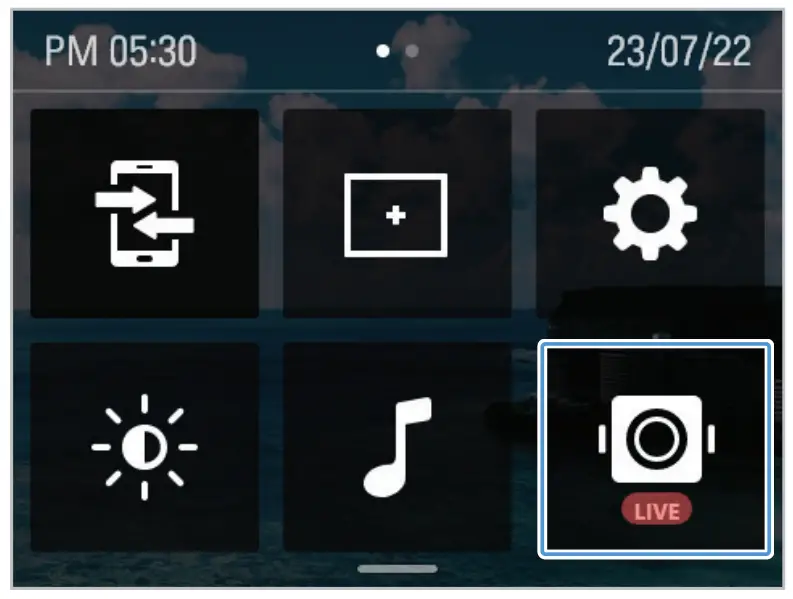
4.2 Using live streaming
You can use the live streaming feature in the National Geographic gimbal cam app to stream stable and high-definition broadcasts.
Live streaming
- Swipe down on the preview screen to open the settings menu, then touch the app connection button and follow the on-screen instructions to connect the app and product.

- Select the desired broadcasting platform from the Live streaming menu in the app preview screen or the app home screen’s setting menu, and then go to the streaming settings. Twitch live streaming will be supported.

- Sign in to the registered or newly registered account for each broadcasting platform, set the transmission resolution and network items, and touch the Streaming Settings Complete button. To use mobile hotspot data, first enable hotspot data in your smartphone Wi-Fi settings, and then enter the hotspot’s AP information.
- When the streaming setup is complete, the setting information is delivered to the product and the connection between the app and the product is disconnected.
- When the connection between the app and the product is disconnected, swipe down on the preview screen to open the settings menu and then touch the live streaming button to start live streaming.

Quick live streaming
- Swipe down on the preview screen to open the settings menu, then touch the live streaming button to start live streaming. This feature is available only when there is saved live streaming information. To save streaming information, connect to live streaming via the app.

- The broadcasting platform icon is displayed in the status bar if live streaming is proceeding normally. The product connects with the AP set in the app. It will not connect in places where the corresponding AP is not present.


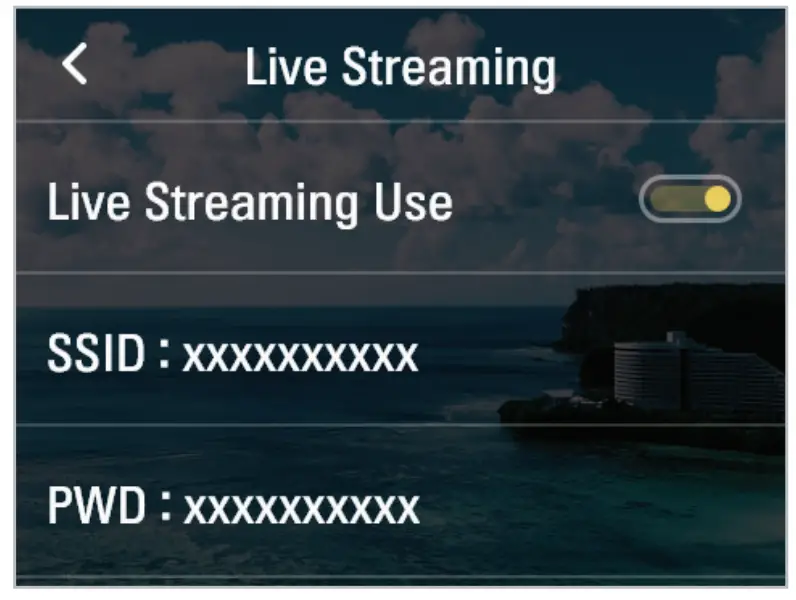
View live streaming information
- Swipe down on the preview screen to open the settings menu, then touch Settings( ) > Connection Settings > Live Streaming.

- Check the AP SSID and password stored in the product. To change the broadcasting platform, connect to the new broadcasting platform in the app.
Using recording modes
You can check the screen of each recording mode and change the settings.
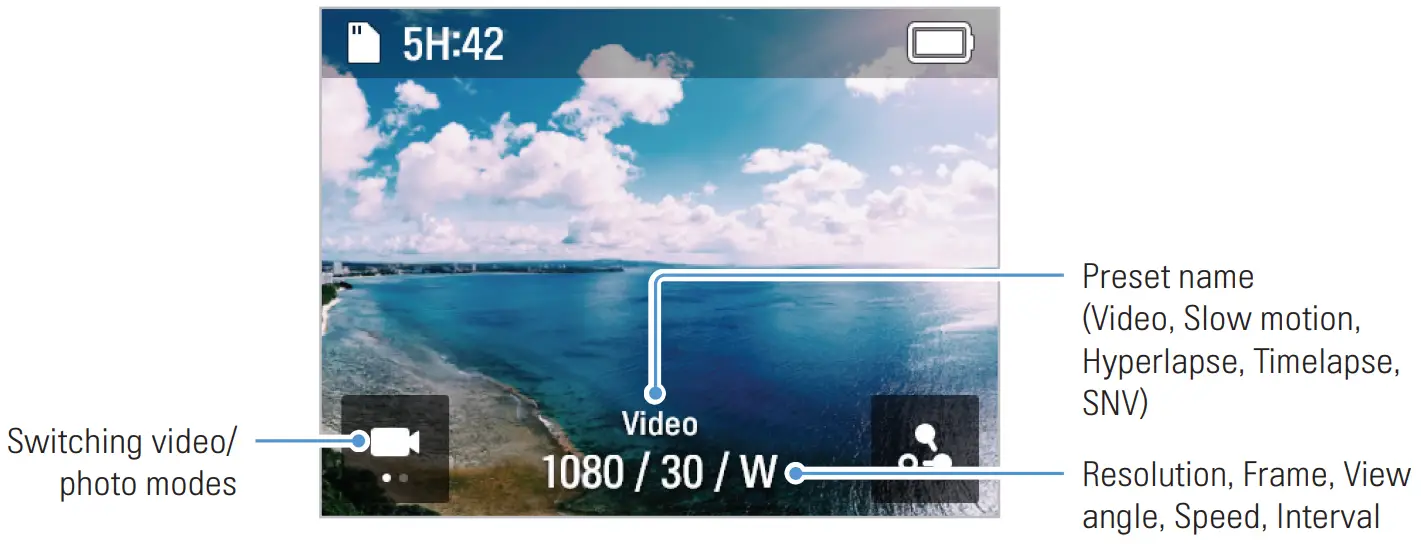
5.1 Using video modes
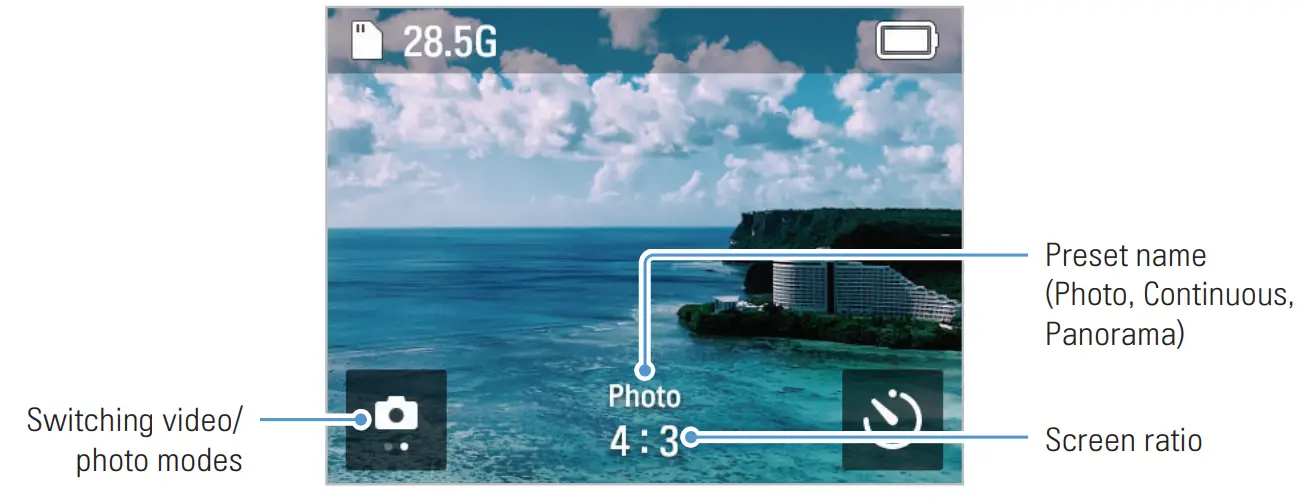
Video mode screen
| Mode | Description |
| Video | Records high-definition videos with up to 4K @60fps resolution. |
| Slow motion | Suitable for fast-moving subjects, it records 4x slower. |
| Hyperlapse | You can record while moving with video frames at set intervals. Records long hours of activity in short, dynamic videos. |
| Timelapse | Records a short video of a long-duration activity with video frames at set intervals. |
| SNV | Records with optimal brightness at 4K @15fps resolution in extremely low light conditions. |
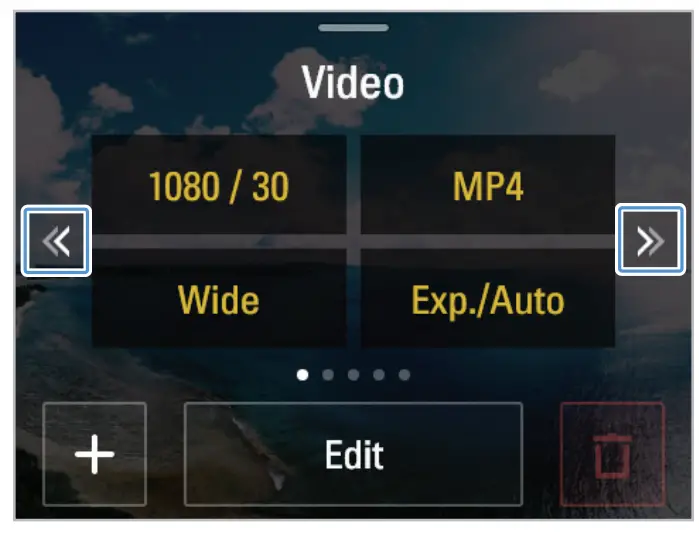
Switching video modes
On the Preset settings screen, swipe left or right on the screen or touch the arrow to change the video mode. You can switch to 5 different video modes (Video, slow motion, hyperlapse, timelapse, SNV).
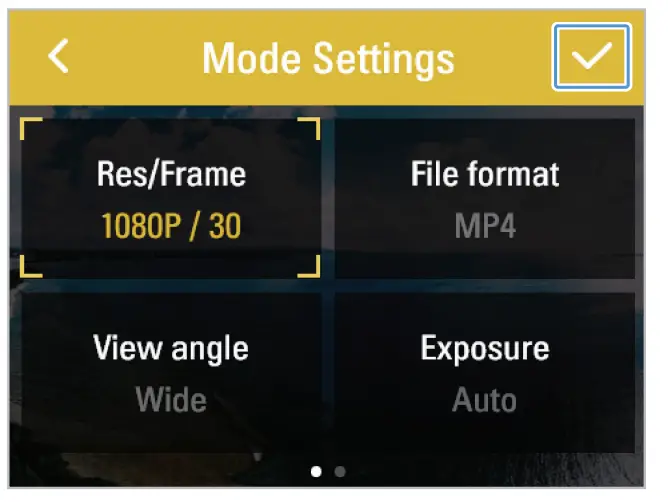
Video recording settings
Touch the Edit button to change the recording environment to the desired setting.
You can set the file format, the view angle when recording, the color temperature, and the brightness of the screen.
Video setting value
| Settings | Detailed setting value |
| Resolution/ Frame | 1080p @24, 30, 60, 120fps 2.7K @24, 30, 60fps 4K @24, 30, 60fps |
| File format | MP4/MOV |
| View angle | Wide/Linear/Narrow angle (4K @60fps linear/narrow angle not supported, 4K @30fps narrow angle not supported, 2.7K @60fps linear/narrow angle not supported) |
| Exposure | Auto/Manual |
| White balance | Auto/Sunlight/Cloudy/Incandescent/ Fluorescent/Manual |
Hyperlapse setting value
| Settings | Detailed setting value |
| Resolution/ Speed | Resolution: 1080p, 2.7K, 4K Speed: 2x, 5x, 10x, 15x, 30x |
| File format | MP4/MOV |
| View angle | Wide/Linear/Narrow angle (4K linear/narrow angle not supported) |
| Exposure | Auto/Manual |
| White balance | Auto/Sunlight/Cloudy/Incandescent/ Fluorescent/Manual |
SNV setting value
| Settings | Detailed setting value |
| Resolution/ Frame | Speed: 4K @15fps |
| File format | MP4/MOV |
| View angle | Wide/Linear angle |
| Exposure | Auto |
| White balance | Auto/Sunlight/Cloudy/Incandescent/ Fluorescent/Manual |
Slow motion setting value
| Settings | Detailed setting value |
| Resolution/ Speed | Resolution: 1080p Speed: 4x |
| File format | MP4/MOV |
| View angle | Wide/Linear/Narrow angle |
| Exposure | Auto/Manual |
| White balance | Auto/Sunlight/Cloudy/Incandescent/ Fluorescent/Manual |
Time lapse setting value
| Settings | Detailed setting value |
| Resolution/ Interval | Resolution: 1080p, 4K Interval: 0.5, 1, 2, 3, 5, 10, 15, 30, 60 |
| File format | Video/Photo + Video |
| View angle | Wide/Linear/Narrow angle (4K linear/narrow angle not supported) |
| Exposure | Auto/Manual |
| White balance | Auto/Sunlight/Cloudy/Incandescent/ Fluorescent/Manual |
5.2 Using photo modes
Using photo modes
| Mode | Description |
| Photo | Takes a single 12-Megapixel picture. |
| Continuous | Takes 20 continuous shots based on the set timer. |
| Panorama | Takes multiple photos with the set aspect ratio and saves them to be edited into a single photo. |
![]() • When entering the album, the panoramic photos appear as a single preview photo. To check the original photos, connect the product to your computer and access the dedicated folder.
• When entering the album, the panoramic photos appear as a single preview photo. To check the original photos, connect the product to your computer and access the dedicated folder.
• When taking a panorama, subjects with unclear cuts may not be automatically composited. Avoid taking a panorama if the subject is out of focus due to the close distance of the lens to the subject, or if the details of the subject are blurred.
Switching photo modes
On the preset setting screen, swipe left or right or touch the arrow to change the photo mode. You can switch to 3 different photo modes (Photo/Continuous/Panorama).
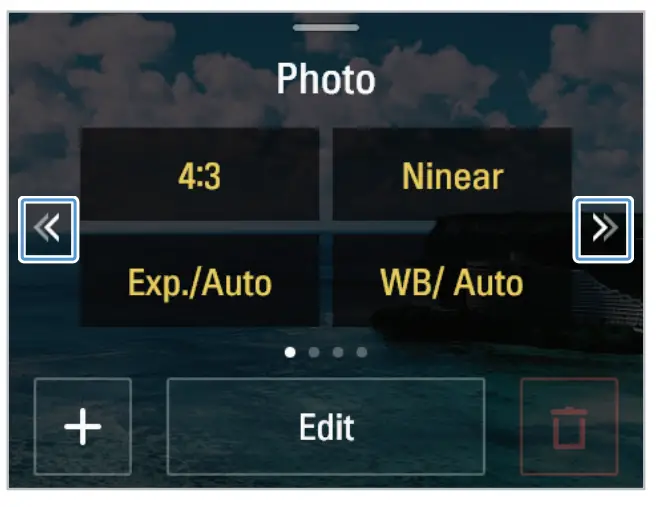
Photo mode setting
Touch the Edit button to change the recording environment to the desired setting.
Photo settings value
| Settings | Detailed setting value |
| Screen ratio | 16:9, 4:3, 1:1 |
| View angle | Wide/Linear angle |
| Exposure | Auto/Manual |
| White balance | Auto/Sunlight/Cloudy/Incandescent/ Fluorescent/Manual |
Panorama setting value
| Settings | Detailed setting value |
| Screen ratio | 180°, 360°, 3×3 |
| Exposure | Auto/Manual |
| White balance | Auto/Sunlight/Cloudy/Incandescent/ Fluorescent/Manual |
Continuous setting value
| Settings | Detailed setting value |
| Screen ratio | 16:9, 4:3, 1:1 |
| Continuous shots | 20 pic/1 second, 3 seconds, 5 seconds |
| View angle | Wide/Linear angle |
| Exposure | Auto/Manual |
| White balance | Auto/Sunlight/Cloudy/Incandescent/ Fluorescent/Manual |
5.3 Setting presets
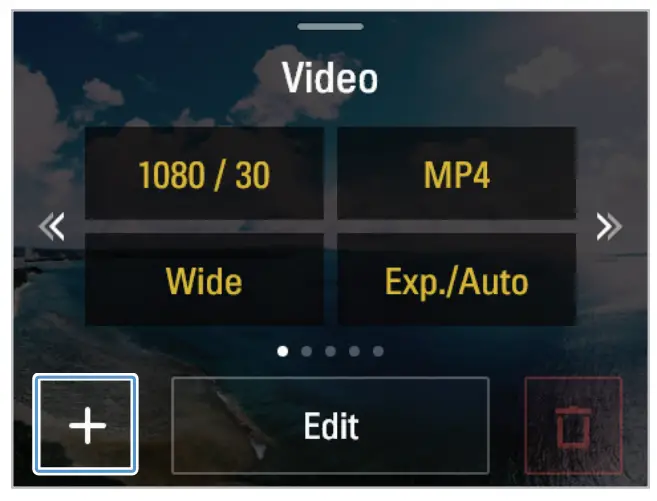
You can add presets with frequently used settings in photo or video mode.
- Touch the + button on the photo or video preset screen.

- Select the desired mode for setting the preset, set the detailed setting value, and touch the OK button to create a customized preset.

5.4 Connecting the product to the computer
You can use various functions of the product by connecting the product to the computer with a USB cable.
USB mode
In the connection mode pop-up window, touch USB mode to check the media files stored on the SD card on the computer.
Webcam mode
In the connection mode pop-up window, touch Webcam mode to use the product as a webcam. The product will restart when you disconnect the USB after connecting in webcam mode.
- Webcam mode supports the 1080p @30fps resolution.
- Webcam mode supports video display, but does not support sound.
- If you connect the product to the computer while recording a video, the recording will continue uninterrupted. The connection mode pop-up window will appear after the recording ends.
Charging mode
In the connection mode pop-up window, touch Cancel (Charge) to charge the product.
Viewing album
Swipe right on the preview screen to open the album and view the photos and videos.
6.1 Overview of the Album screen
Touch the thumbnails of each file to view them.
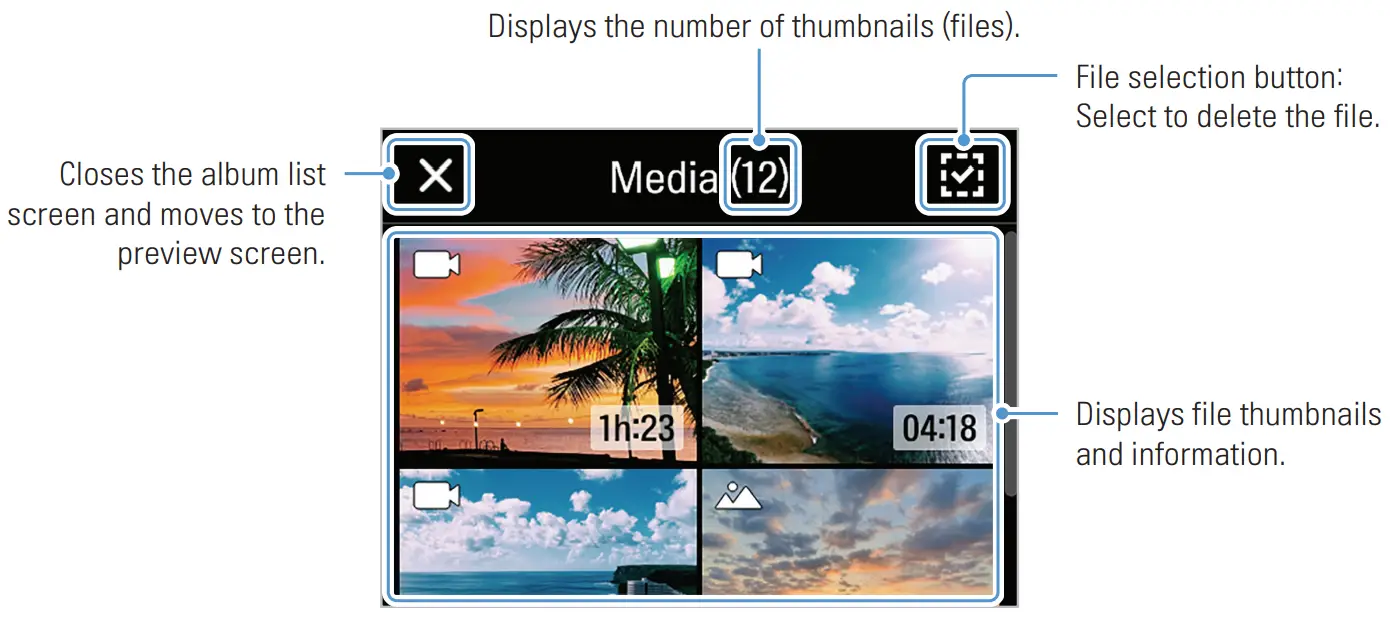
6.2 Deleting files in the album
You can delete files individually/selectively or all files with the File selection button.
- Touch the File selection button and touch the file you want to delete.
- Touch the Delete button on the top-right part of the screen.
- In the Delete file pop-up window, touch Delete to delete the selected file.
Configuring the settings
You can set the product features according to your needs and preferences.
7.1 Gimbal settings
Swipe down on the preview screen to open the settings menu, then touch Settings( ![]() ) > Gimbal Settings to configure the gimbal usage environment.
) > Gimbal Settings to configure the gimbal usage environment.
| Setting menu | Description |
| Gimbal Speed | Set gimbal speed. |
| Gimbal Sensitivity | Set gimbal sensitivity. |
| Welcome Mode | Turn Welcome mode on/off. |
| Calibration | Start the gimbal calibration. |
|
Gimbal Mode | Set the default gimbal mode and the gimbal mode when holding the trigger. • Pan mode: The roll and tilt directions are fixed and move according to the left and right movement of the user’s hand. • Follow mode: The roll direction is fixed and moves according to the left and right movement of the user’s hand. • FPV mode: Pan, roll, and tilt directions move based on the movement of the user’s hand. • Lock mode: Pan, roll, and tilt directions are fixed in one direction. • None mode: The product does not employ any gimbal mode while holding the trigger (keeps the default gimbal mode). |
| Initialize | Initialize the gimbal settings. |
7.2 Connection settings
Swipe down on the preview screen to open the settings menu, then touch Settings( ![]() ) > Connection Settings to configure the connection environment.
) > Connection Settings to configure the connection environment.
| Setting menu | Description |
| National Geographic App | Display the information about Use connected device/National Geographic App Connect/Connect Info.. |
| Head tracker | Set Head tracker Use/Head tracker Connect/LCD Off for Head Tracker/Head tracker calibration/Gaze point correction. |
| Live Streaming | Check live streaming information. |
7.3 Sysyem settings
7.3.1 Recording settings
Swipe down on the preview screen to open the settings menu, then touch Settings( ![]() ) > System Settings > Recording Settings to configure the recording environment.
) > System Settings > Recording Settings to configure the recording environment.
| Setting menu | Description |
| Quick shot | Turn quick shot mode on/off. |
| Upside down | Flip the screen upside down. |
| Mic settings | Set the built-in microphone quality. |
| Ext. mic volume | Adjust the external microphone volume. |
| Output type | Select output type. |
| Face ID | Manage the registered Face ID. |
7.3.2 Other settings
Swipe down on the preview screen to open the settings menu, then touch Settings( ![]() ) > System Settings > Misc. Settings to configure the usage environment.
) > System Settings > Misc. Settings to configure the usage environment.
| Setting menu | Description |
| Auto power off | Set the product to turn off automatically when the specified time is exceeded. |
| Auto LCD off | Set the product’s LCD to turn off automatically when the specified time is exceeded. |
| Date & time Settings | Set the date and time. |
| Indicator | Turn the indicator on/off. |
7.3.3 System information
Swipe down on the preview screen to open the settings menu, then touch Settings( ![]() ) > System Settings > System Info..
) > System Settings > System Info..
| Setting menu | Description |
| Language | Select the desired language from among . |
| Format SD card | Format the SD card. |
| Firmware information | Check the firmware information. |
| Regulation | Check the product’s certification status. |
| System initialization | Initialize all the settings of the product. |
Specifications
To see the product specifications, refer to the following table.
| Item | Specifications | |
|
General | Size | 53 x 161.4 x 49.8 mm |
| Weight | 234 g (with battery) | |
| Wi-Fi/Bluetooth | Internal | |
| Usage time | Approx. 2 hours 20 minutes (based on FHD @24fps / LCD brightness 100% and always on) | |
| Buttons | Recording / Power (M) / Joystick / Trigger | |
| Mount | 1/4 mount, M4 mount | |
|
Battery | Type | Replaceable lithium-ion pack |
| Storage | 2,000 mAh | |
| Voltage | 3.7 V | |
| Charging time | About 180 minutes | |
| LCD | Screen size | 2” |
|
Gimbal | Pan mode | Software control angle -45° to 245° |
| Tilt | Software control angle -42° to 122° | |
| Roll | Software control angle ±45° | |
| Gimbal mode | Pan, Follow, FPV, Lock, None | |
| APP | APP | National Geographic gimbal cam – only app |
| Item | Specifications | |
|
Camera | Sensor | 1/2.3” CMOS / 12.3MP |
| Lens | FOV: 133.9° (diagonal) / F2.6 | |
| Image size | 4,000 x 3,000 | |
| Photo mode | Photo / Continuous / Panorama | |
| Video mode | Video, Hyperlapse, Time lapse, Dynamic motion recording, SNV mode | |
| Tracking mode | Face ID auto tracking, AI tracking, Face tracking, Active tracking | |
| Video resolution | [PAL] [NTSC] 4K @50, 25, 24fps 4K @60, 30, 24fps 2.7K @50, 25, 24fps 2.7K @60, 30, 24fps 1920 x 1080p @100, 50, 25, 24fps 1920 x 1080p @120, 60, 30, 24fps | |
| Photo ratio | 16:9 / 4:3 / 1:1 | |
| Photo file format | JPEG | |
| Video file format | MOV, MP4 | |
| Memory card | microSD card (up to 512 GB), microSDXC, UHC-I U3 class, Class10 | |
| Audio output | 48 KHz AAC | |
FCC Compliance Statement
This device complies with part 15 of the FCC rules. Operation is subject to the following two conditions: (1) This device may not cause harmful interference, and (2) this device must accept any interference received, including interference that may cause undesired operation.
This equipment has been tested and found to comply with the limits for a Class B digital device, pursuant to part 15 of the FCC Rules. These limits are designed to provide reasonable protection against harmful interference in a residential installation. This equipment generates, uses and can radiate radio frequency energy and, if not installed and used in accordance with the instructions, may cause harmful interference to radio communications. However, there is no guarantee that interference will not occur in a particular installation. If this equipment does cause harmful interference to radio or television reception, which can be determined by turning the equipment off and on, the user is encouraged to correct the interference by one of the following measures:
- Reorient or relocate the receiving antenna.
- Increase the separation between the equipment and receiver.
- Connect the equipment into an outlet on a circuit different from which the receiver is connected.
- Consult the dealer or an experienced radio/TV technician for help.
FCC ID: 2ADTG-NC200
FCC Caution
Any changes or modifications not expressly approved by the party responsible for compliance could void the user’s authority to operate this equipment. This transmitter must not be co-located or operating in conjunction with any other antenna or transmitter.
FCC Radiation Exposure Statement
This equipment complies with FCC radiation exposure limits set forth for an uncontrolled environment. This equipment should be installed and operated with minimum distance 5mm between the radiator and your body.
IEEE 802.11b or 802.11g operation of this product in the USA is firmware-limited to channels 1 through 11.
Industry Canada Statement
This device complies with Industry Canada license-exempt RSS standard(s). Operation is subject to the following two conditions: (1) this device may not cause interference, and (2) this device must accept any interference, including interference that may cause undesired operation of the device.
This Class (B) digital apparatus complies with Canadian ICES-003.
IC: 12594A-NC200
Industry Canada Radiation Exposure Statement
This equipment complies with IC radiation exposure limits set forth for an uncontrolled environment. This equipment should be installed and operated with minimum distance 5mm between the radiator & your body.
http://www.thinkware.com
Ver. 1.0 (Apr. 2023)


