![]()
4K Gimbal
NC-200 USER GUIDE
National Geographic gimbal cam is a portable gimbal camera that combines ease of use and functionality.
Basic information overview
1.1 Included items
1.1.1 Standard items
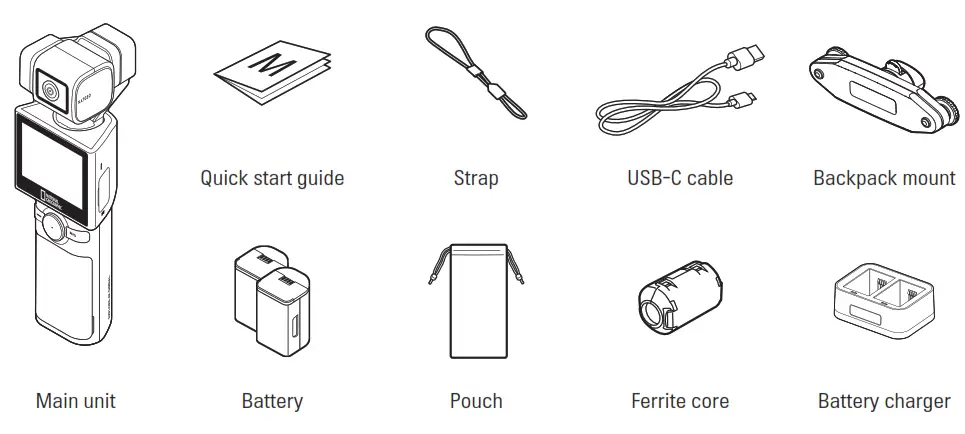
1.1.2 Accessories (sold separately)
Mini tripod / Microphone / ND filter / LCD protective film / Hard protective case (small) / Hard protective case (large) / Head tracker![]() Visit the THINKWARE homepage (http://thinkware.com) to buy extra included items and accessories.
Visit the THINKWARE homepage (http://thinkware.com) to buy extra included items and accessories.
1.2 Part names
1.2.1 Main unit (front/back view)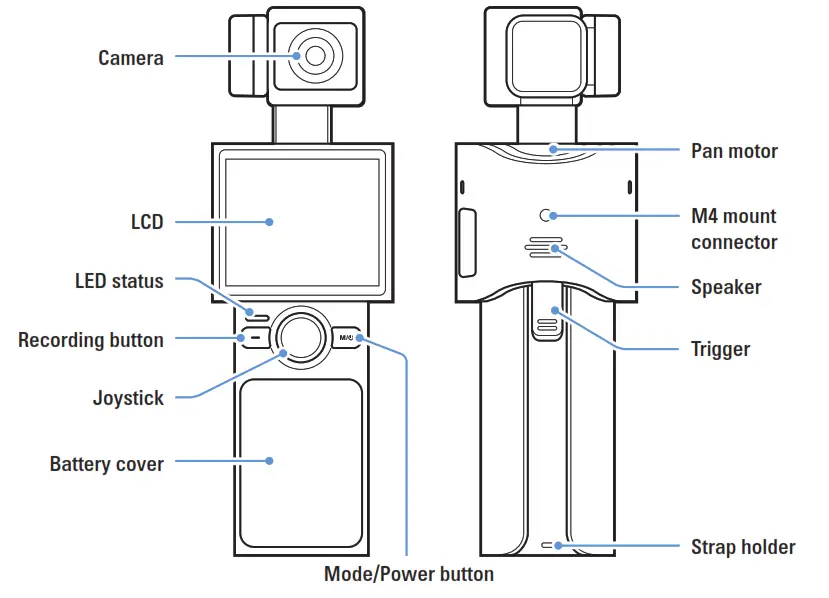
1.2.2 Main unit (side view)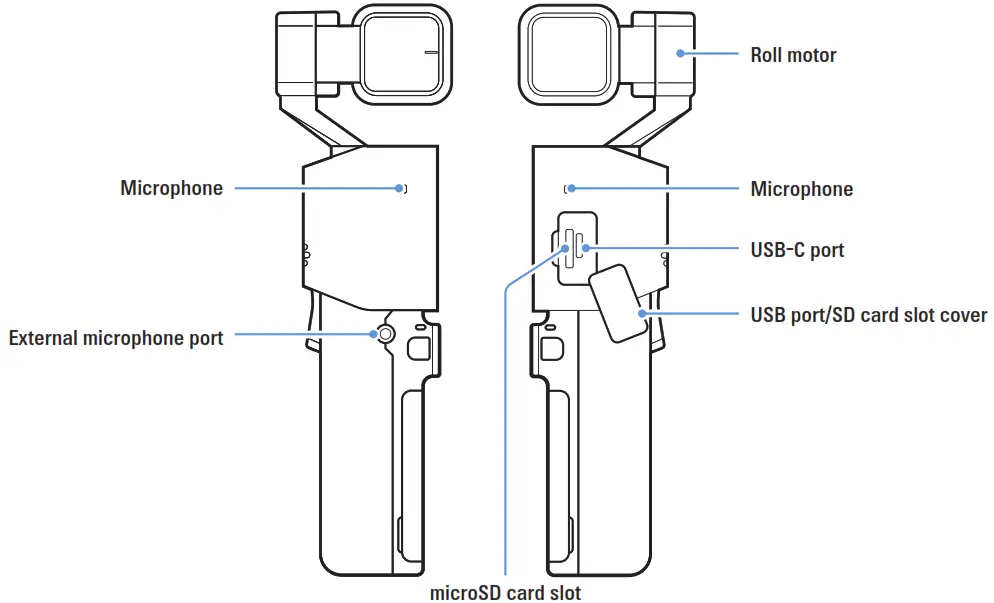
1.2.3 Main unit (top/bottom view)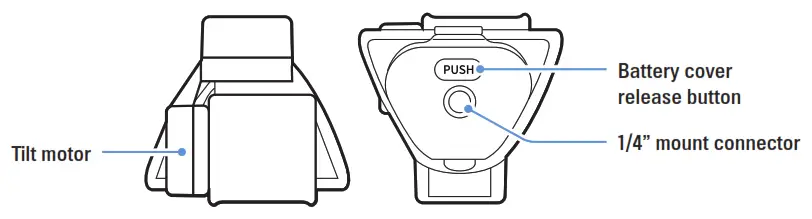
1.3 Removing and inserting the memory card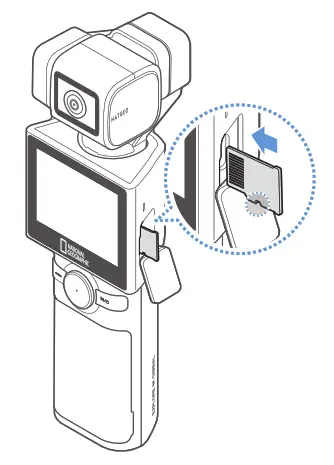 Before removing the memory card, ensure that the product is turned off. Gently push the bottom of the memory card with your fingernail to release it, and then remove it from the product.
To insert the memory card, open the USB/SD card slot cover, ensure that the memory card is in the correct direction, and insert it into the slot until you hear a click.
 Ensure that the memory card is in the correct direction before inserting it into the product. The product slot or the memory card may be damaged if it is inserted incorrectly.
- Format the memory card periodically to avoid memory card fragmentation and storage errors.
 For more information about the recommended microSD cards, visit http://www.thinkware.com/help.
- The recommended microSD cards are subject to change and SD cards from manufacturers other than THINKWARE are not guaranteed to operate properly.
1.4 Removing and inserting the battery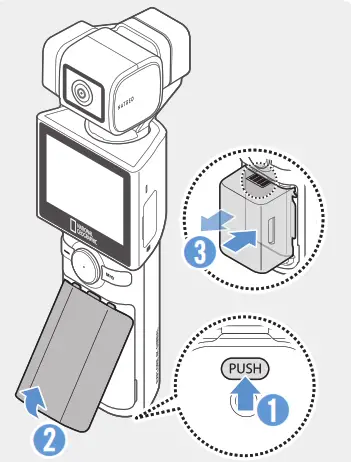
- For optimal performance, use a genuine battery.
- The performance of the product may be limited and the camera performance is not guaranteed if you do not use an authentic battery. For more information on battery safety and use, refer to the Battery Information Guide.
1 Open the battery cover by pressing the battery cover release button and take out the battery by holding the grooves on both sides of the battery.
2 Check that the metal part of the new battery is facing upward and insert it in the correct direction. The product uses a removable battery. Ensure that the battery cover is tightly closed and sealed before using the product.
1.5 Charging the product
1.5.1 Charging the product with a cable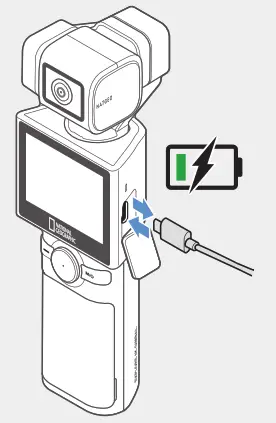
- Connect the product to a USB adapter or computer USB port using the included USB cable.
•Fully charge the battery before using the product for the first time.
• Use an adapter that supports 2A or higher. The product may not charge when using certain adapters.
• If you use a cable other than the included authentic cable, the product may not charge. - When charging begins, the product’s LED indicator will turn red, and when charging is complete, the LED indicator will turn off.
• It takes 180 minutes to fully charge the battery. (You can charge two batteries at the same time by using battery charger.)
• For the fastest charging of the product, use the charger.
• Charging time may vary depending on the charging environment.
1.5.2 Charging the battery with a charger
Check the metal parts of the battery and charger, and be sure tob insert the battery in the correct direction.
| Operation status | LED status |
| Standby | LED off |
| Charging | Red light on |
| Fully charged | Green light on |
| Error | Red + Green lights flicker |
- If you do not know the voltage or current of the charger, use the included USB cable to charge the battery with a laptop or computer.
- This product is for indoor use only and has not been designed for outdoor use or tested for charging leisure vehicles, mobile motor generators, etc.
- Only charge genuine batteries designated for the product.
- Use a 5V adapter and an adapter of 2A or higher. Using a smaller adapter may prevent charging or increase the charging time.
1.6 Turning the product on/off
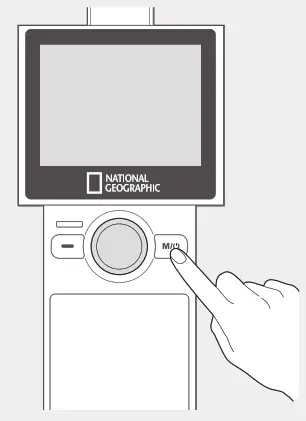
Press and hold theM/![]() button on the product to turn the product on. To turn the product off, press and hold the
button on the product to turn the product on. To turn the product off, press and hold the M/![]() button again.
button again.![]() Be careful when storing or carrying the product as the power may be turned on by pressing the power button.
Be careful when storing or carrying the product as the power may be turned on by pressing the power button.![]() The welcome mode is turned on when the product is turned on. To turn welcome mode off, set it on the gimbal settings menu.
The welcome mode is turned on when the product is turned on. To turn welcome mode off, set it on the gimbal settings menu.
1.7 Checking the battery level
The remaining battery level can be checked through the battery icon displayed at the top-right part of the LCD screen.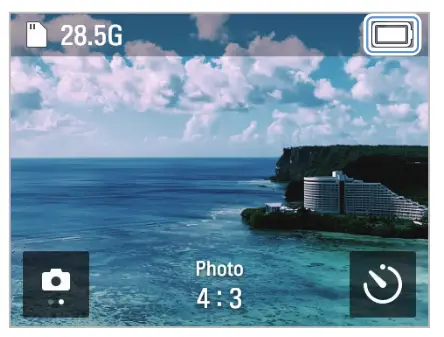
- The battery will last about 60 minutes when you use 4K @60fps, and 140 minutes when you use FHD @24fps.
- The estimated battery life is based on the LCD brightness set to 100% and always on. Battery life will vary depending on resolution and frame settings, screen brightness, and other factors.
1.8 Connecting the product to the backpack mount
You can use the included mount to stabilize the National Geographic gimbal cam in a bag or band. You can conveniently take pictures or record a video without having to hold the camera in your hands when you connect the product to the mount. The backpack mount can be attached as shown below.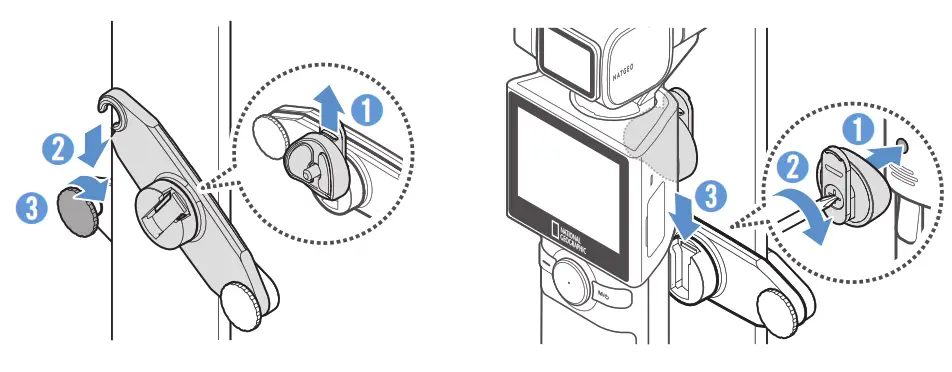
1.9 Connecting the product to the head tracker (optional)
When wearing the head tracker, it recognizes the user and provides tracking. Follow the instructions to properly connect the product and the head tracker.
- Press and hold the power button for more than 3 seconds to turn on the head tracker. Charge the head tracker before use.
- When the power is turned on and the LED indicator flickers green, place the head tracker on a flat, vibration-free surface to calibrate it. Calibration takes about 10 seconds.
- On the National Geographic gimbal cam, tap the Settings(
 ) > Connection Settings > Head tracker >
Head tracker Use switch to activate it, and then tap Head tracker Connect.
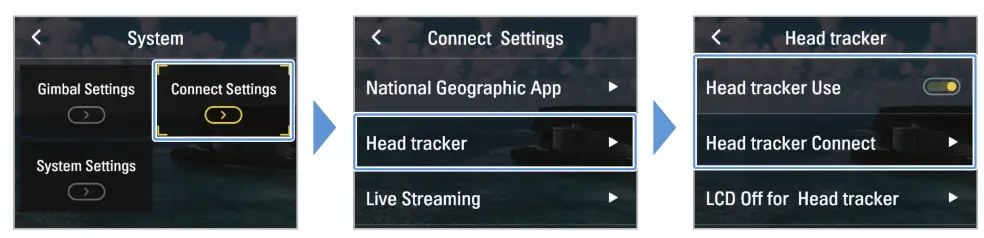
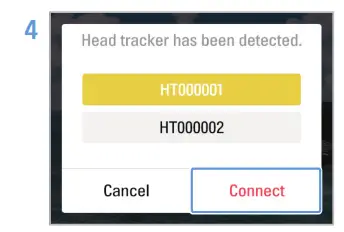
Select the corresponding ID from the search list and tap Connect.
If the head tracker is not found or the connection fails, tap Reconnect to search again.
- Up to three head trackers are listed in order of signal strength.
- If a recently connected head tracker is detected, it will automatically connect.
- Head trackers connected to other devices cannot be connected.
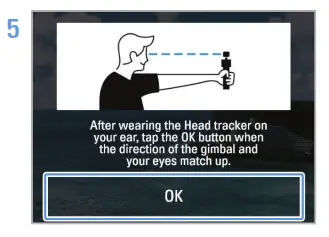
When the product and camera are connected, it will enter origin calibration mode. After putting on the head tracker, adjust the height of the camera by following the on-screen instructions and tap OK.
- For more information about using the head tracker, check the user guide provided with the separately sold product.
- When the product and the head tracker are connected, the head tracker icon will be displayed in white at the top of the screen, and you will be able to check the remaining battery power of the head tracker in the gimbal quick settings.
1.10 Safety information for proper use
Read the following safety information to properly use the product.
Product operation
- If the product is impacted, it may malfunction or break down.
- Avoid contact with sand and liquid to protect the gimbal motor and sensors, etc.
- To prevent damage from high temperatures during product use, it may enter overheat protection mode and stop recording.
- Close the cover to prevent foreign objects from entering the memory slot and USB port before using the product.
- Be careful not to get foreign objects inside the battery cover.
- The proper operating temperature for the product is 10 – 35 °C.
- The battery life may vary depending on the product usage environment (such as low or high temperature) and settings.
Product management
- This product is not waterproof. Clean the product with a soft cloth without using any liquid.
- Foreign objects on the camera lens may crack or break the lens. Clean with a soft cloth.
- Do not use a pointed object or compressed air when removing foreign objects from the microphone hole.
- Store the product in the enclosed soft pouch. Do not impact the gimbal motor when storing the product.
Using the product
2.1 Overview of the LCD
2.1.1 Main menu tree
The main menu tree of the product is as follows.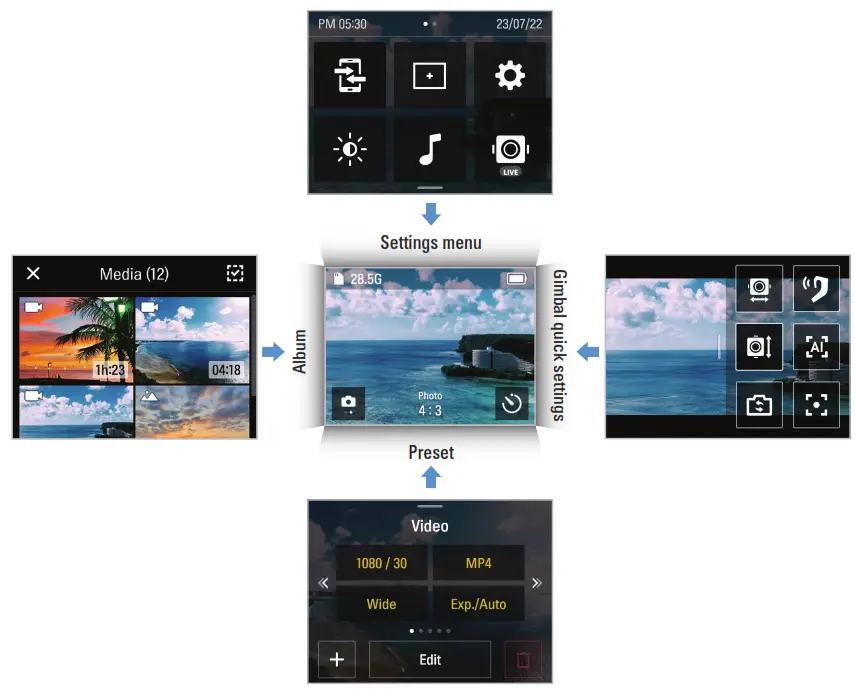 2.1.2 Using the LCD function
You can use the corresponding function by sliding the LCD in each direction.
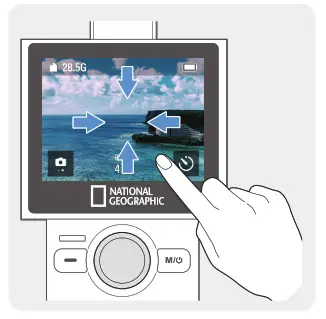
- Swipe Up: Moves to the preset mode.
- Swipe Down: Moves to the settings menu.
- Swipe Left: Moves to the gimbal quick settings.
- Swipe Right: Moves to the album.
![]() You can go back to the preview screen by swiping the LCD in the opposite direction of each direction on each mode screen.
You can go back to the preview screen by swiping the LCD in the opposite direction of each direction on each mode screen.
2.1.3 Screen layout
Preview screen layout
When the product is turned on, the camera preview, recording mode, battery level, and microSD card information are displayed on the LCD.
| Num | Description |
| 1 | Displays SD card information and status. (Estimated recordable time/SD card not inserted/ Insufficient memory capacity/Error) |
| 2 | Displays the battery status. |
| 3 | Tap on the preview screen to hide or show the icons on the screen. |
| 4 | • Displays the currently set mode. • Touch to change video and photo modes. |
| 5 | • Displays the recording settings of the currently set mode. • Swipe or touch the screen to move to the settings. |
| 6 | In photo mode • Touch to set the timer. In video mode • Touch to use dynamic motion recording mode. |
Settings menu screen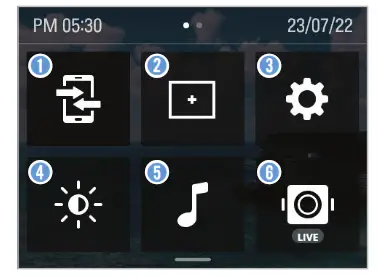
| Num | Description |
| 1 | App connection |
| 2 | Turn the grid on/off (display grid in preview screen) |
| 3 | Settings |
| 4 | LCD brightness |
| 5 | Turn beep on/off |
| 6 | Turn live streaming on/off |
Gimbal quick settings screen
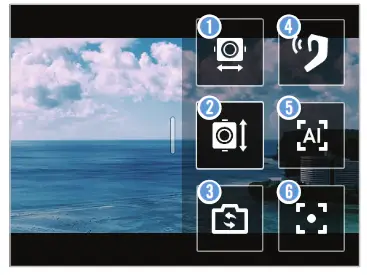
| Num | Description |
| 1 | Gimbal mode settings |
| 2 | Gimbal direction settings |
| 3 | Switch front/selfie mode |
| 4 | Head tracker settings |
| 5 | Tracking settings |
| 6 | Gimbal center alignment |
2.2 Using the buttons
Refer to the table below to use the product’s buttons, trigger and joystick.![]() Press and hold the M /
Press and hold the M /![]() button to turn on the product.
button to turn on the product.
Buttons
| Sort | Preview screen | Recording | ||
| Short press | Long press | Short press | Long press | |
| Start recording | – | Stop recording | – | |
| M / | Photo/video mode switching | Power off | – | Stop recording and power off |
Joystick
| Left | Right | Up | Down |
| Move the camera to the left | Move the camera to the right | Move the camera upward | Move the camera down |
Trigger
| Movement | Preview screen layout | Recording |
| Holding | Use the gimbal control mode set by the user (chosen from among the 5 control modes in gimbal settings) | |
| Press twice | Gimbal center alignment | |
| Press 3 times | Switch front/selfie mode | |
| Trigger +M / | Changing the detailed shooting mode | – |
| Trigger + | Capture a screen while recording a video | |
| Trigger + Joystick up | Zoom in | |
| Trigger + Joystick down | Zoom out | |
- You can change the default and the gimbal mode when holding the trigger on the settings.
- Some button functions are subject to change.
2.3 Overview of LED status and beep
LED status
| Sort | Description |
| Power on | |
| Power off / fully charged | LED off |
| Charging | |
| Recording while charging | |
| Start/stop recording a video | |
| Take a photo / continuous shot | |
| Start/stop taking a panorama | |
| Timer shooting | |
| Calibration in progress |
Buzzer
| Sort | Description |
| Start recording video | 1 single buzz |
| Stop recording video | 3 single buzzes |
| Take a photo/panorama | 1 shutter sound |
| Take a continuous shot | Continuous shutter sounds |
| Calibration complete | 1 completion sound |
Overview of National Geographic gimbal cam features
3.1 Using AI tracking mode
AI tracking mode recognizes additional areas around a person’s face, providing smart recognition extended tracking even for movements that change direction frequently and quickly.![]() Each time you press the button, it switches in the
Each time you press the button, it switches in the![]() following order: AI tracking > Face tracking > Face ID > Tracking mode off.
following order: AI tracking > Face tracking > Face ID > Tracking mode off.
AI tracking mode
1 Swipe left on the preview screen to open the gimbal quick settings, then change the tracking mode to AI tracking mode.![]() Face recognition mode will start in AI tracking mode. When a subject’s face is detected, a square,white border is created around their face.
Face recognition mode will start in AI tracking mode. When a subject’s face is detected, a square,white border is created around their face.![]() If you touch the inside of the square, white border, it turns yellow and tracking starts. When tracking starts, other people’s faces will not be recognized. To stop tracking, touch the square, yellow border.
If you touch the inside of the square, white border, it turns yellow and tracking starts. When tracking starts, other people’s faces will not be recognized. To stop tracking, touch the square, yellow border.


