![]() User Guide
User Guide
R2000S-MHI Dual-SIM LTE IoT Gateway
| x509 | ||
| Item | Description | Default |
| PKCS # 12 Certificate | Select the PKCS # 12 certificate file to import into the route | — |
| Certificate Files | ||
| Index | Indicate the ordinal of the list. | — |
| Filename | Show the imported certificate’s name. | Null |
| File Size | Show the size of the certificate file. | Null |
| Last Modification | Show the timestamp of that the last time to modify the certificate file. | Null |
3.15 VPN>OpenVPN
This section allows you to set the OpenVPN and the related parameters.OpenVPN is an open-source software application that implements virtual private network(VPN) techniques for creating secure point-to-point or site-to-site connections in routed or bridged configurations and remote access facilities. The router supports point-to-point and point-to-point connections.
Click Virtual Private Network> OpenVPN> OpenVPN. The following information is displayed:
OpenVPN
 Click + to add tunnel settings. The maximum count is 3. The window is displayed below when choosing “None” as the authentication type. By default, the model is “P2P”.
OpenVPN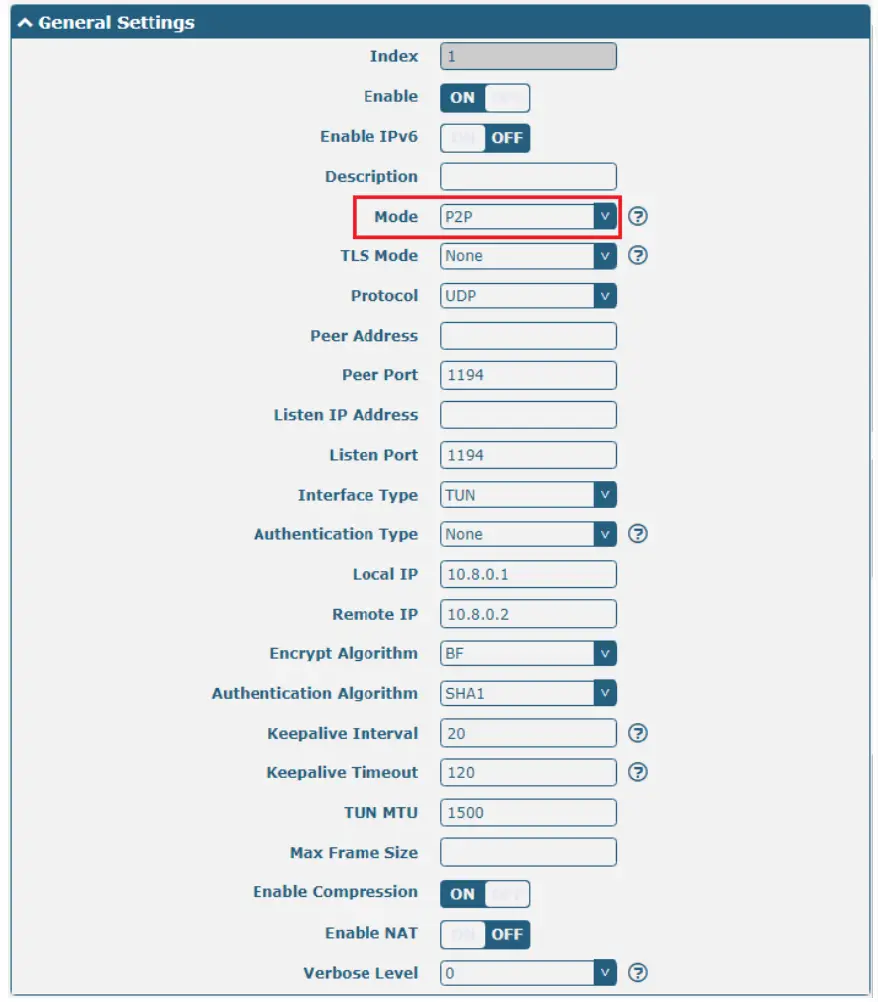
The window is displayed below when choosing “Client” as the mode.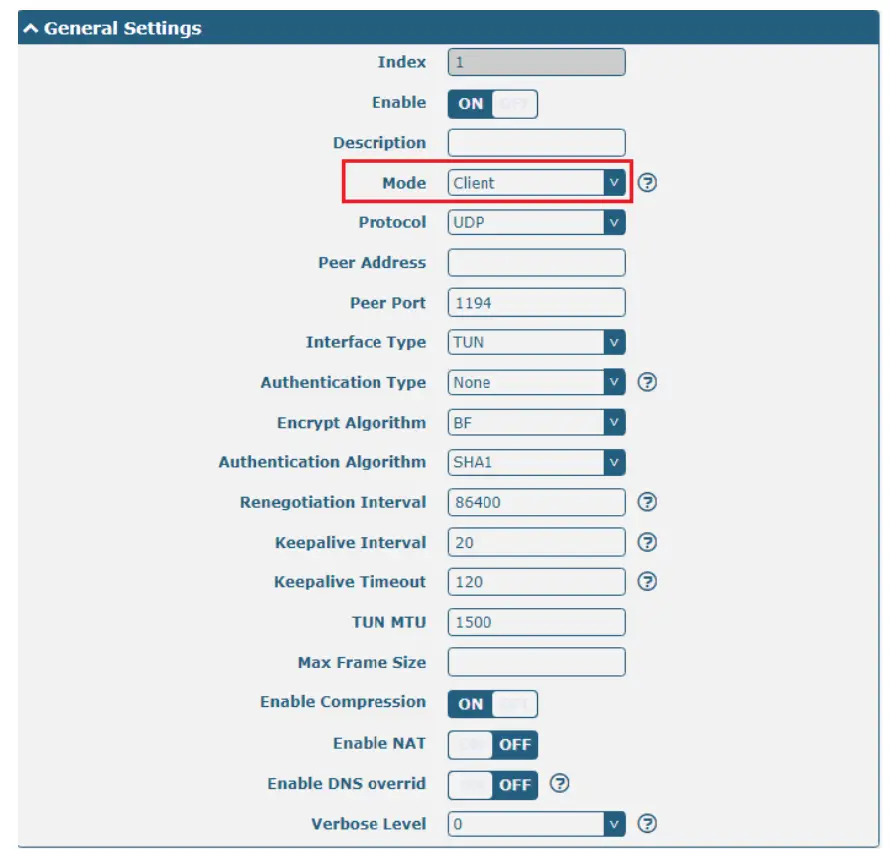
The window is displayed below when choosing “Server” as the mode.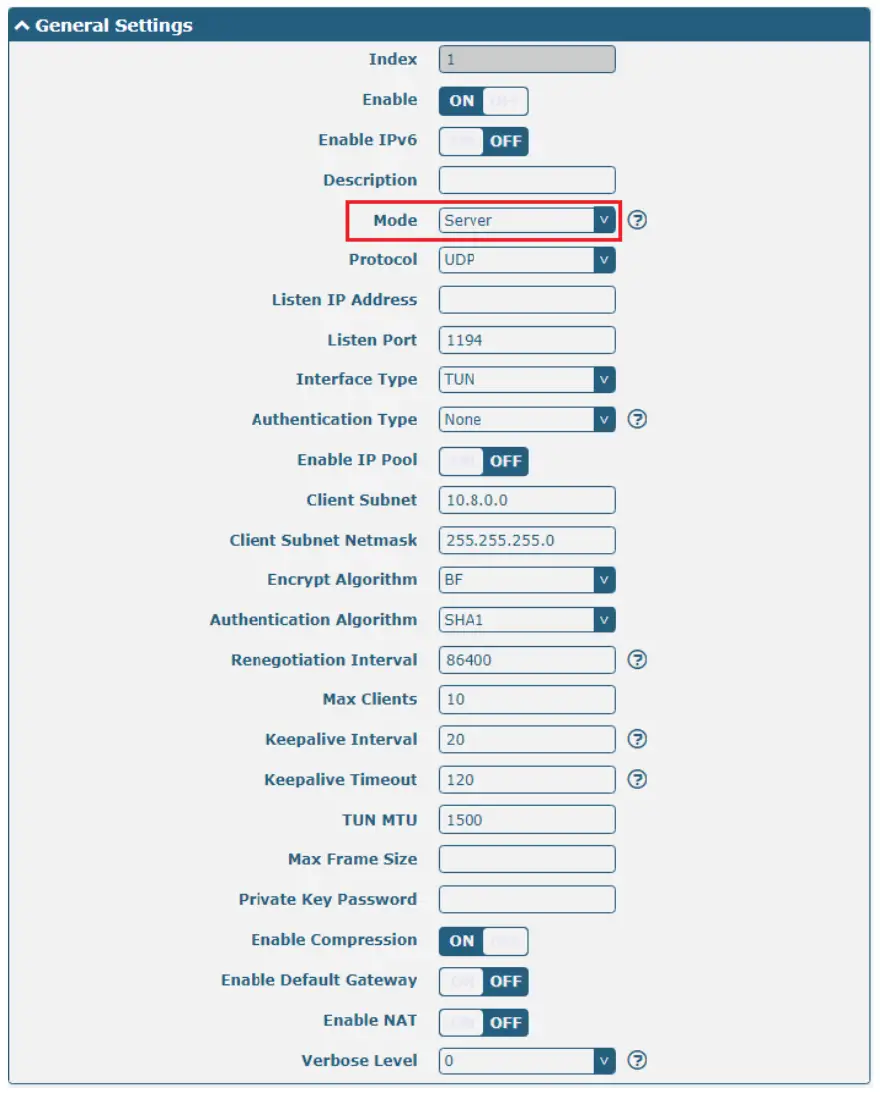
The window is displayed below when choosing “None” as the authentication type.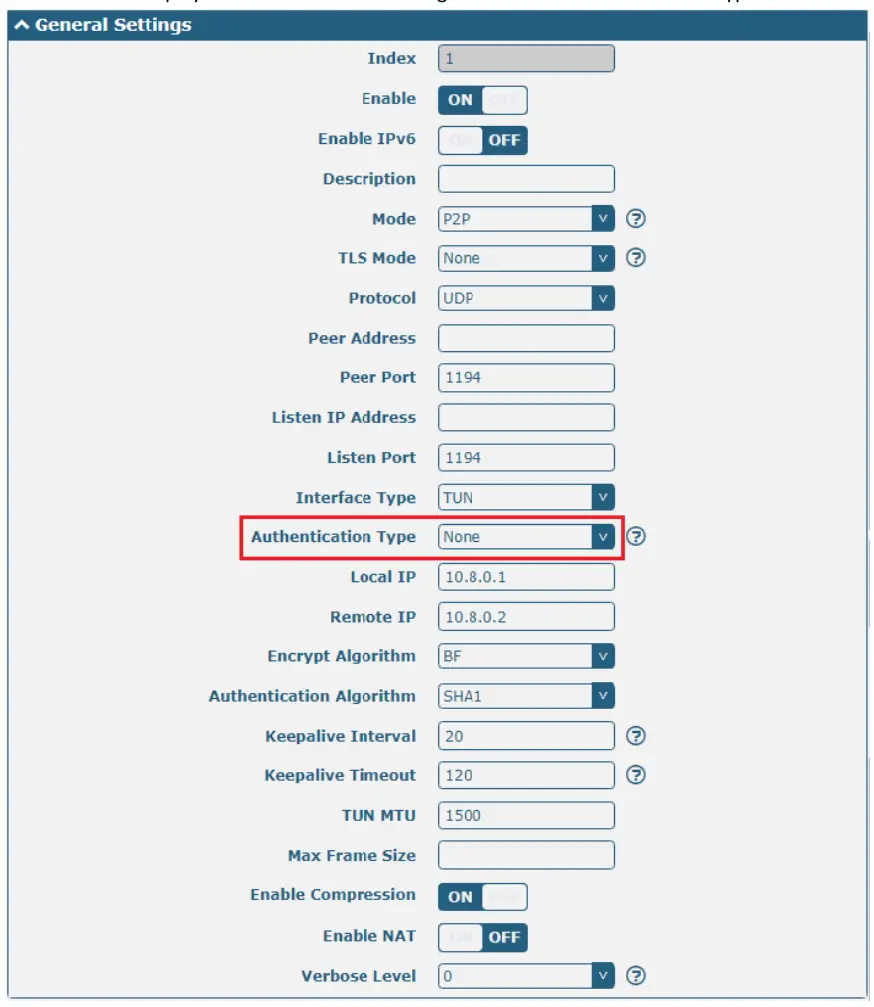
The window is displayed below when choosing “Preshared” as the authentication type.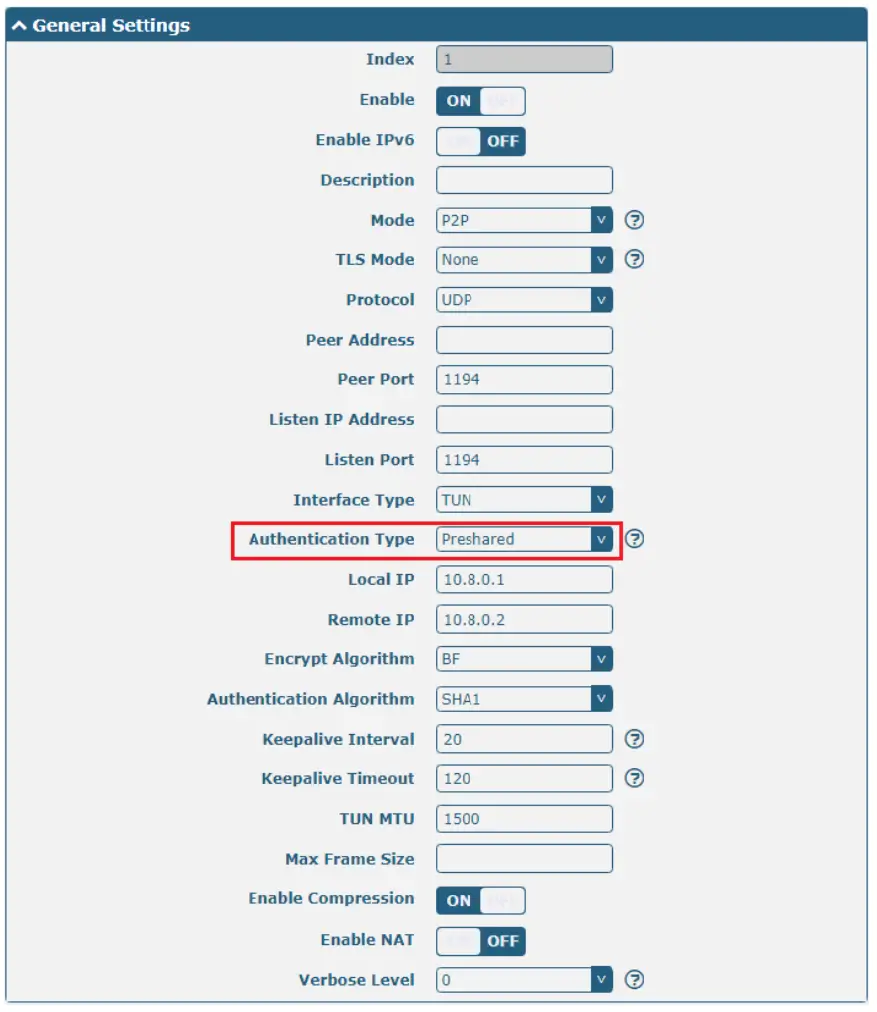
The window is displayed below when choosing “Password” as the authentication type.
The window is displayed as below when choosing “X509CA” as the authentication type.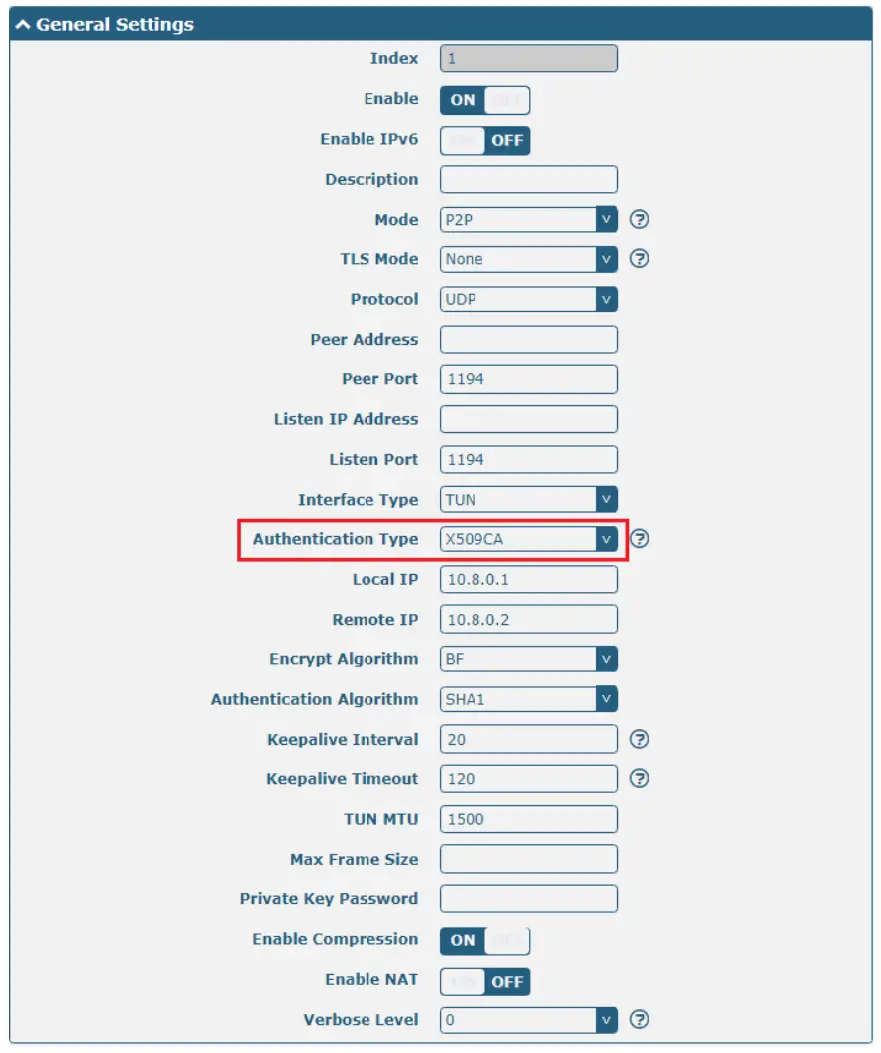 The window is displayed as below when choosing “X 509CA Password” as the authentication type.
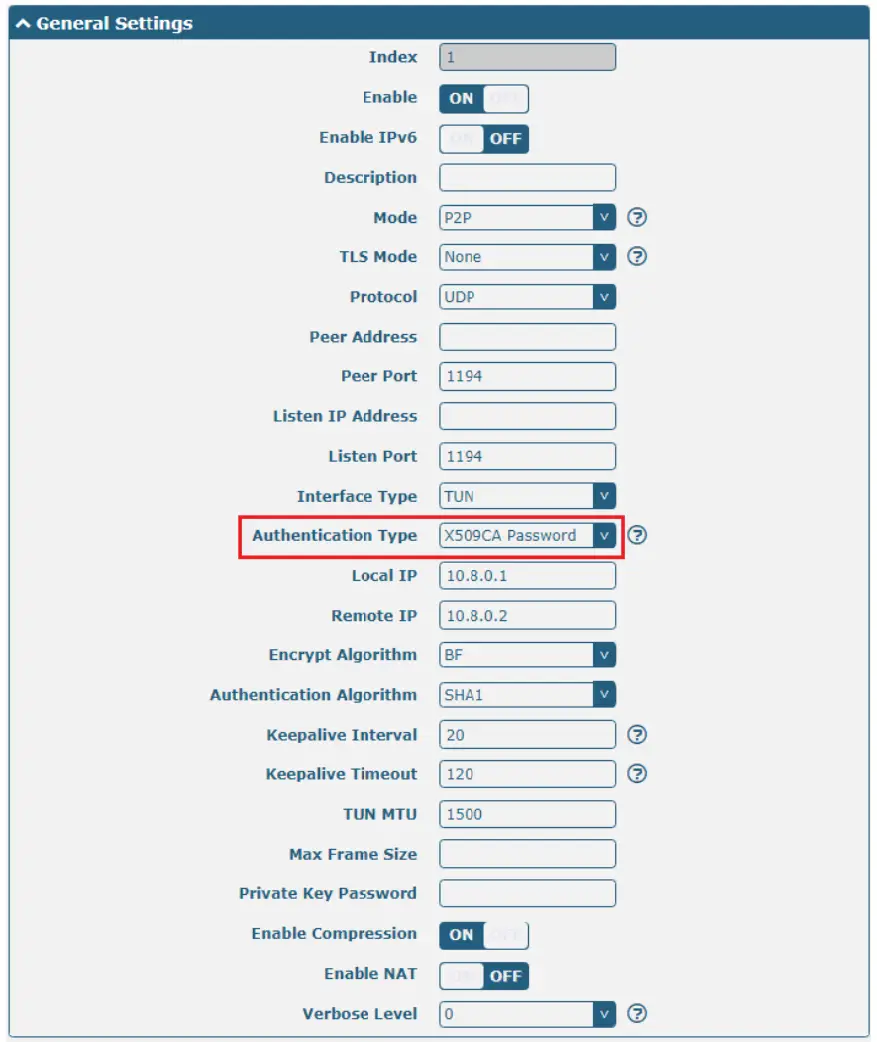 The window is displayed below when choosing “Client” as the mode.
The window is displayed below when choosing “Server” as the mode.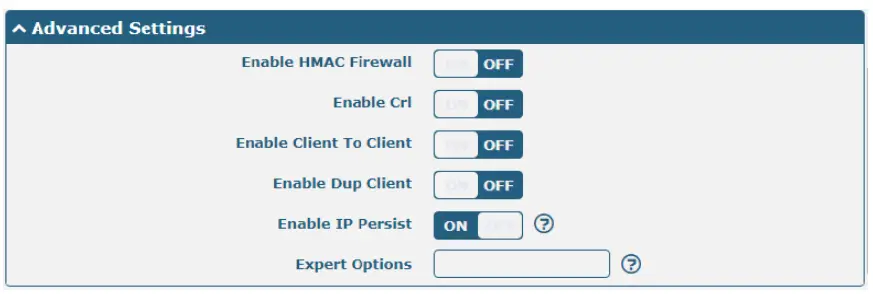
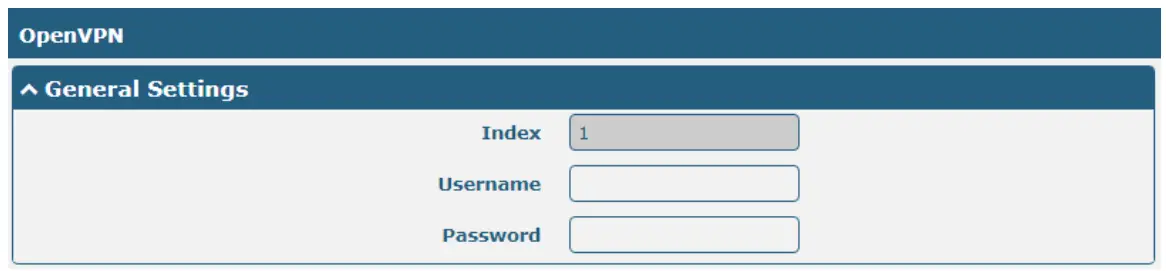
The window of “Virtual Priva ate Network> OpenVPN> > OpenVPN” mode and choosing “X509CA A Password” is displayed as the auth notification type.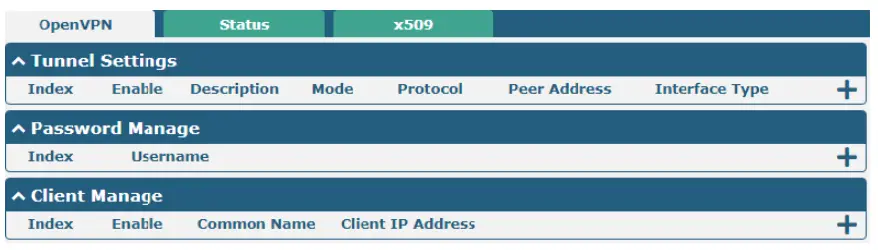 Click User Password Management + to add the user’s name and past password, as shown below:
Click Client Management + to add client information, as shown below: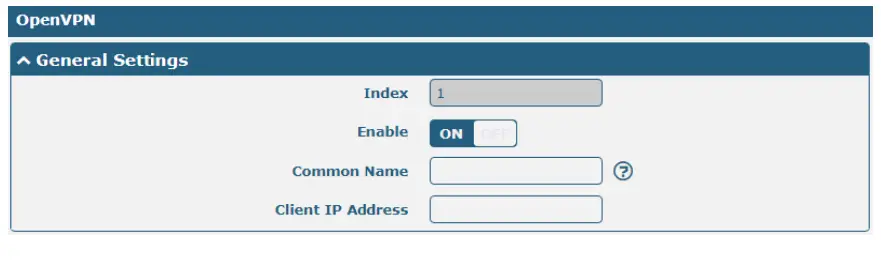
| General Settings @ OpenVPN | ||
| Item | Description | Default |
| Index | Indicate the ordinal of the list. | — |
| Enable | Click the toggle button to enable/disable this OpenVPN tunnel. | ON |
| Enable Ipv6 | Click the toggle button to enable/disable OpenVPN using IPv6. | OFF |
| Description | Enter a description for this OpenVPN tunnel. | Null |
| Mode | Select from “P2P” or “Client”. | Client |
| TLS Mode | Select from “None”, “Client” or “Server”. | None |
| Protocol | Select from “UDP”, “TCP-Client”, or “TCP-Server”. | UDP |
| Server Address | Enter the end-to-end IP address or the domain of the remote OpenVPN server. | Null |
| Server Port | Enter the end-to-end listener port or the listening port of the OpenVPN server. | 1194 |
| Listening Address | Local server address. | Null |
| Listening Port | Local server port. | 1194 |
| Interface Type | Select from “TUN” or “TAP” which are two different kinds of device interfaces for OpenVPN. The difference between TUN and TAP devices is that a TUN device is a point-to-point virtual device on the network while a TAP device is a virtual device on Ethernet. | TUN |
| Authentication Type | Select from “None”, “Preshared”, “Password”, “X509CA” and “X509CA Password”. Note: “None” and “Preshared” authentication types are only working with P2P mode. | None |
| Enable IP Address Pool | Click the toggle button to enable/disable the IP address pool allocation function. | OFF |
| Starting Address | Defines the beginning of an IP address pool that assigns addresses to OpenVPN clients. | 10.8.0.5 |
| End Address | Defines the end of the IP address pool for assigning addresses to OpenVPN clients. | 10.8.0.254 |
| Client Network | Enter the client network IP. | 10.8.0.0 |
| Client Netmask | Enter the client netmask. | 255.255.255.0 |
| Username | Enter the username used for the “Password” or “X509CA Password” authentication type. | Null |
| Password | Enter the password used for the “Password” or “X509CA Password” authentication type. | Null |
| Local IP | Enter the local virtual IP. | 10.8.0.1 |
| Remote IP | Enter the remote virtual IP. | 10.8.0.2 |
| Encrypt Algorithm | Select from “BF”, “DES”, “DES-EDE3”, “AES128”, “AES192” and “AES256”. •BF: Use 128-bit BF encryption algorithm in CBC mode •DES: Use 64-bit DES encryption algorithm in CBC mode •DES-EDE3: Use 192-bit 3DES encryption algorithm in CBC mode •AES128: Use 128-bit AES encryption algorithm in CBC mode •AES192: Use 192-bit AES encryption algorithm in CBC mode •AES256: Use 256-bit AES encryption algorithm in CBC mode | BF |
| Renegotiation Interval | Set the renegotiation interval. If the connection failed, OpenVPN will renegotiate when the renegotiation interval is reached. | 86400 |
| Maximum Number of Clients | Set the maximum number of clients allowed to access the OpenVPN server | 10 |
| Keepalive Interval | Set a keepalive (ping) interval to check if the tunnel is active. | 20 |
| Keepalive Timeout | Set the keepalive timeout. Trigger OpenVPN restart after n seconds pass without reception of a ping or other packet from remote. | 120 |
| MTU | Set the maximum transmission unit. | 1500 |
| Data Fragmentation | Set the maximum frame length. | Null |
| Private Key Password | Enter the private key password under the “X509CA” and “X509CA Password” authentication types. | Null |
| Enable Compression | Click the toggle button to enable/disable this option. Enable to compress the data stream of the header. | ON |
| Enable Default Gateway | Standalone switch button to enable/disable the default gateway function. After enabling, push the local tunnel address as the default gateway of the peer device. | OFF |
| Receive DNS Push | Standalone switch button to enable/disable receiving DNS push function. After enabling, it is allowed to receive DNS information pushed by the peer. | OFF |
| Enable NAT | Click the toggle button to enable/disable the NAT option. When enabled, the source IP address of the host behind the router will be disguised before accessing the remote OpenVPN client. | OFF |
| Verbose Level | Select the level of the output log and values from 0 to 11. •0: No output except fatal errors •1-4: Normal usage range •5: Output R and W characters to the console for each packet read and write •6-11: Debug info range | 0 |
| Advanced Settings @ OpenVPN | ||
| Enable HMAC Firewall | Click the toggle button to enable/disable this option. Add an additional layer of HMAC authentication on top of the TLS control channel to protect against DoS attacks. | OFF |
| Enable PKCS#12 | Click the toggle button to enable/disable the PKCS#12 certificate. It is an exchange of digital certificate encryption standards, used to describe personal identity information. | OFF |
| Enable nsCertType | Click the toggle button to enable/disable nsCertType. Require that the peer certificate was signed with an explicit serotype designation of “server”. | OFF |
| Enable Crl | Click the toggle button to enable/disable the option. When enabled, client certificates can be revoked. | OFF |
| Enable Client to Client | Click the toggle button to enable/disable the option. When enabled, clients can communicate with each other. | OFF |
| Enable Dup Client | Click the toggle button to enable/disable the option. After being enabled, the tunnel IPs obtained by multiple clients are different, and the tunnel IP of the client and the tunnel IP of the server are interoperable. | OFF |
| Enable IP Address Hold | Click the toggle button to enable/disable the option. When enabled, the IP in the address pool is obtained automatically. | ON |
| Expert Options | Enter some other options of OpenVPN in this field. Each expression can be separated by a ‘;’. | Null |
| Advanced Settings @ User Password Management | ||
| Username | Custom tunnel connection username. | Null |
| Password | Custom tunnel connection password. | Null |
| Client Management | ||
| Enable | Click the toggle button to enable/disable this option. When enabled, the client’s IP address can be managed. | OFF |
| Common Name | Set the certificate name. | Null |
| Client IP Address | Set a fixed client virtual IP. | Null |
Status
This allows you to view the status of the OpenVPN tunnel.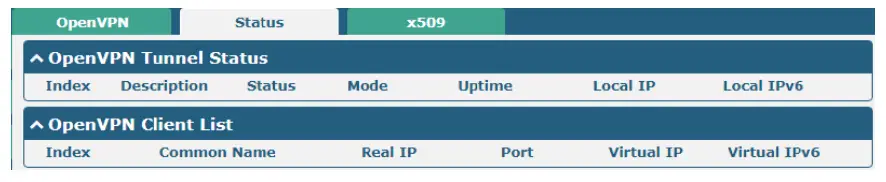 x509
x509
Users can upload the X509 certificates for OpenVPN in this section.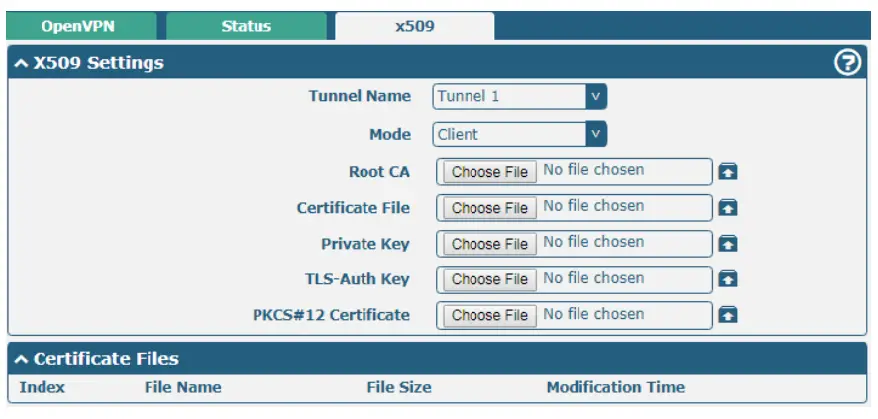
| x509 | ||
| Item | Description | Default |
| X509 Settings | ||
| Tunnel Name | Choose a valid tunnel. Select from “Tunnel 1”, “Tunnel 2”, “Tunnel 3”, “Tunnel 4”, “Tunnel 5″or “Tunnel 6”. | Tunnel 1 |
| Tunnel mode | Select “P2P Mode”, “Client Mode” or “Server Mode”. | Client mode |
| Root certificate | Select the root certificate file to import into the router. | — |
| Certificate Files | Click on “Choose File” to locate the certificate file from your computer, and then import this file into your router. | — |
| Private Key | Select the private key file to import into the router. | — |
| TLS-Auth Key | Select the TLS-Auth key file to import into the router. | — |
| PKCS # 12 Certificate | Select the PKCS # 12 certificate file to import into the router. | — |
| Certificate Files | ||
| Index | Indicate the ordinal of the list. | — |
| Filename | Show the imported certificate’s name. | Null |
| File Size | Show the size of the certificate file. | Null |
| Last Modification | Show the timestamp of that the last time to modify the certificate file. | Null |
3.16 VPN > GRE
This section allows you to set the GRE and the related parameters. Generic Routing Encapsulation (GRE) is a tunneling protocol that can encapsulate a wide variety of network layer protocols inside virtual point-to-point links over an Internet Protocol network. There are two main uses of the GRE protocol: enterprise internal protocol encapsulation and private address encapsulation.
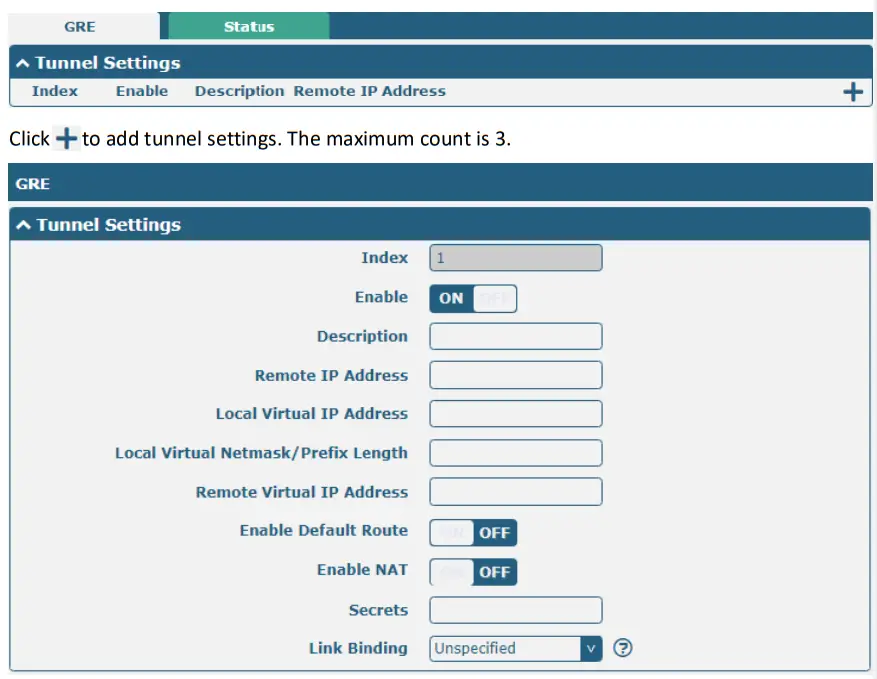
| Tunnel Settings @ GRE | ||
| Item | Description | Default |
| Index | Indicate the ordinal of the list. | — |
| Enable | Click the toggle button to enable/disable this GRE tunnel. | ON |
| Description | Enter a description for this GRE tunnel. | Null |
| Remote IP Address | Set the remote real IP address of the GRE tunnel. | Null |
| Local Virtual IP Address | Set the local virtual IP address of the GRE tunnel. | Null |
| Local Virtual Netmask/ IPv6 prefix length | Set the local virtual Netmask of the GRE tunnel. | Null |
| Remote Virtual IP Address | Set the remote virtual IP Address of the GRE tunnel. | Null |
| Enable Default Route | Click the toggle button to enable/disable this option. When enabled, all the traffics of the router will go through the GRE VPN. | OFF |
| Enable NAT | Click the toggle button to enable/disable this option. This option must be enabled when the router is under a NAT environment. | OFF |
| Secrets | Set the key to the GRE tunnel. | Null |
| Link Binding | Select from “WWAN1”, “WWAN2”, “WAN”, or “WLAN”. | Not bound |
Status
This section allows you to view the status of the GRE tunnel.

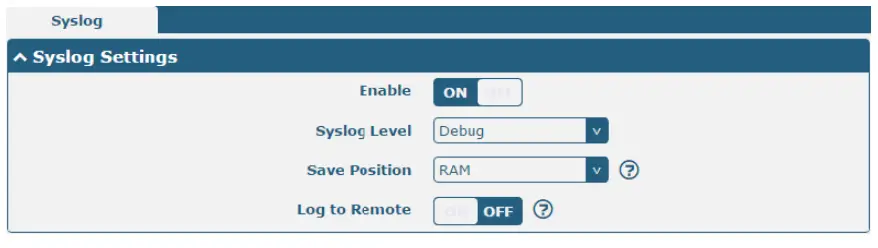
3.17 Services> Syslog
This section allows you to set the Syslog parameters. The system log of the router can be saved in the local, also supports to be sent to remote log server and specified application debugging. By default, the “Log to Remote” option is disabled.
 The window is displayed as below when enabling the “Log to Remote” option.
| Syslog Settings | ||
| Item | Description | Default |
| Enable | Click the toggle button to enable/disable the Syslog settings option. | OFF |
| Sy log Level | Select from “Debug”, “Info”, “Notice”, “Warning”, or “Error”, which from low to high. The lower level will output more Syslog in detail. | Debug |
| Save Position | Select the save position from “RAM”, “NVM” or “Console”. The data will be cleared after reboot when choosing “RAM”. Note: It’s not recommended that you save Syslog to NVM (Non‐Volatile Memory) for a long time. | RAM |
| Log to Remote | Click the toggle button to enable/disable this option. Enable to allow router sending Syslog to the remote Syslog server. You need to enter the IP and port of the Syslog server. | OFF |
| Add Identifier | Click the toggle button to enable/disable this option. When enabled, you can add a serial number to the Syslog message which is used for loading Syslog to RobustLink. | OFF |
| Remote IP Address | Enter the IP address of the Syslog server when enabling the “Log to Remote” option. | Null |
| Remote Port | Enter the port of the Syslog server when enabling the “Log to Remote” option. | 514 |
3.18 Services> Event
This section allows you to set the event parameters. The event feature provides the ability to send alerts by SMS or Email when certain system events occur.
| General Settings @ Event | ||
| Item | Description | Default |
| Signal Quality Threshold | Set the threshold for signal quality. The router will generate a log event when the actual threshold is less than the specified threshold. 0 means disable this option. | 0 |
 Click + button to add Event parameters.
| General Settings @ Notification | ||
| Item | Description | Default |
| In ex | Indicate the ordinal of the list. | ‐‐ |
| Description | Enter a description for this group. | Null |
| Sent SMS | Click the toggle button to enable/disable this option. When enabled, the router will send notifications to the specified phone numbers via SMS if an event occurs. Set the related phone number in “3.21 Services > Email”, and use ‘;’ to separate each number. | OFF |
| Send Email | Click the toggle button to enable/disable this option. When enabled, the router will send a notification to the specified email box via Email if an event occurs. Set the related email address in “3.21 Services > Email”. | OFF |
| D Control | Click the toggle button to enable/disable this option. After it is turned on, the event router will send it to the corresponding DO in the form of Low / High level. | OFF |
| Save to NVM | Click the toggle button to enable/disable this option. Enable to save the event to nonvolatile memory. | OFF |
In the following window, you can query various types of event records. Click Refresh to query filtered events while Clear clicking to clear the event records in the window.
| Event Details | ||
| Item | Description | Default |
| Save Position | Select the events’ save position from”RAM” or “NVM”. • RAM: Random-access memory • NVM: Non-Volatile Memory | RAM |
| Filter Message | Enter the filtering message based on the keywords set by users. Click the “Refresh” button, the filtered event will be displayed in the following box. Use “&” to separate more than one filter message, such as message & message2. | Null |
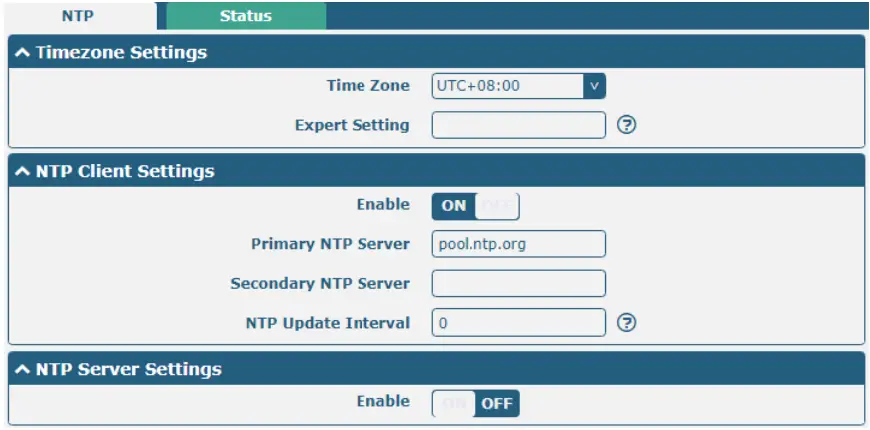
3.19 Services > NTP
This section allows you to set the related NTP (Network Time Protocol) parameters, including Time zone, NTP Client, and NTP Server.
| NTP | ||
| Item | Description | Default |
| Timezone Settings | ||
| Time Zone | Click the drop-down list to select the time zone you are in. | UTC +08:00 |
| Expert Setting | Specify the time zone with Daylight Saving Time in TZ environment variable format. The Time Zone option will be ignored in this case. | Null |
| NTP Client Settings | ||
| Enable | Click the toggle button to enable/disable this option. Enable to synchronize time with the NTP server. | ON |
| Primary NTP Server | Enter the primary NTP Server’s IP address or domain name. | pool.ntp.org |
| Secondary NTP Server | Enter the secondary NTP Server’s IP address or domain name. | Null |
| NTP Updateinterval | Enter the interval (minutes)synchronizing the NTP client time with the NTP servers. Minutes wait for the next update, and 0 means update only once. | 0 |
| NTP Server Settings | ||
| Enable | Click the toggle button to enable/disable the NTP server option. | OFF |
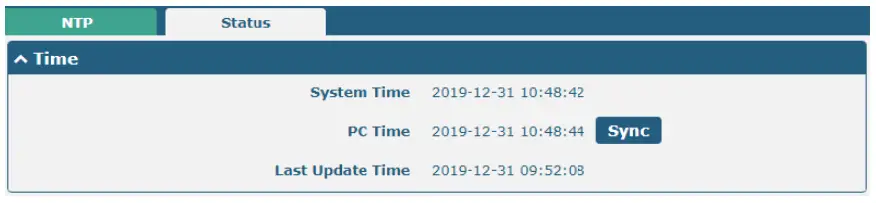
This window allows you to view the current time of the router and also synchronize the router time. Click the Sync button to synchronize the router time with the PCs.
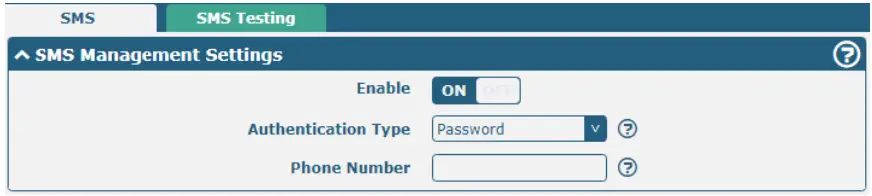
3.20 Services> SMS
This section allows you to set SMS parameters. The router supports SMS management, and users can control and configure their routers by sending SMS. For more details about SMS control, refer to 4.1.2 SMS RemoteControl.
| SMS Management Settings | ||
| Item | Description | Default |
| Enable | Click the toggle button to enable/disable the SMS Management option. Note: If this option is disabled, the SMS configuration is invalid. | ON |
| Authentication Type | Select Authentication Type from “Password”, “Phonenum” or “Both”. • Password: Use the same username and password as the WEB manager for authentication. For example, the format of the SMS should be “username: password; cmd; cmd2; …” Note: Set the WEB manager password in the System > User Management section. • Phonenum: Use the Phone number for authentication, and the user should set the Phone Number that is allowed for SMS management. The format of the SMS should be “cmd; cmd2; …” • Both: Use both the “Password” and “Phonenum” for authentication. The user should set the Phone Number that is allowed for SMS management. The format of the SMS should be “username: password; cmd; cmd2; …” | Password |
| Phone Number | Set the phone number used for SMS management, and use`; ‘to separate each number. Note: It can be null when choosing “Password” as the authentication type. | Null |
Users can test the current SMS service whether it is available in this section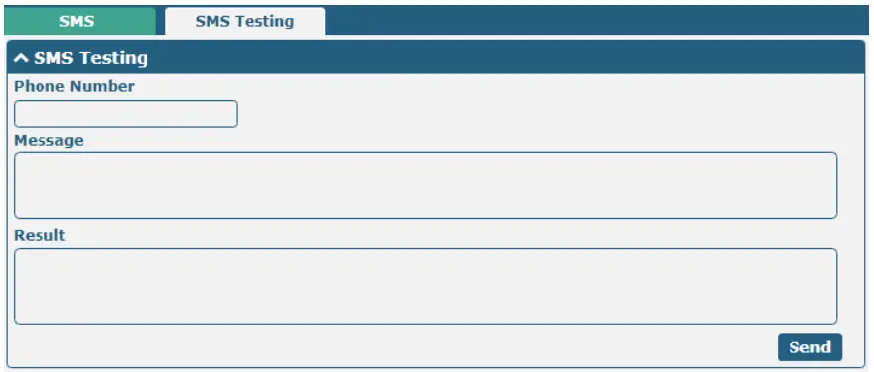
| SMS Testing | ||||
| Item | Description | Default | ||
| Phone Number | Enter the specified phone number which can receive the SMS from the router. | Null | ||
| Message | Enter the message that the router will send to the specified phone number. | Null | ||
| Result | The result of the SMS test will be displayed in the result box. | Null | ||
| Click the button to send the test message. | — | |||
3.21 Services >Email
The email function supports sending the event notifications to the specified recipient by way of an email.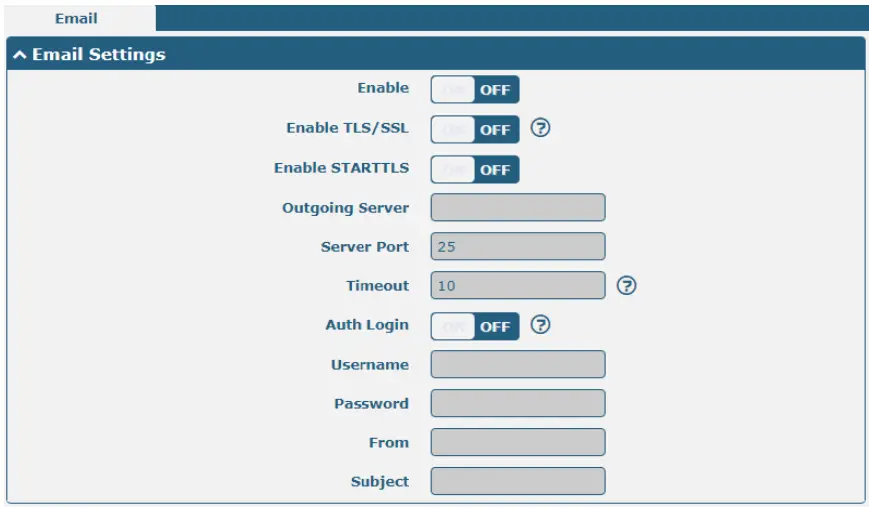
| Email Settings | ||
| Item | Description | Default |
| Enable | Click the toggle button to enable/disable the Email option. | OFF |
| Enable TLS/SSL | Click the toggle button to enable/disable the TLS/SSL option. | OFF |
| Enable STARTTLS | Click the toggle button to enable/disable STARTTLS encryption. | OFF |
| Outgoing server | Enter the SMTP server IP Address or domain name. | Null |
| Server port | Enter the SMTP server port. | 25 |
| Timeout | Set the max time for sending email to the SMTP server. When the server doesn’t receive the email over this time, it will try to resend. | 10 |
| Auth Login | If the mail server supports AUTH login, you must enable this button and set a username and password. | OFF |
| Username | Enter the username which has been registered from the SMTP server. | Null |
| Password | Enter the password of the username above. | Null |
| From | Enter the source address of the email. | Null |
| Subject | Enter the subject of this email. | Null |
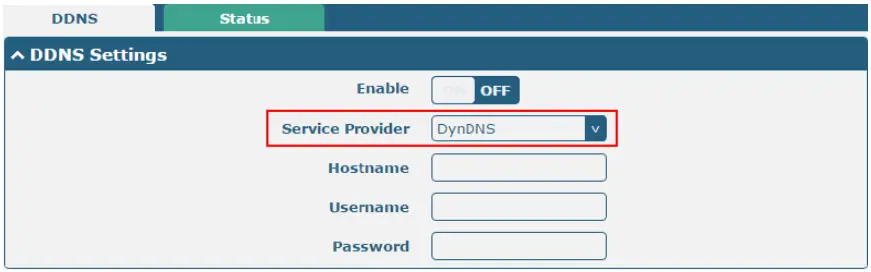
3.22 Services > DDNS
This section allows you to set the DDNS parameters. The Dynamic DNS function allows you to alias a dynamic IP address to a static domain name, and allows you whose ISP does not assign them a static IP address to use a domain name. This is especially useful for hosting servers via your connection, so that anyone wishing to connect to you may use your domain name, rather than having to use your dynamic IP address, which changes from time to time. This dynamic IP address is the WAN IP address of the router, which is assigned to you by your ISP. The service provider defaults to “DynDNS”, as shown below.
When the “Custom” service provider is chosen, the window is displayed as below.

| DDNS Settings | ||
| Item | Description | Default |
| Enable | Click the toggle button to enable/disable the DDNS option. | OFF |
| Service Provider | Select the DDNS service from “DynDNS”,”NO-IP”, “3322” or “Custom”. Note: The DDNS service only can be used after being registered by the Corresponding service provider. | DynDNS |
| Hostname | Enter the hostname provided by the DDNS server. | Null |
| Username | Enter the username provided by the DDNS server. | Null |
| Password | Enter the password provided by the DDNS server. | Null |
| URL | Enter the URL customized by the user. | Null |
Click the ″Stauts″ bar to view the status of the DDNS
| DDNS Status | |
| Item | Description |
| Status | Display the current status of the DDNS. |
| Last Update Time | Display the date and time for the DDNS was last updated successfully. |
3.23 Services > SSH
The router supports SSH password access and secret-key access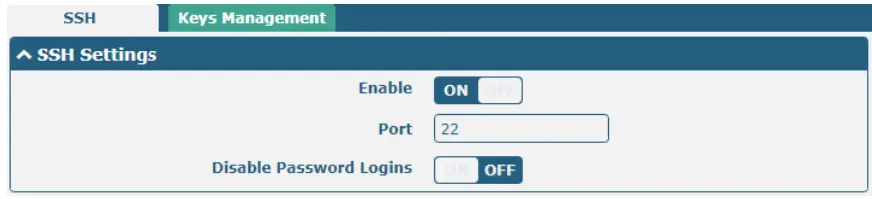
| SSH Settings | ||
| Item | Description | Default |
| Enable | Click the toggle button to enable/disable this option. When enabled, you can access the router via SSH. | ON |
| Port | Set the port of the SSH access. | 22 |
| Disable Password Logins | Click the toggle button to enable/disable this option. When enabled, you cannot use a username and password to access the router via SSH. In this case, only the key can be used for login. | OFF |

| Import Authorized Keys | |
| Item | Description |
| Authorized Ke s | Click on “Choose File” to locate an authorized key from your computer, and then click “Import” to import this key into your router. Note: This option is valid when enabling the password logins option. |
3.24 Services > Web Server
This section allows you to modify the parameters of the Web Server.
| General ettings @ Web Server | ||
| Item | Description | Default |
| HTTP Port | Enter the HTTP port number you want to change in the router’s Web Server. On a Web server, port 80 is the port that the server “listens to” or expects to receive from a Web client. If you configure the router with other HTTP Port numbers except 80, only adding that port number then you can log in router’s Web Server. | 80 |
| HTTPS Port | Enter the HTTPS port number you want to change in the router’s Web Server. On a Web server, port 443 is the port that the server “listens to” or expects to receive from a Web client. If you configure the router with other HTTPS Port numbers except 443, only adding that port number then you can log in router’s Web Server. Note: HTTPS is more secure than HTTP. In many cases, clients may be exchanging confidential information with a server, which needs to be secured in order to prevent unauthorized access. For this reason, HTTP was developed by Netscape corporation to allow authorization and secured transactions. | 443 |
This section allows you to import the certificate file into the router.

| Import Certifi ate | ||
| Item | Description | Default |
| Import Type | Select from “CA” and “Private Key”.
| CA |
| HTTPS Certific te | Click on “Choose File” to locate the certificate file from your computer, and then click “Import” to import this file into your router. | ‐‐ |
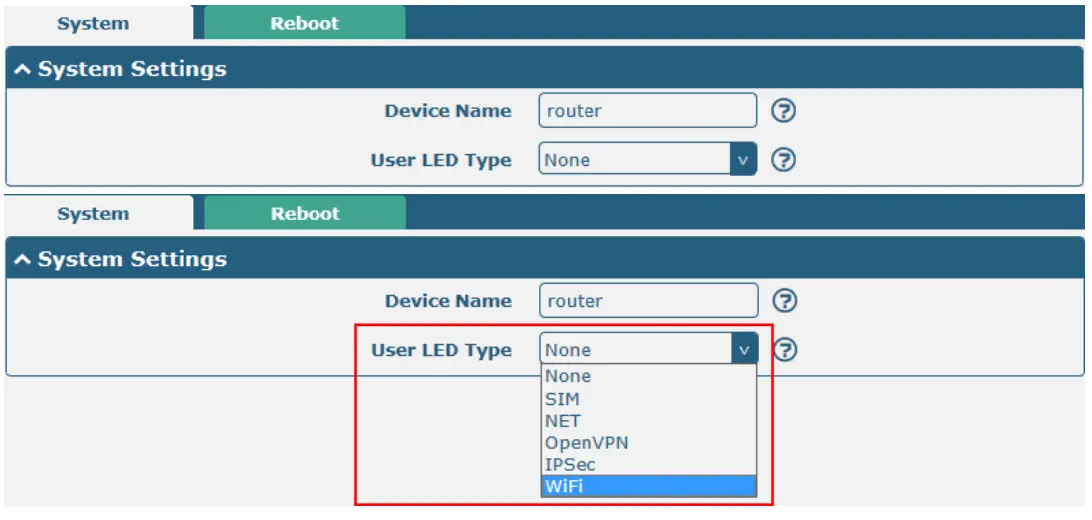
3.25 Services > Advanced
This section allows you to set the Advanced and parameters.
| System Setti gs | ||
| Item | Description | Default |
| Device Name | Set the device name to distinguish different devices you have installed; valid characters are a‐z, A‐Z, 0‐9, @, ., ‐, #, $, and *. | router |
| User LED Type | Specify the display type of your USR LED. Select from “None”, “SIM”, “NET”, “OpenVPN”, “IPSec”, or “WiFi”.
Note: For more details about the USR indicators, see “2.2 LED Indicators”. | None |

| Periodic Reboot Settings | ||
| Item | Description | Default |
| Periodic Reboot | Set the reboot period of the router. 0 means disable. | 0 |
| Daily Reboot Time | Set the daily reboot time of the router. You should follow the format as HH: MM, in 24h time frame, otherwise, the data will be invalid. Leave it empty means disable. | Null |
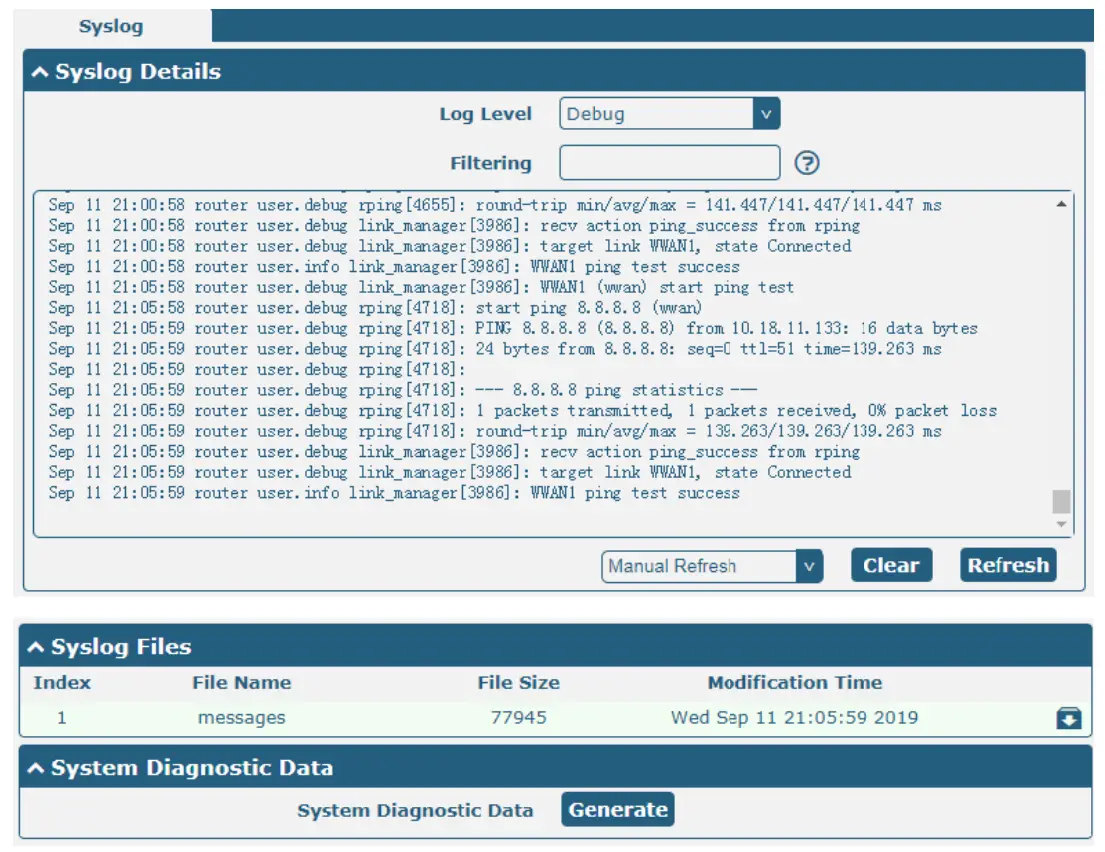
3.26 System>Debug
This section allows you to check and download the Syslog details.
| Syslog | ||
| Item | Description | Default |
| Syslog Details | ||
| Log Level | Select from “Debug”, “Info”, “Notice”, “Warn”, and “Error” from low to high. The lower level will output more Syslog in detail. | Debug |
| Fil ering | Enter the filtering message based on the keywords. Use “&” to separate more than one filter message, such as “keyword1&keyword2”. | Null |
| Refresh | Select from “Manual Refresh”, “5 Seconds”, “10 Seconds”, “20 Seconds” or “3 Seconds”. You can select these intervals to refresh the log information displayed in the following box. If selecting “manual refresh”, you should click the refresh button to refresh the Syslog. | Manual Refresh |
Clear | Click the button to clear the Syslog. | ‐‐ |
Refresh | Click the button to refresh the Syslog. | ‐‐ |
| Syslog Files | ||
| Sy log Files Lis | It can show at most 5 Syslog files in the list, the files’ names range from message0 to message 4. And the newest Syslog file will be placed at the top of the list. | ‐‐ |
| System Diagnosing Data | ||
Generate | Click to generate the Syslog diagnosing file. | ‐‐ |
Download | Click to download the system diagnosing file. | ‐‐ |
3.27 System>Update
This section allows you to upgrade the router system and implement system updates by importing and updating
firmware files. Import a firmware file from the computer to the router, and click Update and restart the device as prompted to complete the firmware update.
Note: To access the latest firmware file, please contact your technical support engineer.
3.28 System>App Center
This section allows you to add some required or customized applications to the router. Import and install your application to the App Center, and reboot the device according to the system prompts. Each installed application will be displayed under the “Services” menu, while other applications related to VPN will be displayed under the “VPN” menu. Note: After importing the applications to the router, the page display may have a slight delay due to the browser cache. It is recommended that you clear the browser cache first and log in to the router again. The successfully installed app will be displayed in the following list. Click X to uninstall the app.
| App Center | ||
| Item | Description | Default |
| App Install | ||
| File | Click on “Choose File” to locate the App file from your computer, and then click Install to import this file into your router.Note: File format should be xxx.rpk, e.g.R2000‐robustlink‐1.0.0.rpk. | ‐‐ |
| Installed Apps | ||
| In ex | Indicate the ordinal of the list. | ‐‐ |
| Name | Show the name of the App. | Null |
| Version | Show the version of the App. | Null |
| St tus | Show the status of the App. | Null |
| Description | Show the description for this App. | Null |
3.29 System> Tools
This section provides users with three tools: Ping, Traceroute, and Sniffer.
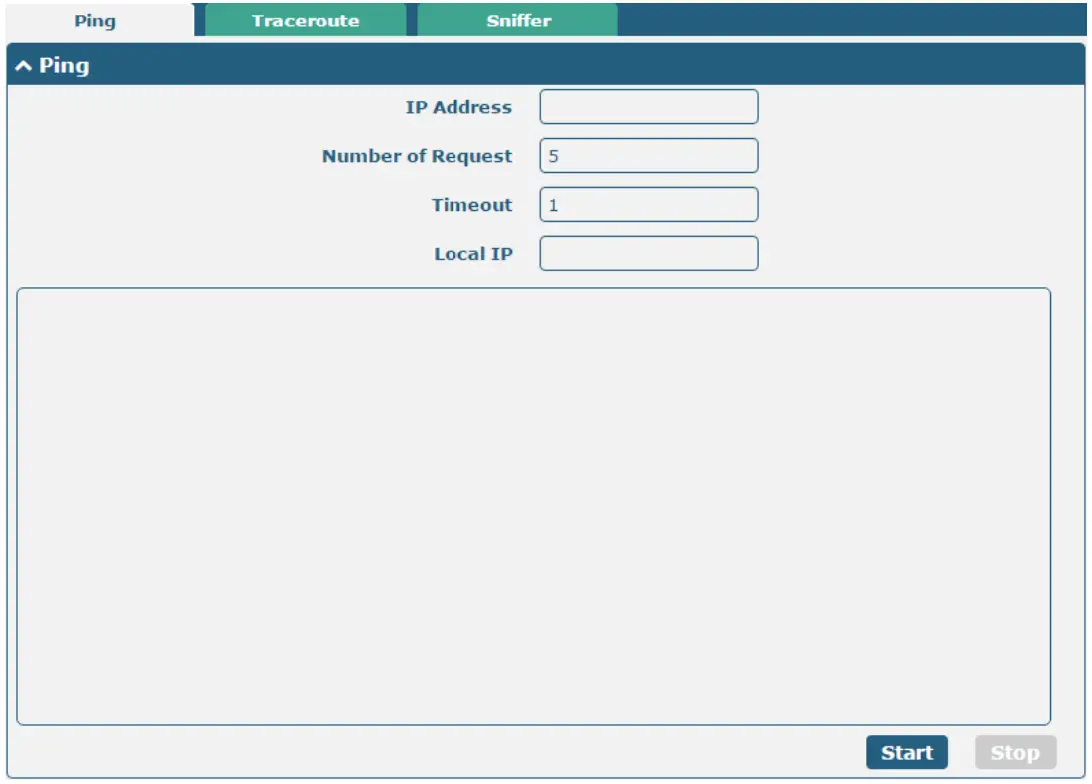
| Ping | ||
| Item | Description | Default |
| IP address | Enter the ping’s destination IP address or destination domain. | Null |
| Number of Re guests | Specify the number of ping requests. | 5 |
| Timeout | Specify the timeout of ping requests. | 1 |
| Local IP | Specify the local IP from cellular WAN, Ethernet WAN, or Ethernet LAN. Null stands for selecting a local IP address from these three automatically. | Null |
Start | Click this button to start a ping request, and the log will be displayed in the following box. | ‐‐ |
Stop | Click this button to stop the ping requests. | ‐‐ |
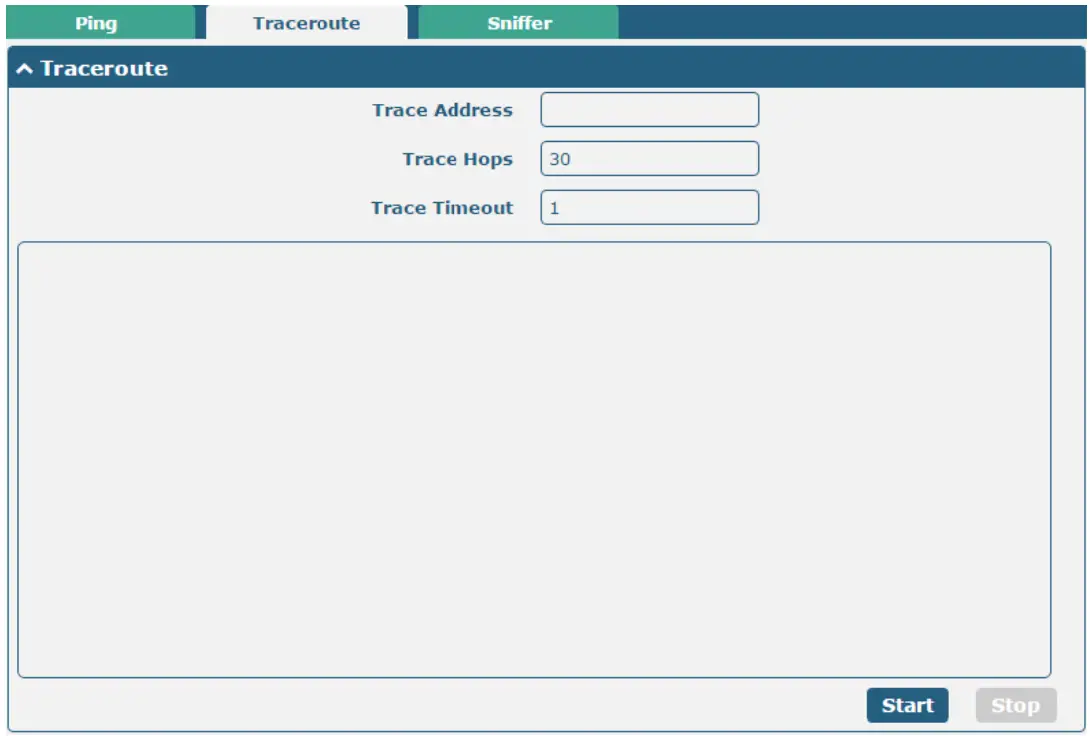
Traceroute | ||
| Item | Description | Default |
| Trace Address | Enter the trace’s destination IP address or destination domain. | Null |
| Trace Hops | Specify the max trace hops. The router will stop tracing if the trace hops have met the max value no matter whether the destination has been reached or not. | 30 |
| Trace Timeout | Specify the timeout of the Traceroute request. | 1 |
Start | Click this button to start the Traceroute request, and the log will be displayed in the following box. | ‐‐ |
Stop | Click this button to stop the Traceroute request. | ‐‐ |
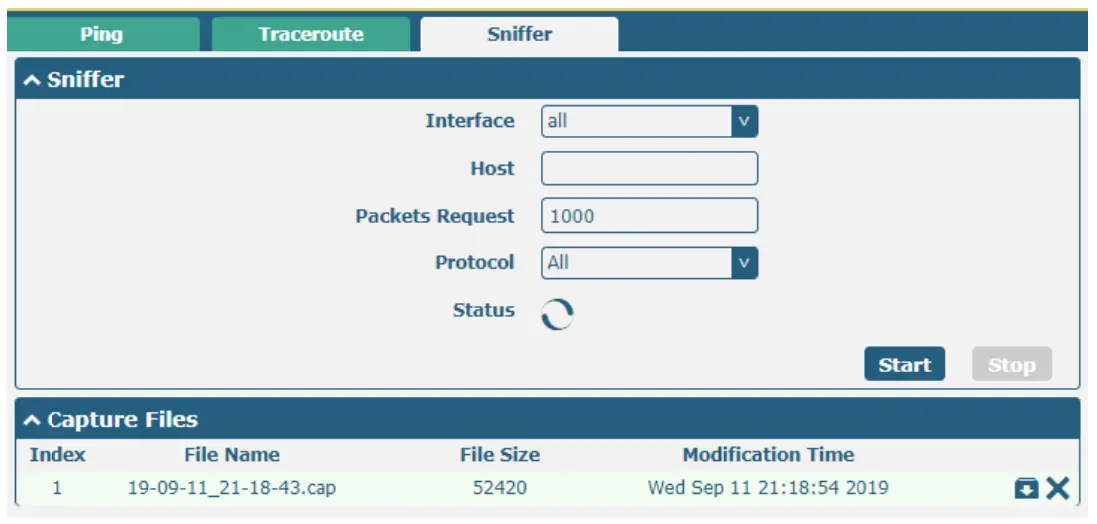
Sniffer | ||
| Item | Description | Default |
| Interface | Choose the interface according to your Ethernet configuration. | All |
| Host | Filter the packet that contains the specified IP address. | Null |
| Packets Request | Set the packet number that the router can sniffer at a time. | 1000 |
| Protocol | Select from “All”, “IP”, “TCP”, “UDP” and “ARP”. | All |
| St tus | Show the current status of the sniffer. | ‐‐ |
Start | Click this button to start the sniffer. | ‐‐ |
Stop | Click this button to stop the sniffer. Once you click this button, a new log file will be displayed in the following List. | ‐‐ |
| Capture Files | Every time of sniffer log will be saved automatically as a new file. You can find the file from this Sniffer Traffic Data List click × to delete the log file. It can cache a maximum of 5 files. | ‐‐ |
3.30 System> Profile
This section allows you to import or export the configuration file, and restore the router to the factory default setting.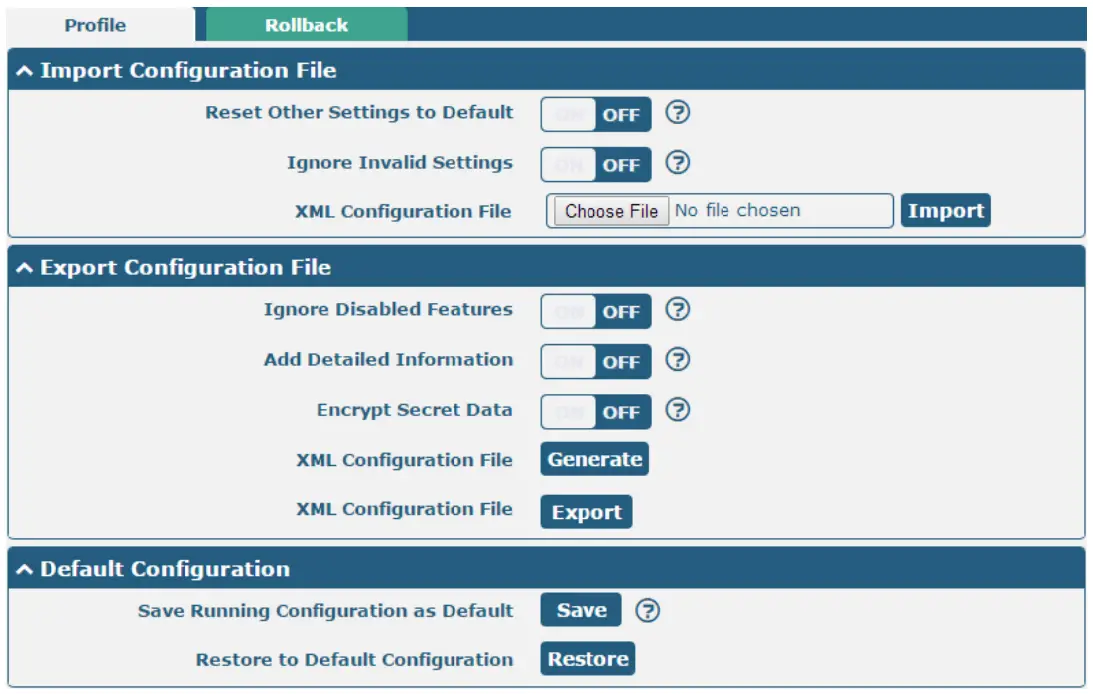
Profile | ||
| Item | Description | Default |
| Import Configuration File | ||
| Reset Other Settings to Default | Click the toggle button as “ON” to return other parameters to default settings. | OFF |
| Ig ore Invalid settings | Click the toggle button as “OFF” to ignore invalid settings. | OFF |
| X L Configuration File | Click on Choose File to locate the XML configuration file from your computer, and then click Inport to import this file into your router. | ‐‐ |
Export Configuration File | ||
| Ig ore Disabled Features | Click the toggle button as “OFF” to ignore the disabled features. | OFF |
| Add Detailed Information | Click the toggle button as “On” to add detailed information. | OFF |
| Encrypt Secret Data | Click the toggle button as “ON” to encrypt the secret data. | OFF |
| X L Configuration File | Click Generate the button to generate the XML configuration file, and click Export to export the XML configuration file. | ‐‐ |
Def ult Configuration | ||
| Save the Running configuration as Default | Click Save the button to save the current running parameters as the default configuration. | ‐‐ |
| Restore to Default Configuration | Click Restore the button to restore the factory defaults. | ‐‐ |

Rollback | ||
| Item | Description | Default |
| Configuration Rollback | ||
| Save as a Rollbackable Archive | Create a savepoint manually. Additionally, the system will create a savepoint every day automatically if configuration changes. | ‐‐ |
| Configuration Archive Files | ||
| Configuration Archive Files | View the related information about configuration archive files, including name, size, and modification time. | ‐‐ |
3.31 System> User Management
This section allows you to change your username and password, and create or manage user accounts. One router has only one super user who has the highest authority to modify, add and manage other common users.
Note: Your new password must be more than 5 characters and less than 32 characters and may contain numbers, upper and lowercase letters, and standard symbols.
Su er User Set ings | ||
| Item | Description | Default |
| New Username | Enter a new username you want to create; valid characters are a‐z, A‐Z, 0‐9, @, ., ‐, #, $, and *. | Null |
| Old Password | Enter the old password of your router. The default is “admin”. | Null |
| New Password | Enter a new password you want to create; valid characters are a‐z, A‐Z, 0‐9, @, ., ‐, #, $, and *. | Null |
| Confirm Password | Enter the new password again to confirm. | Null |

Click ![]() the button to add a new common user. The maximum rule count is 5.
the button to add a new common user. The maximum rule count is 5.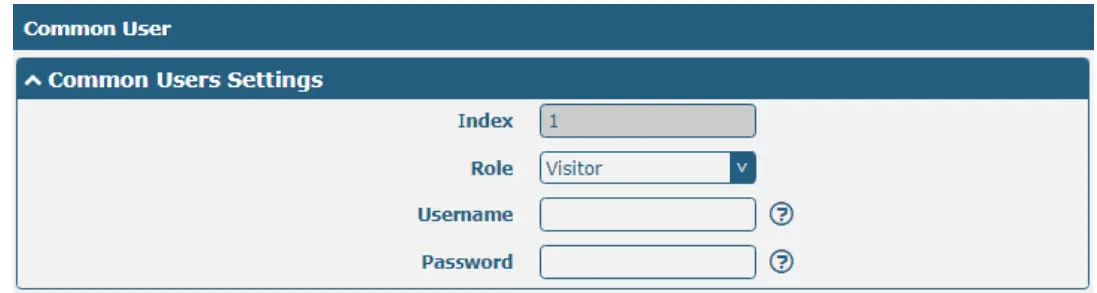
Common User S things | ||
| Item | Description | Default |
| In ex | Indicate the ordinal of the list. | ‐‐ |
| Role | Select from “Visitor” and “Editor”.
| Visitor |
| Username | Set the Username; valid characters are a‐z, A‐Z, 0‐9, @, ., ‐, #, $, and *. | Null |
| Password | Set the password which at least contains 5 characters; valid characters are a‐z, A‐Z, 0‐9, @, ., ‐, #, $, and *. | Null |
Chapter 4 Configuration Examples
4.1 Cellular
4.1.1 Cellular Dial‐Up
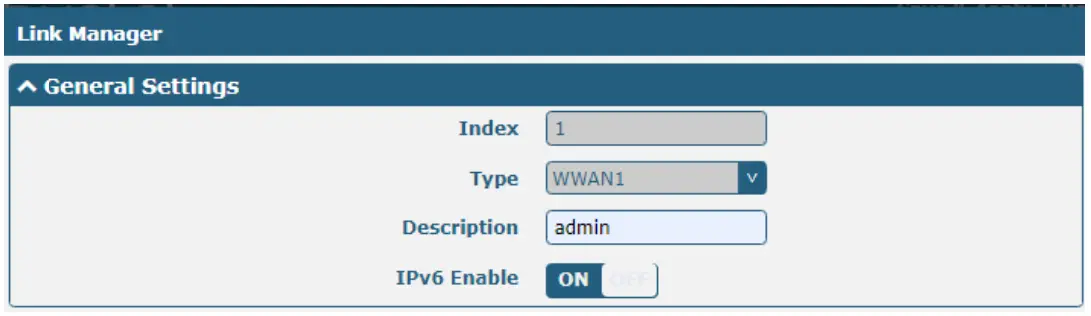
This section shows you how to configure the primary and backup SIM card for Cellular Dial‐up. Connect the router correctly and insert two SIM, then open the configuration page. Under the homepage menu, click Interface > Link Manager > Link Manager > General Settings, choose “WWAN1” as the primary link and “WWAN2” as the backup link, and set “Cold Backup” as the backup mode, then click “Submit”.
Note: All data will be transferred via WWAN1 when choosing WWAN1 as the primary link and set the backup mode as a cold backup. At the same time, WWAN2 is always offline as a backup link. All data transmission will be switched to WWAN2 when the WWAN1 is disconnected.
Click ![]() the button of WWAN1 to set its parameters according to the current ISP.
the button of WWAN1 to set its parameters according to the current ISP.
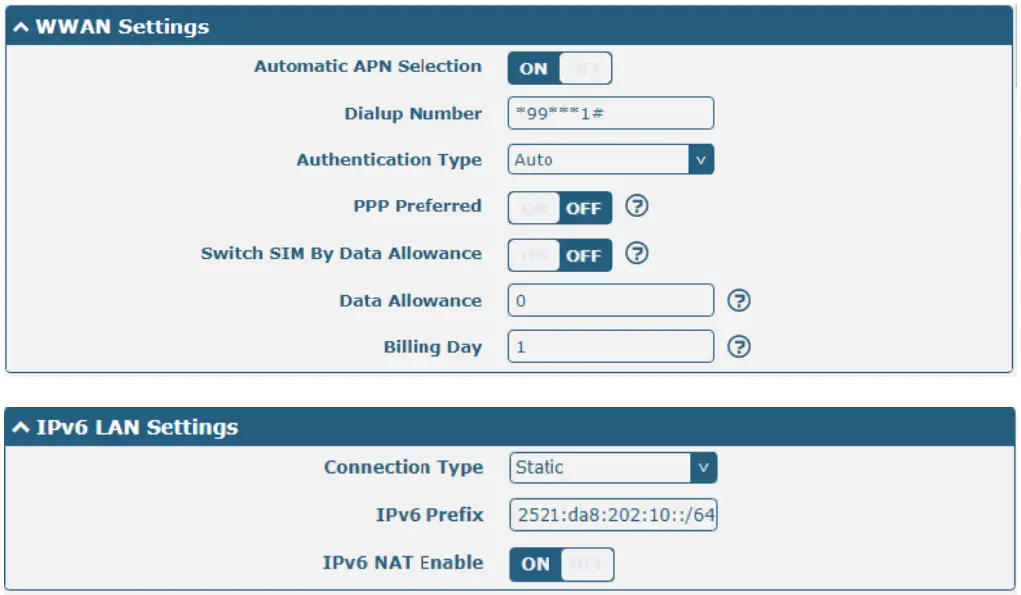
The window is displayed below by clicking Interface > Cellular > Advanced Cellular Settings.

Click the edit button of SIM1 to set its parameters according to your application request.
When finished, click Submit > Save & Apply for the configuration to take effect.
4.1.2 SMS Remote Control
R2000supports remote control via SMS. You can use the following commands to get the status of the router, and set all the parameters of the router. There are three authentication types for SMS control. You can select from “Password”, “Phonenum” or “Both”.
An SMS command has the following structure:
- Password mode—Username: Password;cmd1;cmd2;cmd3; …code (available for every phone number).
- phonenum mode‐‐ Password; cmd1; cmd2; cmd3; … code (available when the SMS was sent from the phone number which had been added to the router’s phone group).
- Both modes‐‐ Username: Password;cmd1;cmd2;cmd3; …code(available when the SMS was sent from the phone number which had been added in the router’s phone group).
SMS command Explanation:
- User name and Password: Use the same username and password as the WEB manager for authentication.
- cmd1, cmd2, cmd3 to Cmdn, the command format is the same as the CLI command, more details about CLI cmd please refer to Chapter 5 Introductions for CLI.
Note: Download the configured XML file from the configured web browser. The format of SMS control command can refer to the data of the XML file.
Go to System > Profile > Export Configuration File, clickGenerateto generate the XML file, and clickExportto export the XML file. XML command:
<lan >
<network max_entry_num=”2″ >
<id > 1</id >
<interface > lan0</interface >
<ip > 172.16.10.67</ip >
<netmask > 255.255.0.0</netmask >
<mtu > 1500</mtu >
SMS cmd:
set lan network 1 interface lan0
set lan network 1 ip 172.16.10.67
set lan network 1 netmask 255.255.0.0
set lan network 1 mtu 1500 - The semicolon character (‘;’) is used to separate more than one command packed in a single SMS.
- E.g.
admin:admin;status system
In this command, the username is “admin”, the password is “admin”, and the function of the command is to get the system status.
SMS received:
hardware_version = 1.0
firmware_version = “3.0.0”
kernel_version = 3.10.49
device_model = R2000
serial_number = 111111111
system_uptime = “0 days, 06:17:32”
system_time = “Thu Jul617:28:51 2017”
 XML command:
admin:admin;reboot
In this command, the username is “admin”, the password is “admin”, and the command is to reboot the Router.
SMS received:
OK
admin:admin;set firewall remote_ssh_access false;set firewall remote_telnet_access false
In this command, the username is “admin”, the password is “admin”, and the command is to disable the remote_ssh
and remote_telnet access.
SMS received:
OK
OK
admin:admin; set lan network 1 interface lan0;set lan network 1 IP 172.16.99.11;set lan network 1 netmask
255.255.0.0;set lan network 1 mtu 1500
In this command, the username is “admin”, the password is “admin”, and the command is to configure the LAN parameter.
SMS received:
OK
OK
OK
OK
4.2 Network
4.2.1 IPsec VPN
The configuration of server and client is as follows.
IPsecVPN_Server:
Cisco 2811:

Click ![]() the button and set the parameters of IPsec Client as below.
the button and set the parameters of IPsec Client as below.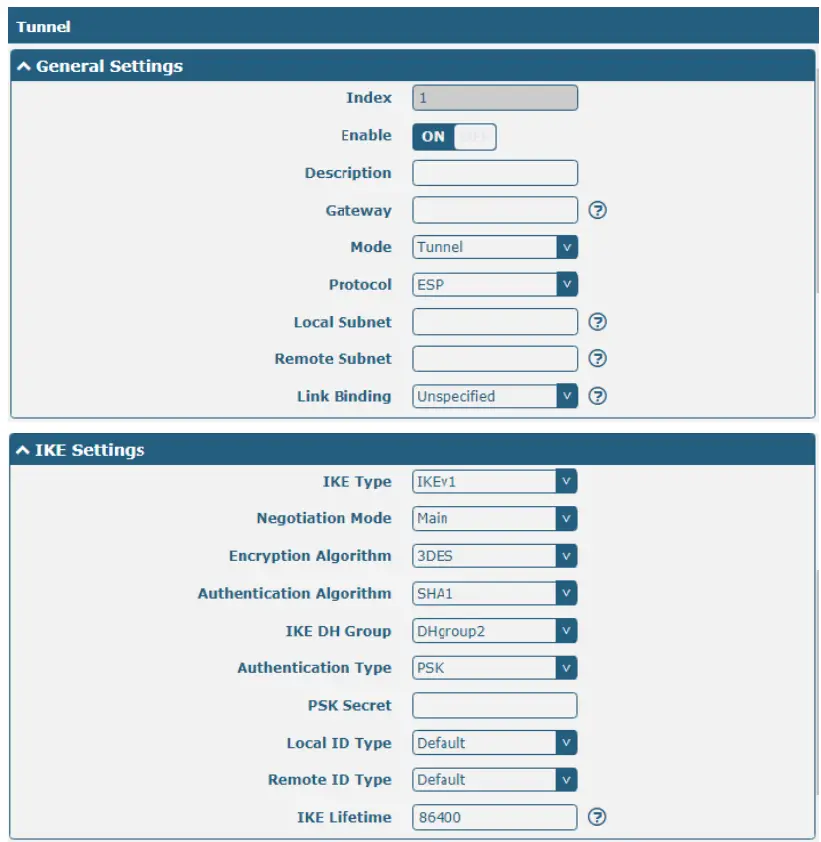


When finished, click Submit > Save & Apply for the configuration to take effect.
The comparison between server and client is as below.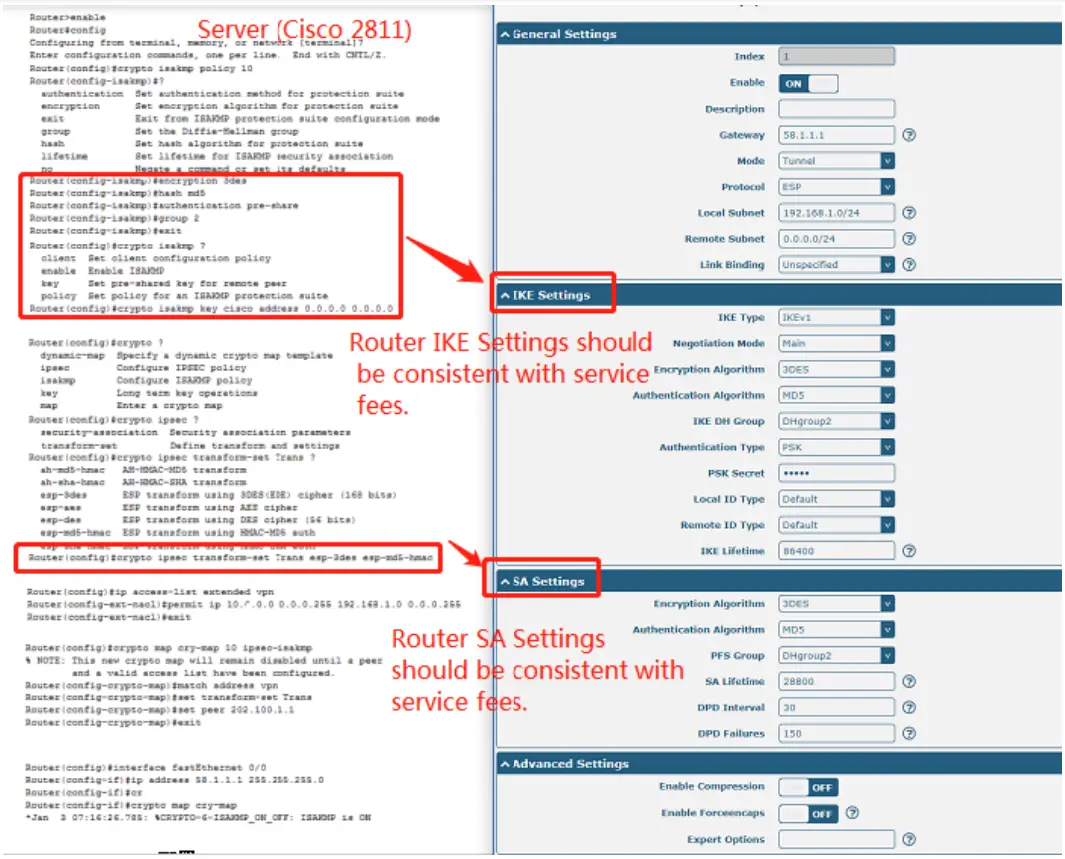
4.2.2 OpenVPN
OpenVPN supports two modes, including Client and P2P. Here takes the Client as an example.
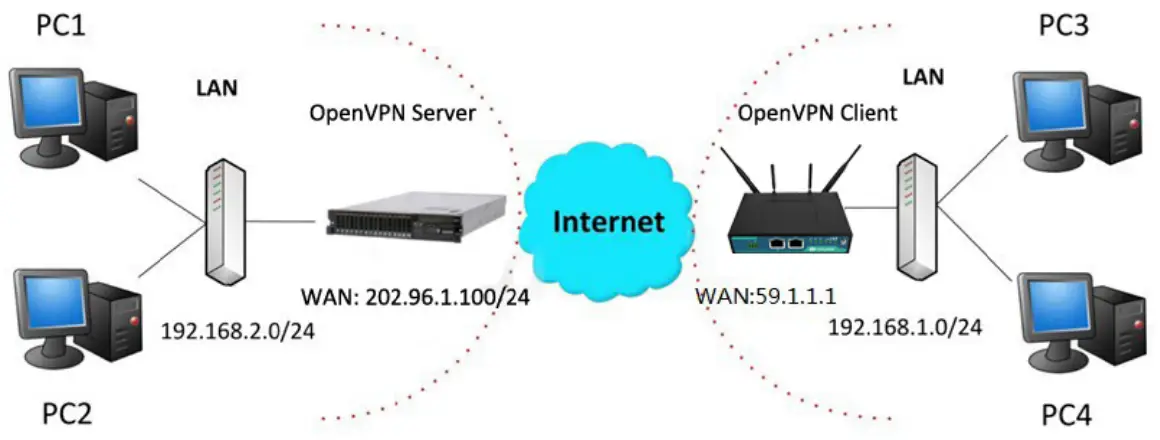
OpenVPN_Server:
Generate the relevant OpenVPN certificate on the server side firstly, and refer to the following commands to configuration of the Server:
local 202.96.1.100
mode server
port 1194
proto UDP
dev tun‐
MTU 1500
fragment 1500
ca ca. crt
cert Server01.crt
key Server01.key
DH dh1024.poem
server 10.8.0.0 255.255.255.0
ifconfig‐pool‐persist ipp.txt
push “route 192.168.3.0 255.255.255.0”
client‐config‐dir CCD
route 192.168.1.0 255.255.255.0
keepalive 10 120
cipher BF‐CBC
comp‐lzo max‐
clients 100 persist‐
key persist‐tun
status OpenVPN‐status.log
verb 3
Note: For more configuration details, please contact your technical support engineer.
OpenVPN_Client:
Click VPN > OpenVPN > OpenVPN as below.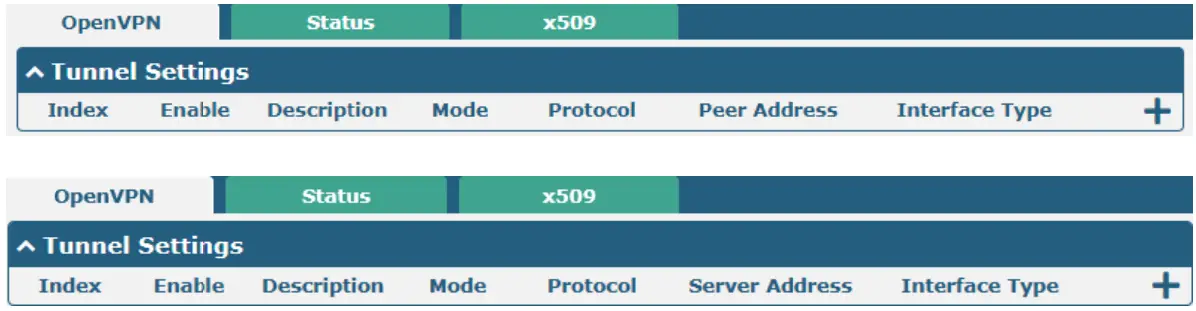
Click ![]() to configure the Client01 as below.
to configure the Client01 as below.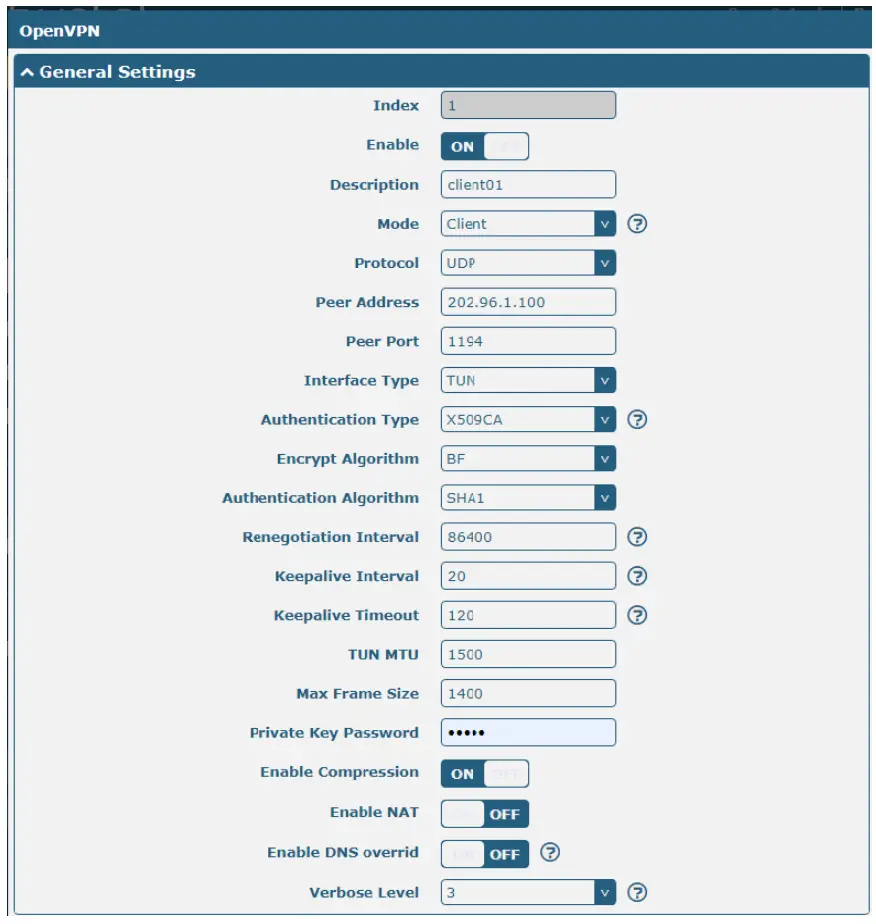

When finished, click Submit > Save & Apply for the configuration to take effect.
4.2.3 GRE VPN
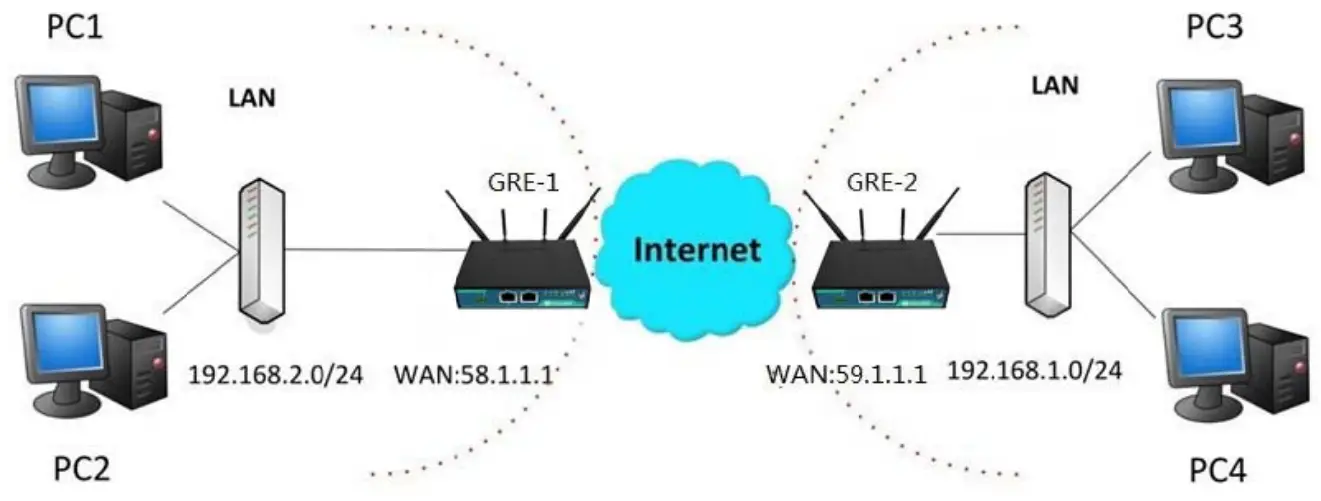
The configuration of the two points is as follows.
The window is displayed below by clicking VPN > GRE > GRE.
GRE‐1:
Click ![]() button and set the parameters of GRE‐1 as below.
button and set the parameters of GRE‐1 as below.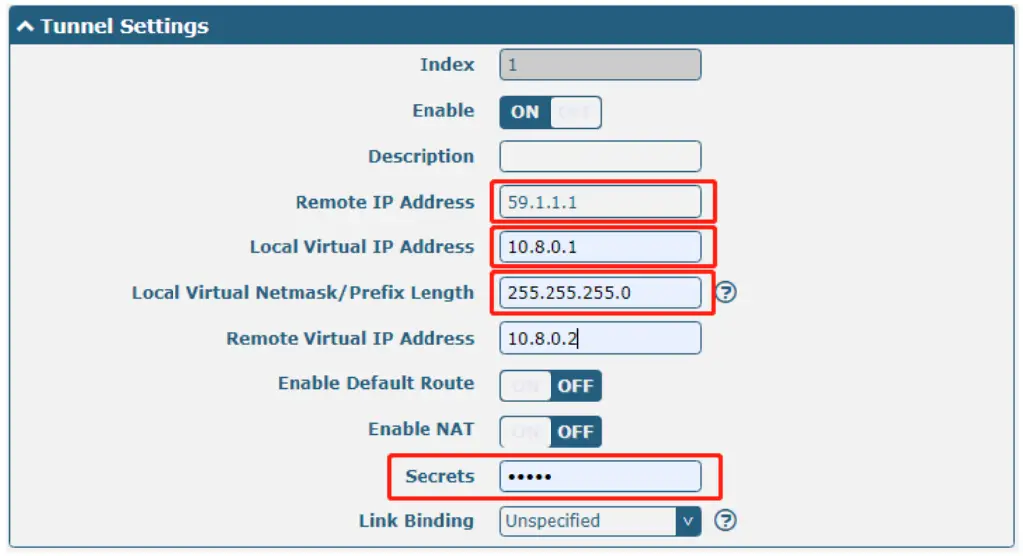
When finished, click Submit > Save & Apply for the configuration to take effect.
GRE‐2:
Click ![]() button and set the parameters of GRE‐1 as below.
button and set the parameters of GRE‐1 as below.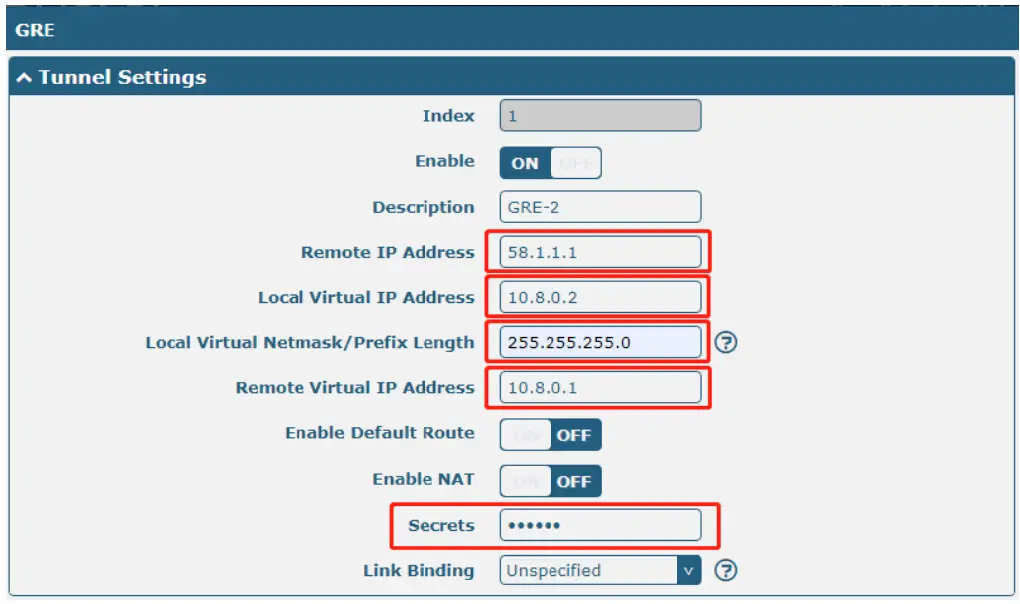
When finished, click Submit > Save & Apply for the configuration to take effect.
The comparison between GRE‐1 and GRE‐2 is as below.
Chapter 5 Introductions for CLI
5.1 What Is CLI
Command‐line interface (CLI) is a software interface providing another way to set the parameters of equipment from the SSH or through a telnet network connection.
Route login:
Router login: admin
Password: admin
#
CLI commands:
#? (Note: the ‘?’ won’t display on the page.)
| ! | Comments |
| add | Add a list entry of configuration |
| clear | Clear statistics |
| config | Configuration operation |
| debug | Output debug information to the console |
| del | Delete a list entry of configuration |
| exit | Exit from the CLI |
| help | Display an overview of the CLI syntax |
| ovpn_cert_get | Download the OpenVPN certificate file via HTTP or FTP |
| ping | Send messages to network hosts |
| reboot | Halt and perform a cold restart |
| route | Static route modify dynamically, this setting will not be saved |
| set | Set system configuration |
| show | Show system configuration |
| status | Show running system information |
| TFTP update | Update firmware using TFTP |
| traceroute | Print the route packets trace to the network host |
| URL update | Update firmware using HTTP or FTP |
| ver | Show version of the firmware |
5.2 How to Configure the CLI
Following is a table about the description of help and the error that should be encountered in the configuring program.
| Commands /tips | Description |
| ? | Typing a question mark “?” will show you the helpful information. eg. # config(Press ‘?’)config Configuration operation # config(Press spacebar +’?’)commit Save the configuration changes and take effect changed configuration save_and_apply Save the configuration changes and take effect changed configuration load default Restore Factory Configuration |
| Ctrl+c | Press these two keys at the same time, except its “copy” function but also can be used to “break” out of the setting program. |
| Syntax error: The command is not completed | The command is not completed. |
| Tick space key+ Tab key | It can help you finish your command. Example: # config (tick enter key) Syntax error: The command is not completed # config (tick space key+ Tab key) commit save_and_apply loan default |
| #config commit | When your setting is finished, you should enter those commands to make |
| # config save_and_apply | your setting takes effect on the device. Note: Commit and save_and_apply play the same role. |
5.3 Commands Reference
| Commands | Syntax | Description |
| Debug | Debug parameters | Turn on or turn off debug function |
| Show | Show parameters | Sho current co figuration of each function, if we need to see all plea e using “sh w running ” |
| Se | Set parameters Add parameters | All t e function parameters are set by commands set and add, the difference is that set is for the single parameter and add is for the list parameter |
| Add |
Note: Download the config.XML file from the configured web browser. The command format can refer to the config.XML file format.
5.4 Quick Start with Configuration Examples
The best and quickest way to master CLI is firstly to view all features from the webpage and then read all CLI commands at a time, finally learning to configure it with some reference examples.
Example 1: Show the current version
# status system
hardware_version = 1.0
firmware_version = “3.0.0”
kernel_version = 3.10.49
device_model = R2000
serial_number = 111111111
system_uptime = “0 days, 06:17:32”
system_time = “Thu Jul 6 17:28:51 2017”
Example 2: Update firmware via tftp
# tftpupdate (space+?)
firmware New firmware
# tftpupdate firmware (space+?)
String Firmware name
# tftpupdate firmware filename R2000‐firmware‐sysupgrade‐unknown.bin host 192.168.100.99 //enter a new
firmware name
Downloading
R2000‐firmware‐s 100% |*******************************| 5018k 0:00:00 ETA
Flashing
Checking 100%
Decrypting 100%
Flashing 100%
Verifying 100%
Verify Success
upgrade success
# config save_and_apply
OK
//update success
// save and apply current configure ion, make your configuration effect
Example 3: Set link‐manager
# set
# set
| at_over_telnet | AT Over Telnet |
| cellular | Cellular |
| DNS | Dynamic DNS |
| ethernet | Ethernet |
| event | Event Management |
| firewall | Firewall |
| GRE | GRE |
| IPsec | IPsec |
| lan | Local Area Network |
| link_manager | Link Manager |
| NTP | NTP |
| OpenVPN | OpenVPN |
| reboot | Automatic Reboot |
| RobustLink | RobustLink |
| route | Route |
| SMS | SMS |
| SNMP | SNMP agent |
| ssh | SSH |
| syslog | Syslog |
| system | System |
| user_management | User Management |
| very | VRRP |
| web_server | Web Server |
| # set link_manager | |
| primary_link | Primary Link |
| backup_link | Backup Link |
| backup_mode | Backup Mode |
| emergency_reboot | Emergency Reboot |
| link | Link Settings |
# set link_manager primary_link (space+?)
Enum Primary Link (wwan1/wwan2/wan)
# set link_manager primary_link wwan1 //select “wwan1” as primary_link
OK
//setting succeed
# se t link_mana ger link 1
| type desc connection_type wwan static_addr pppoe ping mtu dnsl_overrided dns2_overrided | Type Description Connection Type WWAN Settings Static Address Settings PPPoE Settings Ping Settings MTU Override Primary DNS Override Secondary DNS |
# set link_manager link 1 ty e wwan1
OK
#set link_manager link 1 wwan
| auto_apn apn username password dialup_number auth_type aggressive_reset switch_by_data_allowance data allowance billing_day | Automatic APN Selection APN Username Password Dialup Number Authentication Type Aggressive Reset Switch SIM By Data Allowance Data Allowance Billing Day |
# set link_manager link 1 wwan switch_by_data_allowance true
OK
#
# set link_manager link 1 wwan billing_data_allowance 100
OK
# set link_manager link 1wwan billing_day 1
OK
…
# config save_and_apply
OK
//open cellular switch_by_data_traffic
//setting succeed
// setting specifies the day of the month for billing
// setting succeed
// save and apply the current configuration, and make your configuration effect
Example 4: Set Ethernet
# set Ethernet port_setting 2 port_assignmEnt Ian0
OK
# config save_and_apply
OK
//Set Table 2 (ethyl) to Ian0
//setting succeed
Example 5: Set LAN IP address
Glossary
| Abbr. | Description |
| AC | Alternating Current |
| APN | Access Point Name |
| ASCII | American Standard Code for Information Interchange |
| CE | Conformité Européene (European Conformity) |
| CHAP | Challenge Handshake Authentication Protocol |
| CLI | Command Line Interface for batch scripting |
| CSD | Circuit Switched Data |
| CTS | Clear to Send |
| dB | Decibel |
| dBi | Decibel Relative to an Isotropic radiator |
| DC | Direct Current |
| DCD | Data Carrier Detect |
| DCE | Data Communication Equipment (typically modems) |
| DCS 1800 | Digital Cellular System, also referred to as PCN |
| DI | Digital Input |
| DO | Digital Output |
| DSR | Data Set Ready |
| DTE | Data Terminal Equipment |
| DTMF | Dual Tone Multi‐frequency |
| DTR | Data Terminal Ready |
| EDGE | Enhanced Data rates for Global Evolution of GSM and IS‐136 |
| EMC | Electromagnetic Compatibility |
| EMI | Electro‐Magnetic Interference |
| ESD | Electrostatic Discharges |
| ETSI | European Telecommunications Standards Institute |
| EVDO | Evolution‐Data Optimized |
| FDD LTE | Frequency Division Duplexing Long-Term Evolution |
| GND | Ground |
| GPRS | General Packet Radio Service |
| GRE | generic route encapsulation |
| GSM | Global System for Mobile Communications |
| HSPA | High-Speed Packet Access |
| ID | identification data |
| IMEI | International Mobile Equipment Identity |
| IP | Internet Protocol |
| IPsec | Internet Protocol Security |
| kbps | bits per second |
| L2TP | Layer 2 Tunneling Protocol |
| LAN | local area network |
| LED | Light Emitting Diode |
| M2M | Machine to Machine |
| MAX | Maximum |
| Min | Minimum |
| MO | Mobile Originated |
| MS | Mobile Station |
| MT | Mobile Terminated |
| OpenVPN | Open Virtual Private Network |
| PAP | Password Authentication Protocol |
| PC | Personal Computer |
| PCN | Personal Communications Network, also referred to as DCS 1800 |
| PCS | Personal Communication System, also referred to as GSM 1900 |
| PDU | Protocol Data Unit |
| PIN | Personal Identity Number |
| PLCs | Program Logic Control System |
| PPP | Point‐to‐point Protocol |
| PPTP | Point to Point Tunneling Protocol |
| PSU | Power Supply Unit |
| PUK | Personal Unblocking Key |
| R&TTE | Radio and Telecommunication Terminal Equipment |
| RF | Radio Frequency |
| RTC | Real-Time Clock |
| RTS | Request to Send |
| RTU | Remote Terminal Unit |
| Rx | Receive Direction |
| SDK | Software Development Kit |
| SIM | subscriber identification module |
| SMA antenna | Stubby antenna or Magnet antenna |
| SMS | Short Message Service |
| SNMP | Simple Network Management Protocol |
| TCP/IP | Transmission Control Protocol / Internet Protocol |
| TE | Terminal Equipment also referred to as DTE |
| Tx | Transmit Direction |
| UART | Universal Asynchronous Receiver‐transmitter |
| UMTS | Universal Mobile Telecommunications System |
| USB | Universal Serial Bus |
| USSD | Unstructured Supplementary Service Data |
| VDC | Volts Direct current |
| VLAN | Virtual Local Area Network |
| VPN | Virtual Private Network |
| VSWR | Voltage Stationary Wave Ratio |
| WAN | Wide Area Network |
Guangzhou Robustel LTD
Add: 3rd Floor, Building F, Kehui Park, No.95 Daguan Road, Guangzhou, China 510660
Tel: 86-20-29019902
Email: [email protected]
Web: www.robustel.com


 Alarm Communicator With Dial Capture Interface Instruction Manual")
