![]() ITEM #80375155
ITEM #80375155
#80375156 #80375189 #0877823 #0877824
#1059792
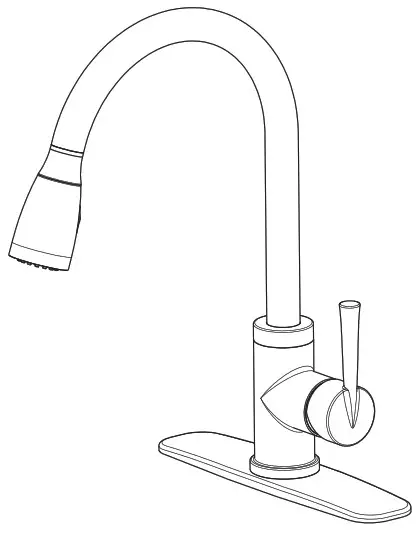
PULL-DOWN
KITCHEN FAUCET
MODEL #FP4AF260CP
PROJECT SOURCE and logo designs are trademarks or registered trademarks of LF, LLC.
All rights reserved.
ATTACH YOUR RECEIPT HERE
Serial Number………
Purchase Date……..
 Questions, problems, missing parts? Before returning to your retailer, call our customer service department at 1-866-389-8827, 8 a.m. – 8 p.m., EST, Monday – Sunday. You could also contact us at [email protected] or visit www.lowespartsplus.com.
PACKAGE CONTENTS

| PART | DESCRIPTION | QUANTITY |
| A | Spray Head (preassembled) | 1 |
| B | Faucet body | 1 |
| C | Water Supply Line (preassembled) | 2 |
| D | Discharge tube (preassembled) | 1 |
| E | Deck plate | 1 |
| F | Putty plate | 1 |
| G | Rubber washer | 1 |
| H | Metal washer | 1 |
| I | Locknut (preassembled) | 1 |
| J | Weight locator label (preassembled) | 1 |
| K | Weight | 1 |
| L | Spray hose (preassembled) | 1 |
| M | Quick connector (preassembled) | 1 |
 SAFETY INFORMATION
 SAFETY INFORMATION
Please read and understand this entire manual before attempting to assemble, operate or install the product.
WARNING
- The product should be installed by a locally licensed plumber.
- Please do not use the plumber’s putty on plastic components. Use silicone caulk if the sealant is required.
- When installing the flexible hose, please note there should be no torsion or deformation.
- Do not fold it into a V or L shape, and do not use it if there are any cracks or damage.
PREPARATION
Before beginning the assembly of the product, make sure all parts are present. Compare parts with package contents list. If any part is missing or damaged, do not attempt to assemble the product.
Estimated Assembly Time: 12 minutes
Tools Required for Assembly (not included):
Adjustable Wrench, Silicone Sealant, Groove Joint Plier.
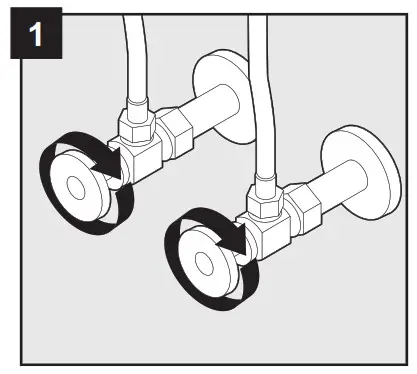
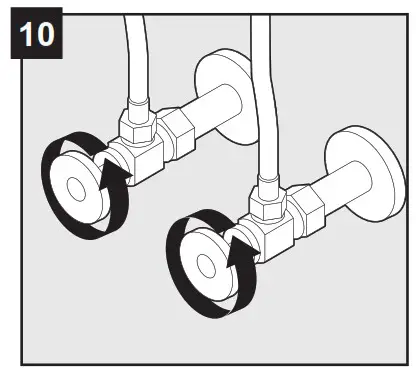
- Prior to beginning installation, turn off the cold and hot water lines and turn on the old faucet to release built-up pressure.
- When installing your new faucet, first hand-tighten connector nuts. Then, use one wrench to hold the fitting and a second wrench to tighten the nut an additional 1/4 turn. Connections that are too tight will reduce the integrity of the system.
ASSEMBLY INSTRUCTIONS
- Turn off the water supply. Remove the existing faucet if necessary.

- Unscrew lock nut (I) from the shank of faucet body (B). Remove lock nut.
 3a. Without deck plate installation: Install faucet body (B) through the top of the sink (not included).
 3b. With deck plate installation: Place a bead of clear silicone sealant (not included) around the base of the putty plate (F). Place putty plate (F)and deck plate (E) on the sink (not included). Insert faucet body (B) through deck plate (E).
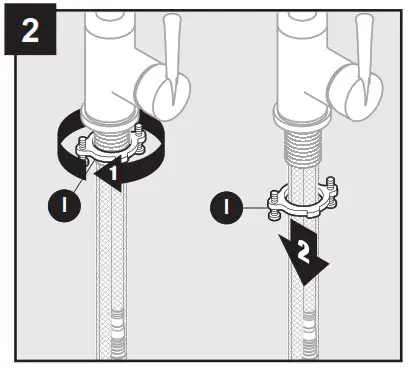
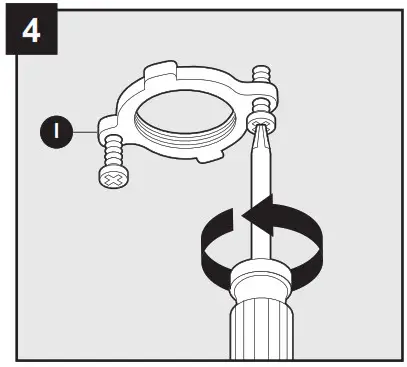
- Unscrew preassembled screws on the lock nut (I) until they are flush with the face of the lock nut (I).

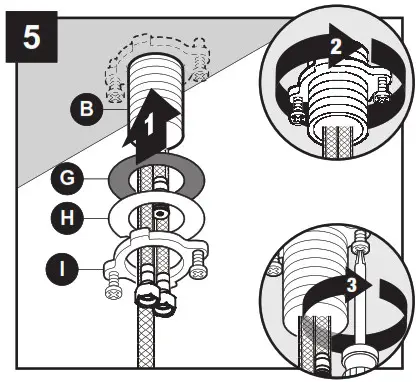
- Slide rubber washer (G) and metal washer (H) onto the shank of the faucet body (B). Secure faucet body (B) to sink with lock nut I) and preassembled screws.

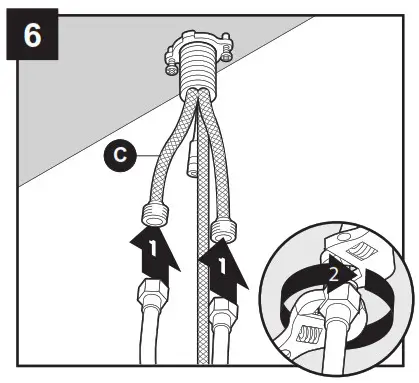
- Connect water supply lines (C) and tighten water supply nuts using two wrenches.

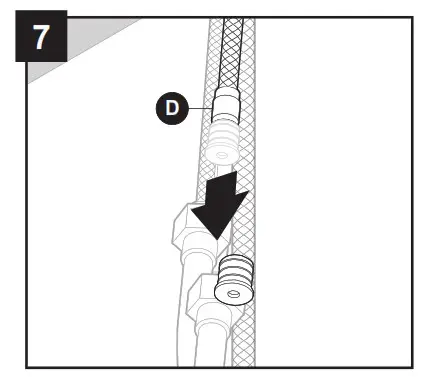
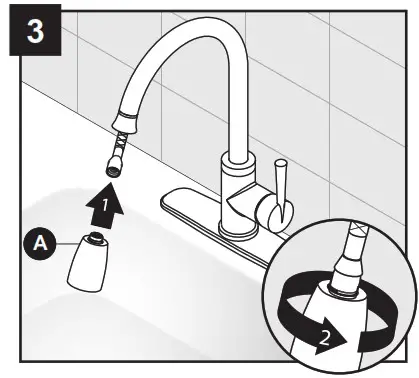
- emove cap from discharge tube (D).

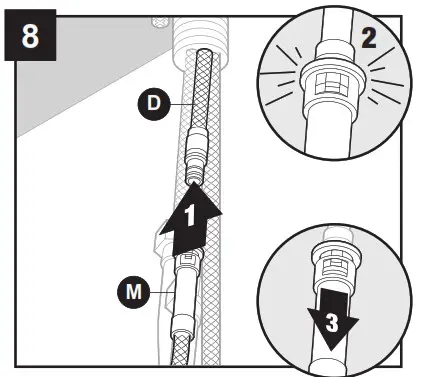
- Attach quick connector (M) to discharge tube (D). Pull down on a quick connector (M) to ensure it is secure.
NOTE: For removal, see “Quick Connector Removal.”
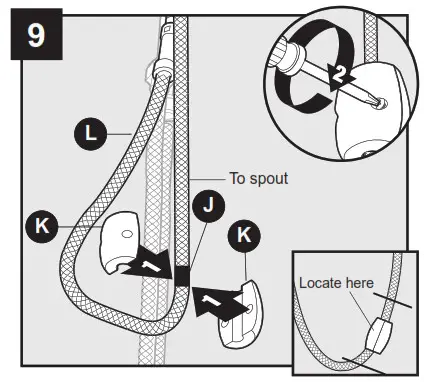
- Attach the weight (K) to cover the weight locator label (J) on the spray hose (L). Use a Phillips screwdriver to secure.

- Turn on the water supply.

 3a. Without deck plate installation: Install faucet body (B) through the top of the sink (not included).
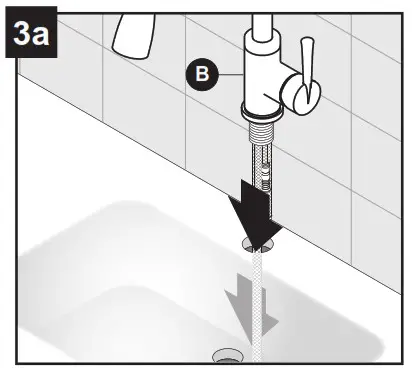 3b. With deck plate installation: Place a bead of clear silicone sealant (not included) around the base of the putty plate (F). Place putty plate (F)and deck plate (E) on the sink (not included). Insert faucet body (B) through deck plate (E).
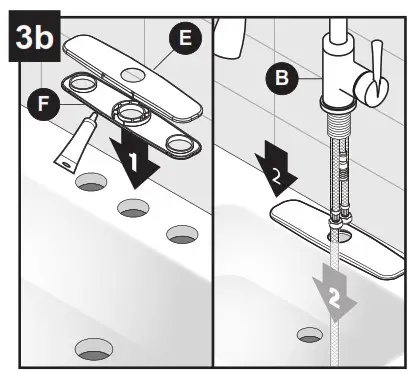
OPERATING INSTRUCTIONS
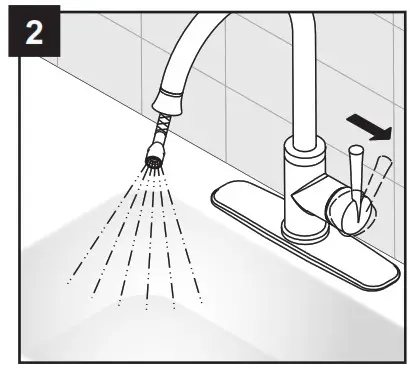
- Remove spray head (A) from the faucet body (B).

- Flush out any debris. Check for leaks.

- Replace spray head (A).


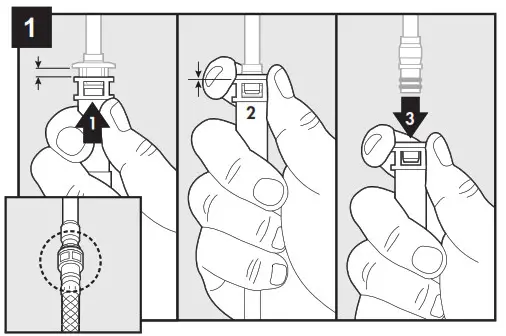
QUICK CONNECTOR REMOVAL
- Push quick connector housing upward.
Hold clip and housing together and pull downward.
WARNING: Be careful in the removal of a quick connector so as not to cut hands.
CARE AND MAINTENANCE
- Clean periodically with a soft cloth. Avoid abrasive cleaners, steel wool, and harsh chemicals as these will dull the finish and void your warranty.
TROUBLESHOOTING
| PROBLEM | POSSIBLE CAUSE | CORRECTIVE ACTION |
| Leak from under the handle. | Trim cap has come loose. 0-ring on the cartridge is dirty or damaged. | Tighten the trim cap. Clean or replace 0-ring. |
| Leaks from the hose under the deck. | The hose and spray head connection may be loose. | Tighten the connection between the spray head and hose. |
| Low water pressure. | Quick connector is clogged with debris. | Turn off the water supply and disconnect the quick connector from the discharge tube. Unscrew the quick connector from the hose and clean it under running water. Screw back onto the hose and connect back to the discharge tube. Test water flow. If the water pressure is still low then replace the quick connector. |
| The hose does not retract. | The weight is not installed in the appropriate position. | Reinstall or readjust the weight. |
WARRANTY
The manufacturer warrants this faucet to be free from defects in workmanship and material present at the time of shipment from the factory for a limited lifetime from the date of purchase. This warranty applies only to the original purchaser. The manufacturer agrees to correct such defects at no charge or, at our option, replace the faucet with a comparable or superior model. To obtain warranty service, call our customer service department at 1-866-389-8827 for return authorization and shipping instructions.
You may be required to present a copy of your sales receipt as proof of purchase. All costs of removal and reinstallation are the expressed responsibility of the purchaser. Any damage to the faucet by accident, misuse or improper installation, or by affixing accessories not produced by the manufacturer, is the purchaser’s responsibility. The manufacturer assumes no responsibility whatsoever for faucet installation during the warranty period. There is no further expressed warranty. The manufacturer disclaims any and all implied warranties. The manufacturer shall not be liable for incidental, consequential or special damages arising at or in connection with product use or performance except as may otherwise be accorded by law. This warranty gives you specific legal rights, and you may also have other rights which vary from state to state, province to province. This warranty supersedes all prior warranties.
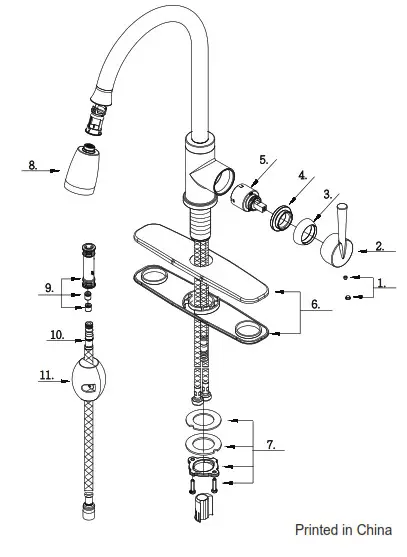
REPLACEMENT PARTS LIST
For replacement parts, call our customer service department at 1-866-389-8827, 8 a.m. – 8 p.m., EST, Monday – Sunday. You could also contact us at [email protected] or visit www.lowespartsplus.com.
| PART | DESCRIPTION | PART # |
| 1 | Index Button | A66D558 |
| 2 | Metal Handle | A069454 |
| 3 | Trim Cap | A103016 |
| 4 | Adjusting Ring | A104207 |
| 5 | Ceramic Disc Cartridge | A507348N |
| 6 | Cover Plate & Putty Plate | A667003 |
| 7 | Mounting Hardware Assembly | A603171 |
| 8 | Hand Spray w/Check Valve | A523178W-50 |
| 9 | Hose Adaptor Assembly | A663123N |
| 10 | Spray Hose | A515220WGR |
| 11 | Weight | A504713 |