![]() SHS-10W Solar Home System
SHS-10W Solar Home System
User Manual
Solar Home System – SHS 10W
User Manual
SHS-10W Solar Home System
Dear Customer,
Congratulations on buying your Phocos Product! Please read the instructions carefully and thoroughly before using the product. Your new Solar Home System is a “state-of-the-art” device that was developed in accordance with the latest available technical standards. It comes with a number of outstanding features, such as:
- Maximum Power Point Tracking technology, which increases the efficiency of your PV system.
- Maintains constant current/ constant voltage for charging the battery.
- LFP batteries provide better power density and increased safety when compared to other lithium chemistries.
- The system is user-friendly with plug-and-play operation.
- Clear and reliable display of battery status.
- Provided with USB mobile charging which includes iPhones, Androids, MP3 players, etc.
- Easy installation of either Wall or Table mounting
- Protection from overcharge and deep discharge.
- Compact, portable, and lightweight.
- Complete electronic protection.
- Solar LED lamps provide high illumination levels with very low power consumption and a long lifespan.
IMPORTANT SAFETY INSTRUCTIONS
Please read the instructions and warnings in this manual carefully before beginning any installation.
Please do not disassemble or attempt to repair our products. Phocos products do not contain any user-serviceable parts.
The information contained in this manual must be observed in its full extent.
MAINTENANCE AND INSTALLATION NOTES
When installing or working on the PV system, please disconnect the PV (solar) modules from the Product first, to prevent any damage to the product!
Please verify that all cable/wire connections are done properly with the cables issued with the product so that no water or humidity can ingress in order to avoid any bad or loose connections that would result in further damage.![]() Keep the Solar panel clean from dust and dirt to maintain charging performance.
Keep the Solar panel clean from dust and dirt to maintain charging performance.![]() Protect the product and lamps from rain and dirt.
Protect the product and lamps from rain and dirt.![]() Don’t use any other lamps other than the specified lamps.
Don’t use any other lamps other than the specified lamps.![]() Never allow children under the age of 3 to play with the product.
Never allow children under the age of 3 to play with the product.![]() Don’t place the product on hot surfaces above ambient temperature, if it exceeds the normal temperature the product gets warm. Never allow a spark or flame near the product.
Don’t place the product on hot surfaces above ambient temperature, if it exceeds the normal temperature the product gets warm. Never allow a spark or flame near the product.
DO’S![]() Install the product in a ventilated area.
Install the product in a ventilated area.![]() For the first time after installation the product should be charged till the battery reaches full condition.
For the first time after installation the product should be charged till the battery reaches full condition.![]() Switch ‘OFF’ the product before maintenance.
Switch ‘OFF’ the product before maintenance.![]() Install the solar panel in direct sunlight.
Install the solar panel in direct sunlight.![]() Use an Individual load switch to turn On/Off the load (Lamp).
Use an Individual load switch to turn On/Off the load (Lamp).![]() When the product is deep discharged, wake up the product in full sunshine.
When the product is deep discharged, wake up the product in full sunshine.![]() The battery has to be discharged and recharged at least once a month for battery performance especially when the product is not being used regularly
The battery has to be discharged and recharged at least once a month for battery performance especially when the product is not being used regularly![]() The SHS should be charged only through PV modules.
The SHS should be charged only through PV modules.
DON’T’S
X Don’t open the product.
X Do not allow water to drip or splash on the product.
X Don’t continuously Power on and Power of the product.
X Do not connect AC LED lamps or other loads to the product.
X Never try to extend the size of the cable supplied along with the product by the manufacturer.
DESCRIPTION OF FUNCTIONS
The major principle of MPPT is to extract the maximum available power from PV modules by making them operate at the most efficient voltage. The product protects the battery from being overcharged by the solar array and from being deeply discharged by the loads. The SHS has a number of safety and display functions.
MOUNTING & CONNECTING
The product is intended for indoor use only. Protect it from direct sunlight and place it in a dry environment. Never install it in humid rooms (like bathrooms).
The product must be installed on a non-flammable surface only.
Remark: Connect the product by the following steps described to avoid installation faults.
- Mark two positions of the drill holes on the wall by using the paper installation position scale.
- Drill the two holes and hammer the expansion tube.
- Fix the given screws on the expansion tubes and mount the product.
INSTALLATION
- Choose the Location of the Solar panel and Permanently install the solar panel on the roof.
- Mount the Product on either wall or Table as per the Mounting Procedure.
- Permanently mount the wire from the solar panel to the product.
- Choose the locations of the 3 lamps in the house.
- Mount the lamps in position as the switch can be placed near for access.
STARTING UP THE CONTROLLER
As soon as the product is switched ON, it starts a self-test routine. Then the display changes to normal operation.
Solar panels should be placed directly facing the sunlight to charge the product and ensure that the product is connected to the panel. Charging is not effective if the panel is kept in shade. SHS will charge slowly on cloudy /unclear days.
Climatic Conditions![]() Full Sunny days
Full Sunny days![]() Cloudy days
Cloudy days
Charging Time (hrs)
8 Hrs With Solar Charging 10Wp
24 Hrs With Solar Charging 10Wp
* After deep discharge, wake up the product in full sunshine.
RECOMMENDATIONS FOR USE
The product gets slightly warm during normal operation. If it is insufficient ventilation or the surrounding the environment is too hot the product will prevent over-heating
by disconnecting the load and charging. The product does not need any maintenance or service. Remove the dust with a dry tissue.
PRODUCT DESCRIPTION
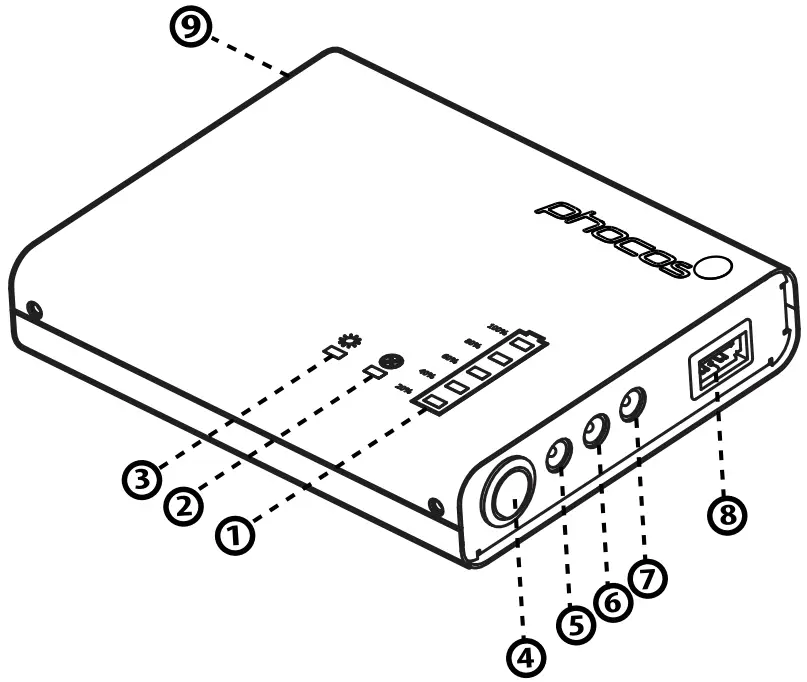
- Battery Status Yellow LED
- Fault Indication Red LED
- Solar Charging Green LED
- System ON/OFF Switch
- Output – 1
- Output – 2
- Output – 3
- Mobile Charger
- PV Input
LED DISPLAY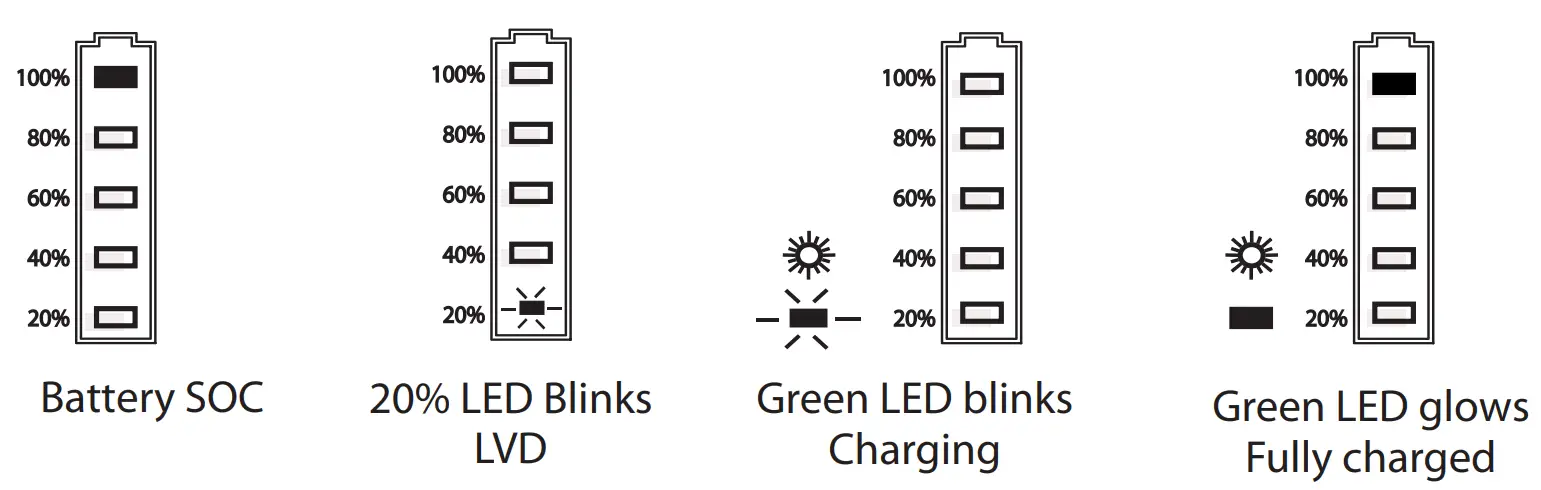
In Normal Operation, the controller shows the state of Charge of the battery and the solar panel activity.
CHARGING SOC CURVE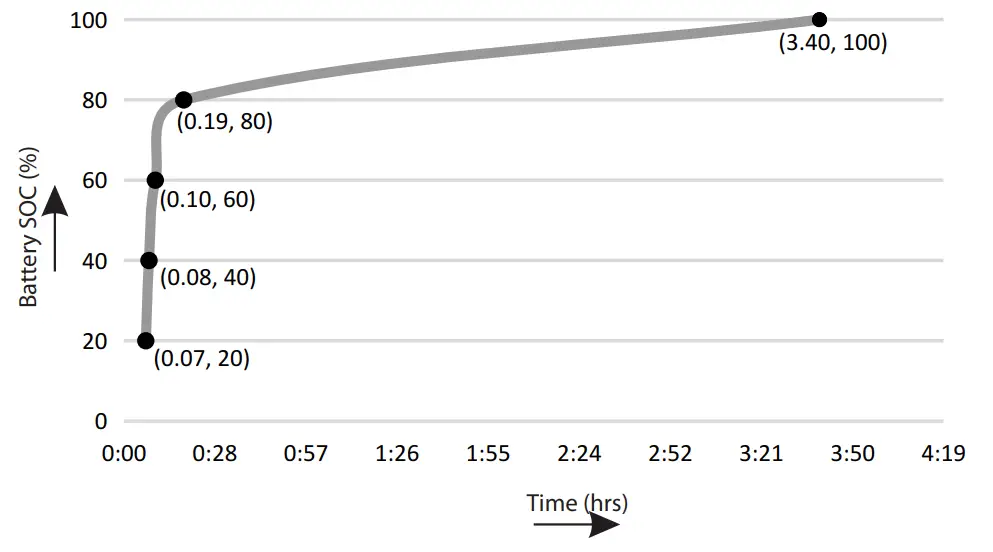
Maximum Charging is done on the 80% SOC LED and 100% SOC LED. The SOC backup time can vary in accordance with the user’s ambient.
PRODUCT DESCRIPTION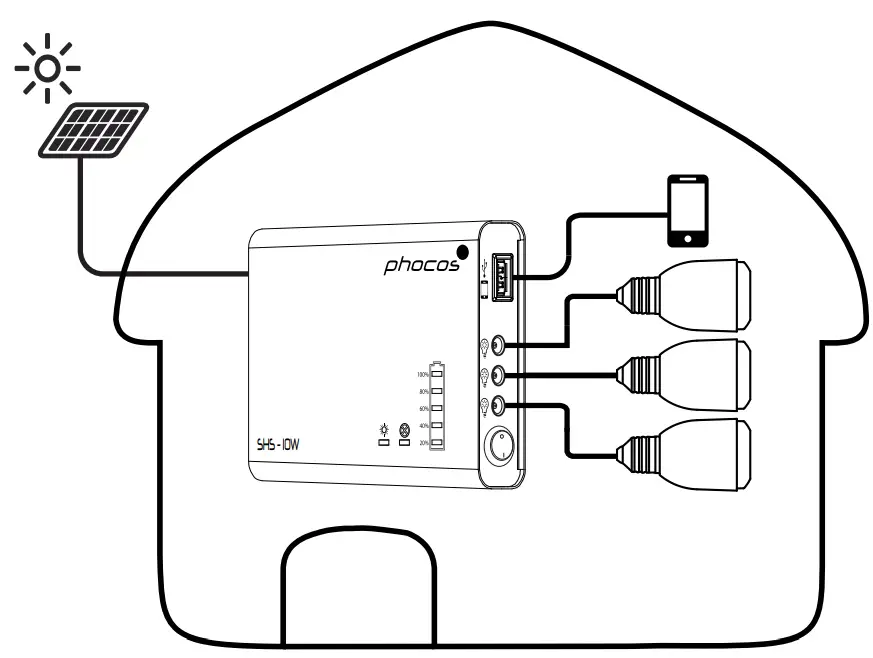
ERROR DESCRIPTION
| Error | Display | Reason | Remedy |
| No indication |  | The switch is turned off The battery is less than LVD | Switch on the product Connect the Panel Charge the battery full |
| The product is not charging during the day | 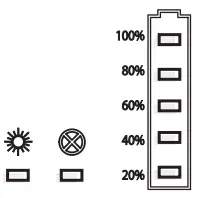 | The switch is turned off Panel disconnected The panel cable is faulty | Switch on the product Ensure that the panel is connected Ensure that the cable is not damaged |
| Red Led blinks | 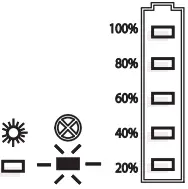 | Overload Improper Loads may be other than the manufacturer specified | Remove overload, connect proper loads and wait as the product reconnects in 20 sec Ensure that you connect only manufacturer specified lamps |
| Red Led Glows | 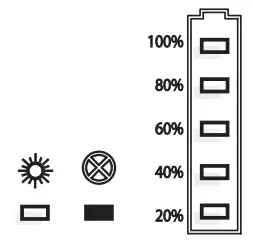 | Load Short Circuit | Switch off all loads and remove the short circuit Reset the product (Turn OFF/ON) |
Note:
When the battery reaches LVD, the product goes to shutdown mode, to conserve battery power, the product can be activated by charging through modules.![]() USB Charging will be disabled when the battery is low (LVD) (Check for low battery indicator LED – 20% Yellow LED Blinks)
USB Charging will be disabled when the battery is low (LVD) (Check for low battery indicator LED – 20% Yellow LED Blinks)
USB CONNECTOR
USB connector for 5.2V supply to small appliances like charging cell phones, compact portable computers, and small music players; with up to 1000 mA of current consumption.
Warning: Do not connect the charging device anywhere else! USB-negative contact is connected to load negative.
Technical Data
| Type | SHS-10W |
| Charging Type | Maximum Power Point Tracking (MPPT) |
| Battery Specification | |
| Battery Type | LiFePO4 |
| Battery Voltage | 12.8V |
| Battery Capacity | 40Wh |
| Max. Charge Current | 700 mA |
| Max. Discharge Current | 700 mA |
| Max. Battery Voltage Limit | 14.4V± 0.2V |
| Load DisconnectVoltage | 11.2V± 0.3V |
| Back-Up Hours® | 1 lamp: 15 h, 2 lamps: 8 h, 3 lamps: 5 h |
| Panel Specification® | |
| Panel Power | 10Wp |
| Open Circuit Voltage (Voc) | 22V |
| The voltage at max. power (Vmp) | 18V |
| Current at max. power (Imp) | 590 mA |
| Short circuit current(ISC) | 620 mA |
| Load Specification | |
| Load Terminals | DC jack 6.5 mm, 3 output terminals |
| operating voltage | 11 – 15V |
| Output Power | 2W – 3Nos |
| Light Color | 6500K (Cool White) |
| Mobile Charging | USB type A, 5.2V, 1000mA |
| Others | |
| ambient temperature | 0 to 50 °C while charging, -20 to 55 °C while discharging |
| Peak Efficiency | >90% |
| Idle Standby | < 10mA |
| Dimension (WxHxD) mm | 375 x 200 x 130 |
| Weight | 2.9Kg (without panel) |
| Ingress Protection | IP 20 |
| Accessories | Panel with cable – 1 Nod; DC LED lamp 2W – 3 No E-27 Lamp holder assembly with switch – 3 Nos and mobile charging cable – 1 No. |
- Conditions apply: Backup time varies and depends upon the ambient temperature and operating conditions. The run time estimate does not account for mobile phone charging.
- Panel Specifications may vary according to the manufacturer.
- The panel comes in a separate box along with the product box.
APPLICATION LIABILITY EXCLUSION
The manufacturer shall not be liable for damages, other than those mentioned in the manual. The manufacturer shall not be responsible if there has been service or repair carried out by any unauthorized person, unusual use, or wrong installation.
Subject to change without Notice
Version: 20181120
Made in India
Phocos AG -Germany
www.phocos.com
RoHS
ISO9001:2015


