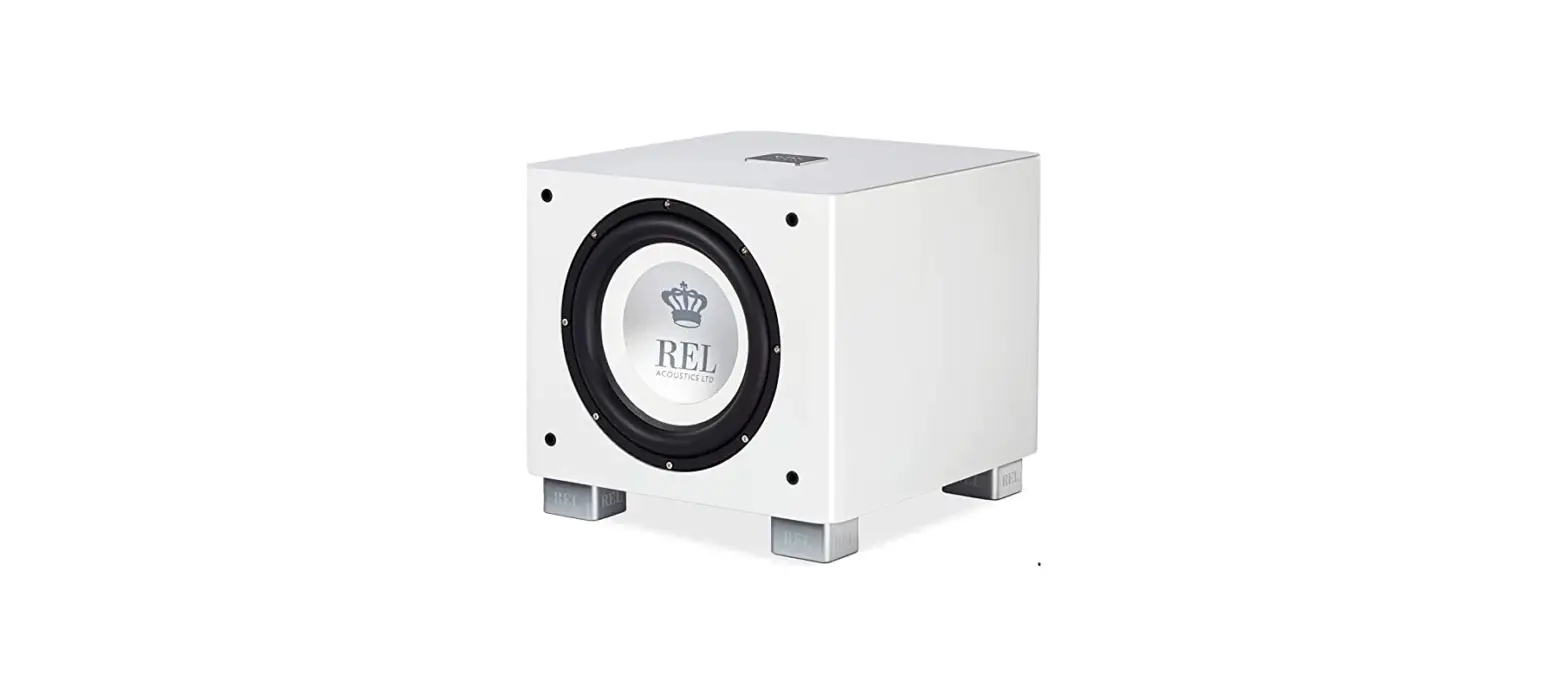
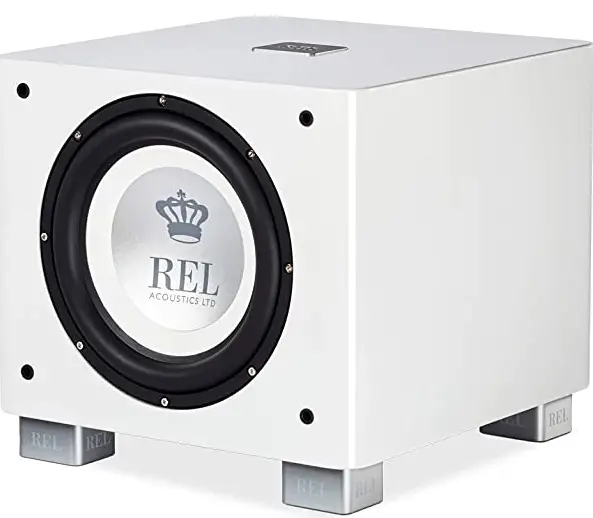
REL Acoustics T/9x Subwoofer Wireless Port
INTRODUCTION
Dear Friend and Valued Customer
Thank you for placing your trust in us and welcome to the REL family. While we make products far more expensive than the T/x range, these T/x models are so very important to us. Experience has taught us that if you have a wonderful experience with this range, you will understand in a deeper way what we’re about as a company and be more likely to become a repeat customer in the future. The Serie T/x took us a long time to develop, principally because we could not conceive of a way to dramatically improve upon the prior T/i models. But after almost two years of design meetings, engineering, sampling, and testing, improve we did. And in absolutely every way possible. Our design team is still a little amazed, as these new designs have taken on some of the sonic aspects of the upmarket Serie S. Our approach was to begin with carefully increasing the internal cabinet volume. This releases more energy for the same amplification. Doing so necessitated a complete redesign of each driver’s suspension, each passive radiator’s suspension and a total revamp of the internal damping we use. This last part is essential because when you are imparting more energy within the cabinet, it must be dealt with sympathetically. The sonic results are spectacular; a massive increase in dynamics, speed and openness resulted from this approach. One that then forced us to completely re-calibrate all of our levels and limiters. Many months were consumed performing this painstaking fine tuning. At the very end of this process, a new transistor within the ultra-reliable Class A/B amplifiers was specified which yielded even more improvements to transparency over the entire sonic spectrum. What we deliver in Serie T/x now represents lessons derived from our larger Serie S models, rather than minor upgrades to an older line. Thank you again for taking this journey with us, we’re very proud of what the team accomplished in the T/x and look forward to hearing your experiences with our newest members of the REL family.
Caution Marking Explanation
The lightning flash with arrowhead symbol within an equilateral triangle is intended to alert the user to the presence of un-insulated dangerous voltage within the product’s enclosure that may be of sufficient magnitude to constitute a risk of electric shock to persons. The exclamation point within an equilateral triangle is intended to alert the user to the presence of important operating and maintenance (servicing) instructions in the literature accompanying the appliance.
Important Safety Instructions
- Read all of these instructions.
- Save these instructions for future use.
- Heed all warnings.
- Follow all instructions.
- Do not use this apparatus near water.
- Clean only with automotive polish and micro fiber cloth.
- Install in accordance with the manufacturer’s instructions.
- Do not install near any heat sources such as radiators, heat registers, stoves or other apparatus (including amplifiers) that produce heat.
- Do not defeat the safety purpose of the grounding-type plug. A grounding type plug has two blades and a third grounding prong. The third prong is provided for your safety. If the provided plug does not fit into your outlet, consult and electrician for replacement of the obsolete outlet.
- Protect the power cord from being walked on or pinched particularly at plugs, convenience receptacles, and the point where they exit from the apparatus.
- Only use attachments/accessories specified by the manufacturer.
- Use only with a cart, stand, tripod, bracket, or table specified by the manufacturer, or sold with the apparatus.
- When a cart is used, use caution when moving the cart/apparatus combination to avoid injury from tip-over.
- Unplug this apparatus during lightning storms or when unused for long periods of time.
- Refer all servicing to qualified service personnel. Servicing is required when the apparatus has been damaged in any way, such as power-supply cord or plug is damaged, liquid has been spilled or objects have fallen into the apparatus, the apparatus has been exposed to rail or moisture, does not operate normally, or has been dropped.
- Minimum distances 10cm around the apparatus for sufficient ventilation.
- The ventilation should not be impeded by covering the ventilation openings with items, such as newspapers, table-cloths, curtains, etc.
- No naked flame sources, such as lighted candles, should be placed on the apparatus.
- Attention should be drawn to the environmental aspects of battery disposal.
- The use of apparatus in moderate climates.
- Batteries shall not be exposed to excessive heat such as sunshine, fire or the like.
Caution: Any changes or modifications not expressly approved by the party responsible for compliance could void the user’s authority to operate this equipment.
Warning
To reduce the risk of fire or electric shock, do not expose this apparatus to rain or moisture. The apparatus shall not be exposed to dripping or splashing and no objects filled with liquids, such as vases, shall be placed on apparatus. The mains plus is used as disconnect device. The mains plug of the apparatus should not be obstructed OR should be easily accessed during intended use. To be completely disconnected from the power input, the mains plug of the apparatus shall me disconnected from the mains. An appliance with a protective earth terminal should be connected to a mains outlet with a protective earth connection.
Design Safety
These apparatus are supplied with a detachable mains cord. For 230V operation a 1.6A fuse is fitted in the socket of the T/5x, a 2A fuse is fitted in the socket of the T/7x and a 3.15A fuse is fitted in the socket of the T/9x, for 120V operation a 3.15A fuse is fitted for the T/5x, a 4A fuse is fitted for the T/7x and a 6.3A fuse is fitted for the T/9x. Should the fuse need to be replaced use a similar rated fuse approved to ASTA or BSI 362 standards. Do not use without the fuse cover in place. Replacement fuse covers are available from your distributor.
- J
- John Hunter
- Head of Design and Acoustics
- REL Acoustics, Ltd.
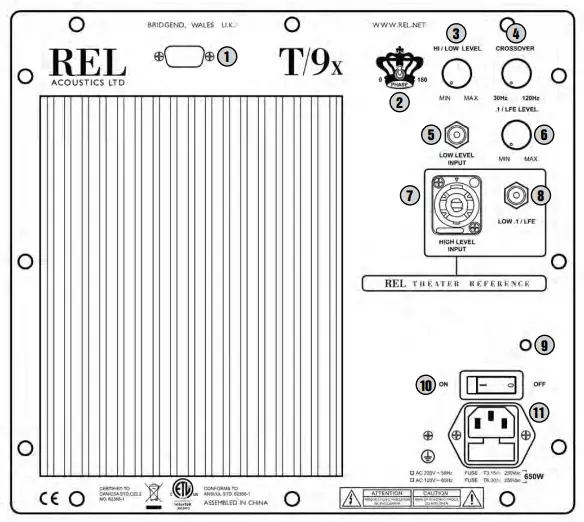
REL SERIE T/x Rear Panel Connection Legend
- Wireless Interface Socket: Used to connect to Arrow™ Wireless.
- Phase: Used to set phase 0-180 degrees.
- Hi/Low Level: Volume control for High/Low Input. Use to adjust output when using either High Level or Low Level input.
- Crossover: Used to adjust crossover frequency of Hi/Low Level channel. Variable between 20-120Hz.
- Low-Level RCA Input: Used to connect low-level signals to the sub-bass system from the output of a preamplifier, integrated amplifier or receiver. (For home cinema use, use .1/LFE input).
- 1/LFE Level: Used to adjust output level when using .1/LFE input from a surround-sound processor.
- High Level Input (Neutrik Speakon): Used to connect to the main front amplifier speaker terminals.
- 1/LFE RCA Input: Used to connect to the .1/LFE output of a surround-sound processor.
- Power Pilot Light: Power On/Off indicator.
- Power On/Off Switch: Use to turn unit on or off.
- IEC Mains Socket: Fused mains (AC) input socket that accepts detachable power cord.

Connectivity and Functionality
High Level Input
Connections should be made to the same binding post on main amplifier as the main speakers. Red to amplifier main right speaker red terminal, yellow to amplifier main left speaker red terminal and black to amplifier main speaker black terminal, right or left but not both. (See Connecting and setting up section below for details on integration with Class D and Differential type amplifier designs). Plug the Neutrik® Speakon® plug into the HI LEVEL Speakon® socket.
Input
This requires an RCA to RCA cable and is a dedicated true .1 channel. This circuit therefore eliminates the normal Natural RollOff™ Crossover and passes the .1 low-level signal through with only the required 120Hz fourth-order filter.
Low Level Input
The RCA input allows for conventional connection from one channel of a preamplifier. This connection is necessary when using active, powered speakers or when connecting to certain soundbars. Plug one end of an RCA to RCA cable into the LOW LEVEL INPUT of the REL and the other end into the left or right channel output of your preamplifier.
Phase Switch
Used to set phase. Phase Switch on remote control is momentary. Refer to display for 0 or 180 degree status. Phase selection affects High Level, Low Level and .1/LFE inputs.
PHASE SELECTION AFFECTS BOTH HIGH AND LOW LEVEL INPUTS
Crossover is always engaged for high and low level inputs. The .1/LFE signal does not pass through the crossover circuit.
Connecting Up
Always switch off your system before disconnecting any wires. To increase the versatility of connecting up, the Serie T/x models have three separate inputs. A high-level input socket, a .1/LFE RCA input, and a low-level RCA input. This is to facilitate use with both two-channel stereo systems and AV surround sound systems. The high-level, unbalanced, dual-channel (stereo) input is via a Neutrik® Speakon® connector is designed to accept the stereo (two-channel) signals from the speaker terminals of your receiver, integrated amplifier or basic amplifier. This has the advantage of ensuring that your subwoofer receives exactly the same signal as the main speakers, which means that the character of the bass from the main system is carried forward into the Sub-Bass System. This is a very important point and together with REL’s Natural RollOff™ circuitry, ensures far superior system integration of the Sub-Bass System with the main system. STOP! Please read the following or damage can occur. Do not force the Neutrik Connector into its socket on the rear of the amplifier. Please study the Neutrik and note that the cable’s black and blue plug has a black key, a part that locates into a corresponding slot on the amplifier. Line up the cable’s connector with this slot on the amplifier. insert fully into socket and rotate clockwise until a soft “click” is heard. To remove the Neutrik® Speakon® plug, grip body of plug, place thumb on chrome lever, move lever backwards, rotate plug anticlockwise quarter turn and withdraw. There is a single RCA socket for low level connection to the output of a stereo preamplifier or receiver. Another single RCA socket connects to the .1/LFE output of a home cinema processor. HIGH LEVEL and .1/LFE inputs can be used simultaneously. The benefits are two-fold when used with a home cinema processor. The .1/LFE input reproduces the .1/LFE channel and the high-level connection underpins the main front speakers. The main front speakers should be set to the ‘Large’ option on the processor. (See “Theatre Applications” for more information).
REL Set-Up Made Simple
REL products are not traditional subwoofers, but true Sub-Bass Systems. A REL is designed to augment the performance of “full range” speaker systems in order to provide, in certain cases, linear response below 15Hz. Therefore, for the moment, please set aside everything you’ve been taught about subwoofers and how they are integrated into a stereo or home cinema system. REL Sub-Bass Systems set-up and positioning differs from conventional subwoofers. A REL will take advantage of physics and room acoustics to provide deep pressurization as no traditional subwoofer can. It is important that you bring to the set-up process a willingness to do things a little differently in order to obtain these superior results. The end result of your labors will be an utterly seamless integration of true deep bass to a sound system, regardless of the main speakers’ low bass capability. Basic set-up should take no more than ten to fifteen minutes to accomplish once connected.
Two Things Before You Begin
- It is helpful to know that you will almost always connect the REL to the input on the rear panel labeled “HIGH-LEVEL INPUT.” This connection is made using the supplied 33’ 6” (10 meters) cable, the bare leads of which connect to the speaker output terminals of the power amplifier. The easy and foolproof connection at the REL is done with a Neutrik® Speakon® connector. The purpose of connecting to the speaker output terminals is one of the unique secrets of REL’s success. By connecting to the High Level input on the REL from the amplifier, you build forward the sonic signature of your main system, including the tonal balance and timing cues of the entire electronics chain. In this way, the REL is fed the exact signal that is fed to the main speakers.
- When possible, the REL should be placed in one of the corners behind the speakers. Remember, we are dealing with true LOW bass pressurization with RELs. Low bass pressurization below 40Hz is best derived from corner placement, where the most linear and efficient low bass can be produced because the subwoofer is able to take advantage of the tangential (corner-to-corner) axis which is typically the longest axis in a room.
Connecting and Setting Up
- High-level connection, using the enclosed cable with the Neutrik® Speakon® connector, is always the first choice. This connection can be made without affecting the performance of the amplifier because the REL’s amplifier input impedance is 150,000 ohms, in effect producing NO additional load on the rest of your system.
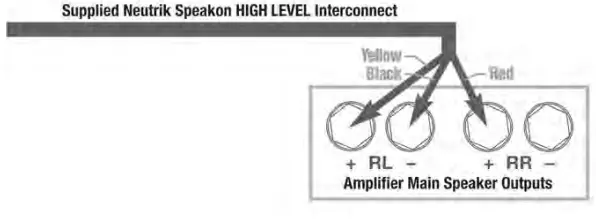
- The standard high-level hook up procedure is: attach the red wire to the amplifier’s right positive speaker output terminal; attach the yellow wire to the amplifier’s left positive speaker output terminal; attach the black wire to whichever of the amplifier’s ground output terminals is convenient; plug the Speakon® connector into the Sub-Bass System’s high-level input.
Standard High level
For differential (i.e. fully balanced) amplifiers using one REL, simply use the standard connecting scheme with the exception of NOT connecting the black wire to a negative speaker terminal. Instead, it should first be allowed to “float” or hang down without connection to ANY terminal. Should hum occur using this method, please try connecting to an unused RCA connector on the rear of a preamp or amplifier. Please contact your dealer should there be any questions concerning this or any other hookup procedure.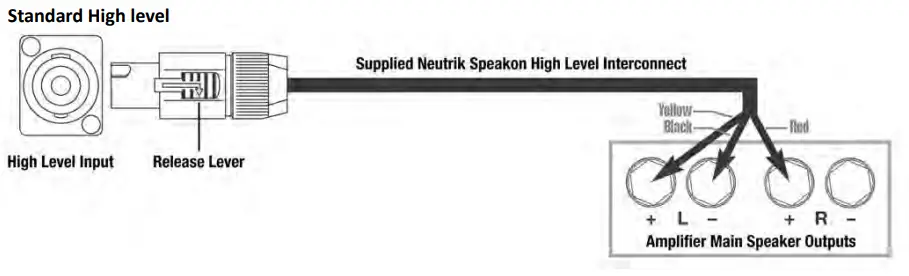 Differential (i.e. Fully Balanced)
NOTE: Serie T/x models are equipped with internal circuitry to allow connection to many Class D (digital) amplifiers
Warning: Do NOT connect the Black wire to the main Class D power amplifier’s speaker ground terminal. Some Class D amplifiers produce positive voltage at the amplifier’s speaker ground terminal (black) and connecting the REL’s ground will produce an undesirable shorting to ground. If connecting to a Class D amplifier, follow the above connection procedure for differential amplifiers. When connecting RELs to Mono Bloc amplifiers (2) RELs, one for each amplifier, must be used. Connect the black wire of each REL to the negative speaker terminal of the corresponding amplifier channel; twist together the red and yellow wires of each REL separately and connect each pair to the positive speaker terminal of the corresponding amplifier channel. In some instances, this will result in exceptionally high gain (output) from the RELs. If it seems simply too high in gain, please remove either the red or yellow wire from the twisted pair. This will reduce output by half and restore a natural dynamic.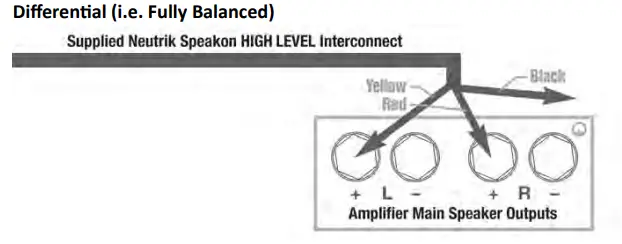
Mono Bloc
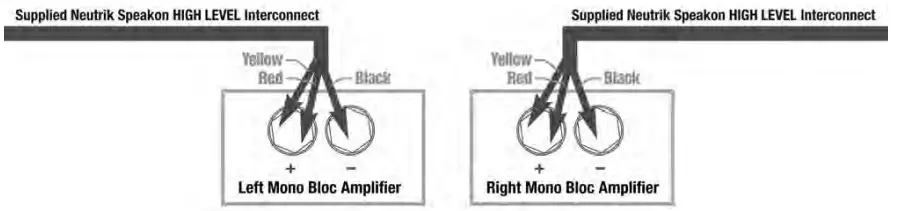
Mono Bloc Differential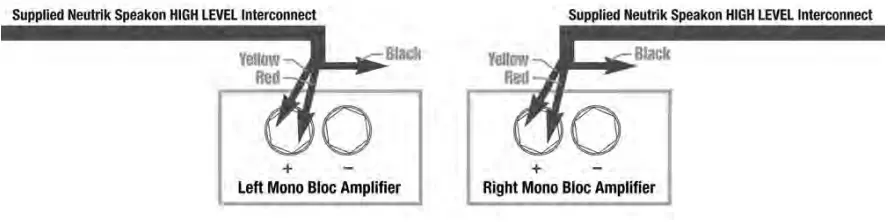
If connecting a single REL as a dedicated centre channel sub, an insider tip is to consider connecting to the rear of the speaker, rather than routing the REL High Level enable all the way back to the amplifier (unless the amplifier is of Class D or Differential output design). Connect the black wire of the REL to the negative centre channel speaker terminal; twist together the red and yellow wires and connect this paired cable (red/yellow paired together) to the positive centre channel speaker terminal
Dedicated Centre Channel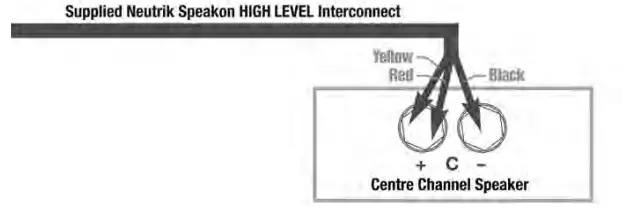
If connecting a REL as a dedicated rear channel sub, connect the black wire of the REL to either the left rear or right rear negative speaker terminal; connect the yellow wire to the left rear positive speaker terminal; connect the red wire to the right rear positive speaker terminal. If the amplifier is of balanced differential design, please follow the instructions in the section above labeled Differential Connection.
Dedicated Rear Channel
Low-level connection (via RCA connector) is always an option if high-level connection is not possible. When connecting to the low-level inputs in a system in which high-level connection is not possible, such as if using internally-amplified speakers, connect left and right RCA cables between the LOW LEVEL INPUT jacks of the REL and the left or right channel output of your preamplifier. In some cases, these channels can be combined with a “Y” cable or a dedicated SUB output. Please consult your pre-amplifier’s/integrated amplifier’s manufacturer before connecting with a “Y” cable. When connecting to a home cinema system where there is a .1/LFE channel output, connect a single RCA to RCA or XLR to XLR cable between the sub output of the processor/receiver and the .1/LFE input jacks on the REL.
- Positioning: The optimal position for a single REL Serie T/x is in one of the corners behind the main speakers. This position provides 9 dB of mechanical amplification and allows for the most linear true low bass wave launch, owing to the ability to tune the REL’s crossover to the longest distance in the room in order to produce the longest, therefore lowest frequency, bass waves. 1a.Stereo Set-Up of Serie T/x: : (see page 11 through 12 for Stereo Set-Up procedure).When this step has been completed, proceed to Number 2, immediately below.
- The Process: To begin the set-up process, choose a piece of music that has a repetitive bass line that is very low in frequency. We suggest track 4 from the soundtrack to Sneakers (Columbia CK 53146). This has a repetitive bass drum throughout that gives you plenty of time to move the woofer around, but more importantly, the venue was quite large for this recording, and therefore it has a very deep and large-scale bass signature. This track is perfect for the set-up process and should be played at the highest reasonable level expected for system playback. Working with a partner, one in the listening position and one at the REL manipulating the controls, is the most effective and efficient way to set up the REL. If working alone, the initial steps in the set-up can be very effectively carried out from the location of the REL. Trying to ignore all other music in the track, listen for the bass drum and its effect on the listening room.
- Phase Orientation: Once in the corner, we need to adjust for phase. This may be the single most critical step, and because it really is quite simple, it is often over-thought. Keep in mind; the right phase is whichever position is the loudest or fullest. While playing music with true low bass, adjust the crossover to a point where the REL and the speaker are sure to share frequencies at 50Hz on the crossover control, or slightly higher for smaller speakers. At this point turn the HI/LO LEVEL control up so that both the REL and speaker are roughly equal in volume and then switch, using the phase switch, from 0 to 180 phase positions. Again, whichever position is loudest or fullest is the correct position. That is, when the position is working in harmony with your main speakers, reinforcing bass, not canceling it.
- Corner Fine Tuning: (When Setting up for Stereo Serie T/x it is Possible that Placement is Not Corner Loaded and this Step May be Omitted). The next step is to determine precisely how far from the corner the sub should be placed to achieve the most efficient output, as well as the lowest frequency extension. With the REL fully into the corner, and pointing straight out along the diagonal coming out of the corner, continuing to play the music, slowly pull the REL from the corner on the diagonal, equidistant from both side and rear wall. At a certain point (sometimes a matter of only a few inches, in rare cases a foot or more) the REL will audibly go lower, play louder, and, if it truly locks on to the room and is fully pressurizing it, the air around the REL will seem to be energized, stop right there! This is the correct position from the corner for the REL.
- Orientation: Once the position from the corner has been established, the orientation of the woofer must be determined by rotating the REL from an imagined centre point at the rear of the REL. As the REL is moved from one side to the other listen for the greatest level of output and bass linearity. In effect, the REL should be left in the position where it is playing the loudest and lowest.
- Crossover and Level Settings: To determine the crossover point, take the volume of the REL (using the HI/LO Level control) all the way down, and put the crossover to 30Hz. At this point, bring the REL’s volume back up slowly to the point where you have achieved a subtle balance, i.e. the point at which you can just hear the Serie T/x even with the main speakers playing. First, bring the crossover point up until it is obviously too high; now gently reduce frequency to the appropriate setting. For all intents and purposes, this is the correct crossover point. Once this stage has been reached, subtle changes to volume and crossover may be accomplished to provide the last bit of complete and seamless integration. With that, set-up is complete.
Hint: There may be a tendency to set the crossover point too high and the volume of the Sub-Bass System too low when first learning how to integrate a REL with the system, the fear being one of overwhelming the main speakers with bass. In making this common error, the resulting set-up will be lacking in bass depth and dynamics. The proper crossover point and volume setting will increase overall dynamics, allow for extended bass frequencies, and improve soundstage properties.
Note: volume adjustments may need to be made to offset the effects of crossover changes. In general, when selecting a lower crossover point, more volume may need to be applied. Higher crossover frequencies will generally necessitate less gain
Stereo Set-Up of REL Serie T/x
Stereo Sub-Bass is advised for the fastest, clearest, deep bass—not for more output. Conventional wisdom has it that stereo subs results in between +3 and +6 db additional output depending upon positioning. In and of itself, this is of only passing interest in most instances since even a single Serie T/x is capable of profound output. What then, is the point to adding a second stereo sub bass Serie T/x? In a word, clarity. Clarity that permits “seeing” back into the farthest reaches of the sound stage. Clarity that illuminates all dimensions of the musicians and the space that they inhabit equally and enhances the natural reality of a great full range system, as only RELs can. Stereo Serie T/x produce clarity, transparency, speed and low level detail NOT just in the bass but throughout the entire spectrum of music.
Set-Up:
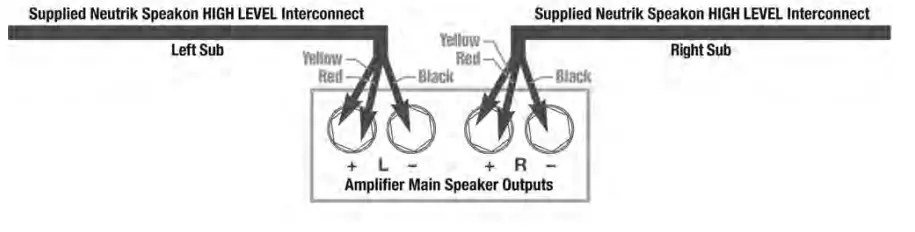
When setting up stereo Serie T/x, it is possible to place both units in the front corners of the room, carefully toed-in and placed per normal guidance in this manual. Connect each sub to the speaker terminal outputs based on the following diagrams for standard stereo amp, non-balanced mono blocks or balanced differential monoblocks.
Stereo
Mono Bloc
Mono Bloc Differential

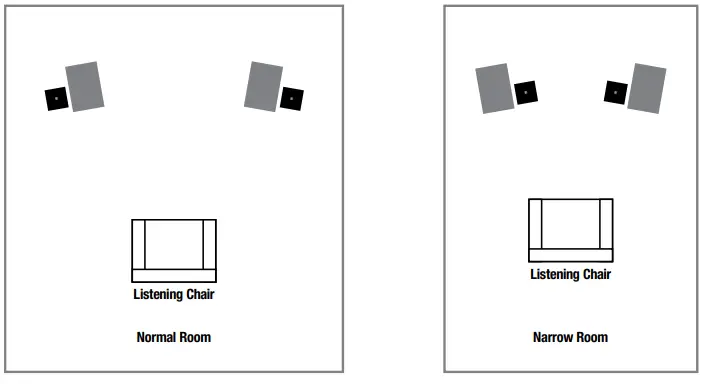
Expert Set-Up: Preferable is to bring the subs further out into the room and place them slightly behind and outboard of the main speakers.
- Set each side up independently. Disconnect the sub that is not being set-up so your complete focus can be given over to the sub that is being set-up. Carefully follow the guidance provided in standard set-up if you are unfamiliar with standard REL set-up procedure for gain, phase and crossover settings.
- Carefully fine-tune the position of the sub in its recommended location (slightly behind and to the outside of the main speaker) listening for rich powerful room nodes, but focusing on speed and connection with the main speaker. Since there will be a preponderance of output available to a stereo Serie T/x owner, focusing on connection with and blending with the main speaker becomes the primary focus, not merely raw output.

Once each sub has been carefully tuned, attach the cables for both subs. At this point, the output achieved will be too loud and will require re-setting the volume/gain control of each Carbon Special lower. This is normal as the combined output is likely to be at least 3 db louder with both subs now being used. Start by turning down each channel one click on the HI/LOW LEVEL control, carefully listen then adjust again until the perfect balance is achieved. You will have to adjust on the rear of the RELs then walk back to the listening position to determine this balance
Theatre Applications
For Dolby Digital AC3 or other 5.1 theatre systems, once the standard set-up for the two-channel outlined above is complete, the LFE output from the processor or receiver should be connected to the .1/LFE INPUT and appropriate volume adjustments made using the .1/LFE level control. For this configuration, you must set the processor to the “large” or “full range” setting for the left and right speakers in order for the REL to receive the bass signal via the high-level cable. In this configuration, the REL provides support for both the left and right speakers for two-channel listening, and support for the LFE when movies are playing. Most processors will allow you to defeat the subwoofer output when listening in the two-channel mode. The effect of this set-up is one of greatly increased dynamics in the mid-bass range, no bass bloat, and a greater degree of space and timing from the special audio effects. For an even greater sense of space and impact, a second REL connected in parallel to the centre channel will prove to be a dramatic improvement as well. And if that is not enough, a rear REL, both to support the rear channel speakers as well as to evenly distribute LFE through the room, truly completes the full-range sonic picture for state-of-the-art film reproduction.
Running In
Care taken during run in will be rewarded by many years of pleasurable use. Both the electronics and the drive unit will benefit from an initial period of carefully controlled use. Possible damage may be sustained by running in the unit at too high a volume setting over an extended period. On the other hand, by taking a little care over this initial period, about 24 hours of actual use, a longer life with a higher potential eventual performance is assured.
Care and Polishing
The cabinets are best maintained by using an automobile polish made by reputable manufacturers. Our favorites are those made by Meguiars and Mother’s. If objects are to be placed upon the top, it is advisable to use a small mat to protect the surface and to avoid the risk of rattles.
Overload Protection
All REL Sub-Bass Systems are designed as true sub bass speakers. They are designed to reproduce those exceptionally deep notes that are felt as well as heard. This it will attempt to do at whatever volume level you set. If set too high no damage should result because the built-in electronics will limit the cone movement. This electronic control is called Set-Safe™. It constantly and instantaneously monitors the output from the power amplifier and is totally transparent in operation until required. This means it has absolutely no effect on the sound quality of your REL until an overload is detected. Ordinarily an overload would cause the power amplifier to go into clipping with resultant loss of control over the drive unit. This can cause drive unit damage, and always sounds nasty. Set-Safe™ detects the point of incipient clipping and gently soft-clips the waveform of the signal to ensure actual clipping does not occur. This is a necessarily simplified description of what actually happens, but in effect, Set-Safe™ controls the amplifier and ensures there is minimum risk of amplifier and driver damage caused by over-driving. A thermal overload device is fitted to all Serie T/x Sub-Bass Systems. If the unit is deliberately over-driven this device will sense the temperature rise and cut the output; recovery time is approximately five minutes. If this happens, it is a warning that the unit is being over-driven and the volume level control should be reduced to a safe level. Although everything possible has been done to minimize risk of thermal overload failure, there can be no defense against those individuals who deliberately abuse the device. Such damage is NOT covered by warranty. Please remember your REL is there to supplement your main system, not overwhelm it!
Power Saving Efficiency
All REL sub bass system designs utilize a true On-Off switch that affords the owner the ability to turn off their unit completely, without having to unplug the A/C mains cord. When a REL sub bass system is switched off using the On-Off switch on the rear panel it draws ZERO power. Leaving a REL on, produces the best sonic performance and the most reliable operation. Using this setting ensures that the Serie T/x is ready to react instantaneously to bass transients, whether in music or films.
Specifications
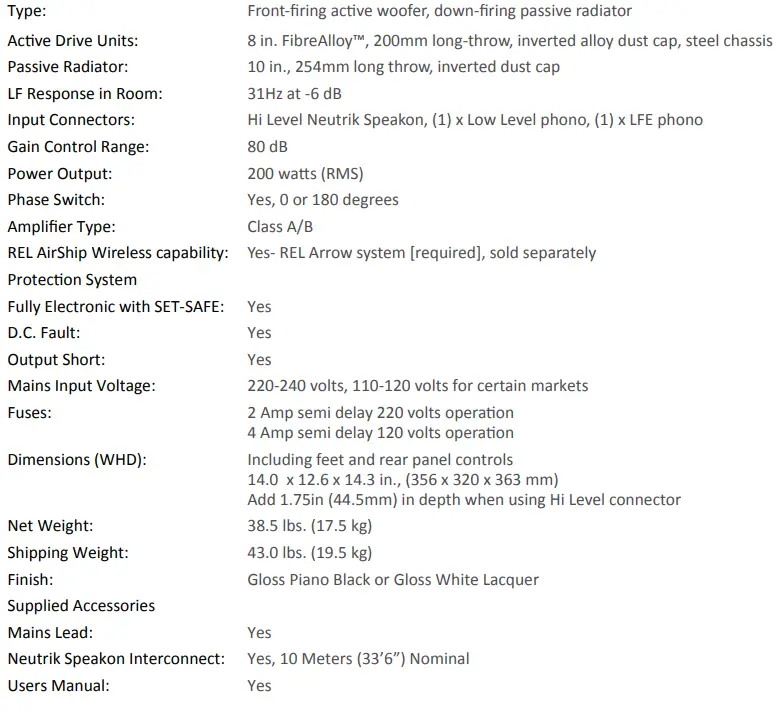
T9/x Specifications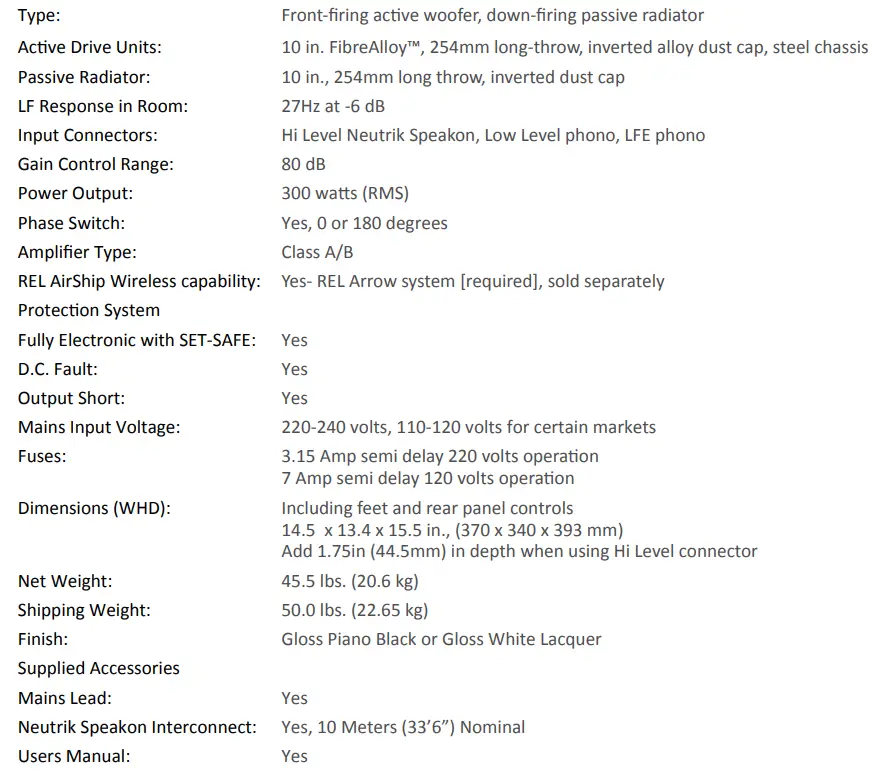
T7/x Specifications
T5/x Specifications

NEED HELP
- North Road, Bridgend industrial Estate . Bridgend, CF31 3TP . United Kingdom
- Telephone: +44 (0)1 656 768 777 . Fax: +44 (0) 1 656 766 093
- Web: www.rel.net.
FCC STATEMENT
This device complies with Part 15 of the FCC Rules. Operation is subject to the following two conditions:
- This device may not cause harmful interference, and
- This device must accept any interference received, including interference that may cause undesired operation.
NOTE: This equipment has been tested and found to comply with the limits for a Class B digital Device, pursuant to Part 15 of the FCC Rules. These limits are designed to provide reasonable protection against harmful interference in a residential installation. This equipment generates, uses and can radiate radio frequency energy and, if not installed and used in accordance with the instructions, may cause harmful interference to radio communications. However, there is no guarantee that the interference will not occur in a particular installation. If this equipment does cause harmful interference to radio or television reception, which can be determined by turning the equipment off and on, the user is encouraged to try and correct the interference by one or more of the following measures:
- Reorient or relocate the receiving antenna.
- Increase the separation between the equipment and receiver.
- Connect the equipment into an outlet on a circuit different from that to which the receiver is connected.
- Consult the dealer or an experienced radio/TV technician for help.
FAQS
All of the performance benefits which you described apply both when connecting a single subwoofer in a system using it’s High Level input and when using a stereo pair of subwoofers. For High Level connection instructions specific to your system, please write in to [email protected] and we will be happy to assist
The T/9x uses a Class A/B amplifier, with completely analog circuitry throughout, including the filter circuit
None of our subwoofer models feature servo-control technology, though they do all feature lightweight drivers, high-current amplifiers, and exceptionally low-latency filters which enable them to produce fast and responsive sub-bass output. In our experience, this speed allows the subwoofer to blend seamlessly with the system’s main loudspeakers without the subwoofer drawing attention to itself or distracting from the rest of the system
The T/9x subwoofer can absolutely be connected to the Yamaha RX-A6A AV Receiver, and in order to get the best possible performance from the subwoofer we recommend connecting using both the High Level input and the .1/LFE input simultaneously. If you have additional questions or need assistance with connecting the T/9x to this amplifier, then feel free to write in to [email protected] and we will be happy to assist
the neutrik speakon connector plugs into the REL subwoofer and the red, yellow and black wires should be connected to the same speaker terminals as your main left and right speakers. You can find the proper way to connect to a variety of systems and amplifiers on our website. The high level cable doesn’t take any power from the amplifier and rather just uses it as a conditioning source so the subwoofer seamlessly blends with your main speakers.
The shipping weight for the T/9x, including the packaging, is 50 lbs. The subwoofer on it’s own is 45.5 lbs
The T/9x can be fully powered off when not in use if you prefer, though for optimal performance we do recommend keeping the subwoofer fully powered on at all times. This allows it’s amplifier to maintain a stable operating temperature, and places less stress on the electrical components due to reduced power cycling. Also, for reference the T/9x only draws 9.6 watts when idle, or powered on but not producing any signal
When tuned correctly the T/9x will only produce low-frequency output, though in our experience the addition of fast and responsive sub-bass to a system can help midrange and even high-frequency output sound more natural and realistic. If you have any additional questions about REL subwoofers then feel free to write in to [email protected] and we will be happy to help
I have owned T9 in both England and in the US. And I have discussed conversion with REL engineers. T9s bought in the US will ONLY work on the standard US voltage. Those bought in England, only work on 240V. It is possible to have them converted, at the REL factory.
while the SVS woofers to a wonderful job of producing prodigious bass, there really isn’t any comparison – at least for music. Using one or two REL woofers in your system, when set up properly makes the entire system sound better. I have bought, built and tried many subs of all kinds and sizes, and for serious listening, I always come back to REL. I use two T/9x subs with a pair of Key LS50 Metas and the sound outperforms many systems I’ve heard and 3 – 4x the price. The REL subs are simply more musical, integrate better than anything I’ve tried (and I’ve been an audiophile for 50+ years) and disappear. Highly recommended
The T/9x is fully compatible for use with the Arcam SA30 integrated amplifier. If you would like assistance with how to connect the T/9x to this amplifier, then feel free to write in to [email protected] and we will be happy to assist.
If connecting 2 RELs, connect the black wire of each REL to a negative speaker terminal of the corresponding channel; twist together the red and yellow wires of each REL separately and connect each pair to the positive speaker terminal of the corresponding amplifier channe
REL is one of the longest running scam companies in audio, IMO. Their products have always been overpriced and poorly engineered.
REL Acoustics Ltd. is a United Kingdom based manufacturer of high-end award winning sub-bass systems and subwoofers for use in two-channel and home theater systems for over 25 years. REL subwoofers are known for being the utmost in reliability, coupled with a natural sound quite uncommon in the category
You can use high to low converters for the amps to accept high level inputs directly. The best way of doing that is by using a Line Output Converter. This tool is very popular because it connects your radio’s speaker wires and converts the speaker-level signals into a preamp-level signal


