![]()
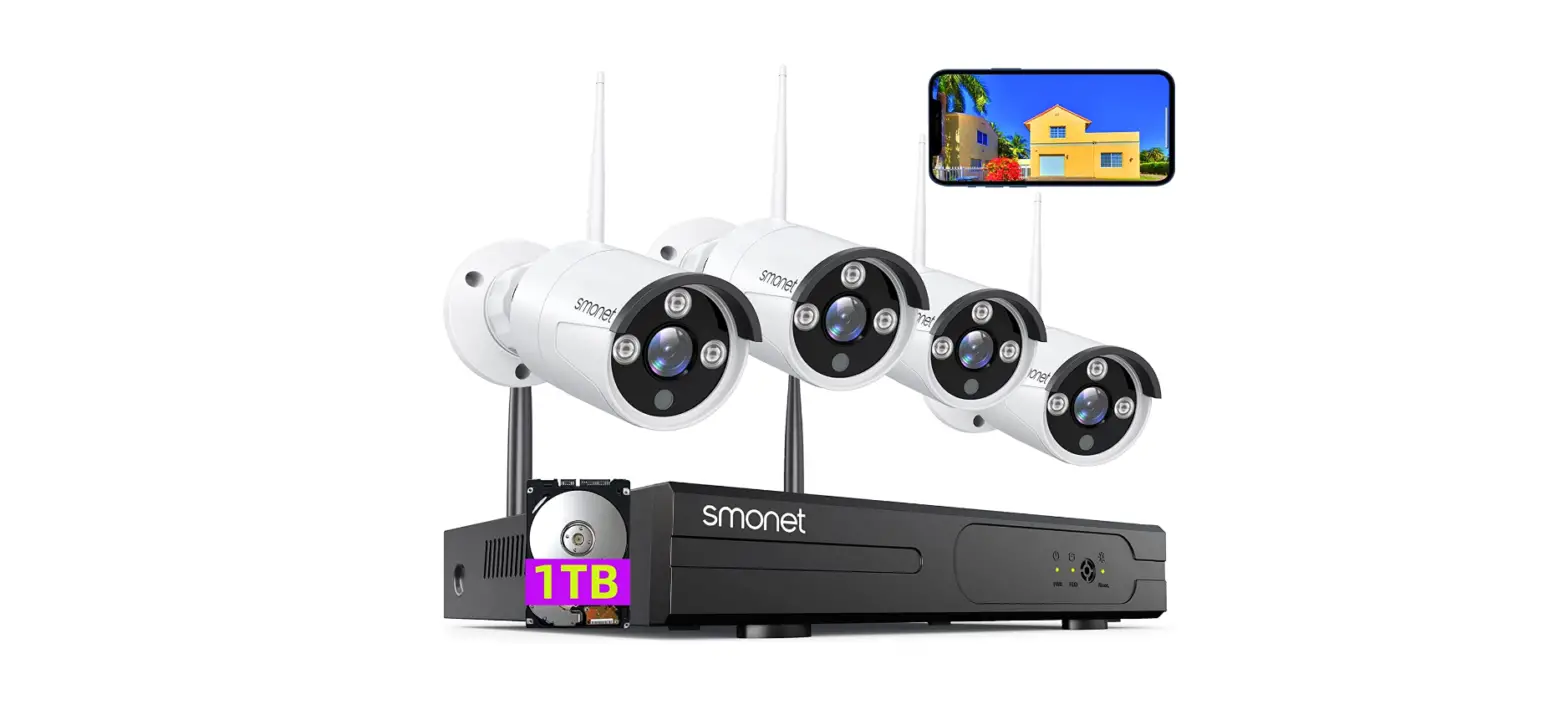
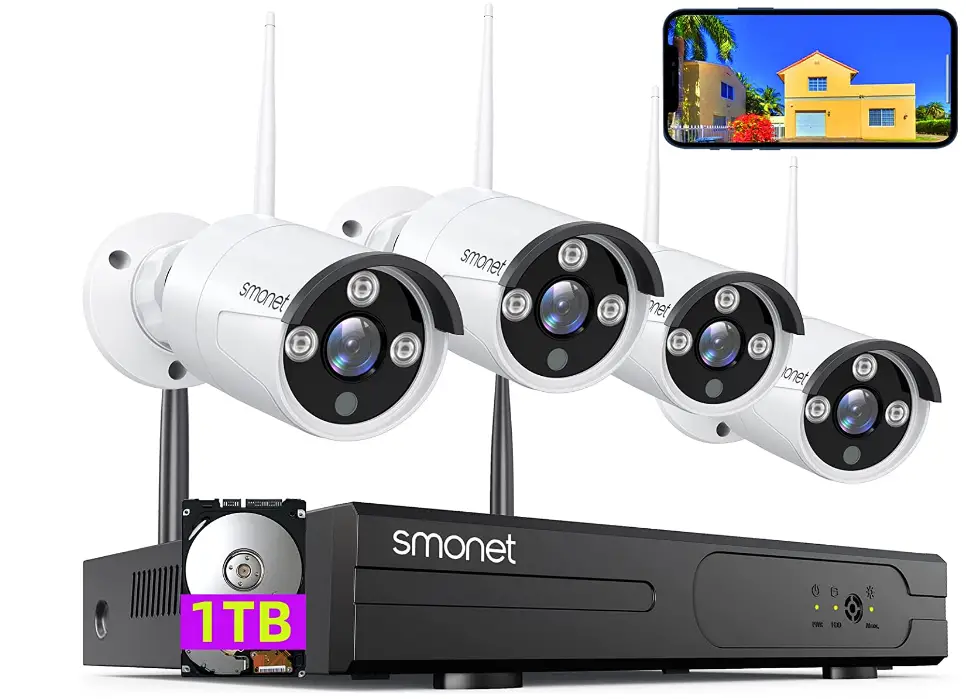
SMONET SMUS-W843M1T-XM-A WiFi Security Camera System
After-sales Contact Information
E-MAIL:[email protected]
USA: (866) 710-5666
CANADA: (888) 792-5254
Safety Caution
- Please do not put any fluid container on the product.
- Please use the product in ventilated environment and preventN blocking the vents.
- Please use the product under its standard working temperature.
- Please obey the regulation and policy in your country and area during installation.
Package Contents
Thank you for choosing our product.
Here is the list for product and relevant accessories.
| S/N | Item | Quantity |
| 1 | NVR | 1pc |
| 2 | IP Camera(4CH/8CH) | 4/8 pcs |
| 3 | DC 12V/2A power supply(for NVR)-3.3 feet | 1pc |
| 4 | DC 12V/1A power supply(for IPC4CH/8CH)-10 feet | 4/8 pcs |
| 5 | 3.3 Ft network cable | 1pc |
| 6 | USB mouse | 1pc |
| 7 | User manual | 1pc |
Camera System Installation
- Preparation for setup
Before installation, be sure to prepare the followings:
TV/PC monitor (Not laptop or all in one computer), with 1080P or higher resolution.
HDMI or VGA cables for connection to the TV/PC monitor.
Router (WAN) and Internet Service (for remote viewing)
If the system you purchase has no hard drive pre-installed, you will need a hard drive if you want to record videos. - Installing a hard drive
(skip this section if a hard drive pre-installed)
Hard Drive Specifications: 6TB maximum, internal, SATA Interface, 3.5 inches
Please power off the NVR before installing the hard drive.
NOTE: A new Hard Drive needs to be formatted before recording.
More information can be found at below part 4.2.1
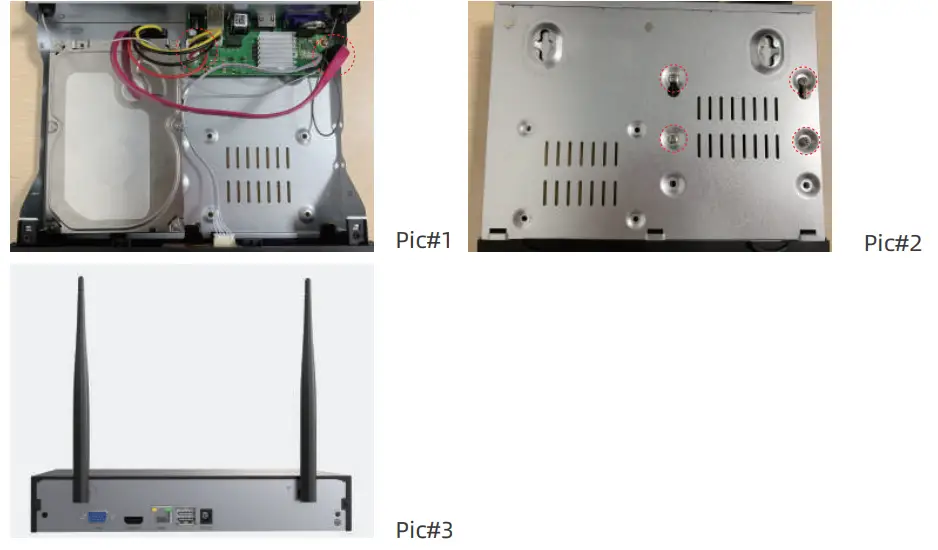
- Unplug your NVR from power, unscrew the screws and remove the top cover.
- Connect the SATA power cable and Data cable from the NVR to the corresponding ports on your HDD (as shown).
- Holding the hard drive and the NVR, gently turn it over and line up the holes on the hard drive with with holes on the NVR. Using a Phillips screwdriver,screw the provided screws into the holes and assemble the cover.
How to format the hard drive and check its information?
Generally the hard drive will be automatically formatted. From the home screen of your monitor, right click the mouse, navigate to Main Menu > Advanced > HDD Info.
If the status shows abnormal or error, please select the hard disk and click “
Format Storage” > click “OK”. From this screen you can also select the hard disk and click “Recover” to try to repair it.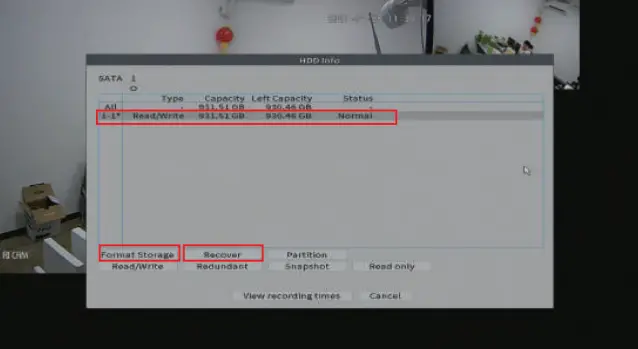
System connection
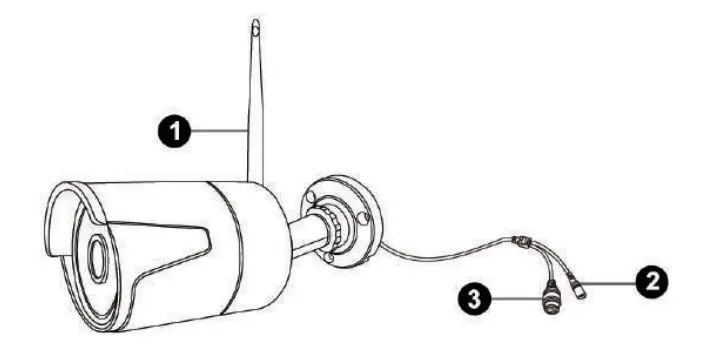
Camera Schematic
- Wireless antenna: wireless connection with NVR
- DC Port: connected to power supply
- RJ45 Port: For matching code and wired connection between IPC and NVR.
Note, DO NOT cut off the port.
System Connection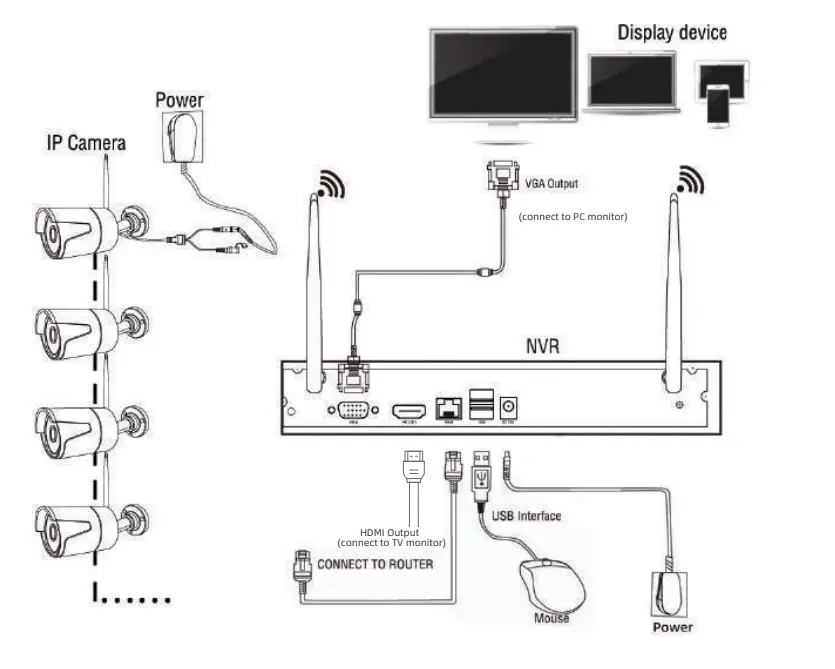
Connect NVR and cameras with corresponding power adapters. NOTICE,
NVR Power Adapter: 12V/ 2A
Camera Power Adapter: 12V/ 1A
Connect provided mouse to NVR box.
Attach provided antennas to cameras. (Note, if antenna has already been screwed into the camera, please DO NOT unscrew it. Otherwise camera will be broken. Systems have two different antennas. One can be removed and the other cannot be, which is all-in-one.)
Connect NVR to PC Monitor or TV by VGA/ HDMI cable, please kindly noted that the system doesn’t support on laptop and All- in-One PC for initial Setup.
Connect NVR to the router by provided Ethernet cable, the router must be WAN (wide area work).
NOTE: if the system you purchased is ALL-IN-ONE (including a screen), you only need to connect the mouse, network cable and power cable to the unit.
The system settings are consistent with the settings of system without a screen.
Password
Password Management
After system powered up, it will show Startup Wizard.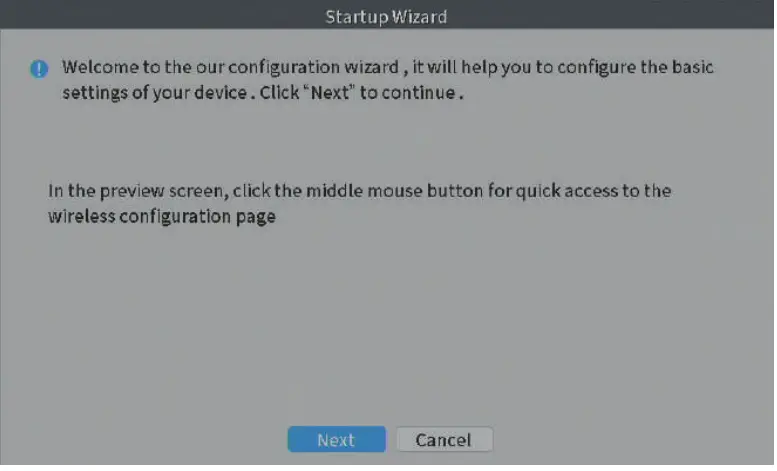
Click ‘’Next’’ to continue.
Click ‘’Cancel’’ to go to SYSTEM LOGIN. The default username is admin.
Click “OK’, then follow the instructions on screen to set password.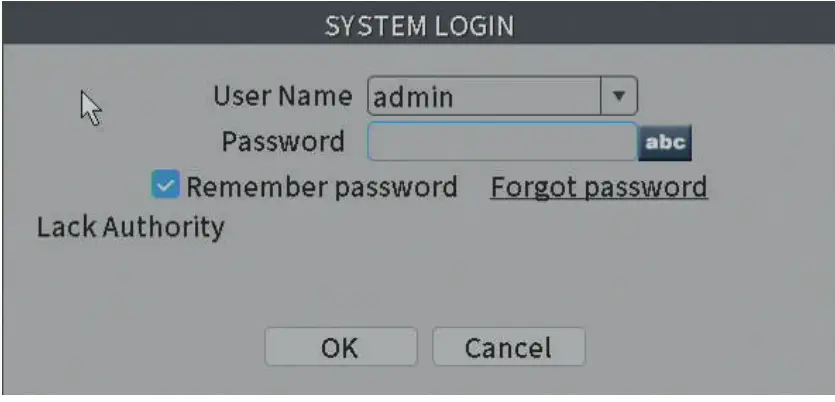
Note, the password should be no less than 6 digits, in the form of number and letter.
Password Modification
Right click the mouse on the home screen and navigate to Main Menu > System
> Account > Modify Pwd > enter old password > set new one and repeat to confirm > click “OK”.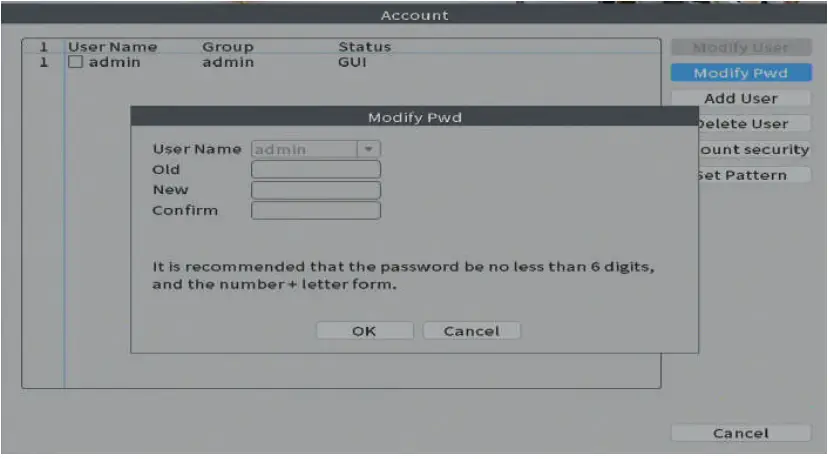
At Account page, you can also set an unlock pattern to login.
Click “Set Pattern”> long press the left button of the mouse to draw pattern.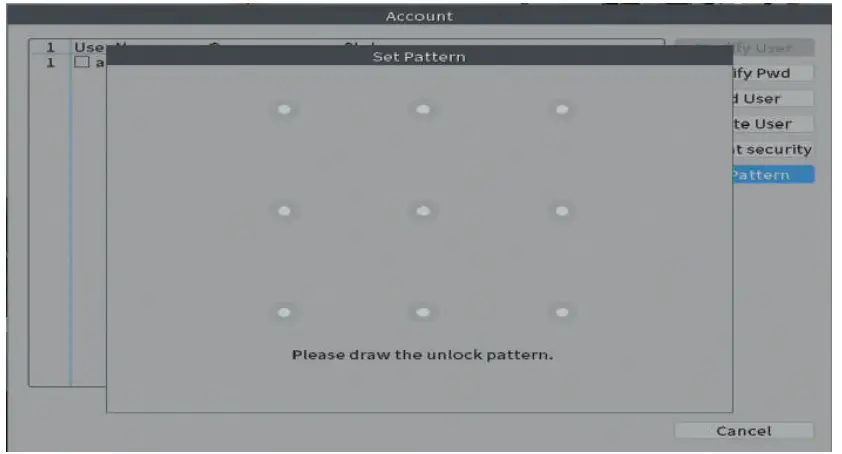
Password Reset
Click “Forgot password”>answer two questions selected before>click “OK”>set a new password>Next>OK.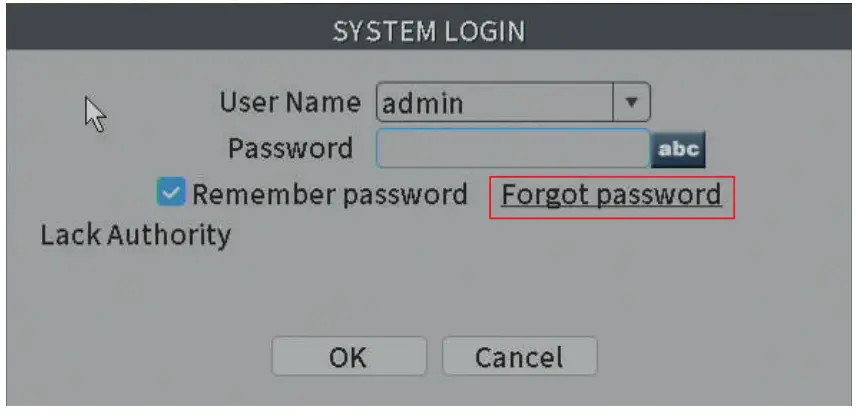
If you forget the answers to the questions, please click “Forget Answer?” at Safety question page. Then follow the tips to enter the verification code to reset password.
Network Connection
For remote viewing on phone or laptop, please connect the system to your router with an Ethernet cable provided.
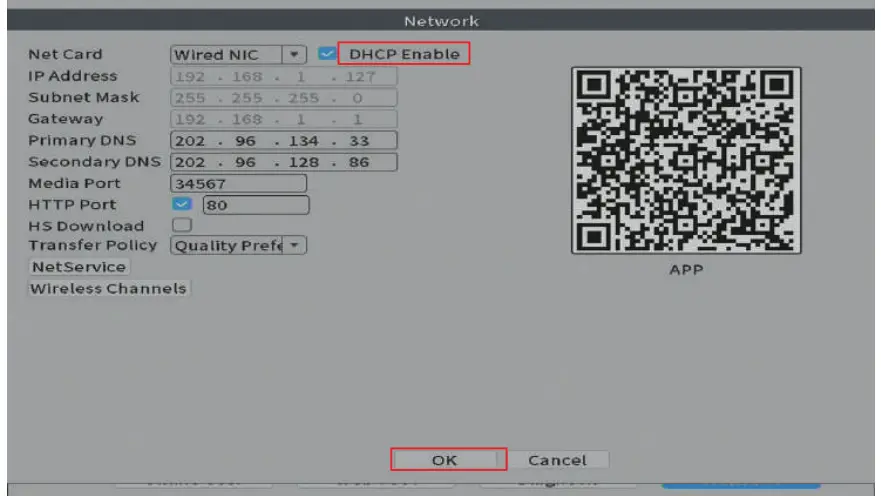
Check Network Status: Right click the mouse navigate to NetDetect.
The Diagnosis Result should be “Test Success” if online, as shown below.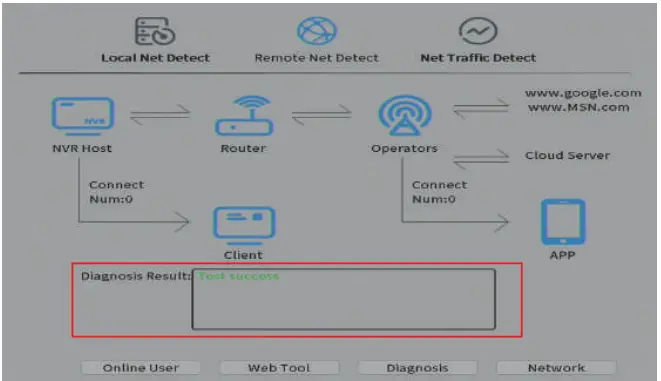
If test failed, please troubleshoot below.
- Check if the network cable connected well.
- At “NetDetect” page, click “Network” to check if “DHCP Enable” has been ticked.

- Check other reasons through the diagnosis result.
Video Recording
NOTE:
- Recording and playback requires a hard drive installed and shipped with thesystem or installed in the NVR by the user.
- Make sure the status of the hard disk is Normal. A newly installed Hard Drive needs to be formatted before recording. More information can be found at part
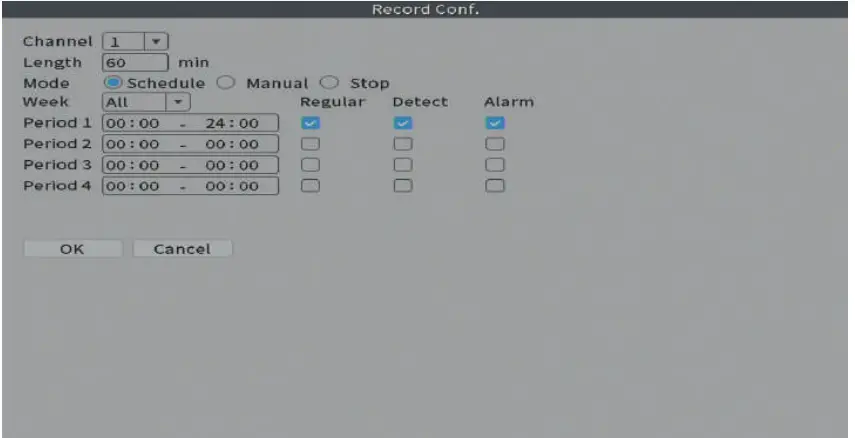
Scheduled Recording
Right click the mouse on the home screen and navigate to Main Menu>Record Conf.>Select “Schedule”.
Factory default setting is playing 24 hours/ 7days recording for all channels.
If device user like to change, please setup your own schedule.
How:
Repeat the following steps for each camera channel:
- Step1: Select the channel you wish to schedule.
NOTE: You do not have to repeat this process for each channel if you select “All” to set all the channels consistently. - Step2: Select recording type: Regular and Detect.
NOTE:
Regular refers to perform common recording during the set time period.
Detect means the NVR will record all the motions once motion triggered during the set time period. - Step3: The period can be set to an individual day of the week (7 days available from Monday to Sunday). Specific time intervals can be set for recording during a 24-hour period.
- Step4: Click “OK” to save the settings.

Motion Activated Recording
Make sure the alarm detection has been set up first. More information can be found at part 10.1 about “Intelligent Alert”. In Main Menu>Record Conf.>Select Schedule. After select the channel you wish to record for motion, please tick “Detect” ONLY. Then please refer to the steps of scheduled recording to set the time period to complete the configuration. Save all the settings by clicking “OK”. Repeat the steps above for each camera channel if needed.
Manual Recording
In Main Menu>Record Conf.>Select Manual. It records 24 hours per day. Other options are ineffective.
Record Mode(Shortcut menu)
Right click the mouse on the home screen and go to “Record Mode”.
It is used to simply set the recording mode of each channel, but the specific parameters need to be set in the Main Menu.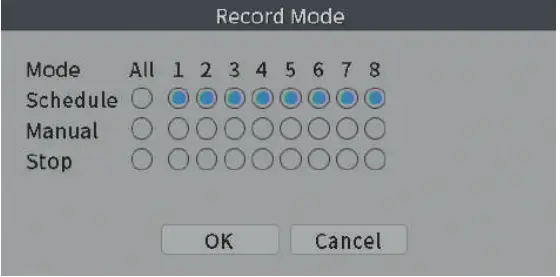
Video Playback
How to set up the Maximum number of playback
Right click and navigate to “Main Menu” > “Advanced” > ”Digital” > “Channel Type” > Check the option that supporting the Maximum number of playback. Then click “OK”.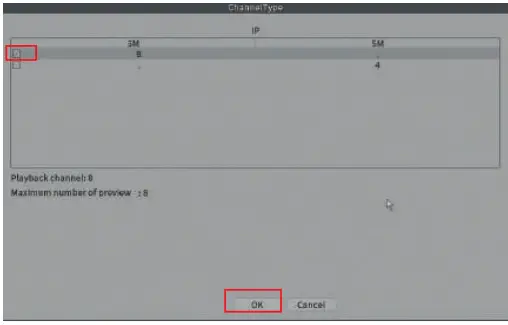
- To use the playback feature, you must first set up the recording function as described in part 7 about Video Recording. To playback, from the home screen of your monitor, right click and navigate to “Playback” or right click and navigate to “Main Menu”> “Playback”.
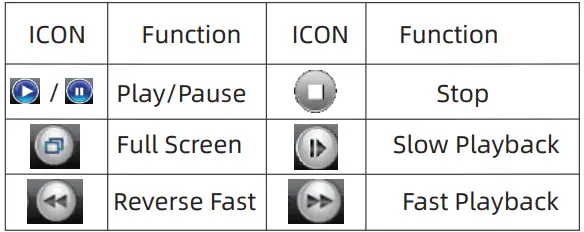
- Some commonly used buttons:

- The following contents introduce 3 modes.
Common PlayBack
- When at “Play Mode”, select the channels then the date and a period you wish to play>OK>Click “Start Playback”.
Note: Button “Start Playback” , as shown below.
- Then you’ll see colorful timeline show up at bottom of your screen, recorded video will start to playback. Please select the record type at the bottom to check if needed.
- Please click “Stop Playing” before select another channel or date to play.
- The playback control buttons are effective for only one channel.
- For example, if fast playback needed, please left click the mouse to select one video, then click “Fast Playback”. Fast Playback up to 8 times speed.
Please click “Stop Playing” and “Start Playback” before selecting another video to fast forward. - Right click the mouse> “UpWindow” to go back to the home screen.


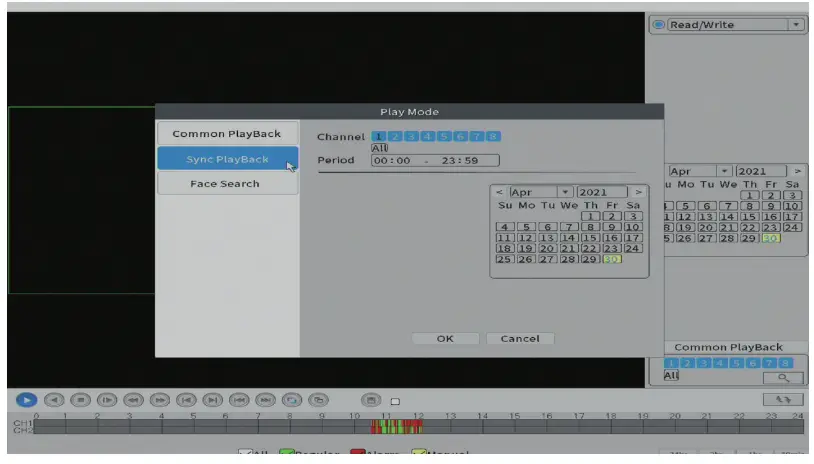
Sync PlayBack
Refer to the steps of part 8.2 about Common PlayBack. The playback control buttons are effective for all channels at one time. For example, it supports to fast playback all videos at the same time.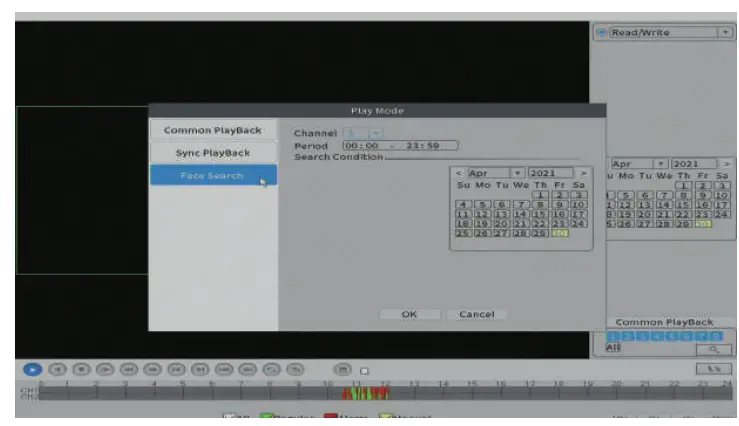
8.4 Face Search
Retrieve the image captured when the face retrieval alarm is generated (only one similar image will be retained when multiple similar images are captured in a certain period of time).
- When at Play Mode> Click “Face Search”.
- After clicked “OK’, many fragments containing different or identical face will be displayed.
- Click on the image>select the video to playback.
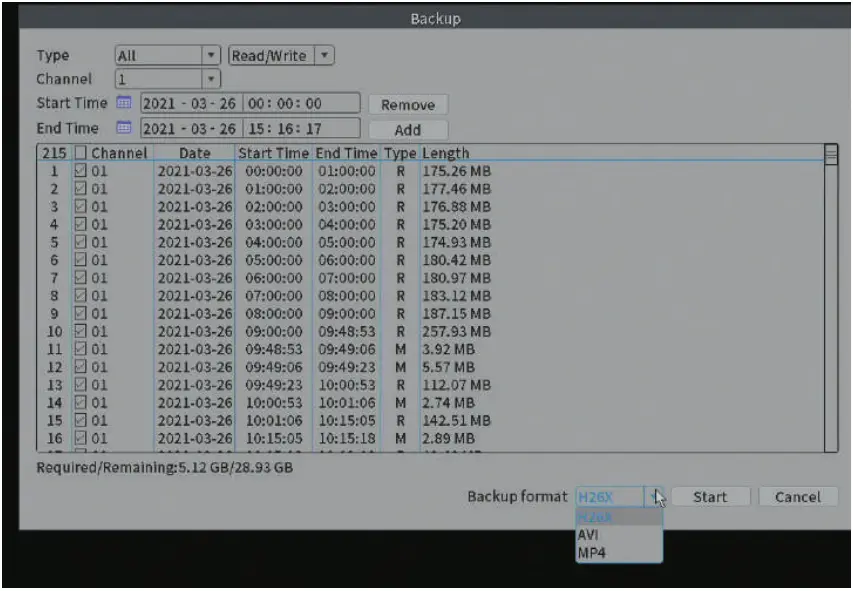
video Backup
Right click the mouse from home screen, navigate to Main Menu>System> Backup>Plug in your USB disk and click ‘Detect’>Select the detected USB disk
and click ‘Backup’>Select the type, channel and time and click ‘add’>Tick the recorded file you want to back up and select the backup format>click ‘start’
Note:
- NVR only supports FAT32 format U disk.
- It is recommended to choose AVI or MP4 format to backup and use VLC Playerto play the recording.

Alarm
Right click the mouse >navigate go to “Main menu” > “Alarm”.
The Alarm part includes three parts: Intelligent Alert, Abnormality, Traditional alarm.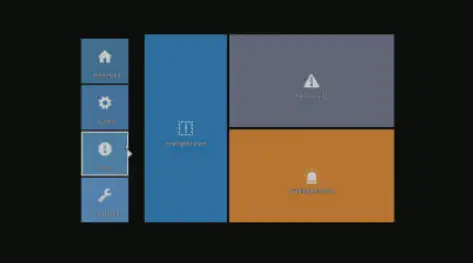
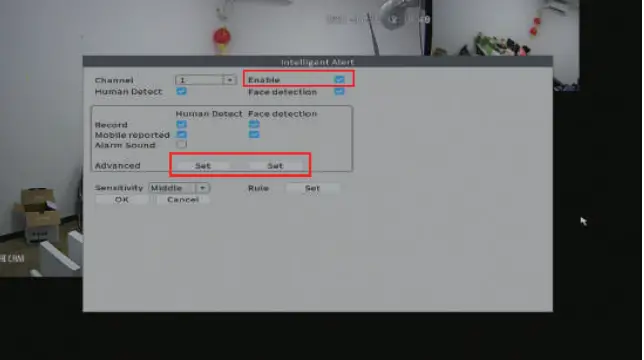
Intelligent Alert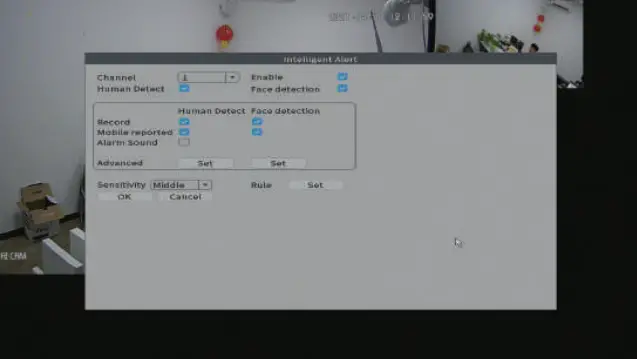
Intelligent alert will be triggered by motion detection, human detection and face detection.
The alarm is enabled by default. Human Detection and Face Detection are effective.
If you want to set “Human Detect” only, please uncheck “Face Detection”.
If you want to set “Motion Detect” only, please uncheck “Human Detect”.
- Channel: Select the channel to set motion detection
- Record: Tick “Record” if motion record needed.
- Mobile Reported: If this option is checked and the alarm push on the phone app is enabled, the alarm message will be received by phone app.
- Sensitivity: Set sensitivity depending on your installation environment
- Rule: the function to set the area of detecting motion Click “Set” right beside “Rule”, this screen will pop up.

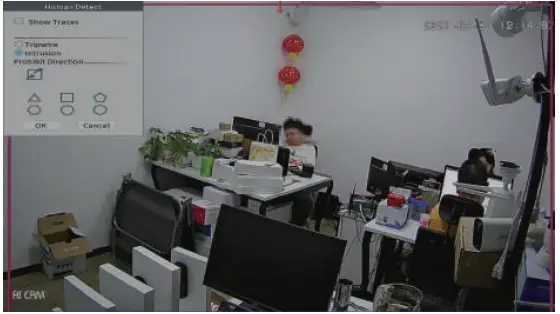
- Show Traces: When the system detects human, there will be a moving frame showing on the live view.
- Tripwire: For defaulting setting, there is a diagonal line across the screen. The two points of the line can be dragged randomly to adjust the area and the direction.
For example, if someone crosses the line, it will trigger the alerts. - Intrusion: Click on one of the polygons. Drag the vertices of the polygon to select the detection area.
Take a triangle as an example. If someone walk from the outside to the triangle, it will trigger the alerts.
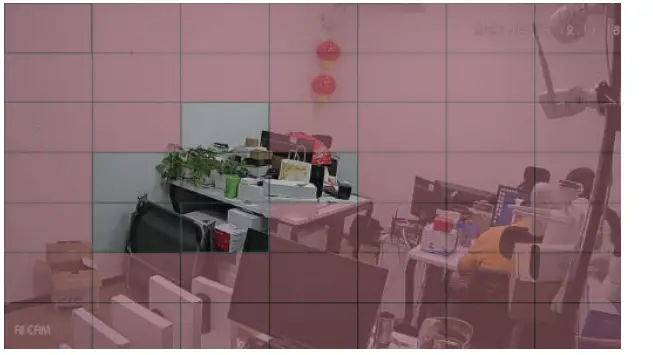
If you set “Motion Detect” with only “Enable” checked, as shown below, please click “Set” right beside “Region”.
- Region: For default setting, the whole area with color has been selected for motion detection. Left click the mouse to cancel or select the area you want to set. Right click the mouse to return to the previous page.

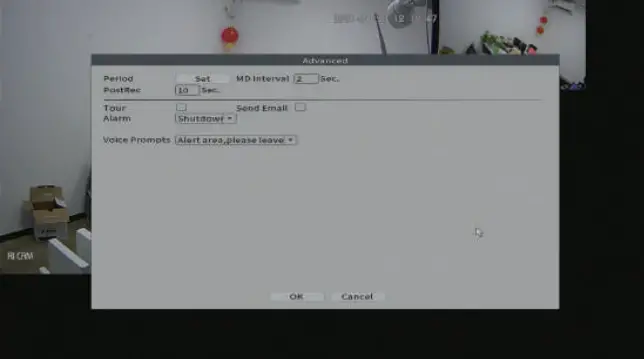
Click “Set” right beside “Advanced”.
This interface below will be displayed.
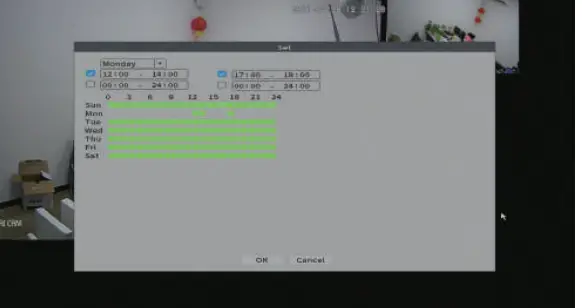
- Period: Within the set time range, the device will trigger the motion detection alarm, as shown in the figure below. It can be set according to the week, or can be set uniformly, with four time periods set every day. Select the check box “■” before setting the time period, and the set time will be valid. Click “OK” to save settings.

MD Interval: Within the set interval, if multiple motion have been detected, alarm will be triggered sequentially.
PostRec: When the motion is over, the system will keep recording for a period of time; the time range can be set from 10 to 300 seconds.
Tour: When there is an alarm signal, the selected channel will be previewed in a single-screen round tour. About how to set interval time, please right click the mouse on home screen > navigate to “Main Menu” > “System”> “Display” > “Tour”.
Send Email: When an alarm occurs, the system will send an email to notify the user.
Alarm: It supports Voice Prompts and Shutdown. NOTE, only monitor with HDMI audio output supports voice prompts. The sound comes from your displayer.

Abnormality
The function is set to detect the Abnormality of storage and network status.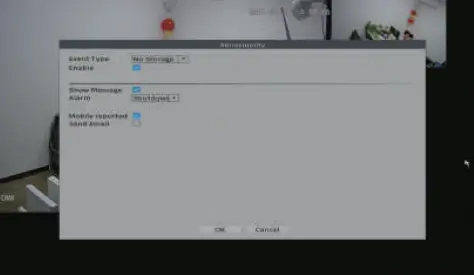
Video Blind and Video Loss are effective.
- Video Blind: The video image transmitted by the front-end camera to the recorder is affected by the outside world, and when the light intensity reaches the set sensitivity parameter, the video occlusion alarm is triggered;
Video Loss: When the video recorder cannot obtain the video signal transmitted by the front-end camera, the video loss alarm is activated.
Email Notice
- Make sure your network is online. Please refer to the part 6 about “Network Connection”.
- Refer to the part of Intelligent Alert. When at “Intelligent Alert”, make sure alert has been enabled > click “Set” right beside “Advanced” > tick “Send Email” > “OK”. Repeat the process to ensure settings have been set for all channels.
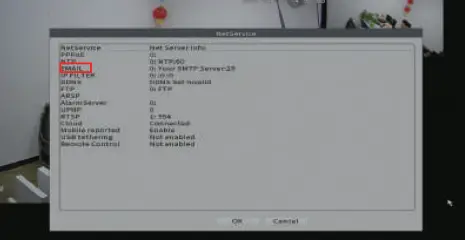
- Then right click the mouse from home screen, navigate to “Main Menu” > “Network” > “NetService” > double click “Email” .


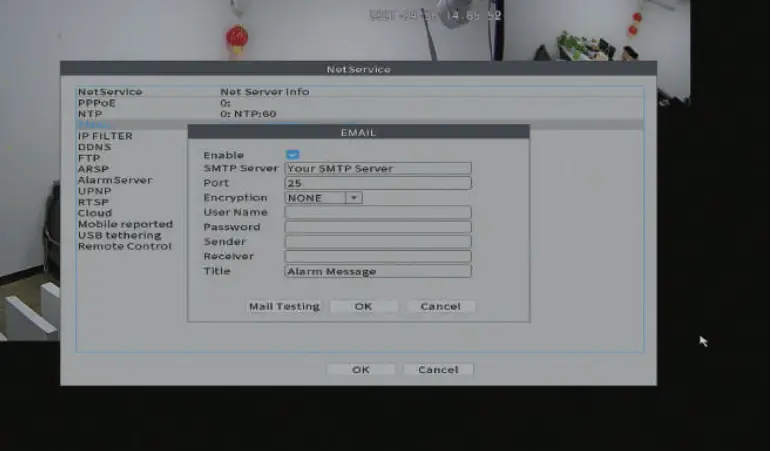
To receive notifications, you need a Email account ( Such as, Hotmail, Gmail, Yahoo,etc.) Complete the fields on the screen as follows (take hotmail account as an example): Tick “Enable”
- SMTP Sever: SMTP.live.com
- Port: 587
- Encryption:TLS
- User Name: Your email address
- Password: Email login password
- Sender: Your email address
- Receiver: Your email address
NOTE, you can use the same email address as stated above.
Then click “Mail Testing” until the Test success message appears on the screen.
Please allow a few minutes for the testing cycle to complete. If the test failed, try another Email account. Whether or not your test was successful, be sure to click “OK” to save your setting.
If you use another email account as sender,such as gmail, yahoo,etc, you need to find out their own SMTP server and port, or you can contact our service person.
How to get better signal
Antenna Adjustment
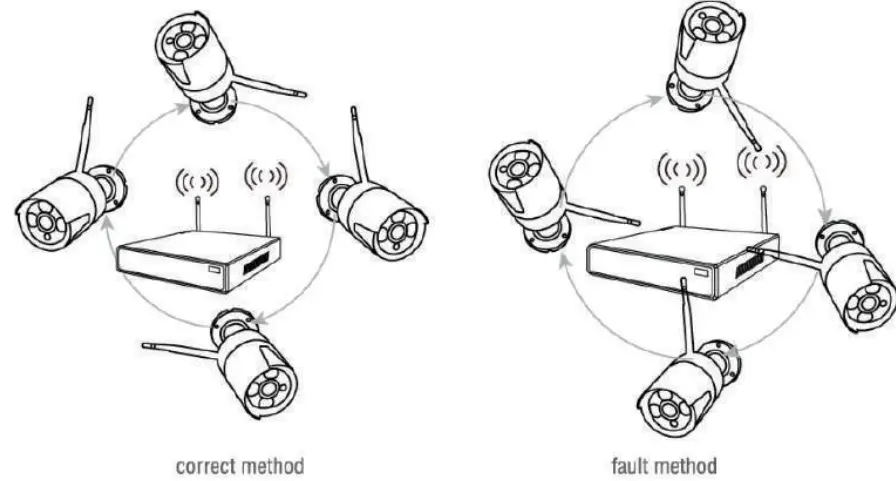
- The antennas of NVR and IPC should be placed in a high and open place, and not close to walls, metal, glass and other obstacles, which will affect the signal’s divergence.
- The IPC antenna should be placed in parallel with the NVR antenna as much aspossible, as shown in the figure below.

Repeat set
Right click the mouse from home screen, navigate to “Wireless” > “Repeat Set” > click IPC > “Repeat Mode”, there are three modes:
Auto Repeat, Open Repeat and Close Repeat.
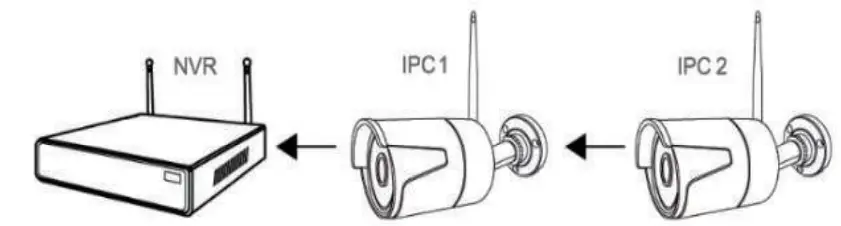
- Auto Repeat: This mode can support at most 2 levels of repeater chain like NVR->IPC1->IPC2. In this repeater chain, IPC1 connects the NVR directly and the IPC2 connects the IPC1. In this mode, the camera receiving a weak signal will automatically connect to another camera with better reception
 Open Repeat: This mode can support 3 and more levels of repeater chain.
It is not recommended to turn on this mode because it will cause excessive load on the WiFi module during transmission.- close Repeat: In some complex environments, IPC may be repeated to an undesirable one, at this time please turn off the repeated equipment to prevent wrong repeat.
 Open Repeat: This mode can support 3 and more levels of repeater chain.
Remotely View On Your Smartphone
Refer to the part 6 about “Network Connection” to make sure the system network is online and cameras are connected well.
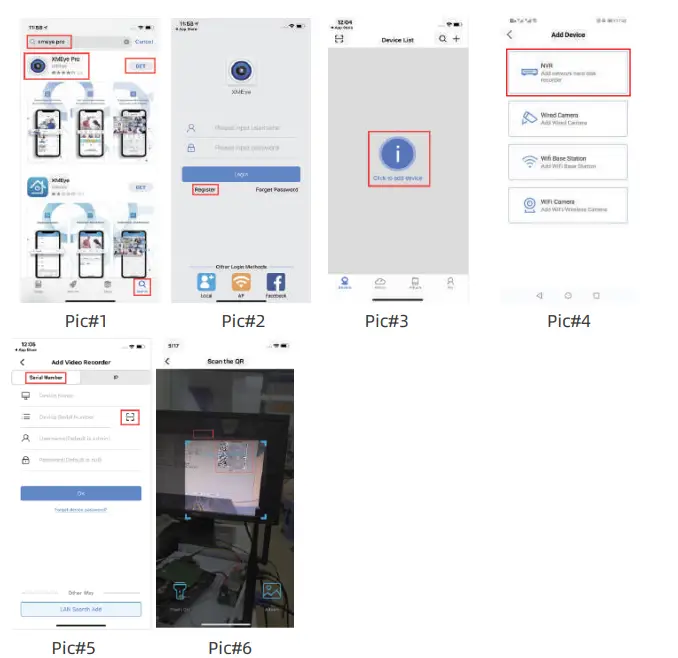
- Go to the App store/Google Play on your Smartphone and download app called “XMEye Pro”.(Pic#1)
- After app opened, please click “Register” to create an account and password and be sure to remember your account login info. (Pic#2)
- Click the “i” button and then click “NVR”. (Pic#3&4)
- Scan the QR code on the NVR system by your Smartphone. (Pic#5)
The code can be found by right clicking the mouse from home screen of NVR system, navigate to Main Menu>Network. (Pic#6)
Please note: If you use the app on multiple devices, you must register new accounts in the app on each device.
Note, if “XMEye Pro” does not work on your phone, please download another official app named “XMEye”.
How to playback on your Smartphone
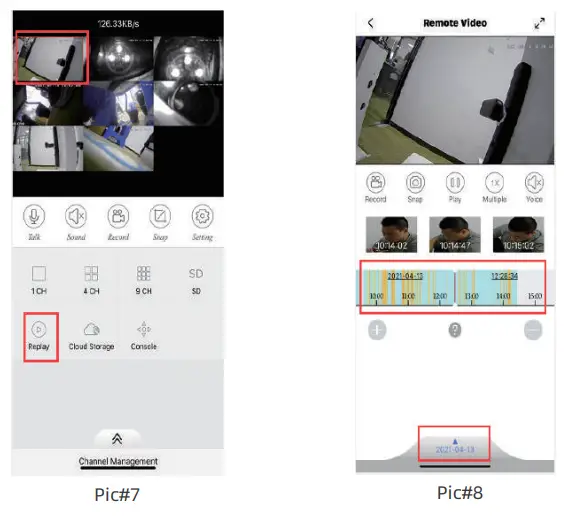
- Go to “Replay” after open the app on your Smartphone. (Pic#7)
Note, it only supports to replay one channel at a time. - Choose the date you want to replay. (Pic#8)
Note, click “Multiple” to fast forward if needed.
How to setup APP Alarm
- Refer to the part 10.1 Intelligent Alert to make sure alert has been enabled.
- Go to Main Menu on your NVR system>Network>Net service>Double left click on “Mobile reported”, tick “Enable” and then click “OK”.
- Open the app on your Smartphone>Alarm>settings>turn “Allow Notifications” on.
Please note: If you still can’t receive any notifications, please contact our tech support via email or phone call (Page#1).
Viewing on PC by VMS software
Please contact seller for PC client software. Contact information is on page#1.
Install VMS software on your PC.
The default user name and password are “admin”. Then click “SIGNIN”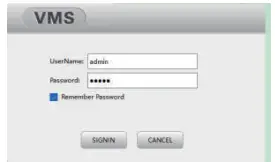
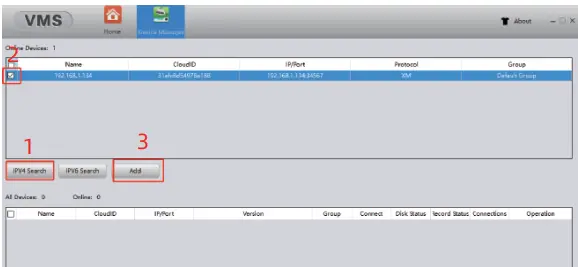
After signed in, please click “Device Manager” to add the device.
There are 3 ways to add device.
- Add device automatically
Click “IPV4 Search” to search for devices > select the device you want to access with VMS > click “Add” to add the device. See screenshot below.
- Add device by IP
Click “Manual Add”;
Device name: name the device
Login Type: choose “IP”
IP: The IP is the NVR’s IP. Right click the mouse on the NVR monitor > go to “Main Menu” > “Network” > IP Address
UserName: admin
Password: the same password on the NVR system
After all information entered, please click “OK” > go to “Home” > click “Live view” > double click the device name under the device list > double click each channel and the images will show up. - Add device by Cloud ID
Go to “Home” > click “Device Manager” > click “Manual Add”.
Refer to the steps of section above about “Add device by IP” in addition to the following information.
Login Type: choose “CloudID”
CloudID can be found by this way: Right click the mouse on the NVR monitor > go to “Main Menu” > “Advanced” > “Version” > the Serial Number is the CloudID.
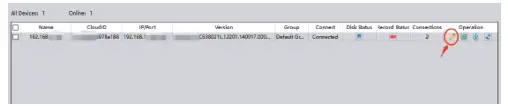
If you need to edit the device, please click the under “Operation”to modify, as shown below.
After adding it successfully, go to “Home” > click “Live View” > double click each channel on the right side and you will see the cameras, as shown below.
- Playback on the software
Go to “Home” > click “Playback”.

Other Functions
Color Setting and PTZ Control are not available currently.
Please leave them default settings
Frequently Asked Questions
What is the working temperature of Security Cameras?
From -50 degrees Fahrenheit to +122 degrees Fahrenheit.
How to adjust the Date and Time?
First way: Navigate to Main Menu>System>Date Time, please select correct Date & Time and Time Format>OK.
Warm tip: If DST setup needed, please tick “DST” to set.
Second way: Verify that your system have a healthy network (refer to section#6 about Network Connection).
Navigate to Main Menu>Network>NetService>double click “NTP”>Check “Enable” to synchronize time>OK>OK>OK.
What should I do when Hard Drive Not Found?
If hard drive not found, here are some steps to troubleshoot.
- Double check if the power adapter for the NVR box is 12V/2A(output).
The power supply for NVR and camera are different.
Don’t mix the power supply of NVR and camera. - If the power supply is correct, please open the NVR box and check if the cables of the HDD are connected right and tight. Please try to reconnect them.
- If step#B does not work, please change a power supply with output 12V/3A, 4A or 5A to test.
- If step#C does not work, please contact our customer service (page#1).
How to match the new camera to the NVR?
There are 2 ways to match a new camera to the NVR. Wireless matching code and wired matching code
What should I do when camera does not work or camera offline?
Check if the power supply works or not. Please cover the photocell with your finger as shown in the figure below around 5 to 10 seconds to check if the IR-CUT light turns red.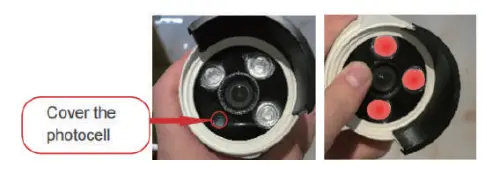
- Wireless Matching Code
Note, camera needs to be within 30ft from the NVR when wirelessly matching code.
Right click the mouse from home screen, navigate to “Wireless” > Code for wireless > Power or reconnect the camera, following the prompt to wait around 3 minutes > click “Exit” when the process is completed. - Wired Matching Code
Connect the camera to the NVR with network cable, and wait around 3 minutes until the image appears, then disconnect the network cable.
Note, if the old camera needs to be replaced by the new one, please click the red “X” on “Wireless” interface to delete the old camera first, then follow steps above A or B to match camera.
If yes, the camera and the power supply are working. Please refer to the part 16.4 “How to match the new camera to the NVR” to regain the image.
If no IR-CUT light on, please test with another good power adapter.
In this case, please contact after-sales service (page#1 ).
How to restore the unit?
Right click the mouse from home screen, navigate to Main Menu>Advanced> Restore>Select All>OK. After settings restored, the cameras will show up automatically. Please login with user name “admin” and password blank, then follow the operation guide on screen to reset a password.
Face Detection
Right click the mouse from home page, navigate to “Face detection”. The device supports IPC with face detection function. You can view the detection results on the real-time preview interface. Check the part 10.1 Intelligent Alert for more details.
What to do if nothing comes up on the monitor screen?
- Be sure the HDMI/VGA cable and power cable are tightly connected. Switch HDMI cord or VGA cord with a functional one.
- Make sure your TV/PC Monitor has been set to HDMI/VGA Mode.
- Make sure there are lights on in the front of the NVR box. Switch power cord for the NVR box with a functional one if power indicator light is off.
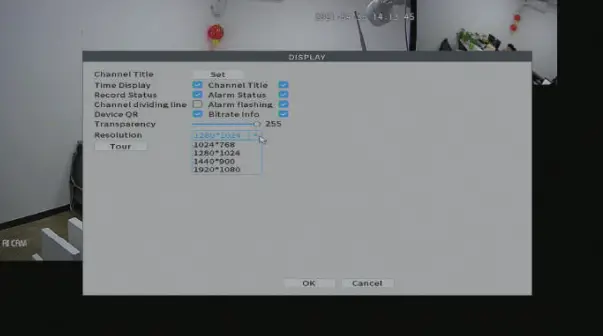
- Connect system to another monitor with higher resolution to test. When the videos appear, please adjust the NVR to a lower resolution level, such as 1024*768, to allow the videos to properly display on the first screen. If so, right click the mouse on your home screen and navigate to Main Menu> System>Display>change Resolution to 1024*768 and click “OK” to save.

- If Step4 does not work or you do not have another monitor, please contact our tech support via email or phone call (page#1 ). We will send you software to search NVR IP and modify the resolution on your computer.
How to use wireless camera as a wired one?
Power up the camera and connect it to the NVR with network cable>Right click the mouse from home screen, navigate to “Wireless”>click the red “X” to delete the specific camera IP>click “Wired configuration”>go to “Quick set”>click “OK” after the progress bar is completed>IP starts with 192.xxx.xx.x will be found at the top window, then Select its check box “■” >click “Add”>Click “Apply”after IP went to the bottom>Click “Exit”.
After-sales Contact Information
USA TOLL-FREE: (866) 710-5666 (Available after 5:00 PM at Pacific Time)
CANADA TOLL-FREE:(888) 792-5254(Available after 5:00 PM at Pacific Time)
E-MAIL: [email protected]
SKYPE ID: safeskysales003
WECHAT: B997520270
WEBSITE:WWW.SMONETCCTV.COM


