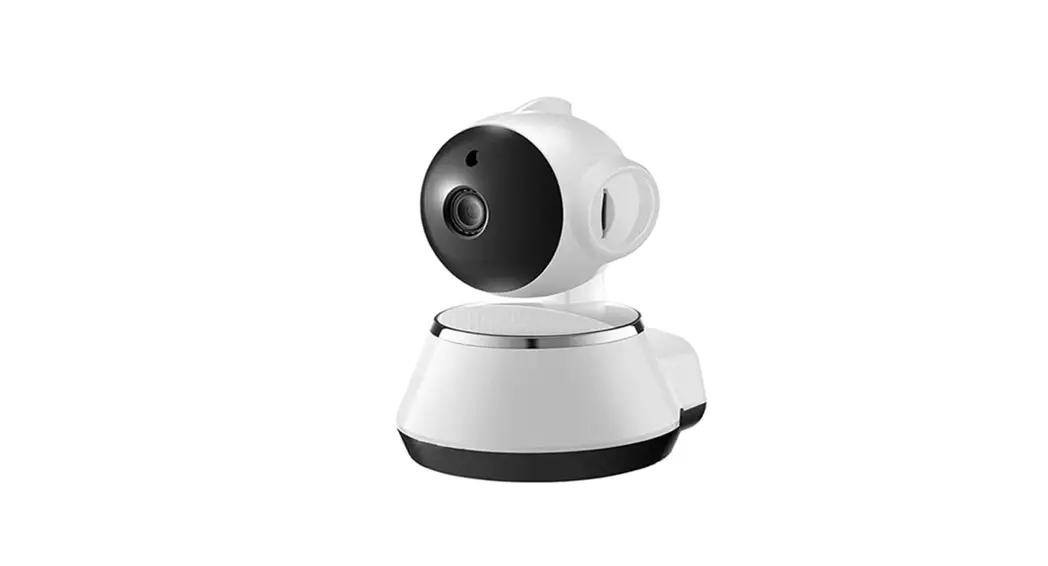
AI-IP019 WiFi Home Security Camera
User Manual
AI-IP019 WiFi Home Security Camera
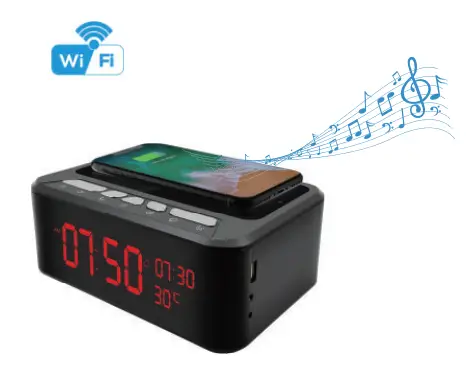
Stereo speaker + Wireless charger+Clock camera
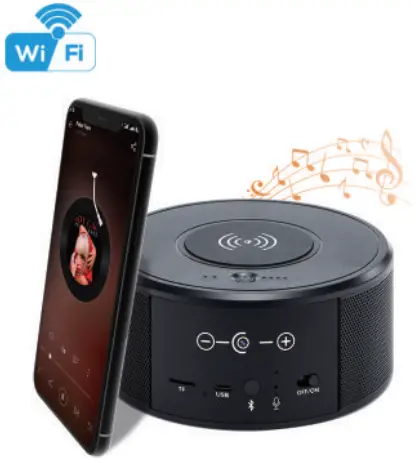
Stereo speaker + Wireless charger
Overview:
This security Wi-Fi camera kit is equipped with a powerful 1080p smart Wi-Fi camera for live streaming video, and it comes with motion detection video recording and alarm.
Mini design and easy hidden to DIY any kinds of unique and exclusive security cameras for home & business surveillance.
Usages: Nanny camera, home/ shop/ office/ warehouse surveillance camera
Warning : * illegal use is not allowed! Or, there will be consequences to bear! ” •
In the box:
Clock charger
- 1 x Wi-Fi camera
- 1 x 12V 2.5A DC power adapter
- 1 x Reset pin 1 x Cable
- 1 x User manual
- 1 x Micro SD card reader
Wireless charger
- 1 x Wi-Fi camera
- 1 x Reset pin
- 1 x USB Cable
- 1 x User manual
- 1 x Micro SD card reader
Product instruction
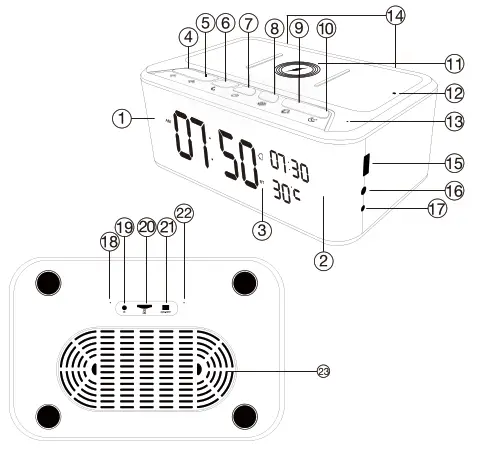
| 1. Camera; 2. Night vision LED; 3. Bluetooth icon; 4. 5. 6. 7. 8. 9. Alarm setting; 10. 11. 5W Wireless Charging Zone; | 12. Wireless Charging Indicator; 13. Bluetooth Microphone; 14. Loudspeaker; 15. USB port; 16 AUX; 17. 12V DC; 18. Wi-Fi camera microphone; 19. Reset; 20. Micro SD card slot; 21. ON/OFF for Camera; 22. Indicator light; 23. Speaker diaphragm; |
Speaker Operation:
- Turn on speaker: Short press above
 to turn on, with start tone;
 - Pair with smart phone: Phone setting=>Bluetooth=>find signal 019 BT=>click to connect;
- Turn off speaker: Short press above to turn off, with end tone;
- Disconnect bluetooth: Phone setting=>Bluetooth=>find signal 019 BT=>click to disconnect;
- Automatically be off:
a. Speaker is not paired with phone in 10 minutes after turned On;
b. There’s no paired phone in speaker’s receiving range with in 10 meters.
Common fault solution:
- Cannot connect to the speaker
> Delete 019 BT from the phone’s Bluetooth pairing list, and search 019 BT again; - Cannot search the speaker
> When heard start tone, it will be found. Tips: This product is without internal battery, please use package included 12V 2.5A DC adaptor to power on.
Product instruction
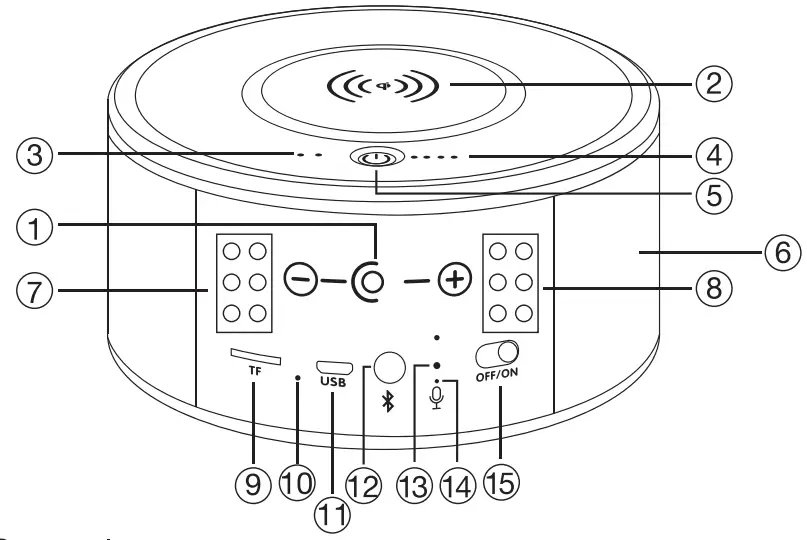

| 1. Camera lens 2. Wireless charging area 3. Wireless charging indicator 4. Battery indicator 5. On/Off for wireless charger 6. Stereo speaker 7. 8. Invisible night vision LEDs | 9. TF/Mciro SD card slot 10. Speaker indicator 11. Charging port 12. On/Off for Speaker 13. Reset for Wi-Fi camera 14. Indicator for Wi-Fi camera 15. On/Off for Wi-Fi camera 16. Two-way audio speaker |
Wireless charging function:
- Device with 4500mA built-in battery, pls plug in power or charge it fuly first;
- One press top On/Off to turn on the wireless charger,
- Charge your phone;
- Twice press top On/Off to turn off the wireless charger,
Stereo speaker function:
- Turn on speaker:
Short press back bluetooth button 12 to turn on, it wil say “DingDong” - Pair with smart phone:
Phone setting=>Bluetooth=>find signal BT=>click to connect; - Turn off speaker:
Short press back bluetooth button 12 to turn off speaker; - Disconnect bluetooth:
Phone setting=>Bluetooth=>find signal BT=>click to disconnect; - Automatically be off:
a. Speaker is not paired with phone in 5 minutes after turned On;
b. There’s no paired phone in speaker’s receiving range with in 5 minutes;
c. Speaker’s battery less then 5%.
Common fault solution:
- Cannot connect to the speaker
> Delete BT from the phone’s Bluetooth pairing list, and search BT again; - Cannot search the speaker
> Turn off speaker, and turn on again when heard “DingDong”, it will be found.
Getting started of Wi-Fi camera part
Step 1: Download and install APP
Search and download free APP named “NDSmartIPC” in Apple APP store, Google play or Electronic market, and install it. Step 2: Plug in power and turn switch to ON. wait for 1 minute:
Stec, 3:Connect WiFi
- Open smartphone settings, search and connect the device’s vireless signal named”Al/LM……”,wait Wi-Fi connected, and phone .tatus bar appear wi-Fr
 symbol.
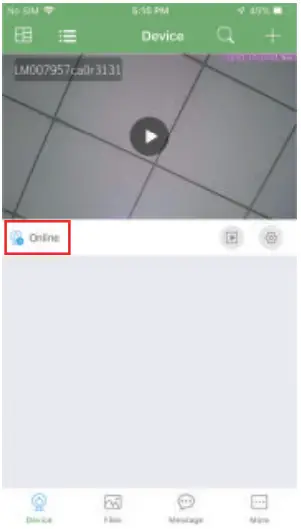
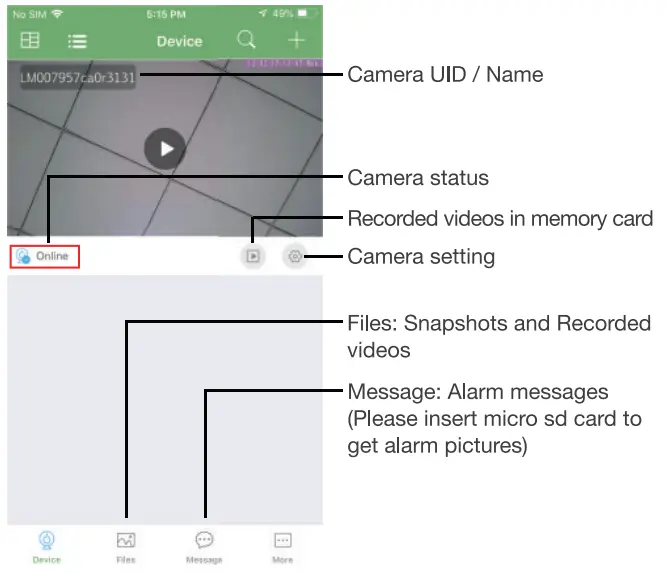
- Eneter APR app will add just connected camera automatically, Damera Online then;
 TIPS: This step = P2P mode, can check video locally when without Wi-Fi.
 - Press the gear icon
 after the camera and select Device settings ,select Wi-Fi Config.
- Select the router Wi-Fi and input password, camera will be connected to the router Wi-Fi. The smartphone will disconnect the signal from device and connect to the router Wi-Fi.
- Quit APR and device restart automatically and ready again in 30 seconds.
- Enter APP and check live video locally or remotely anywhere.

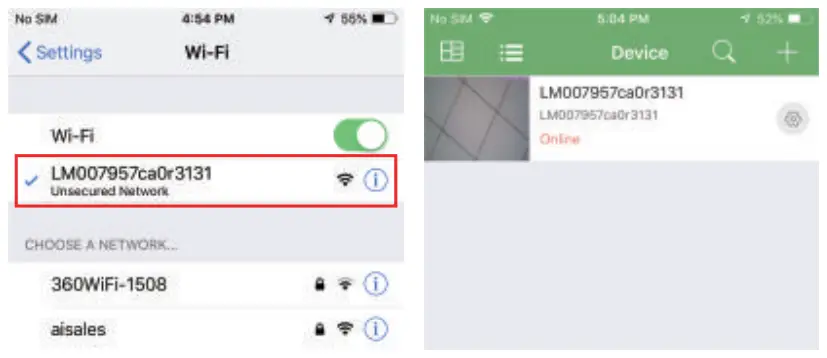 TIPS: This step = P2P mode, can check video locally when without Wi-Fi.
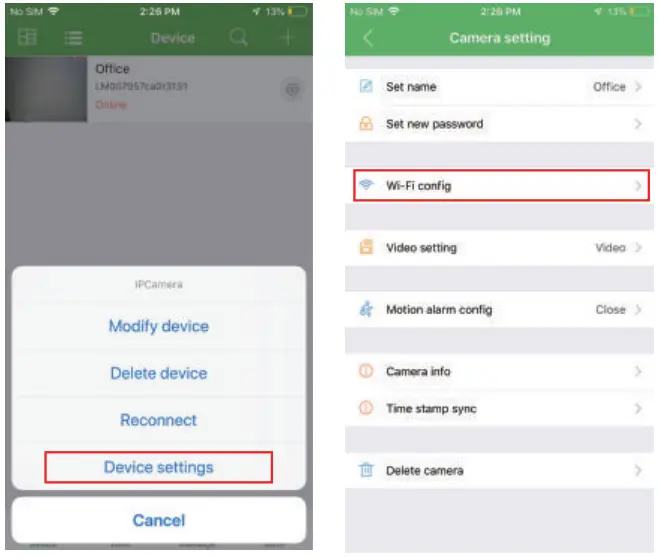
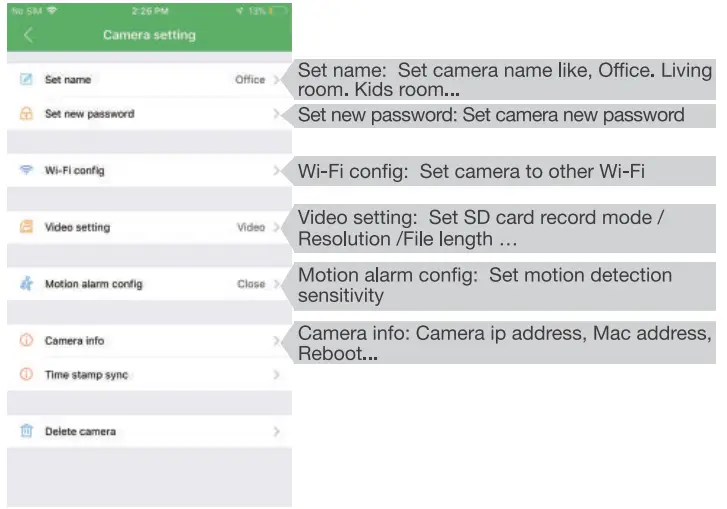
Set camera name and private code
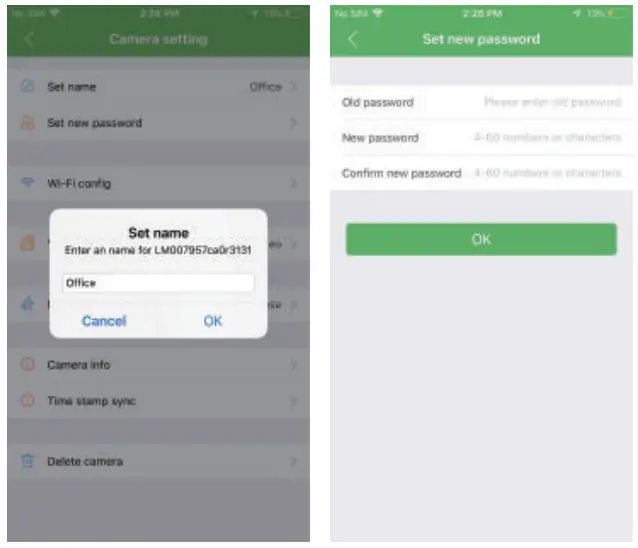
Set name:Press the ![]() after the camera and select Device settings,select Set name, insert name like Office,Room……
after the camera and select Device settings,select Set name, insert name like Office,Room……
Set new password:Press the ![]() after the camera and select Device settings,select Set new password and change it to new one. Default one is 8888.
after the camera and select Device settings,select Set new password and change it to new one. Default one is 8888.
APP introduction:
Live video page – Click camera to check
TIPS: Each setting in Device Settings, please scroll down and press ok to save the setting.
Set and watch by PC remotely (Windows Only)

https://drive.google.com/open?id=1-c45Oqa_G_e27q_z9zvCz5vZwdGrFUB3
Scan to download PC Client
Specification
| Sensor | 2.0 Mega pixel CMOS Lens |
| Video resolution | Max 1920*1080 |
| Frames | Max 25fps |
| Compressed format | H.264 |
| View Angel | 120° 190° |
| Night Vision | Invisible 6M |
| Type of Memory Card | TF>=Class 4/10 HC Marked |
| Capacity of Memory Card | Max 128GB |
| PC operation system | Windows 7,8IMac OS X |
| Mobile Phone operation system | Android/10S |
| Video Player | VLC Player/SM Player |
| Recording | 1min/20mb |
| Power adapter | 12V/2.5A |
| Wireless charger power | 5 W |
FAQ
– A: Press reset key for 10 seconds and wait 1 minute.
– A: Select suitable resolution according to the real time network environment.
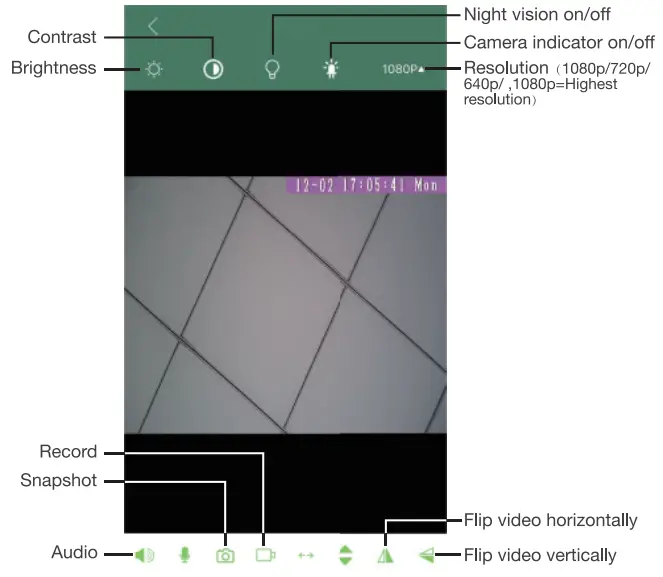
– A:1). Set motion detect sensitivity in Motion alarm config;
– 2). When motion detected, camera will push a alarm message to your phone and take one picture for checking in the APP [ Page 16 – Message ]. (A micro sd card MUST be inserted for saving alarm pictures)
– A: 1). Use a card reader to read and play;
– 2). Use APP to play back [ Page 16 –![]() ]
]
– 3). Play back in good speed network.
– A: Turn on camera and wait for 1 minute, press reset key around 10 seconds till back indicators off to restore factory default. Camera restarts and get ready again in 1 minute.
– A: Please contact local dealer for video guide.
This device complies with part 15 of the FCC Rules. Operation is subject to the following two conditions:
- this device may not cause harmful interference. and
- This device must accept any interference received. including interference that may cause undesired operation.
Changes or modifications not expressly approved by the party responsible for compliance could void the user’s authority to operate the equipment. This equipment has been tested and found to comply with the limits for a Class 8 digital device. pursuant to Part 15 of the FCC Rules. These limits are designed to provide reasonable protection against harmful interference in a residential installation. This equipment generates uses and can radiate radio frequency energy and. if not installed and used in accordance with the instructions. may cause harmfri interference to radio communications. However, there is no guarantee that interference will not occur in a particular installation, If this equipment does cause harmful interference to radio or television reception. which can be determined by turning the equipment off and on. the user is encouraged to try to correct the interference by one or more of the following measures:
- Reorient or relocate the receiving antenna.
- Increase the separation between the equipment and receiver.
- Connect the equipment into an cutlet on a circuit different from that to which the receiver is connected.
- Consult the dealer or an experienced radio/TV technician for help.
This equipment complies with the FCC RE radiation exposure limits set forth for an uncontrolled environment. This equipment should be installed and operated with a minimum distance of 20cm between the radiator and any part of your body.
Version: May 2020


