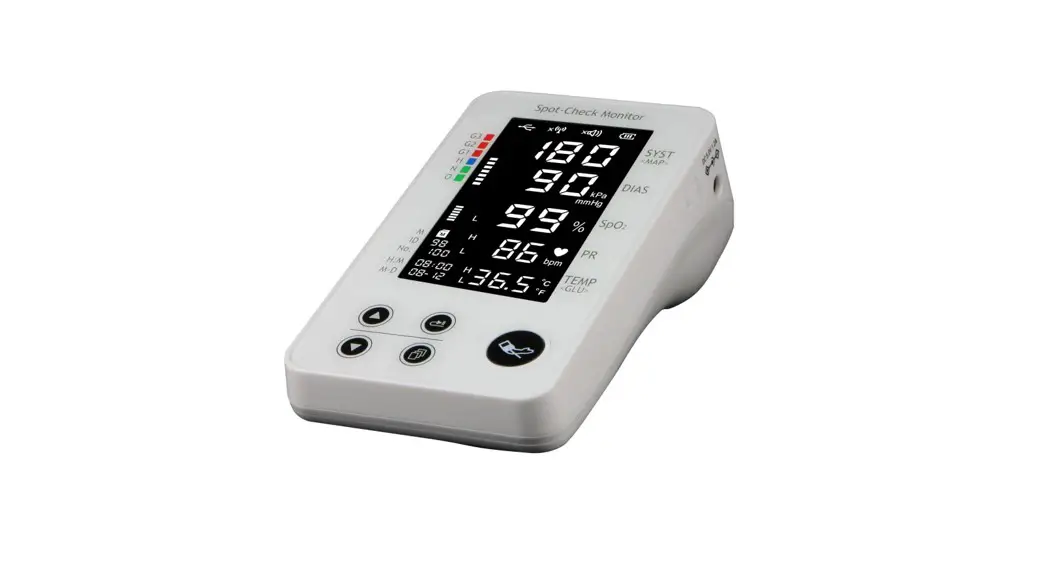
![]() PC-100 Spot Check Monitor
PC-100 Spot Check Monitor
Instruction Manual
PC-100 Spot Check Monitor
This Manual is written for the current Spot-Check Monitor.
The Manual describes, in accordance with the Spot-Check Monitor’s features and requirements, main structure, functions, specifications, correct methods for transportation, installation, usage, operation, repair, maintenance and storage, etc. as well as the safety procedures to protect both the user and equipment. Refer to the respective chapters for details.
The Manual is published in English and we have the ultimate right to explain the Manual.
Version of This User Manual: Ver1.1
All rights reserved.
Issued Date: November 18, 2021
Product expectancy life: 5 years (not warranty time) Manufacturing date: See label on device 3502-2600017
Marks in the Manual:![]() Caution: must be followed to avoid endangering the operator and the patient.
Caution: must be followed to avoid endangering the operator and the patient.![]() Attention: must be followed to avoid causing damage to the Spot-Check
Attention: must be followed to avoid causing damage to the Spot-Check
monitor.
☞ Note: contains some important information and tips about operations and application.
Dear Customers,
Thank you for purchasing this quality product. Please read the following information very carefully before using this device.
Read these instructions carefully before using this Spot-Check Monitor. These instructions describe the operating procedures to be followed strictly. Failure to follow these instructions can cause monitoring abnormity, equipment damage and personal injury. The manufacturer is NOT responsible for the safety, reliability and performance issues and any monitoring abnormality, personal injury and equipment damage due to user’s negligence of the operation instructions. The manufacturer’s warranty service does not cover such faults.
For the user’s convenience, we provide the latest version of PC software for the Spot-Check Monitor, which be downloaded from our website (www.creative-sz.com). Please consult the manufacturer or local distributor for any issue about the software downloading.
Cautions:![]() This device is used for measurement. Do not use for self-diagnose and it is not a treatment device.
This device is used for measurement. Do not use for self-diagnose and it is not a treatment device.![]() This device is applicable to adult.
This device is applicable to adult.![]() This device is not designed to be used in movable vehicle (such as a car, airplane).
This device is not designed to be used in movable vehicle (such as a car, airplane).![]() To avoid any harm during charging, it is recommended that the device shall not be in use while the battery is charging.
To avoid any harm during charging, it is recommended that the device shall not be in use while the battery is charging.![]() Check the device, accessories including cable and cuff before use. Stop use if any damage and aging is found.
Check the device, accessories including cable and cuff before use. Stop use if any damage and aging is found.![]() Please check the monitor completely to verify that the accessories can function safely and normally.
Please check the monitor completely to verify that the accessories can function safely and normally.![]() Do NOT use the device under the flammable gas condition or in any environment that may lead to explosion.
Do NOT use the device under the flammable gas condition or in any environment that may lead to explosion.![]() The device is forbidden to be used together with other equipment not specified in this Manual.
The device is forbidden to be used together with other equipment not specified in this Manual.![]() All combinations of equipment must be in compliance with standard of IEC 60601-1-1 medical and electric system requirements.
All combinations of equipment must be in compliance with standard of IEC 60601-1-1 medical and electric system requirements.![]() Do not modify or disassemble this device and the cuff without authorization of the manufacturer.
Do not modify or disassemble this device and the cuff without authorization of the manufacturer.![]() Although biocompatibility tests have been performed on all the applied parts, some exceptional allergic patients may still have anaphylaxis. Do NOT apply to those who have anaphylaxis.
Although biocompatibility tests have been performed on all the applied parts, some exceptional allergic patients may still have anaphylaxis. Do NOT apply to those who have anaphylaxis.![]() When disposing of the monitor and its accessories, the local law should be followed.
When disposing of the monitor and its accessories, the local law should be followed.
Contraindication: NO.
Attentions:![]() Please store and operate the device in specified temperature, humility and atmospheric pressure. The excessive ambient environment may affect the measuring result.
Please store and operate the device in specified temperature, humility and atmospheric pressure. The excessive ambient environment may affect the measuring result.![]() To avoid damaging device, if the monitor gets wet, please do not start it until it is air-dry.
To avoid damaging device, if the monitor gets wet, please do not start it until it is air-dry.![]() ONLY monitor one person at a time.
ONLY monitor one person at a time.
Note:
☞ In this Manual, “long press” means press and hold key for about 3 seconds; “short press” means press key for less than 1 second.
OVERVIEW
1.1 Features
- Blood pressure, oxygen saturation and pulse rate can be measured;
- A wearable device, and convenient to measure;
- Small in size, light in weight, easy to carry and operate;
- It’s intended to use in homes;
- The measurement result can be set to the host device via wireless communication.
- The measured data can be displayed, stored and manged by APP software installed on the host device, such as smart phone, tablet, and computer, which can be Android and IOS system.
- The device can option temperature probe to measure temperature, and/or option Blood Glucose Meter to measure blood glucose.
1.2 Application and Scope
The Spot-Check Monitor is applicable for measuring adult’s physiological parameters, such as non-invasive blood pressure (NIBP), functional oxygen saturation (SpO2), and pulse rate (PR).
1.3 Conformation
The Spot-Check Monitor consists of the main unit, functional accessories (cuff, SpO2 sensor) and the software package running on the host system.
1.4 Product Name and Model
Name: Spot-Check Monitor
Model and Configuration: (“√” means function is available, and “–” means function is not available).
| Model | Configuration | Remarks | ||
| NIBP | Sp0² | Pulse Rate | ||
| PC-101 | V | — | ||
| PC-102 | V | V | V | |
| PC-104 | V | V | V | PC-104 can receive the data from Blood Glucose Meter |
1.5 Working Environment and Power Supply
- Operating temperature: 5℃~40℃; Operating humility: 15%~93% ; Atmospheric pressure: 70.0kPa~106.0kPa
- Power Supply:
External power supply by AC adapter: Input: a.c. 100V~240V with 50/60Hz, current 0.5A; Output: d.c.5.0V current 1.2A
Internal power supply by built-in battery: d.c. 3.7V (lithium battery) with capacity 1000mAh. When the device is charging, the icon ” ” will be displayed on the screen (in scroll status), when the device is full charged, the icon turns to be ”
  “. Normally, it will take at least 4 hours to be fully charged to the capacity for use of 120 times of NIBP measurement.
APPEARENCE
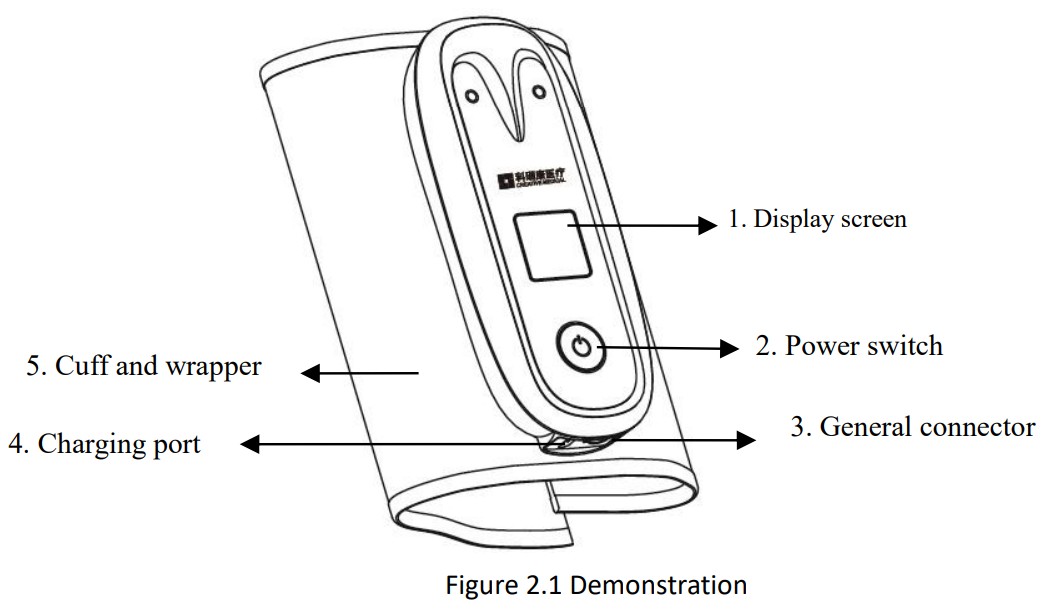
- “
 “: display screen.
 - ”
 “: power switch. Long pressing to turn on/off the device; Short pressing to start/cancel NIBP measurement.
 - ”
 “: general connector. It can be used to connect SpO2 probe, temperature probe or Blood Glucose Meter.
 - ”
 “: external DC power input socket (Micro USB interface).
 - Cuff: it is used for wrapping patient’s upper arm for NIBP measurement. It is self-bound to the device and can not be disassembled.
- Symbols and description
| Symbol | Description | Symbol | Description |
| Type BF applied parts |
| Serial number | |
| “Attention!”–please refer to the User Manual | Class II device | ||
| Battery is fully charged | Battery is charging | ||
| Following WEEE regulations for disposal | Manufacturing date | ||
| Wireless icon | No alarms | ||
| Do not litter at will | Manufacturer (including address) | ||
| Authorised representative in the European community | UK Responsible Person |
Note: the above signs and symbols may appear on your device.
INSTALLATION AND CONNECTION
The measurement result of Spot-Check Monitor can be ALSO displayed, stored and managed via the APP software installed in a host device (such as smart phone , tablet, computer etc.), so before making measurement, please install APP software firstly and make sure the APP software connects to the Spot-Check Monitor via wireless successfully.
For example of the host device with Android system and iOS system, the APP software is installed in the following procedure:
- Scanning QR Code by smart phone, please focus the QR Code frame while scanning.
- If successfully scanned, the the scanning result, a web link for downloading the APP will be displayed on the smart phone.
- Open this web link by a web browser to download the APP software. Install this APP software if successfully downloaded.
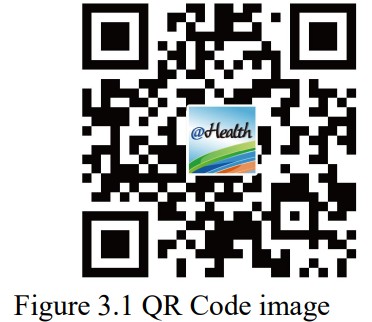
For terminal devices with the iOS system (such as iPhone, iPad), the user can also follow this procedure to download:
- On the App Store of the device, enter “Shenzhen Creative” into the search function.
Note: if you use an iPad to search, please select “iPhone only” when searching. - Once the search results are listed, select the result with @health icon “
 “, then download the corresponding APP software.
Instruction for Measurement
☞ Make sure the APP software connects with the Spot-Check Monitor successfully.
☞ Refer to the manual of this APP software for detail operating.
You can also download this APP software from the following website: http://www.creative-sz.com/
MEASUREMENT
4.1 Blood Pressure Measurement
Long pressing power switch ” ![]() “, the device displays software version number and UID, and 1.5 seconds later, it enters into the default screen, as shown in figure 4.1.
“, the device displays software version number and UID, and 1.5 seconds later, it enters into the default screen, as shown in figure 4.1.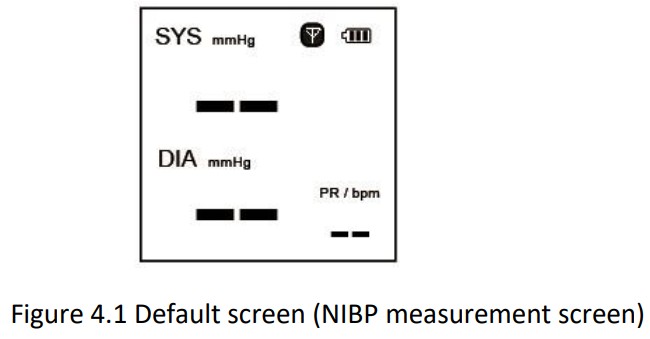 Note: If there is no signal or no operation for 3 minutes, then the device will power off automatically.
Safety instruction before making measurement:
- Take off the sweater or the thick cloth to make the arm is uncovered or only one thin cloth left.
- Before making measurement, do not eat, drink, smoke, take exercise or have a bath.
Operating procedure:
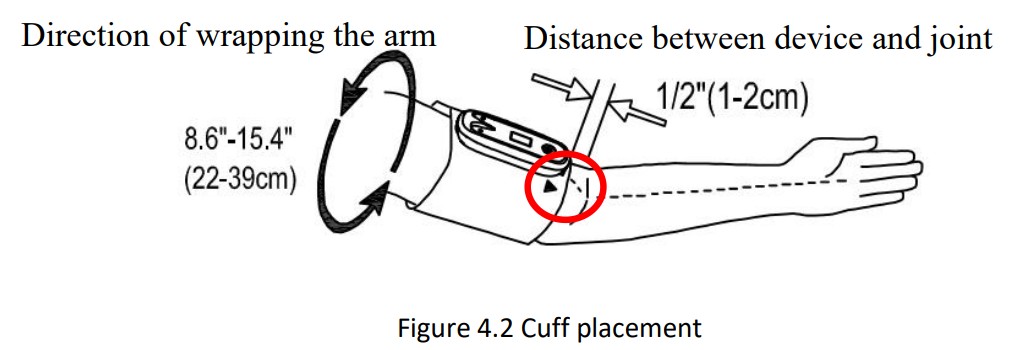
- When putting on the cuff, spread the cuff and wrap it around the upper arm evenly to appropriate tightness. The correct cuff position refers to figure 4.2. Note: locate the cuff in such a way that direction mark “▼” directs to the lower arm.

- Adjust the teste’s position. Right position: the teste should stand, sit or lay down with calm condition and make the cuff and the teste’s heart on the same level to get accurate measurement.
- Short pressing power key to start NIBP measurement.
- When the measurement is finished, the measured result and the corresponding emoji will be displayed on the screen, refer to the following figure.

Screen Description:
” ![]() “: battery capacity.
“: battery capacity.
“ ![]() ”: wireless icon. Icon flashing means the host device is connecting to the device; Icon staying means the host device is successfully connected with the device.
”: wireless icon. Icon flashing means the host device is connecting to the device; Icon staying means the host device is successfully connected with the device.
“SYS 109 mmHg”: it displays the measured value and the unit of systolic pressure.
“DIA 84 mmHg”: it displays the measured value and the unit of diastolic pressure.
“PR 79 bpm”: it displays the measured value and the unit of pulse rate.
Emoji description:
 : it means the measured result is normal, that is to say, the measured SYS <130 and DIA <85.
 : it means the measured result is high normal, that is to say, the measured SYS is between 130 and 159, and DIA is between 85 and 99.
 : it means the measured result is abnormal, that is to say, the measured SYS is ≥160 and DIA ≥100.
Safety Instructions for blood pressure measurement![]() During measurement, the testee should not talk, move the device, shake body or arm.
During measurement, the testee should not talk, move the device, shake body or arm.![]() For the same testee, the testee should wait for 3 minutes for another NIBP measurement.
For the same testee, the testee should wait for 3 minutes for another NIBP measurement.
4.2 SpO2 Measurement (Optional)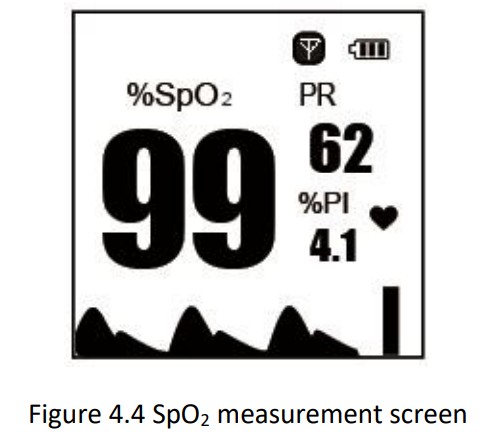 Screen description:
“%SpO2 99”: mark and value of oxygen saturation.
“PR 62″: mark and value of pulse rate.
“%PI 4.1”: mark and value of Perfusion index.
” ![]() “: heart beat icon.
“: heart beat icon.
” ![]() “: plethysmogram.
“: plethysmogram.
“![]() “: pulse bar graph.
“: pulse bar graph.
Operation procedure:
- Connect the SpO2 probe to the connector on the sensor connector.
- When the device is powered on, insert one finger (index finger is preferred, the nail should be not too long) into the clip of the probe.
- Wait for 2 seconds, the device will auto begin to make measurement.
- The measured result will be displayed on the screen, as shown in figure 4.4. If the host device is connected to the device, then the measured result can be displayed on the screen of the host device by running APP software.
- Remove the finger, the prompt “Finger out!” pops on the screen .
Note:
- PR and SpO2 over-limit indication are available for the device (if the PR and SpO2 options are selected).
- If NIBP and SpO2 are measured simultaneously, then the NIBP measured result will be prior to be displayed for 10 seconds.
4.3 Blood Glucose Measurement (Optional)
Note: there are three models of Blood Glucose Meter for optional: Persona Glucose Meter, Yicheng Glucose Meter and, Bioland Glucose Meter, please see the below description for details. Preparing:
- Wash the hands with soap and waiting for drying.
- Take out the glucose meter, blood-collecting needle (lancing device), blood-collecting pinhead (blood lancet) and test strip, install the pinhead to the blood-collecting needle.
Description for Yicheng Glucose Meter (optional)
Take out the blood-collecting needle and install the pinhead, select level 3 of the prick depth (there are 5 levels in total, the level 5 is deepest). Then pull the shuttle of the needle slightly. As shown in figure 4.5.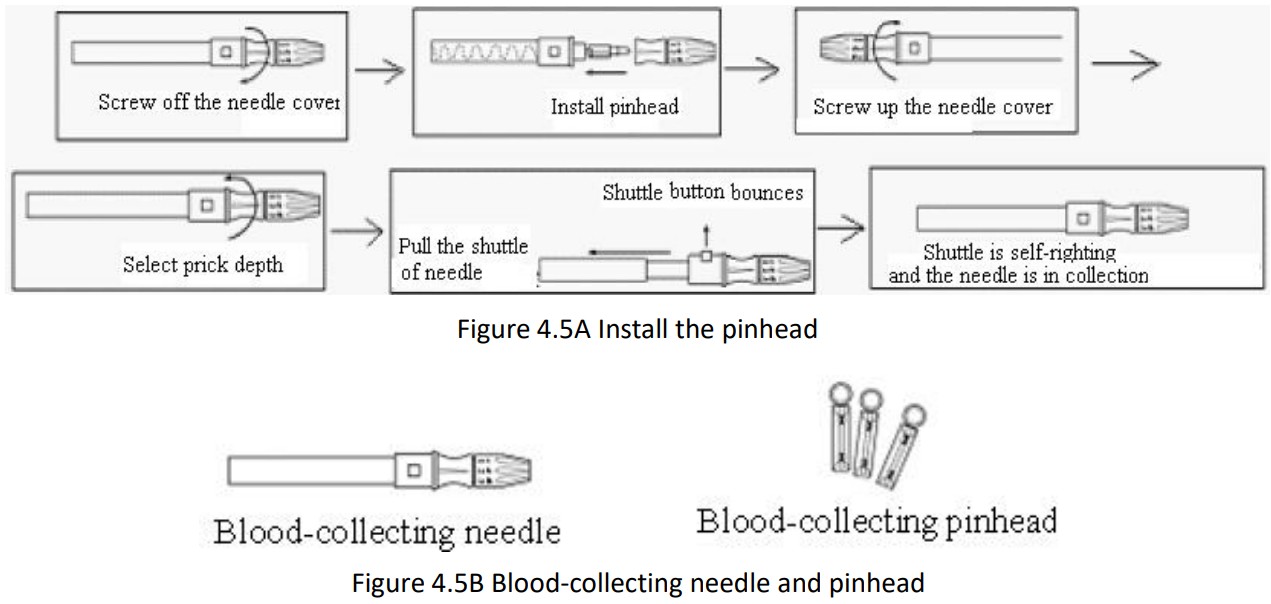 Operation procedure for Yicheng Glucose Meter:
- Connect the Yicheng Glucose Meter to the signal connector “ ” on the Spot-Check Monitor.
- Power on the Glucose Meter, then the “Calibrating” message blinks on the screen which reminds the user to check if the calibration code on device is the same as what on the packaging. If not, please long pressing the switch key of the Glucose Meter to shut off it, and change the calibration code.
- Taking a new test strip to insert into the testing port of the device when “Insert” message appears on the screen. Please do not touch the reaction area of the test strip and testing port.
- Disinfect the finger needed to test with alcohol and waiting for drying.
- Touch the pinhead on the finger and press the shuttle button of the needle. Do not use force to press the finger when collecting blood.
- Please put the blood sample on the reaction area of the test strip when “Receive” message appears on the screen. Please not that the reaction area should be full of blood at one time. It is forbidden to put blood on the reaction area repeatedly.
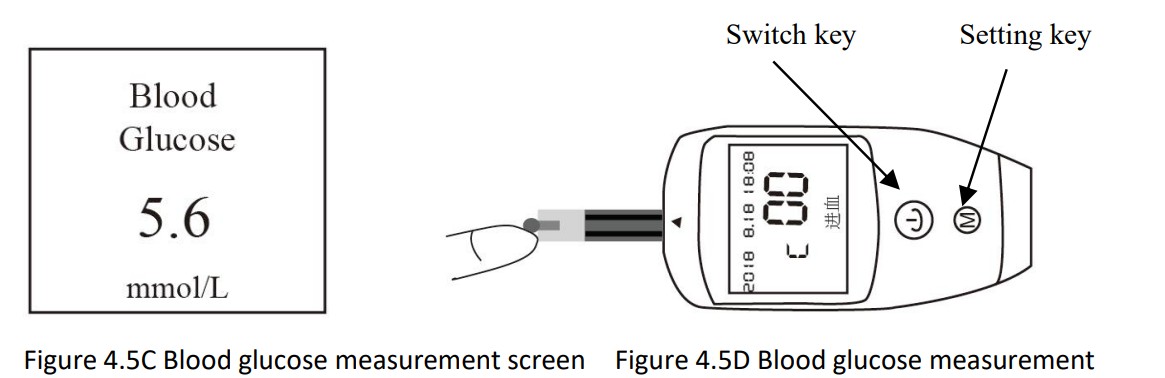
- The test result will be displayed in 5 seconds on the screen of APP software (or PC software) of the host device. The default unit is mmol/L.
 Description for Smartest Persona Glucose Meter (optional)
By use of the optional link cable for Smartest Persona Glucose Meter, connect the Smartest Persona Glucose Meter to the signal connector “![]() ” on the Spot-Check Monitor.
” on the Spot-Check Monitor.
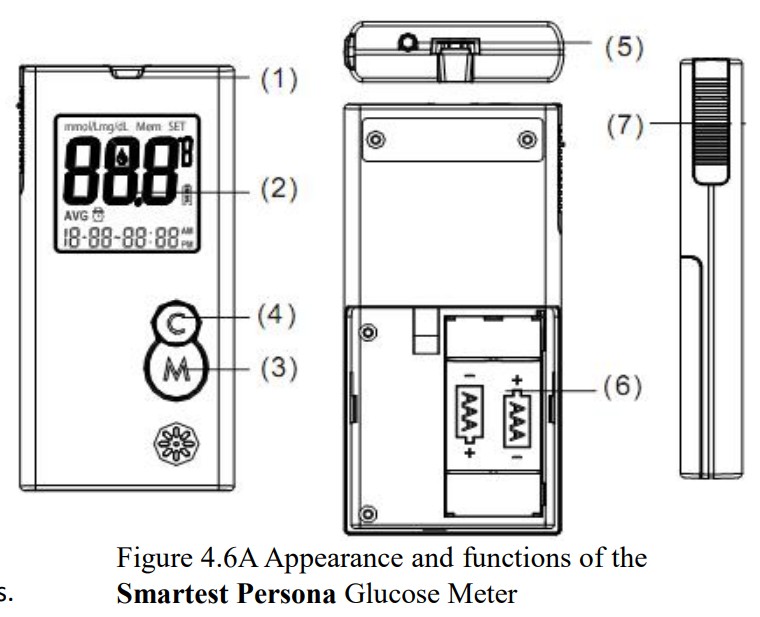
Appearance and key functions of the Smartest Persona Glucose Meter:
- Test strip slot: when the strip is inserted into the slot, the meter will automatically turn on.
- LCD display.
- M key: power on/off, also for memory recalling mode.
- C key: Setting mode. Please refer to User Guide for “Smartest Persona Blood Glucose Monitoring System” for detailed function descriptions.
- Data interface: can be used to connect the Spot-Check Monitor for data transmitting.
- Battery compartment: insert 2 AAA size batteries with the correct polarities.
- Ejector: remove the used strip.
 Operations for the Lancing Device and Blood Lancet
- Unscrew the lancing device by turning the end cap counter clockwise.
- Insert a new lancet firmly into the lancet holder.
- Twist off the protective tip of the lancet.
- Close the end cap of the lancing device. Slide into the locking position. Refer to figure 3.6B
 Operation procedure for Smartest Persona Glucose Meter:
- While the meter is off, insert a new test strip into the meter. The Meter will automatically turn on and a blinking blood icon will be displayed on the screen.
- Lance the finger and let a blood drop form.
- When the blood drop icon is still blinking on the meter, apply the blood drop to the front edge of the test strip. The meter will display the test result after 6 seconds.
- Remove the used strips by hand or by pushing the ejector and the meter will turn off and display “OFF” on the screen
 Refer to the provided user guide for the “Smartest Persona Blood Glucose Monitoring System” for further detailed instructions.
Safety Instruction for Blood Glucose Measurement![]() The provided test strips should be used with the corresponding Glucose Meter.
The provided test strips should be used with the corresponding Glucose Meter.![]() Do NOT clean or disinfect the finger with iodine.
Do NOT clean or disinfect the finger with iodine.![]() The calibration code must be the same with that on the packaging.
The calibration code must be the same with that on the packaging.![]() The Smartest Persona Glucose Meter will automatically switch to stand-by mode if a test strip is not inserted for 1minute.
The Smartest Persona Glucose Meter will automatically switch to stand-by mode if a test strip is not inserted for 1minute.![]() The test strip will draw blood at one end automatically.
The test strip will draw blood at one end automatically.![]() Do NOT press or scrape the bleeding finger.
Do NOT press or scrape the bleeding finger.![]() The test strip should be used as soon as possible after unpacking, and the unused strips should be kept in an airproof bottle.
The test strip should be used as soon as possible after unpacking, and the unused strips should be kept in an airproof bottle.![]() Only take one measurement per minute.
Only take one measurement per minute.
☞ The blood-collect pinhead is a disposable item. It’s recommended to insert it back to the plastic cover and throw it into the specific dustbin![]() Description for Boland Blood Glucose Meter (optional) Appearance and key functions of the Bioland Blood Glucose Meter:
Description for Boland Blood Glucose Meter (optional) Appearance and key functions of the Bioland Blood Glucose Meter: Operation Procedure for Lancing Device and Blood Lancet
- Unscrew the lancing device cap.
- Put the needle into the needle holder until the bottom.
- Unscrew the needle cap and put it in the recycling dustbin.
- Cover the cap.
- Adjust the proper level (usually level 3).
- Aiming at the sterilized part for blood-taking, press the blue release key to finish blood-taking.
- Unscrew the device cap.
- Push the ejection button and discard the used lancet in appropriate container.
- Cover the device cap.
Refer to figure4.7B.
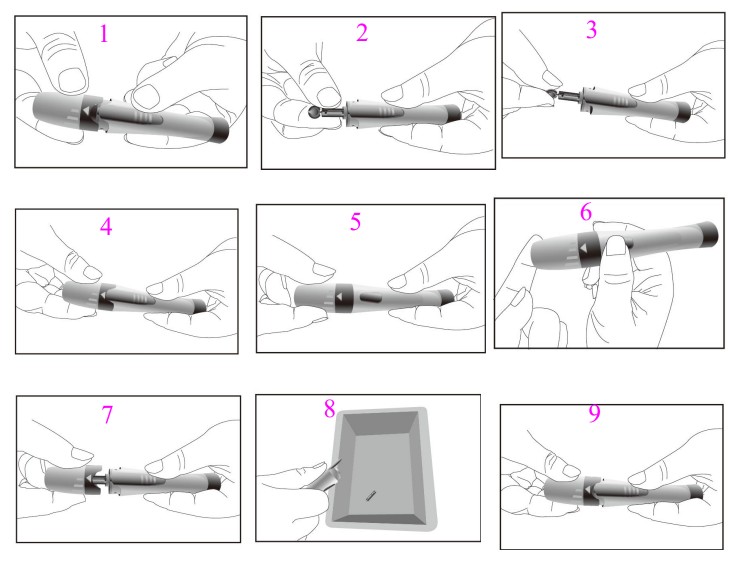 Figure 4.7B
Operation procedure for Bioland Blood Glucose Meter:
- Take a new test strip, and insert it into the Blood Glucose Meter.
- Refer to below figure 4.7B, install the blood lancet into the lancing device to get the blood sample.
- When blood drop icon(“
 ”)appears, and put the fingertip’s blood to the socking hole of the test trips, as shown in figure 4.7C.
 - Five seconds later, the testing result will be displayed on the screen of Glucose Meter and Spot-check Monitor, as shown in figure 4.7D.
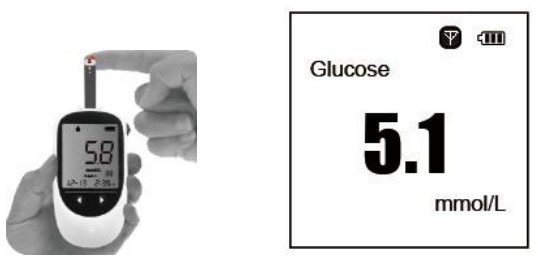 Figure 4.7C Blood Glucose measurement
Figure 4.7D
4.4 Temperature Measurement (Optional)
The infrared temperature probe is a delicate transducer. To operate please follow these steps and procedures. Failure to accurately operate may cause damage to the probes.
The infrared temperature probe Please place the infrared temperature probe in a stable ambient temperature for 30 minutes before taking a measurement.
Operation procedure:
- Connect the infrared temperature probe to the connector of “ ”.
- When the screen shows as figure 4.8B and the temperature unit “℃” is blinking, the user can begin to take the measurement.
- Insert the tip of the temperature probe into the earhole and press the measuring key to start the measurement. A short beep means the measurement has finished and the result will be
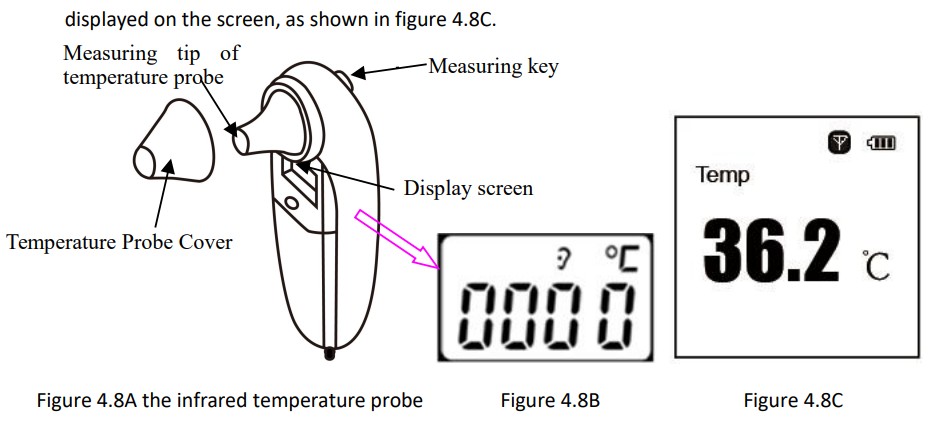 Note:
Note:
- The infrared temperature probe will switch to stand by automatically if there is no operation for 1 minute. If a further measurement is needed, press the measuring key and repeat step 2 and step 3.
- Normal body temperature varies depending on the position/area the measurement is taken from.
The following table shows the varying temperature ranges of the different body positions.![]() This device meets requirements established in ASTM Standard (E1965-98).
This device meets requirements established in ASTM Standard (E1965-98).![]() Do NOT use the infrared temperature probe when the subject temperature and ambient temperature are outside the operating ranges specified by the manufacturer.
Do NOT use the infrared temperature probe when the subject temperature and ambient temperature are outside the operating ranges specified by the manufacturer.![]() Performance of the device may be adversely affected when one or more of the following occur:
Performance of the device may be adversely affected when one or more of the following occur:
A. Operation outside of the manufacturer specified subject temperature range.
B. Operation outside of the manufacturer specified operating temperature and humidity ranges.
C. Storage outside of the manufacturer specified ambient temperature and humidity ranges.
D. Mechanical shock.![]() Manufacturer defined soiled or damaged infrared optical components.
Manufacturer defined soiled or damaged infrared optical components.
Temperature varying range at different body positions:
| Arm | 34.7 ~ 37.3 ℃ |
| Oral | 35.5 ~ 37.5 ℃ |
| Rectal | 36.6 ~ 38.0 ℃ |
| Ear | 35.8 ~ 38.0 ℃ |
Safety Instruction for Temperature Measurement![]() This device meets requirements established in ASTM Standard (E1965-98).
This device meets requirements established in ASTM Standard (E1965-98).![]() Do NOT using the infrared temperature probe when the subject temperature and ambient temperature are outside the operating ranges specified by the manufacturer.
Do NOT using the infrared temperature probe when the subject temperature and ambient temperature are outside the operating ranges specified by the manufacturer.![]() Performance of the device may be adversely affected when one or more of the following occur:
Performance of the device may be adversely affected when one or more of the following occur:
A. Operation outside of the manufacturer specified subject temperature range.
B. Operation outside of the manufacturer specified operating temperature and humidity ranges.
C. Storage outside of the manufacturer specified ambient temperature and humidity ranges.
D. Mechanical shock.![]() Manufacturer defined soiled or damaged infrared optical components.
Manufacturer defined soiled or damaged infrared optical components.![]() Do NOT take a measurement when the patient is moving.
Do NOT take a measurement when the patient is moving.![]() Patients with tympanitis and otitis problems should NOT use this device.
Patients with tympanitis and otitis problems should NOT use this device.![]() When the infrared temperature probe is connected to the device, the probe will consecutively be at power-on status, therefore pressing the power on/off key on the temperature probe will not cause any effect.
When the infrared temperature probe is connected to the device, the probe will consecutively be at power-on status, therefore pressing the power on/off key on the temperature probe will not cause any effect.
TECHNICAL SPECIFICATIONS
5.1 Blood Pressure Measurement
- Blood pressure measuring range: Systolic pressure: 60mmHg~240mmHg Diastolic pressure: 30mmHg~180mmHg
- Blood pressure measuring accuracy: mean difference≤5mmHg, standard deviation≤8mmHg
- Pneumatic system error: ±3mmHg
- Pressure display resolution: 1mmHg
5.2 SpO2 Measurement (Optional)
- SpO2 measuring range: 35%~100%
- SpO2 measuring accuracy: Arms is not greater than 2% for SpO2 range from 70% to 100%
Note: Arms is defined as root-mean-square value of deviation according to ISO 9919 - Resolution: 1%
- Low limit alarm value for SpO2: 90%.
Note: when the measured SpO2 ≤ 90%, then the over-limit SpO2 value blinks.
5.3 Pulse Rate Measurement (Optional)
- Pulse Rate measuring range: 30bpm~240bpm
- Pulse rate measuring accuracy: ±2bpm or ±2% of reading, whichever is greater
- Resolution: 1bpm
Note: when the measured PR ≥ 120bpm or PR ≤50bpm, then the over-limit PR value blinks.
5.4 Temperature Measurement (Optional)
- Measuring range: 32.0℃~43.0℃
- Measuring accuracy: ±0.2℃ is for TEMP range from 36.0℃ to 39.0℃, and ±0.3℃ is for the rest; ±0.4℉is for TEMP range from 96.8℉to 102.2℉, and ±0.5℉ is for the rest.
- Response time: ≤5s
5.5 Blood Glucose Measurement (Optional)
- Technique: Amperometric, glucose oxidase
- Measuring range: 1.1mmol/L~33.3mmol/L (20~600mg/dL)
- Measuring time: 6 seconds
Refer to the Blood Glucose Meter User Manual for detailed specification.
5.6 Wireless Communication
- Emit and receiving frequency: 2402MHz~ 2480MHz
- The Channel number: 40
- Bandwidth: 2 MHz
- Modulation method: GFSK
- Effective radiated power : <1mW
5.7 Classification
- Protection against electric shock: Class II equipment and internally powered equipment.
- The degree of protection against electric shock: Type B applied parts
- The degree of protection against harmful ingress of liquid: The equipment is IPX1 with protection against ingress of liquid.
- Electric-magnetic compatibility: Group I, Class B.
- Mode of operation: Continuous
5.8 Dimension and Weight
Dimension: 140.5mm(L) ×60.0mm(W) × 24.5mm(H) Gross Weight: 260g
MAINTENANCE AND SERVICE
The Spot-Check Monitor is designed to serve for 5 years, it should be properly maintained to ensure its maximum performance and long service life. In addition to the warranty period, the manufacturer also offers long-term service for customers. It is important that the user read and follow the operating instructions, important information and maintenance measures.
6.1 Technical Maintenance
6.1.1 Daily Examination
Before using the device, the following checks should be carried out:
- Check the device for any mechanical damage;
- Inspect the exposed parts and the connected parts for all the cables, and the accessories;
- Examine all the functions of the device that are likely to be used for measuring, and ensure that it is in good working condition.
In case of any indication of damage about the function of the device is detected and proven, it is not allowed to use. Please contact the local dealer or the manufacturer.
6.1.2 Battery Maintenance![]() Only use the provided AC adapter to charge the built-in battery, if other charger is used, the device may be damaged.
Only use the provided AC adapter to charge the built-in battery, if other charger is used, the device may be damaged.![]() Whether the monitor is on or off, the built-in battery will be charged as long as the monitor is connected to the provided AC adapter and AC power is on. When the battery is full, it will stop charging for protecting the battery from damage.
Whether the monitor is on or off, the built-in battery will be charged as long as the monitor is connected to the provided AC adapter and AC power is on. When the battery is full, it will stop charging for protecting the battery from damage.![]() In order to maintain battery power and prolong battery lifetime, please charge the battery routinely. Generally, charge the battery every 3 months if the device has not been used for more than 3 months.
In order to maintain battery power and prolong battery lifetime, please charge the battery routinely. Generally, charge the battery every 3 months if the device has not been used for more than 3 months.
6.2 Cleaning and Disinfection of the Main Unit![]() Switch off the device and disconnect the power adapter before cleaning.
Switch off the device and disconnect the power adapter before cleaning.![]() Do NOT let any cleanser and disinfectant flow into the connector or any parts of the device.
Do NOT let any cleanser and disinfectant flow into the connector or any parts of the device.![]() Do NOT put any parts of the monitor or its accessories in the liquid.
Do NOT put any parts of the monitor or its accessories in the liquid.![]() Do NOT pour the disinfectant on its surface while disinfecting.
Do NOT pour the disinfectant on its surface while disinfecting.
6.3 Cleaning and Disinfection of Accessories![]() The accessories can not be entirely immerged into water, liquid or cleanser.
The accessories can not be entirely immerged into water, liquid or cleanser.![]() Wipe the accessories clean with a mild cloth if it is dirtied.
Wipe the accessories clean with a mild cloth if it is dirtied.![]() Wipe the accessories clean and keep it in the packaging for maintenance after using.
Wipe the accessories clean and keep it in the packaging for maintenance after using.
6.4 Storage
If the device will not be used for long period of time, wipe it clean and keep it in the package, which shall be kept in a dry good ventilation place free from dust and corrosive gases. Storage environment: Ambient temperature: -20°C~60°C
Relative humidity: ≤93%
Atmospheric pressure: 53.0kPa~106.0kPa
TROUBLESHOOTING
| Trouble | Possible reason | Solution |
| Can not turn on the device | The built-in battery is exhausted | Recharge it by connecting the power supply adapter |
| Incompatible accessories are misconnected to this device | Remove the misconnected parts and try again. | |
| No blood pressure result | The cuff is wrapped around the arm incorrectly | Wrap the cuff around the arm correctly |
| No Sp02 result | Sp02 probe is not inserted to the sensor connector or the finger is out of probe | Plug Sp02 probe to the sensor connector and check if the finger is inserted into the probe properly. |
| Can not connect to the host device | 1.Bluetooth version is not compatible; 2.Low battery | 1.Use the mobile phone with Bluetooth Ver 4.0 and try again. 2.Recharging the battery |
ERROR MESSAGE INTERPRETING
| Error Code | Description |
| ERR 01 | Fail to inflate pressure to 30mmHg within 7 seconds (The cuff is not well-wrapped) |
| ERR 02 | Cuff pressure is over 295mmHg (Overpressure protection) |
| ERR 03 | No valid pulse is detected |
| ERR 04 | Excessive motion artifact |
| ERR 05 | The measurement fails |
| ERR 06 | Air leakage |
Note: the above error codes appears when the NIBP measurement fails.
PACKING LIST
| Item | Description | Quantity | Check |
| 1 | Spot-Check Monitor | One piece | OK |
| 2 | User Manual | One piece | OK |
| 3 | AC power adapter (charger) | One piece | OK |
| 4 | SpO2 probe | One piece | Optional |
| 5 | Charging cable | One piece | OK |
| 6 | Handbag | One piece | OK |
Quality Certificate
Name: Spot-Check Monitor
Model:……….
Date:…………
QA:…………………..
This product has been inspected in accordance with the standards specified in the User Manual. Shenzhen Creative Industry Co., Ltd
Warranty Clause
- We offer one year free repair for the main unit and 6-month for the accessories since purchasing. The invoice date is the starting date.
- Make sure that the Warranty is sealed. Please present both the Warranty and the Invoice when you are requesting free repair.
- Please send the device to the specified place for repair.
- We will not offer free repair if one of the following condition exists:
Disassemble or refit the device arbitrarily;
Incorrect operation;
Drop, immerse and collision of the device;
Incorrect repair by unauthorized personnel. - The cost of repair beyond warranty will be taken by the charge rate, and we offer 3-month repair warranty for such malfunction.
Warranty
| Device Information: | |||||
| Name | Model | ||||
| Serial Number: | |||||
| Date | Shop | ||||
| User Information: | |||||
| Name | Post code | ||||
| Tel: | |||||
| Add: | |||||
| Repair Record | |||||
| Date | Repairing Item | Repairer | |||
Appendix
Classification of Blood Pressure Level
The below form is applicable to adult with age over 18 years.
| Blood Pressure Level | SYS (mmHg) | DIA (mmHg) |
| Optimal blood pressure | <120 | <80 |
| Normal blood pressure | <130 | <85 |
| High normal blood pressure | 130-139 | 85-89 |
| Hypertension Grade 1 | 140-159 | 90-99 |
| Hypertension Grade 2 | 160-179 | 100-109 |
| Hypertension Grade 3 | 180 | 110 |
 EMC Compliance
Note:
Warnings:
- The instrument conforms to the requirements of IEC60601- 1 – 2 , EN 60601-1-2 and ISO 80601-2-61standards for electromagnetic compatibility.
- The user shall install and use the EMC information provided in the random file.
- Portable and mobile RF communication equipment may affect the performance of the instrument, avoid strong electromagnetic interference when using, such as close to the mobile phone, microwave oven, etc .
- The guidance and manufacturer’s declaration are detailed in the table below .
- The instrument should not be close to or stacked with other equipment. If it must to be close to or stacked, it should be observed and verified to be able to operate normally under its configuration.
- In addition to the cables sold by the instrument manufacturer as spare parts for internal components, the use of other accessories and cables may result in increased emission or reduced immunity.
| Guidance and manufacturer’s declaration-electromagnetic emission | ||
| The Spot-Check Monitor is intended for use in the electromagnetic environment specified below. The customer or the use of the Spot-Check Monitor should assure that it is used in such an environment. | ||
| Emissions test | Compliance | Electromagnetic environment-guidance |
| Conducted emissions CISPR 11 | Group 1 Class B | The Spot-Check Monitor uses RF energy only for its internal function. Therefore, its RF emissions are very low and are not likely to cause any interference in nearby electronic equipment. |
| Radiated emissions CISPR 11 | The Spot-Check Monitor suitable for use in all establishments, including domestic establishments and those directly network that supplies buildings used for domestic purposes. | |
| Harmonic emissions IEC61000-3-2 | Class A | |
| Voltage fluctuations/flicker emissions IEC61000-3-3 | Complies | |
Guidance and manufacturer’s declaration-electromagnetic emission
The Spot-Check Monitor is intended for use in the electromagnetic environment specified below. The customer or the user
| of the Spot-Check Monitor should assure that it is used in such an environment. | |||
| Immunity test | IEC60601 test level | Compliance level | Electromagnetic environment -guidance |
| Electrostatic discharge(ESD) IEC61000-4-2 | ±8 kV contact ±2 kV, ±4 kV, +8 kV, ± 15 kV air | ±8 kV contact +1 kV, ±4 kV, ±8 kV, ± 15 kV air | Floors should be wood, concrete or ceramic tile. if floors are covered with synthetic material, the relative humidity should be at least 30% |
| Electrical fast transient/ burst IEC61000-4-4 | ±2kV for power Supply lines ±1kV for Input a.c. Power Ports | ±2kV for power Supply lines ±1kV for Input a.c. Power Ports | N/A |
| Surge IEC 61000-4-5 | ±0.5 kV, 1kV line (s) to line(s) ±0.5 kV, ± 1 kV, ±2kV line(s) to earth | ±0.5 kV, 1kV line (s) to line(s) ±-0.5 kV, ± 1 kV, line(s) to earth | N/A |
| Voltage dips, short interruptions and voltage variations on power supply input lines IEC61000-4-11 | <5% UT (>95% dip in UT) for 0.5 cycle <40% UT (60% dip in UT) for 5 cycles <70% UT (30% dip in UT) for 25 cycles <5% UT (>95% dip in UT) for 5 s <5% UT | < (>95% dip in UT) for 0.5 cycle <40% UT (60% dip in UT) for 5 cycles <70% UT (30% dip in UT) for 25 cycles <5% UT (>95% dip in 1_ I I for 5 s | N/A |
| Power frequency( 501-1z/60Hz) magnetic field IEC61000-4-8 | 30A/m | 30A/m | Power frequency magnetic fields should be at levels characteristic of a typical location in a typical commercial or hospital environment. |
| NOTE: UT is the a.c. mains voltage prior to application of the test level. | |||
Table 3
Guidance and manufacturer’s declaration – electromagnetic immunity
The Spot-Check Monitor is intended for use in the electromagnetic environment specified below. The customer or the user
| of The Spot-Check Monitor should assure that it is used in such an electromagnetic environment. | |||
| Immunity test | IEC60601 test level | Compliance level | Electromagnetic environment -guidance |
| Conducted RF IEC61000-4-6 | 0,15MHz–80MHz 3 V RMS outside the ISM band, 6 V RMS in the ISM | 0,15MHz–80MHz 3 V RMS outside the ISM band, 6 V RMS in the ISM | Portable and mobile RF communications equipment should be used no closer to any part of The Spot-Check Monitor, including cables, than the recommended separation distance calculated from the equation applicable to the frequency of the transmitter. Recommended separation distance d=1.2 P |
| d=1.2 P 80MHz to 800MHz | |||
| Radiated RF IEC61000-4-3 | 80 MHz to 2.7 GHz 3V/m | 80 MHz to 2.7 GHz 3V/m | d=2.3 P 800MHz to 2.5GHz Where P is the maximum output power rating of the transmitter in watts (W) according to the transmitter manufacturer and is the recommended separation distance in metres (m). b Field strengths from fixed RFtransmitters, as determined by an |
| electromagnetic site survey ,a should be less than the compliance level in each frequency range . b Interference may occur in the vicinity of equipment marked with the following symbol. | |||
| NOTE 1: At 80 MHz and 800 MHz, the higher frequency range applies. NOTE 2: These guidelines may not apply in all situations. Electromagnetic propagation is affected by absorption and reflection from structures, objects and people. | |||
| a: Field strengths from fixed transmitters, such as base stations for radio (cellular / cordless) telephones and land mobile radios, amateur radio, AM and FM radio broadcast and TV broadcast cannot be predicted theoretically with accuracy. To assess the electromagnetic environment due to fixed RF transmitters, and electromagnetic site survey should be considered If the measured field strength in the location in which The Spot-Check Monitor is used exceeds the applicable RF compliance level above, The Spot-Check Monitor should be observed to verify normal operation. If abnormal performance is observed, additional measures may be necessary, such as re-orienting or relocating The Spot-Check Monitor. b: Over the frequency range 150 kHz to 80 MHz, field strengths should be less than 3V/m. | |||
Table 4
| Frequency Range and Level: RF wireless communication equipment | |||
| Test Frequency (MHz) | Modulation | Minimum immunity Level (V/m) | immunity Level Applied (V/m) |
| 385 | **Pulse Modulation: 18 Hz | 27 | 27 |
| 450 | *FM + 5 Hz deviation: 1 kHz sine **Pulse Modulation: 18 Hz | 28 | 28 |
| 710 745 780 | **Pulse Modulation: 217 Hz | 9 | 9 |
| 810 870 930 | **Pulse Modulation: 18 Hz | 28 | 28 |
| 1720 1845 1970 | **Pulse Modulation: 217 Hz | 28 | 28 |
| 2450 | **Pulse Modulation: 217 Hz | 28 | 28 |
| 5240 5500 5785 | **Pulse Modulation: 217 Hz | 9 | 9 |
| ATTENTION: If necessary to achieve the IMMUNITY TEST LEVEL, the distance between the transmitting antenna and the ME EQUIPMENT or ME SYSTEM may be reduced to 1 m. The 1 m test distance is permitted by IEC 61000-4-3. | |||
a) For some services, only the uplink frequencies are included
b) The carrier shall be modulated using a 50 % duty cycle square wave signal.
c) As an alternative to FM modulation, 50 % pulse modulation at 18 Hz may be used because while it does not represent actual modulation, it would be worst case.
Table 5
| Recommended separation distances between portable and mobile RF communication the equipment | |||
| The Spot-Check Monitor is intended for use in an electromagnetic environment in which radiated RF disturbances are controlled. The customer or the user of The Spot-Check Monitor can help prevent electromagnetic interference by maintaining a minimum distance between portable and mobile RF communications equipment (transmitters) and the Spot-Check Monitor as recommended below, according to the maximum output power of the communications equipment. | |||
| Rated maximum output power of transmitter W(Watts) | Separation distance according to frequency of transmitter M(Meters) | ||
| 150kHz to 80MHz d=1.2 | 80MHz to 800MHz d=1.2 | 80MHz to 2,5GHz d=2.3 | |
| 0,01 | N/A | 0.12 | 0.23 |
| 0,1 | N/A | 0.38 | 0.73 |
| 1 | N/A | 1.2 | 2.3 |
| 10 | N/A | 3.8 | 7.3 |
| 100 | N/A | 12 | 23 |
| For transmitters rated at a maximum output power not listed above, the recommended separation distance in metres (m) can | |||
be determined using the equation applicable to the frequency of the transmitter, where P is the maximum output power rating of the transmitter in watts (W) according to the transmitter manufacturer.
NOTE 1 : At 80 MHz and 800 MHz, the separation distance for the higher frequency range applies.
NOTE 2 : These guidelines may not apply in all situations. Electromagnetic propagation is affected by absorption and reflection from structures, objects and people.
Patent
State Intellectual Property Office of the P.R.C. patented and certificated Creative Spot-Check Monitor on March 26th, 2014. Patent Number: ZL 2013 2 0615696.X
![]() Shenzhen Creative Industry Co., Ltd.
Shenzhen Creative Industry Co., Ltd.
Floor 5, BLD 9, Baiwangxin High-Tech Industrial Park, Songbai Road, Xili Street, Nanshan District, 518110 Shenzhen, P. R. China
Tel: +86-755-2643 3514
E-mail: [email protected]
Fax: +86-755-2643 0930
Website: www.creative-sz.com![]() Shanghai International Holding Corp. GmbH (Europe) Eiffestrasse 80, 20537 Hamburg Germany
Shanghai International Holding Corp. GmbH (Europe) Eiffestrasse 80, 20537 Hamburg Germany![]() Etheria Medical Ltd
Etheria Medical Ltd
The Old Brush Factory Unit 2d Whickham Industrial Estate, Swalwell, Newcastle Upon Tyne, United Kingdom, NE16 3DA
Tel: +44-191-4889922
Fax: +44-191-4889922


