DAKTRONICS P1196 All Sport 5000 Pitch Timer User Manual
Basic Operation
This manual explains the operation of All Sport® 5000 series control consoles for pitch timing. For additional information, refer to the All Sport 5000 Series Control Console Operation Manual (ED-11976) located online at www.daktronics.com/manuals.
Console Operation
The console face consists of a 2-line by 16-character liquid crystal display (LCD), number/ menu keypads, horn/clock controls with LED status indicators, and an area for a sportspecific insert. Refer to Figure 1 to locate these components on the control console face.
Figure 1: All Sport 5000 Layout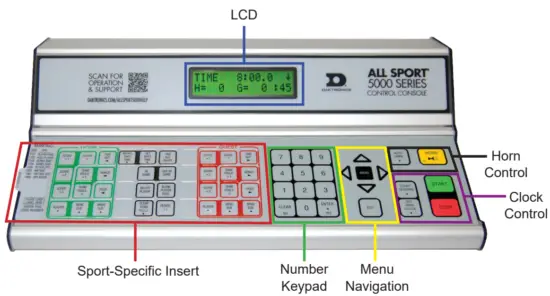
In most cases, the top line of the LCD shows the main clock time, direction the clock is counting, and when the main horn is sounding, while the bottom line typically shows the HOME and GUEST team scores.
The standard fixed keys and functions on the right side of the console are explained in Standard Keys (p.2). All of the keys that pertain to a specific sport code insert are explained in detail in their respective sport section.
In addition, Quick References and Menu Flowcharts for the Standard Keys and many of the more common individual sports are provided in Appendix B.
Throughout this manual, the names or letters of keys on the keypad are enclosed in angle brackets (such as )
Sport Inserts
A sport insert identifies the keys required for normal operation of a specific sport. In most cases, pressing a key immediately changes the scoreboard. Keys that require entry of additional information are marked by a dot. This additional information is usually a number followed by the key.
To use an insert, slide it into the opening on the left side of the console until it stops. To remove a sport insert, pull on the tab that extends from the left side of the console.
If an insert is lost or damaged, a printed copy of the insert drawing from Appendix A may be used until a replacement can be ordered.
Start Up
Use the switch on the back of the console to turn it on, then follow the LCD screens:
| Display | Action |
| AS-5000 VX X X ED-11544 | The console performs a self-test when it is powered on. During the self-test, a message displays the version of the standard software loaded in the console. V = version number and revision number ED = standard software number |
| PREV CODE NNNN RESUME GAME?NNNN = last code selected | When the self-test completes, a prompt displays the code number for the last game played. This is useful when power to the console is lost during a game. Press <YES> to resume the last game stored in memory. The console is now ready for game operation. Press <NO> to start a new game or change to a different sport. The console will prompt for a new code number. |
| SELECT CODE CODE NNNN NNNN = current code | The SELECT CODE prompt lets the operator accept the last code selected (shown on the second line) or enter a new code. To accept the code shown, press <ENTER>. To select a new sport code:
|
Standard Keys
Start
Start is used to start the main clock. The green LED on the key is on while the main clock is running.
Stop:
Stop is used to stop the main clock. The green LED on the key is off while the main clock is stopped.
Enter/Yes
The <ENTER/YES*> key has two functions:
- Completes an action. As a reminder to press this key, an asterisk appears on the LCD.
- Serves as for input prompts (Y).
Clear/No
The <CLEAR/NO> key has two functions:
- Clears the LCD of numerical information.
- Serves as for input prompts (N).
The <CLEAR/NO> key also acts as an escape during data entry. The number of key presses to escape depends on the step in the entry process (flashing asterisk or not).
Example 1: The operator presses the key to adjust the game time.
- If no number key has been pressed yet, press the <CLEAR/NO> key once to escape.
- If any number key has been pressed, the <CLEAR/NO> key must be pressed twice to escape; the first press blanks the data on the LCD, and the second press escapes.
Example 2: The operator presses followed by a key to change the score.
- The <CLEAR/NO> key must always be pressed twice to escape.
Edit Press the key followed by one of the increment or decrement keys for the desired field on the scoreboard to modify. Then simply enter the new value to display and press to accept.
Menu Press to access general and sport-specific options. Use the up and down arrow keys to scroll through the menu list. Press again at any time to return to the game in progress.
Set Main Clock
| Display | Action |
| MAIN CLOCK -SET CURR MM:SS * MM:SS = minutes, seconds MM:SS = minutes, seconds | After the main clock has been stopped, press <SET MAIN CLOCK> to display the current time of the main clock. To change the time, enter the desired value using the number pad, and then press <ENTER>. Press <CLEAR> twice to clear changes and return to the game. |
Count Up/Down
| Display | Action |
| MAIN CLOCK- DOWN 1-UP 2-DOWN | After the main clock has been stopped, the direction of the clock can be set. Press <1> or <2> to select UP or DOWN (default). Note: The current direction of the main clock is shown on the top line of the LCD. |
Pitch Timing Operation
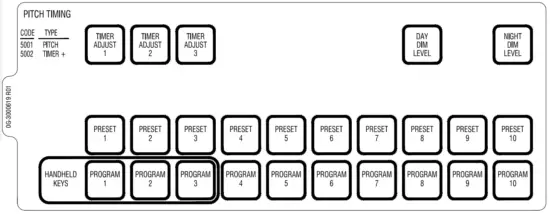
Sport Insert: 0G-3000619 Pitch Timing Code: 5001 (or 5002)
Refer to Section 1: Basic Operation (p.1) for information on how to start up the console and use the sport insert. The Quick Reference is located in Appendix A. The Sport Insert drawing is located in Appendix B. If an insert is lost/damaged, use a copy of the insert drawing until a replacement arrives
Reference Drawings:
Insert; LL-2438 A/S 5000, Baseball……………… DWG-125061
Preset Keys (1-10)
Configuration
| Display | Action |
| PRESET NN MM:SS* WARNING MM:SS* NN = preset number MM:SS = minutes, seconds | Press <EDIT> followed by one of the <PRESET> keys to set the value of the PRESET and WARNING times.
To disable a PRESET, enter a time of 0:00. |
| PRESET NN MM:SS* WARNING MM:SS* MM:SS = current time | The WARNING time is a specific value at which the digits will start flashing when counting down.
To disable flashing, enter a time of 0:00. |
Operation
| Display | Action |
| TIME MM:SS} PRESET NN MM:SS = current time NN = preset number | To view the details of a preset, press the appropriate <PRESET> key. Note: The Main Clock must be stopped before selecting a <PRESET> key. |
| TIME 0:00 } PRESET NONE | If no preset is configured for a chosen key, “PRESET NONE” will display on the LCD when pressed. |
| TIME 2:43 } PRESET 1 | To begin a countdown, press <START>. |
| TIME 0:00 } PRESET END | When the clock reaches 0:00, “PRESET END” displays on the LCD, and the time is cleared from the scoreboard. |
Default Settings
| MLB | MiLB | |||
| Preset # | Time | Warning | Time | Warning |
| 1 | 2:45 | 0:00 | 2:45 | 0:00 |
| 2 | 2:25 | 0:00 | 2:25 | 0:00 |
| 3 | 0:20 | 0:00 | 0:20 | 0:00 |
| 4 | 0:00 | 0:00 | 0:00 | 0:00 |
| 5 | 0:00 | 0:00 | 0:00 | 0:00 |
| 6 | 0:00 | 0:00 | 0:00 | 0:00 |
| 7 | 0:00 | 0:00 | 0:00 | 0:00 |
| 8 | 0:00 | 0:00 | 0:00 | 0:00 |
| 9 | 0:00 | 0:00 | 0:00 | 0:00 |
| 10 | 0:00 | 0:00 | 0:00 | 0:00 |
Note: The MLB settings are the factory default for new consoles. The console will save any changes made to these settings.
Program Keys (1-10)
Each program key allows up to three separate presets to run sequentially.
Configuration
| Display | Action |
| PROGRAM 1-STEP 1 PRESET NN* NN = preset number | Press <EDIT> followed by one of the <PROGRAM> keys to enter the PRESET number of each step.
using the number keypad, and then press <ENTER>. |
| PROGRAM 1-STEP 2 PRESET NN* NN = preset number |
|
| PROGRAM 1-STEP 3 PRESET NN* NN = preset number |
|
Notes:
|
Operation
| Display | Action |
| TIME MM:SS } PRGMXX PNN MM:SS = current time XX = program number NN = preset number | To view the details of a program, press the appropriate <PROGRAM> key. Up to three steps may be displayed in the bottom row of the LCD. Note: The Main Clock must be stopped before selecting a <PROGRAM> key. |
| TIME 0:00 } PROGRAM NONE | If no program is configured for a chosen key, “PROGRAM NONE” will display on the LCD when pressed. |
| TIME 0:17 } PRGM3 P1 >3 | To begin a countdown, press <START>. While the clock is counting down, the preset (P) will alternately change to an arrow (>) to indicate the current program step. In the example at left, the second step (Preset 3) of the third program is running. The countdown will continue automatically through each valid step of the selected program. |
| TIME 0:00 } PROGRAM END | When the clock reaches 0:00 of the last step in a program, “PROGRAM END” displays on the LCD, and the time is cleared from the scoreboard. |
Default Settings
| MLB | MiLB | |||||
| Program # | 1st Step | 2nd Step | 3rd Step | 1st Step | 2nd Step | 3rd Step |
| 1 | Preset 1 | 0 | Preset 1 | 0 | ||
| 2 | Preset 2 | 0 | Preset 2 | 0 | ||
| 3 | Preset 1 | Preset 3 | 0 | Preset 3 | 0 | |
| 4 | 0 | Preset 1 | Preset 3 | 0 | ||
| 5 | 0 | 0 | ||||
| 6 | 0 | 0 | ||||
| 7 | 0 | 0 | ||||
| 8 | 0 | 0 | ||||
| 9 | 0 | 0 | ||||
| 10 | 0 | 0 | ||||
Note: The MLB settings are the factory default for new consoles. The console will save any changes made to these settings.
Dimming Keys
Configuration
| Display | Action |
| DAY DIMMING LEVEL(0-9): NN% NN = current setting NONE = <0> 50% = <5> 90% = <1> 80% = <2> 70% = <3> 60% = <4> | Press <EDIT> followed by the <DAY DIM LEVEL> key to set the dimming level for daytime operation. Press <0> (brightest) through <9> (dimmest) or use the left/right arrow keys to set the scoreboard digit dimming level. Press <ENTER> to accept the new value and update the intensity of the scoreboard digits. Press <CLEAR> to restore the previous value and abort entry. |
| Display | Action |
| NIGHT DIMMING LEVEL(0-9): NN% NN = current setting NONE = <0> 50% = <5> 90% = <1> 40% = <6> 80% = <2> 30% = <7> 70% = <3> 20% = <8> 60% = <4> 10% = <9> | Press <EDIT> followed by the <NIGHT DIM LEVEL> key to set the dimming level for nighttime operation. Press <0> (brightest) through <9> (dimmest) or use the left/right arrow keys to set the scoreboard digit dimming level. Press <ENTER> to accept the new value and update the intensity of the scoreboard digits. Press <CLEAR> to restore the previous value and abort entry. |
Operation
To change the intensity of the scoreboard digits to match the ambient lighting conditions, press the key or the key. The bottom line of the LCD will briefly display the selected dimming level.
Default
- Day Dimming Level = NONE (0%)
- Night Dimming Level = 50%
Timer Adjust Keys (Code 5002 Only)
These keys are used to add time to the current program time that is counting. The default values for each key are shown below:
| Key | Default Value |
| TIMER ADJUST 1 | 0:30 |
| TIMER ADJUST 2 | 1:00 |
| TIMER ADJUST 3 | 1:30 |
When a key is pressed, the amount of time assigned to the key is added to the current time, and it will be added whether the timer is counting or stopped. If the timer has counted down and reached the end of the program, pressing the Timer Adjust keys will not add any more time.
| Display | Action |
| TIMER ADJUST #N VALUE = MM:SS* N = Timer Adjust key number MM:SS = current time | To edit the default time values, press <EDIT> followed by the appropriate <TIMER ADJUST #> key, and then enter the desired value using the number keypad. |
Handheld Switch
The 3-button pitch timer handheld switch (Figure 2) will be connected directly to the back of the All Sport 5100 console or to a 9-pin junction box on the field or in the control room. To select a program from the handheld remote, press , , or . The console will be set to the first step of the selected program, and this time will display on the scoreboard.
Note: The Main Clock must be stopped before pressing the , , or buttons on the handheld.
To begin the countdown, toggle the <START/STOP> switch. The countdown will continue automatically through each valid step of the selected program. Upon reaching 0:00 of the last step, the scoreboard will blank by default to help ensure that the players are not distracted. Refer to Timer Mode (p.9) to change this setting.
Figure 2: 3-Button
Handheld Switch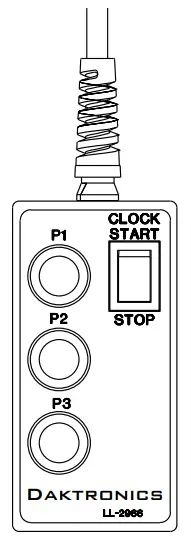
Note: The three (3) program buttons on the handheld remote correspond to the first three (3) programs on the console keypad insert.
Press to access general and sport-specific options. Use the up and down arrow keys to scroll through the menu list. Press again at any time to return to the game in progress.
New Game
| Display | Action |
| MENU- MAIN NEW GAME? | Press <ENTER> to clear all data for the current game in progress and begin a new game. |
New Code
| Display | Action |
| MENU- MAIN NEW CODE? | Press <ENTER> to switch to a different sport code through the SELECT CODE prompt. Refer to Start Up (p�2) for more information on sport codes. |
Dimming Menu
The Dimming Menu changes the brightness of the scoreboard.
Note: If this value is set differently from the values assigned to either key, the dimming menu setting will be overwritten when those keys are pressed.
| Display | Action |
| MENU- DIMMING LEVEL(0-9): NN% NN = current setting NONE = <0> 50% = <5> 90% = <1> 80% = <2> 70% = <3> 60% = <4> | Press <0> (brightest) through <9> (dimmest) or use the left/right arrow keys to set the scoreboard digit dimming level. |
The items in this menu will not typically be needed for pitch timing functions.
Timer Mode
| Display | Action |
| MENU-DISPLAY BLANK AT ZERO? Y | Press <YES> to make the display go blank when a countdown is complete. This is the default setting. Press <NO> to leave “0:00” on the display when a countdown is complete. |
| MENU-DISPLAY BLANK TIME S S = seconds | If YES is selected, enter the amount of time (in seconds) before the display goes blank. Use the arrow keys to select a value from 1 second (default) to 5 seconds. |
| Display | Action |
| MENU-DISPLAY BLANK ON STOP? N | Press <YES> to make the display go blank when the countdown of the selected PRESET or PROGRAM is stopped by the operator. This is the default setting. Press <NO> to leave information on the display when a countdown is stopped. |
| Display | Action |
| TIMER RESET ON STOP? N | Press <YES> to make the timer reset to the Reset 1 value when the clock is stopped. This allows a third reset value for two- button handheld pendants and a second reset value for the RC-100/RC-200 Start/Stop Remote function. Press <NO> to not reset the time when a countdown is stopped. This is the default setting. |
| Timer Reset on Stop DISABLED | Timer Reset on Stop ENABLED | |
| RC-100/ RC-200 Operation |  |  |
| 2-Button Handheld Pendant Operation | 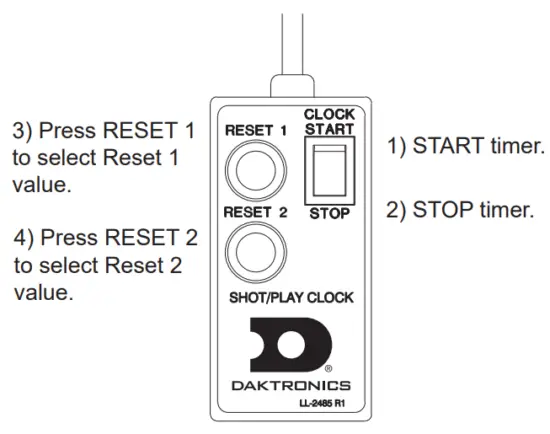 | 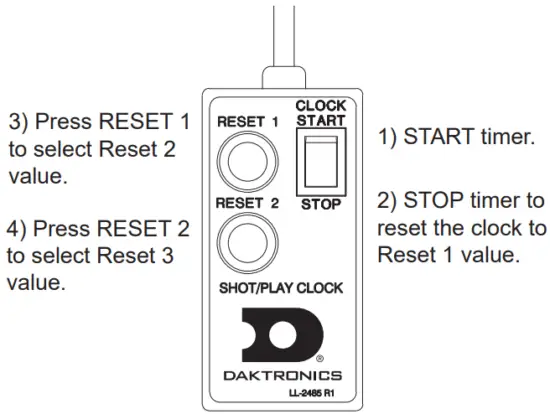 |
| 3-Button Handheld Pendant Operation (All Sport 5100 Only) |  | 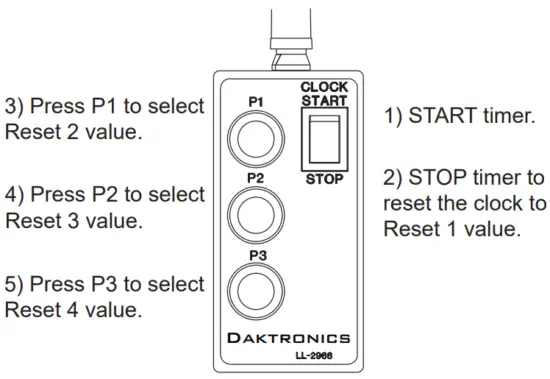 |
Switch Output
The All Sport 5000 console has a relay switch that can be used to control external devices. The switch can be configured to operate under different clock or horn conditions. The default setting is 1-CLOCK= 0.
- Press the number key (<0>, <1>, <2>, <3>) as a shortcut or use the left and right arrow keys to select the desired setting.
- Press to select the new setting, or press to leave the switch setting as is.
The possible settings for the switch output are displayed below:
| Display | Action |
| SWITCH OUTPUT=N 0-DISABLED? N = current setting | The switch remains open at all times and any external devices are disabled. |
| Display | Action |
| SWITCH OUTPUT=N 1-CLOCK =0? N = current setting | In count down mode, the switch closes when the main clock reaches zero and stays closed until a nonzero value is entered. In count up mode, the switch closes when the main clock reaches the proper period, break, or overtime length and opens when any other value is entered. |
| SWITCH OUTPUT=N 2-CLOCK =STOP? N = current setting | The switch closes when the main clock is stopped and opens when the main clock is running. External devices are disabled when the main clock is running. |
| SWITCH OUTPUT=N 3-MAIN HORN? N = current setting | The switch closes when the <HORN> key is pressed. |
Quick Reference
All Sport 5000 Standard Keys
Refer to Standard Keys (p.2) for detailed operating instructions.
Start/Stop Clock
- START and STOP control the function of the main clock.
- The green LED on the START button is illuminated when the clock is running.
Clock Direction
- COUNT UP/DOWN> sets the direction of the main clock. The clock direction is shown in the upper-right corner of the LCD.
- This key is disabled while the clock is running
Set Main Clock
- Press <SET MAIN CLOCK to edit the current main clock value.
• Enter the desired clock value on the number pad and then press <ENTER - This key is disabled while the clock is running.
Edit Key
- EDIT > is used to edit score or statistic values. Press <EDIT followed by the desired button to be edited. Refer to the specific sport section for all edit key functions.
Pitch Timer
Refer to Section 2: Pitch Timing Operation (p.4) for detailed operating instructions. Start-Up
- Turn the Power Switch ON.
- At the Resume Game? Y/N prompt, press <ENTER/YES> to resume the game where last shut off, or press <CLEAR/NO> to enter a new sport code number.
Day Dim Level
- DAY DIM LEVEL sets the intensity of the scoreboard for daytime operation.
Night Dim Level
- NIGHT DIM LEVEL> sets the intensity of the scoreboard for nighttime operation.
Preset 1-10
- PRESET 1> to sets the timer to the selected PRESET.
Program 1-10
- PROGRAM 1> to sets the timer to the first step of the selected PROGRAM
Timer Adjust 1-3 (Code 5002 Only)
- <TIMER ADJUST 1 to <TIMER ADJUST 3 adds extra time to the current timer.
Start - START begins the countdown of the selected PRESET or PROGRAM.
Stop - STOP> will suspend the countdown.
Edit Key Function
- Press <EDIT followed by any of the following keys to edit their respective values: <DAY DIM LEVEL NIGHT DIM LEVEL PRESET> <PROGRAM
Sport Inserts
Reference Drawings:
Insert; A/S 5000, Pitch Timing ….. DWG-3000619
| n DAKTRONICS, INC. BROOKINGS, SD 57006 | THE CONCEPTS EXPRESSED AND DETAILS SHOWN ON THIS DRAWING ARE CONFIDENTIAL AND PROPRIETARY. DO NOT REPRODUCE BY ANY MEANS WITHOUT THE EXPRESS WRITTEN CONSENT OF DAKTRONICS, INC.COPYRIGHT 2015 DAKTRONICS, INC. | |||||||
| DO NOT SCALE DRAWING | ||||||||
| FRatALL SPORT 5000 SERIES CONSOLE | ||||||||
| TITLE INSERT; A/S 5000, PITCH TIMING | ||||||||
| DESIGN: KDRAGT | DRAWN:KDRAGT | DATE 05 FEB 15 | ||||||
| SCALE: 1 =1 | ||||||||
| SHEET | REV | JOB NO: | FUNC –TYPE–SIZE | 3000619 | ||||
| 01 | P 1196 | E – 07 – A | ||||||
| REV | DATE: | ADDED CODE 5002 AND TIMER ADJUSTS | BY: | |
| 01 | 15 JUN 15 | KDD |