TIETI B-2 Spirit Mini Wireless Mechanical Gaming Keyboard User Guide
GETTIGN TO KNOW YOUR KEYBOARD


BEFORE FIRST USE
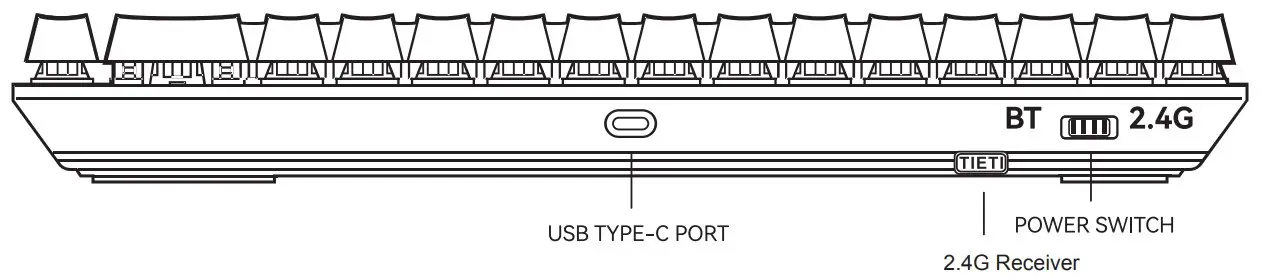
Charge the keyboard fully before first use by connecting the USB cable to the keyboard USB Type-C port.
CHARGING & BATTERY LIFE
The keyboard will indicate charging status when connected with PC.
| INDICATOR | INDICATOR | STATUS |
| Left CTRL key | Breathing White | Charging |
| Solid White | Fully Charged | |
| Flashing White | Low Charge |
Using the check battery life shoutcut below, an indication will play to denote current battery charge level.
| SHORTCUT | FUNCTION | INDICATION | STATUS |
FN+Enter | Check Battery Charge Level | Key “1” Solid Red | 10% charged |
| Key “‘I” &”2″ Solid Red | 20% charged | ||
| Key “1” & “2” & “3” Solid Red | 30% charged | ||
| Key “1” & “2” & “3” & “4” Solid Yellow | 40% charged | ||
| Key “1” & “2” & “3” & “4” & “5” Solid Yellow | 50% charged | ||
| Key “1” & “2” & “3” & “4” & “5” & “6” Solid Yellow | 60% charged | ||
| Key “1” & “2” & “3” & “4” & “5” & “6” & “7” Solid Yellow | 70% charged | ||
| Key “‘I” & “2” & “3” & “4” & “5” & “6” & “7” & “8” Solid Green | 80% charged | ||
| Key “1” & “2” & “3” & “4” & “5” & “6” & “7” & “8” & “9” Solid Green | 90% charged | ||
| Key “‘I” & “2” & “3” & “4” & “5” & “6” & “7” & “8” & “9” & “0” Solid Green | 100% charged |
RESET TO FACTORY DEFAULTS
Press and Hold the key “FN” and “CAPS” together for 3 seconds then release, the keyboard will be reset to factory default settings.
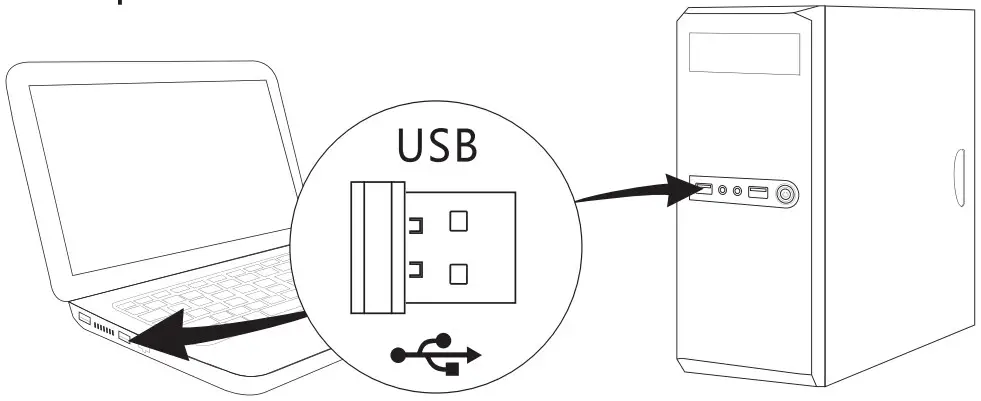
CONNECTING VIA 2.4G WIRELESS
- Plug in the 2.4G receiver to PC USB port
- Slide the keyboard power switch button to the 2.4G position
- The keyboard will connect to PC automatically.
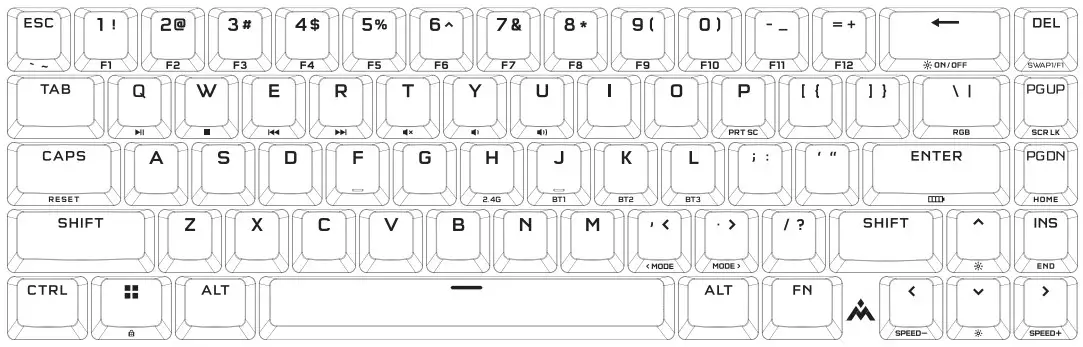
Note 1: If the nano wireless adaptor lost pairing with PC, or an unused nano wireless adaptor need be connected, repeat the above step 1 and 2, press and hold key “FN” and “H” together for at least 3 seconds, key “H” will start quick flashing green, after successfully paired, it will turn to solid green for 3 seconds then off.
Note 2: If key “H” keeps flashing green for 1 minute but still not paired, the keyboard will go to sleep mode and flashing will be off. You need enter a random key to wake up the keyboard, then retry the steps listed in Note 1.
CONNECTING VIA BLUETOOTH WIRELESS
- Initiate Bluetooth pairing on the host device such as PC or phone
- Slide the keyboard power switch button to the BT position
- Press and hold “FN” and “J” or “K” or “L” for at least 3 seconds, key “J” or “K” or “L” will start quick flashing green, after successfully paired, it will turn to solid green for 3 seconds then off.
Note : If key “J” or “K” or “L” keeps flashing green for 1 minute but still not paired, the keyboard will go to sleep mode and flashing will be off. You need enter a random key to wake up the keyboard, then retry the above steps.
| SHORTCUT | FUNCTION |
| FN+H | 2.4G wireless pairing, hold for 3 seconds |
| FN+J | BT 1 connection, hold for 3 seconds |
| FN+K | BT 2 connection, hold for 3 seconds |
| FN+L | BT 3 connection, hold for 3 seconds |
CONNECTING VIA USB CABLE
- Connect the keyboard via USB cable to a USB Type-A port on PC
- The keyboard will automatically switch to USB wired mode.
SOFTWARE MODE
Welcome to visit TIETI’s website www.tieti-tech.com/download and download the software TIETI Synapse for installation, you can control everything of the keyboard from lighting to powerful macros.
SWAPPING KEYSWITCHES
The keyswitches can be removed and replaced with any variety or combination of CHERRY MX RGB mechanical keyswitches. Other third party mechanical keyswitches with 3-pin design may be compatible, but are not guaranteed to work due to physical differences.
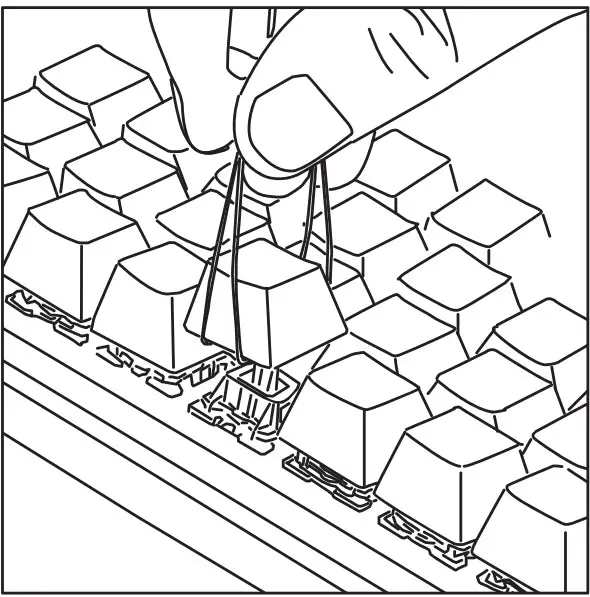
1.Push the side for keycap of the 2-IN-1 PULLER over the keycap, then lift to remove
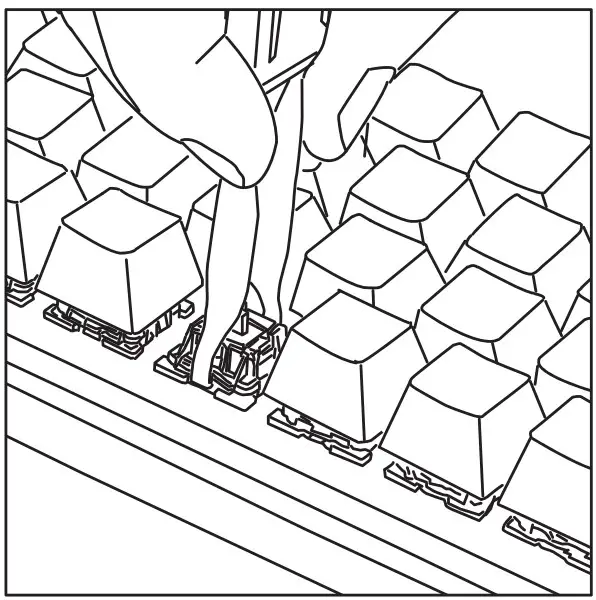
2.Position the tips of the keyswitch puller under the keyswitch top and bottom tabs, then press in and lift to remove
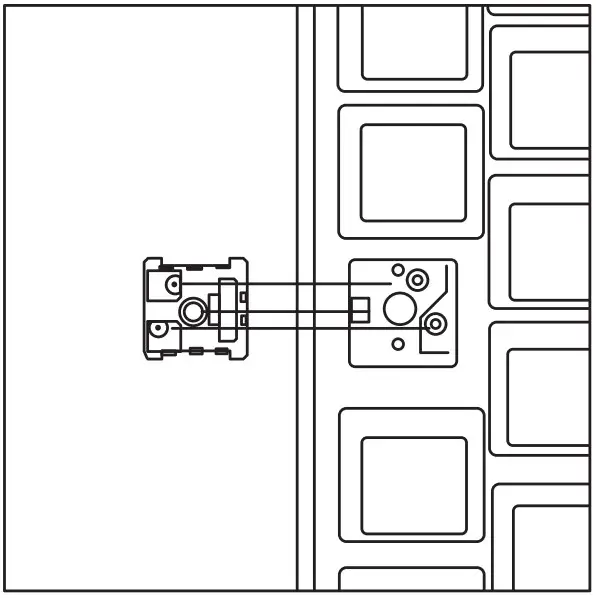
3.Align the new keyswitch’s pins and base with the sockets and opening.
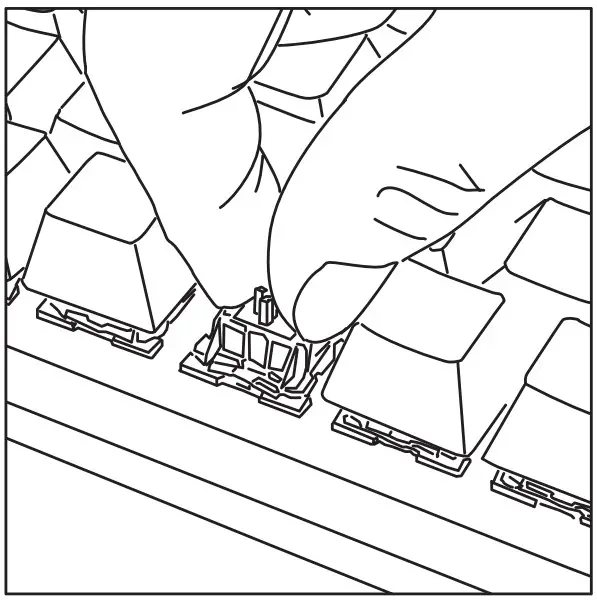
4.Carefully press the keyswitch in until it c icks into place. If you feel any resistance, remove and try again.
PROFILE & LOCK FUNCTIONS
| SHORTCUT | FUNCTION | ON-KEY INDICATION FN |
| FN+:: | Windows Lock | Solid White (When ON) |
| FN + Page Up | Scroll Lock | Solid White (When ON) |
| CAPS | Caps Lock | CAPS Solid White (When ON) |
LIGHTING SETTING
| SHORTCUT | FUNCTION |
| FN+Backspace | ON/OFF backlighting |
| FN + arrow down | Adjusts backlighting brightness in 25% decrements |
| FN + arrow up | Adjusts backlighting brightness in 25% increments |
| FN + arrow left | Slow down backlighting |
| FN + arrow right | Speed up backlighting |
| FN+ \ I ) | Shift RGB lighting mode(Sequence: Rainbow, Red, Orange, Yellow, Green,Cyan, Blue, Purple, White |
| FN + < | Shift RGB lighting mode (from end to start) |
| FN + > | Shift RGB lighting mode (from start to end) |
Total 22 modes are available as below, including the last 3 modes which are provided in software mode.
- Static color
- Dynamic Breathing
- Color Shift
- Rainbow Wave
- Rainbow Ripple
- Stars Twinkling
- Streaming
- Type Lighting
- Flapping
- Sine Waving
- Surging
- Blooming
- Lasing
- Color Waterfall
- Inclined Rain
- Raining
- Streaming line
- Type pulsing
- Customization mode
- Music mode (EDM)
- Music mode (Classic)
- Soft White
Audio and Media
SHORTCUT FN+Q FN+W FN+E FN+R FN+T FN+Y FN+U
FUNCTION Play/Pause Stop Last track Next track Mute Increase Volume Decrease Volume
| SHORTCUT | FUNCTION |
| FN+ESC | \ |
| FN+ SHIFT +ESC | ~ |
| FN+1 | F1 |
| FN+2 | F2 |
| FN+3 | F3 |
| FN+4 | F4 |
| FN+5 | F5 |
| FN+6 | F6 |
| FN+7 | F7 |
| FN+8 | F8 |
| FN+9 | F9 |
| FN+O | F10 |
| FN+- | F11 |
Full-size Keyboard Keys
| SHORTCUT | FUNCTION |
| FN+= | F12 |
| FN+P | Print screen |
| FN + PGDN | Home |
| FN + INS | End |
| FN+Del | Swap all function keys (1,2,3…=)to F1-F12 (DEL key will light up white when on) |
Easy automatic cordless connection
a. Connect the USB nano receiver to your computer into your PC USB port, wait until automatic installation has completed.