![]() V6000 RefreshButler
V6000 RefreshButler
Instruction Manual
![]() The appliance should be installed by qualified personnel only.
The appliance should be installed by qualified personnel only.
Each step must be carried out and checked in full in the order specified.
Validity
These installation instructions apply to the model: 14003
Transport
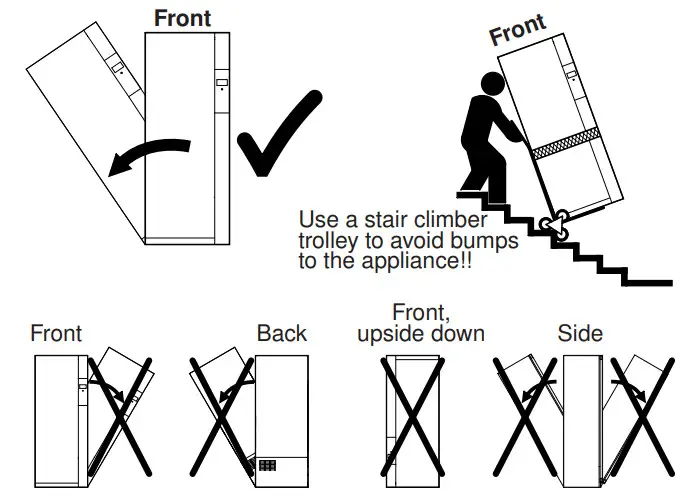
Transport the appliance in an upright position only! Transporting it in any other position will result in damage to the appliance! When carried carefully without being shaken, the appliance may be tilted a maximum of 90° to the left (viewed from the front).
The appliance must be allowed to stand in the standard operating position for about 2 hours before using the heat pump. Failure to do this can result in damage to the appliance.
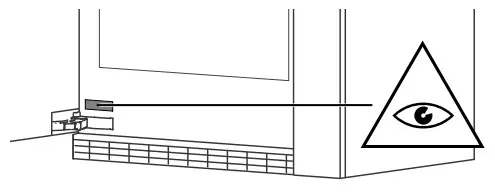
Identification plate
- Open the appliance door.
– The identification plate is located next to the lower door hinge.
Electrical connections
Electrical connections must be carried out by qualified personnel in accordance with the guidelines and standards for low-voltage installations and the specifications of the local electricity supply companies.
A plug-in appliance may only be connected to a socket outlet with earthing contact, installed according to specifications. An all-pole mains isolating device with 3 mm contact opening should be provided in the house wiring system. Switches, plug and socket devices, circuit breakers and fusible cut-outs which are accessible after installation and which have all-poles switching are permissible as isolating devices. Effective earthing and separately installed neutral and earth conductors ensure safe and fault-free operation. After installation, live parts and cables with basic insulation must not be accessible. Check old installations.
- Use at altitude: Electrical safety is guaranteed up to 2,000 m above sea level.
- Refer to the identification plate for information on the required mains voltage, current type and fuse protection.
 The mains plug must not be cut off.
 The mains plug must not be cut off.
Installation
![]() Do not install the appliance behind a door that locks, a sliding door or a door with a hinge that lies opposite the hinge of the appliance.
Do not install the appliance behind a door that locks, a sliding door or a door with a hinge that lies opposite the hinge of the appliance.
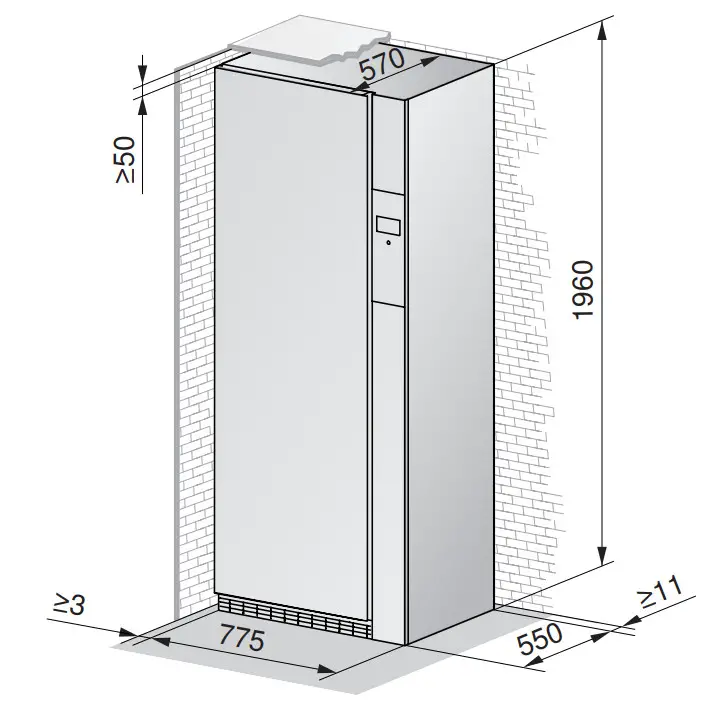
Free-standing position![]() When positioning a RefreshButler so that it is free-standing, a distance of min. 3 mm must be kept to the walls to the left and right.
When positioning a RefreshButler so that it is free-standing, a distance of min. 3 mm must be kept to the walls to the left and right.
Positioning in a niche (without decor panel)
The cabinet door extends across entire width of opening. There is no connection to the RefreshButler door.![]() If the niche is fitted with a door, hinge the niche door on the same side as the appliance door. Ensure that the niche door is left open during the process.
If the niche is fitted with a door, hinge the niche door on the same side as the appliance door. Ensure that the niche door is left open during the process.
Niche
Floor plan

Elevation view
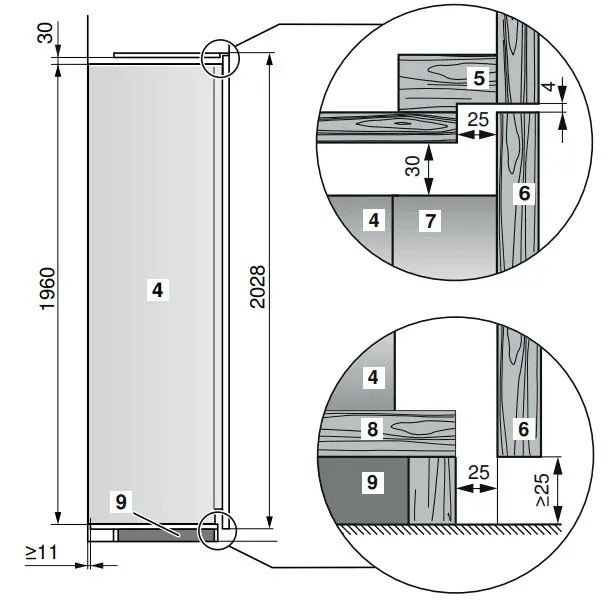
- Position ventilation slit 1 of ≥200 cm2 on the top at the back or above the cabinet door.
- Observe load-bearing capacity of cabinet floor 2 (min. 170 kg).
- Set the cabinet ceiling 5 and cabinet base 8 back 25 mm for air circulation.
- Provide base reinforcement 9 for appliance.
- Mount filler strip 3 after installing appliance.
| Ventilation slit | Cabinet door |
| Cabinet floor | RefreshButler door |
| Filler strip | Cabinet base |
| RefreshButler | Base reinforcement |
| Cabinet ceiling |
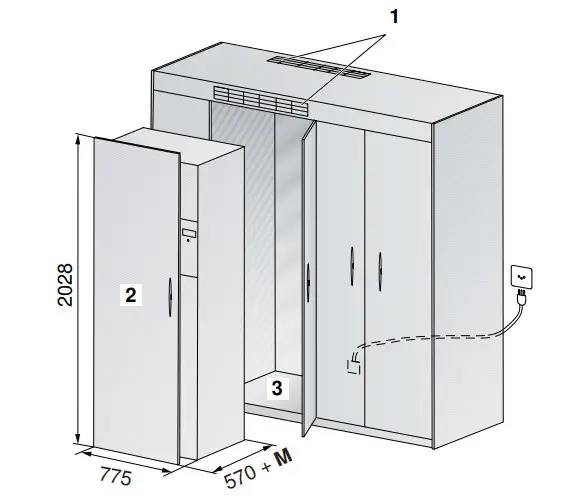
Positioning in a niche (with decor panel)
The decor panel 2 is fastened to the RefreshButler 6 door.
Niche
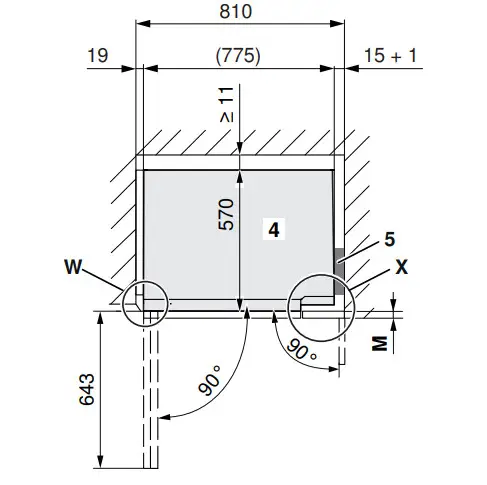
Floor plan
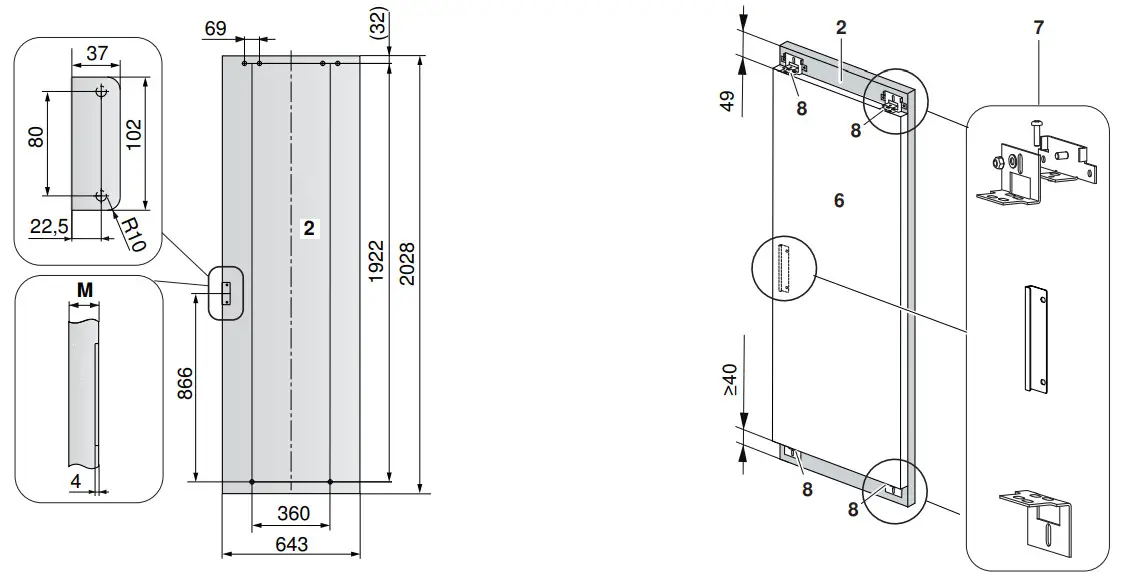
RefreshButler door and decor panel
- Position ventilation slit 1 of ≥200 cm 2 on the top at the back or above the cabinet door.
- Load-bearing capacity of cabinet floor 3: min. 170 kg + weight of decor panel 2(max. 35 kg)
- Determine the thickness M of the decor panel 2 (recommendation: 16 mm).
- Fasten the decor panel 2 to the RefreshButler door 6 with the angle brackets 5. Two threaded holes (M4) are pre-drilled in the RefreshButler door per angle bracket.
- Mount filler strip 5 after installing appliance.
| 1 Ventilation slit | 5 Filler strip |
| 2 Decor panel (max. 35 kg) | 6 RefreshButler door |
| 3 Cabinet floor | 7 5 angle brackets, included in the scope of delivery (see installation set W56295) |
| 4 RefreshButler | 8 Pre-drilled with metric screw holes for mounting the lower/upper angle brackets 7 |
Detail W: RefreshButler door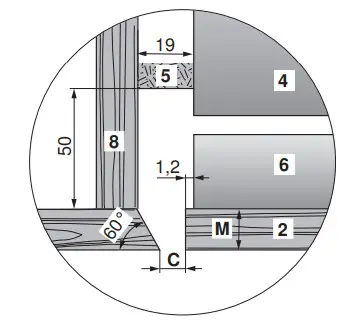
| 2 Decor panel | 6 RefreshButler door |
| 4 RefreshButler | 8 Cabinet inside panel |
| 5 Filler strip |
![]() Decor panel thicknesses over 19 mm are not recommended, as gap dimension C also increases with increasing decor panel thickness M. An installation test must be performed in any case.
Decor panel thicknesses over 19 mm are not recommended, as gap dimension C also increases with increasing decor panel thickness M. An installation test must be performed in any case.
Detail X: Door of RefreshButler display
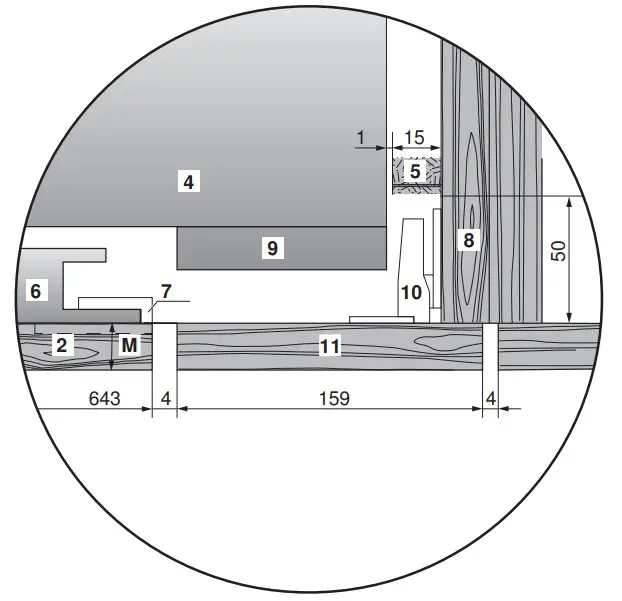
| 2 Decor panel | 8 Cabinet inside panel |
| 4 RefreshButler | 9 RefreshButler display |
| 5 Filler strip | 10 Hinge |
| 6 RefreshButler door | 11 Door of RefreshButler display |
| 7 Middle angle bracket |
Levelling
To ensure fault-free operation, the appliance must stand level with all 4 feet firmly on the ground and not wobble.
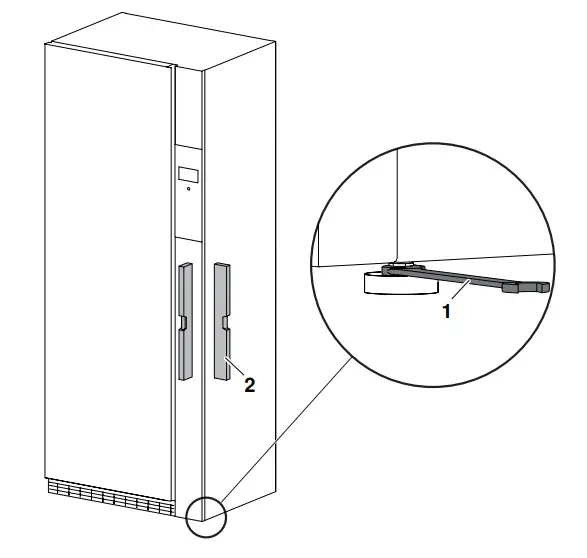
Setting the height
Tools: 10 mm open-end wrench 1 and spirit level 2
Rear adjuster feet:
Maximum height adjustment of 14 mm/1.5 mm per turn.
- Align the appliance vertically by turning the feet with the wrench 1.
Front adjuster feet: 1
▸ Align the appliance vertically by turning the feet with the wrench 1.
– The appliance must not wobble.
1074100-05
26/08/2022