![]() COMGO Z1 Laser Engraver
COMGO Z1 Laser Engraver
User Manual V1.1
Introduction
Dear Customers,
Thank you for choosing the COMGO Z1 Laser Engraver!
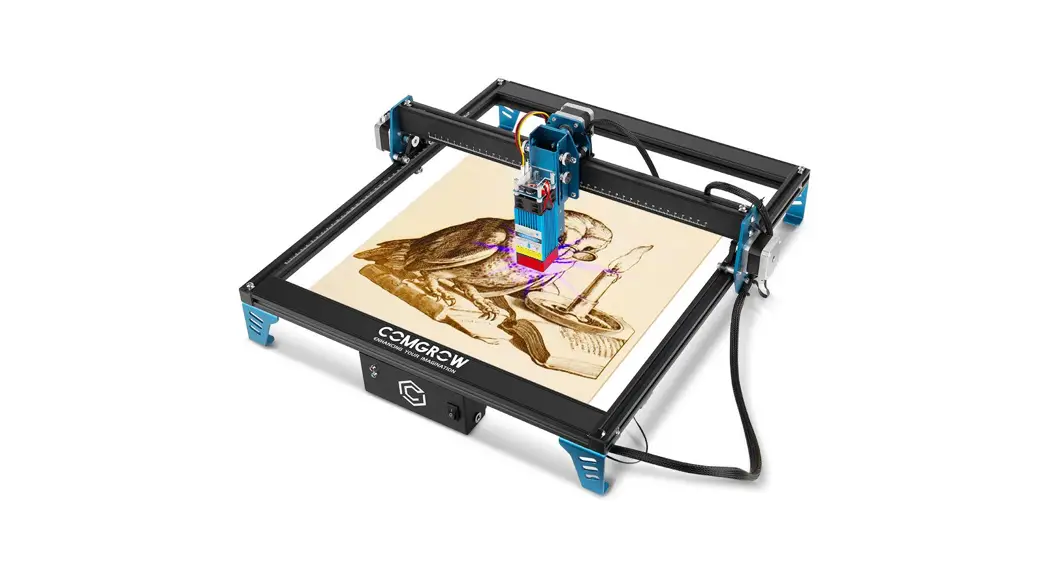
The COMGO Z1 Laser Engraver is a desktop laser engraver. Before operating the COMGO Z1 Laser
Engraver, please read the manual carefully and follow the instructions for assembly and operation. If this manual does not effectively solve your problem, please contact our support team. Cornrow was founded in 2017 by people who have a serious passion for technology that helps you make things. With this deep-rooted dedication, we wanted to make the digital manufacturing process more accessible, giving educators, engineers, manufacturers, small businesses and tinkerers the power to make anything.
Headquartered in Southern China, Shenzhen, Cornrows’ dedicated staff is committed to providing the kind of service that makes you go “wow.”We offer the highest quality materials, machines, and accessories – ranging from industrial-grade 3D printers to DIY laser cutters- all of which have been tested and approved by our in-house experts. Ur amazing gals and guys in customer service are here Monday through Saturday to help with anything you may need, from finding the right material to package your specific product, to discussing which printer is best for heteroatom line is, we’re here to make 3D printing, laser cutting, and CNC milling magic happen. Contact us.
Cautions
- The COMGO Z1 Laser Engraver is for indoor use only and you must be 18 years of age or above to operate this machine.
- Please wear appropriate protective equipment when you are operating the equipment (e.g. laser protection glasses, etc.)
- Please place the machine in a horizontal position before use.
- COMGO Z1 Laser Engraver provides switchable power supply 230V AC or 110V AC with 24V output voltage, it is forbidden to use other power supplies or laser modules, which may lead to machine failure or damage.
- Do not disassemble the power supply or electrical parts. This will void the warranty.
- Laser cutting different materials will produce different levels of smoke, please place the machine in a well-ventilated area and use it under supervision.
- Please maintain the laser module regularly to ensure the life of the laser module.
Paramenters
| Machine Size | 575*575*205mm/22.64*22.64*8.07inch |
| Working Area | 400*400mm/15.75*15.75 inch |
| Machine Weight | 5.0 KG/11lbs |
| Frame Material | Aluminum |
| Stepper Motor | 42mm*42mm*34mm |
| Laser module type | Diode lasers |
| Wavelength | 445nm |
| Compatible Software | Laser GRBL、Lightburn |
| Compatible System | LaserGRBL:Windows XP、Windows7、Windows8、Windows10 Lightburn:Windows、Mac OS and Linux |
| Input Voltage | AC110V-230V |
| Laser Power | 1.6W/5W/10W |
| Focal Length | 1.6W:30-100mm 5W:23mm 10W:45mm |
| S-value Range | S0-S1000(0%-100%) |
| Connection Method | USB |
| Engraving Accuracy | 0.1mm |
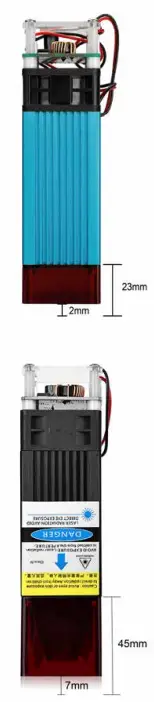
NOTE: the focal length is the distance from the lower face of the laser module profile to the engraving plane.
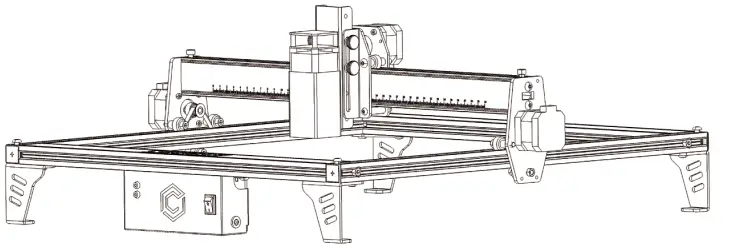
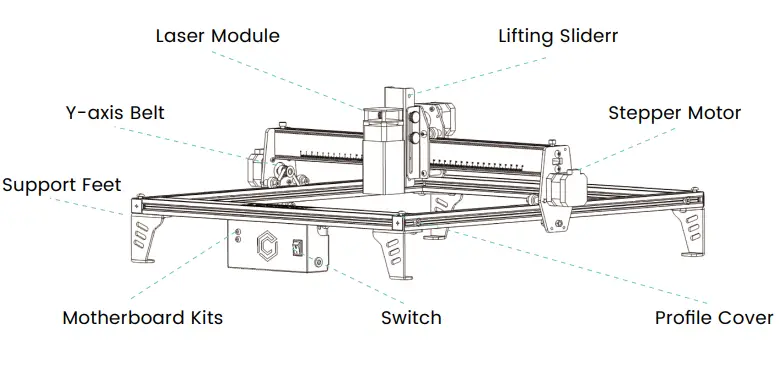
Machine Display
General List

| Image | Name | Qty |
| Safety Goggles | 1 | |
| USB Cable | 1 | |
| SD Card | 1 | |
| Safety Goggles | 2 | |
| M3X6 Screw | 4 |
| Image | Name | Qty |
 | M5X8 Screw | 14 |
| M5X25 Screw | 4 | |
| Profile Cover | 4 | |
| M5 T-Nut | 4 | |
 | M5 Square Nut | 4 |
| Image | Name | Qty |
| Wire holder | 1 | |
| Ties | 2 | |
| Hexagonal wrench | 4 | |
 | Open-end wrench | 2 |
Frame Assembly
Pt.1
Tip: To watch the installation tutorial video, please visit SD Card.
Note: the threaded holes are oriented outward.
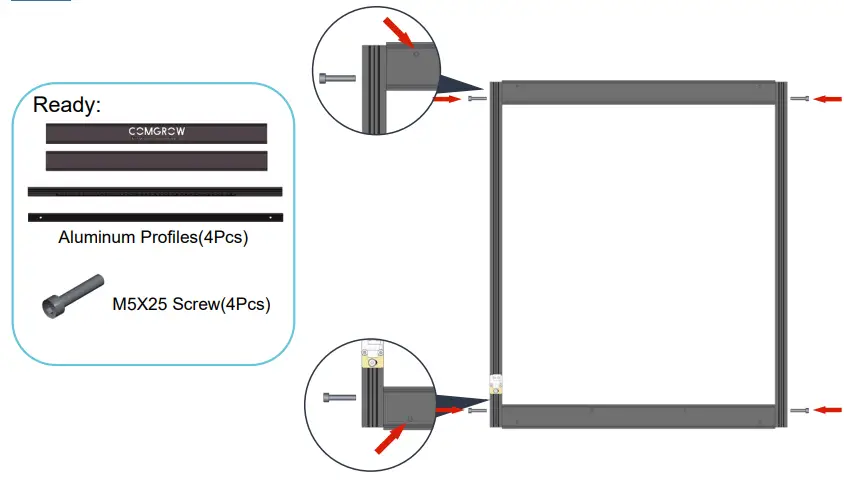
Note: the threaded holes are oriented outward.
STEP1. Take out all four profiles and use four M5*25 screws for fixing to complete the gantry installation. 06
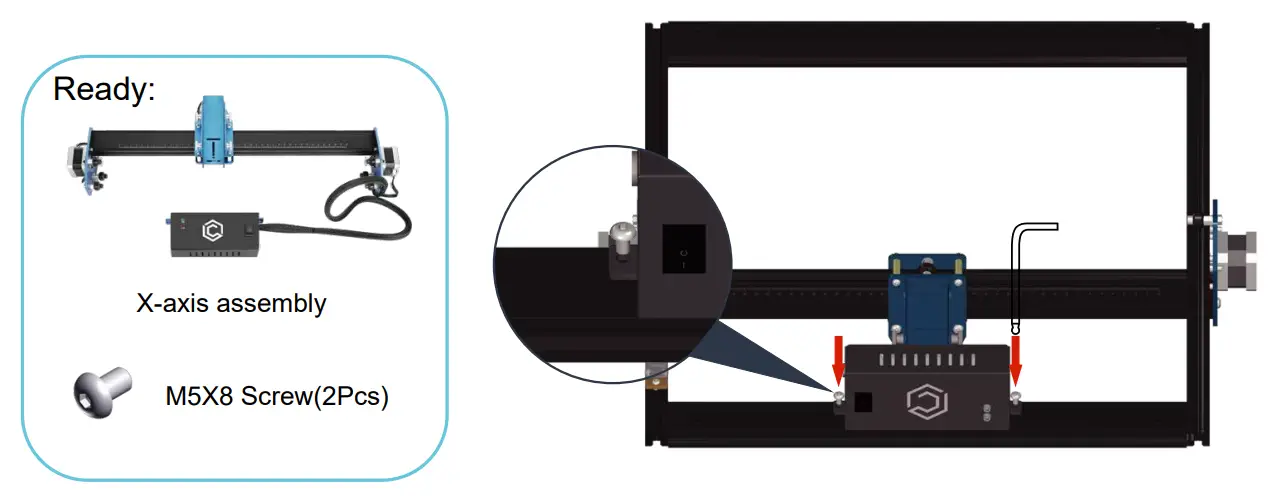
Frame Assembly Pt.2
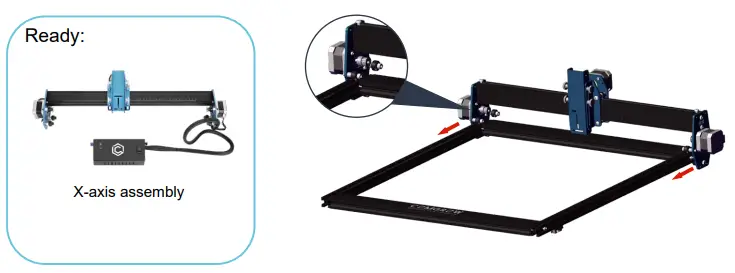
STEP2. Take out the X-axis kit and embed it into the gantry along the V-slot of the Y-axis.
Frame Assembly Pt.3
STEP4. Take out the 4 support feet and install them using 8 M5*8 screws and 4 M5 T-nuts.
Frame Assembly Pt.4
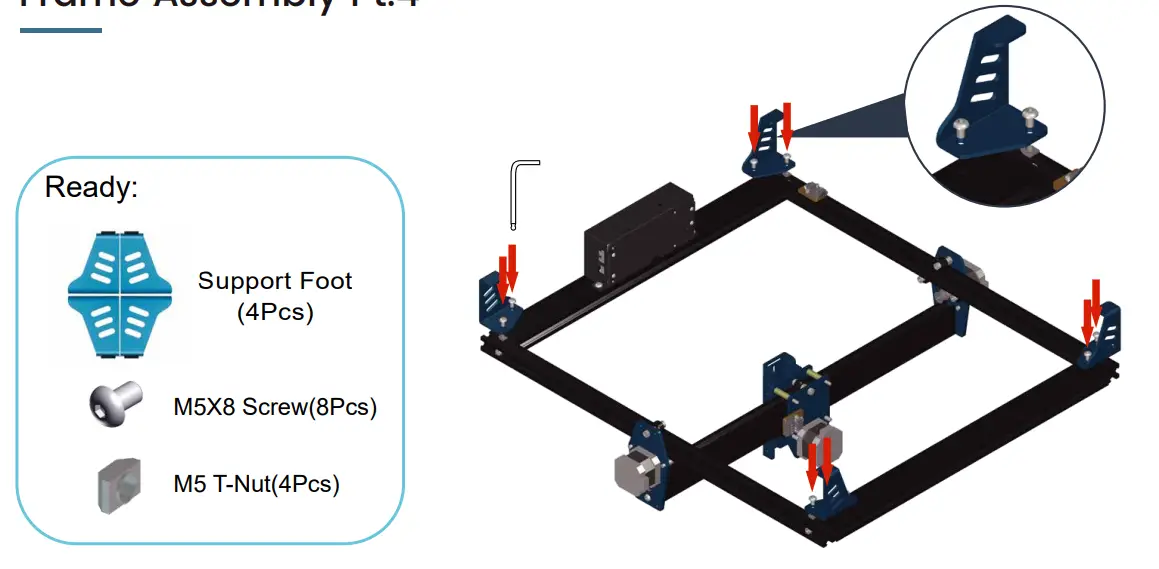
STEP4. Take out the 4 support feet and install them using 8 M5*8 screws and 4 M5 T-nuts.
Frame Assembly Pt.5
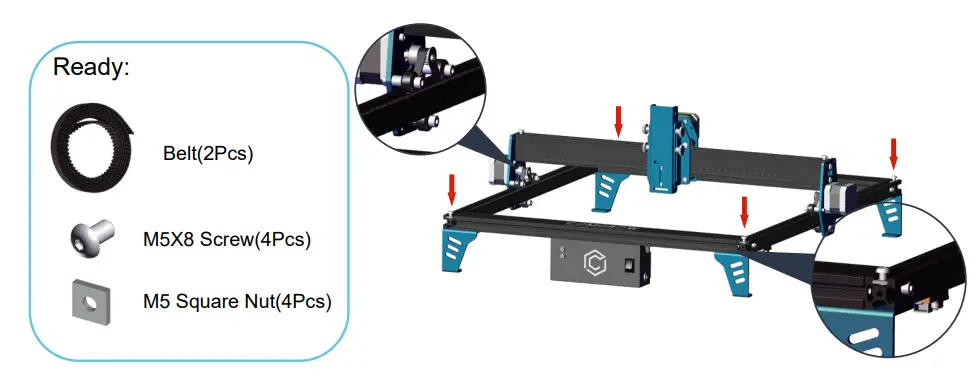
STEP5. Take out 2 belts, put the belts through the two pulleys and the timing pulley, and fix them with 2 M5*8 screws and M5 square nuts.
Frame Assembly Pt.6
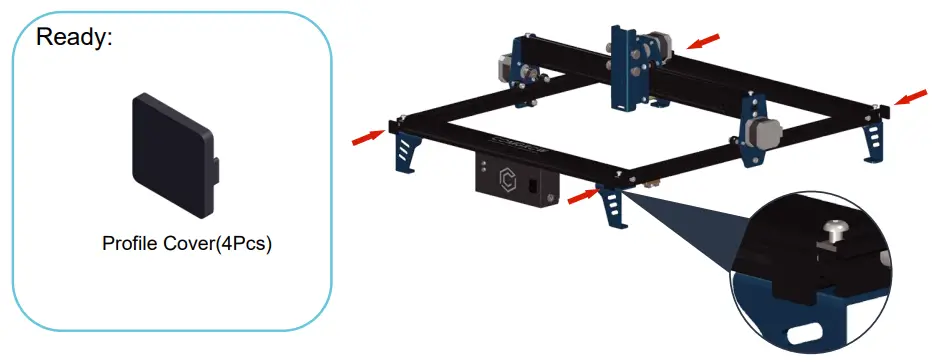
STEP6. Take out the 4 profile covers and install them on the profile end faces at the front and rear ends of the gantry.
Frame Assembly Pt.7
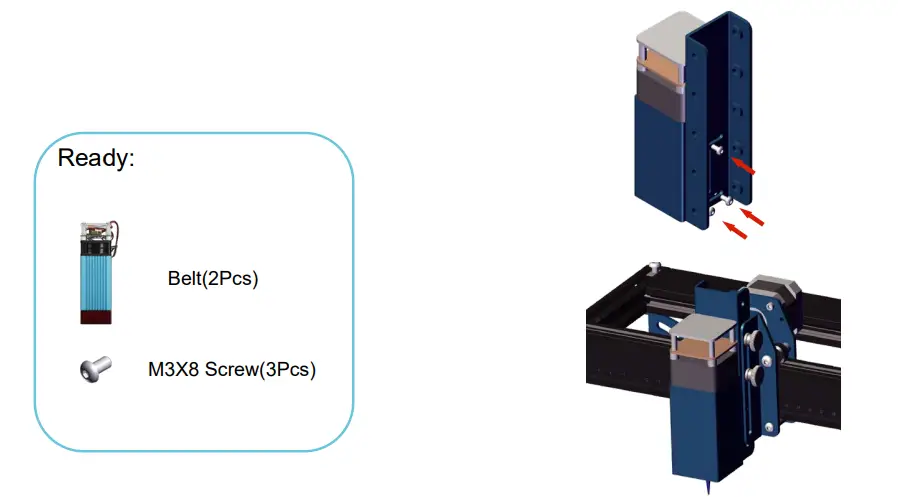
STEP7. Take out the laser module, remove the focus slider, use 3 M3*6 screws then fix the laser module to the focus slider and install the focus slider and laser module along the original path.
Frame Assembly Pt.8
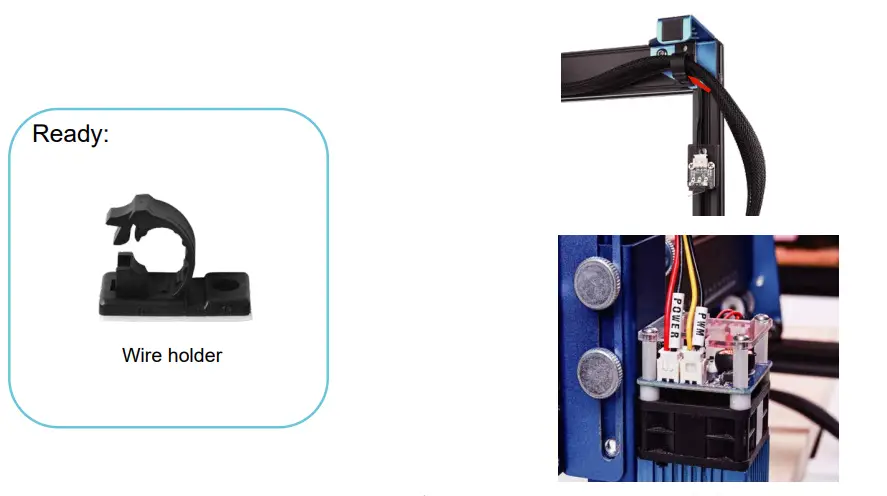
STEP8. Connect the cables of the laser module and the Y-axis limit switch, then attach the fixing mount to the right front support foot and fix the cables.
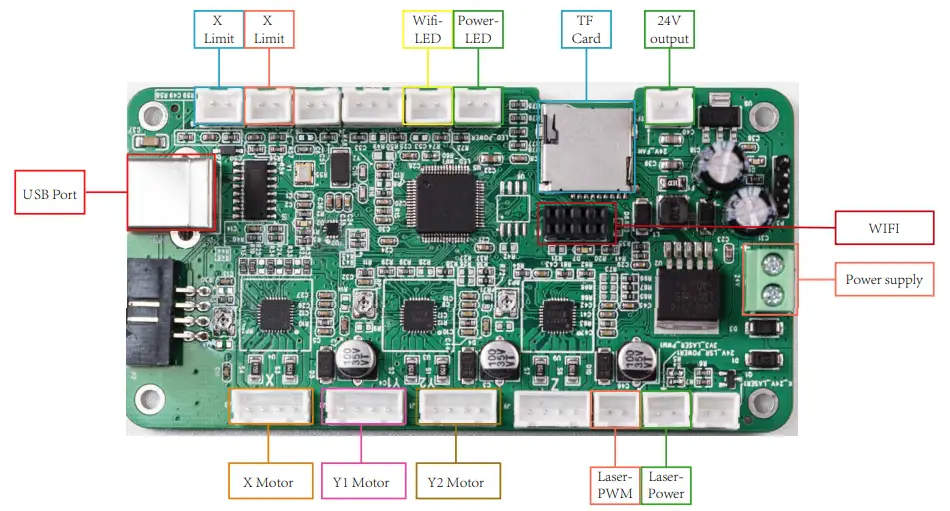
Board Module Diagram
Software Installation Guide
- COMGO Z1 Laser Engraver supports the most popular engraving software LaserGRBL.
- LaserGRBL is an open source, easy to use and powerful software, but LaserGRBL only supports Windows (Win XP/Win 7/ Win 8/XP/ Win 10).
- For Mac users, you can choose LightBurn, which is also an excellent engraving software, but this costs $40 (with a free one-month trial for the first installation) and this software also supports Windows systems.
- The COMGO Z1 Laser Engraver receives mobile commands from the computer in real time, and the engraver needs to stay connected to the computer and cannot close the engraving software (Laser or Light Burn) during the engraving process. In addition, the configuration of the computer can affect the speed and even the quality of the engraving. The following will focus on the installation and use of Laser software. light Burn will briefly explain the installation and configuration process.
1.Laser Grbl Tutorial(Window)
| 1.Click “install” to install the software. Note: Computer RAM needs to be 8GB or more. | 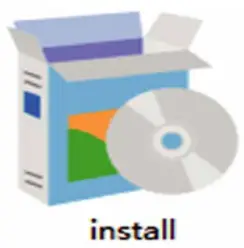 |
| 2.Click“Tools-Install CH340 Driver”. | 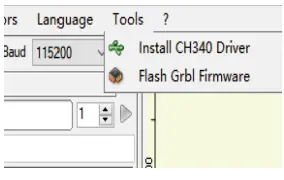 |
| 3.Link the USB cable and turn on the machine, then click“Connect“. | 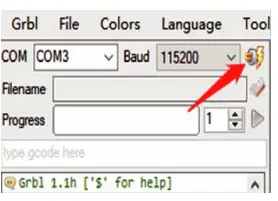 |
| 4.Click “Open File” to select the engraving file. | 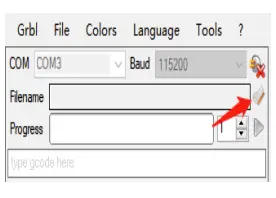 |
| 5.Select the engraving mode and click “Next”. (If you want to engrave grayscale images, we recommend you to select “LineTo Line” or “1bit BW Di thering” mode; if you want black and white images or cut, please select ” Vectorize” mode). | 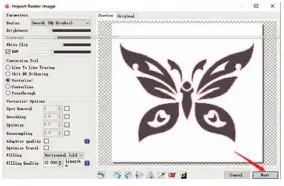 |
| 6.Select carving parameters (M3 for constant power carving,M4 for variable power). | 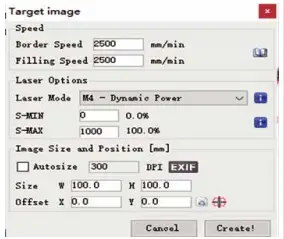 |
| 7.Click “Boundary” to preview the engraving area and adjust the position of the engraved object. |  |
| 8.Click “Run Program” to start engraving. |  |
2.LightBurn Tutorial(Window/Mac/Linux)
| 1.If you are using it for the first time, you need to perform steps 1-10 to set up the operation.Open the SD card, select “Driver Files”, and install the driver according to your computer system. | 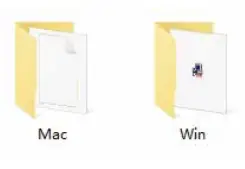 |
| 2.Select “GRBL”, then click”Next”. | 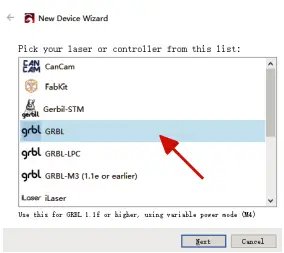 |
| 3.Select Serial/USB and press Next. | 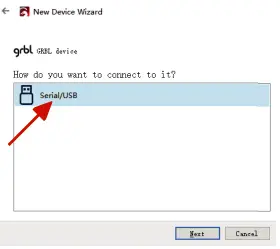 |
| 4.Add device name and engraving range. Name:COMGO Z1 Engraver X Axis Length:400mm Y Axis Length:400mm | 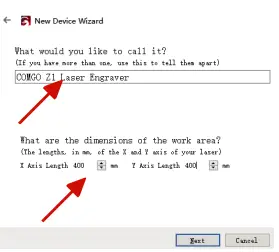 |
| 5.Select Front Left as your Origin X,Y and uncheck Auto “Home”, then press Next. | 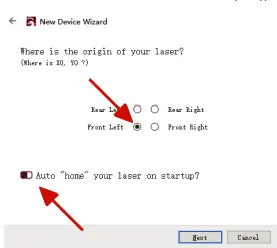 |
| 6.Click Finish. | 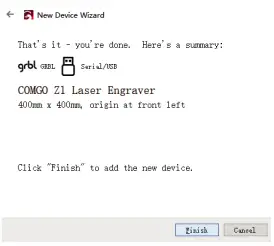 |
| 7.Select “COMGO Z1 Laser Engraver” and click “OK”. | 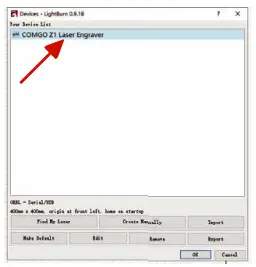 |
| 8.Click “Edit-Settings” in order to set the unit to “mm/min”. |  |
| 9.Click “Edit-Device Settings” and change “S-value-max” to “1000”. | 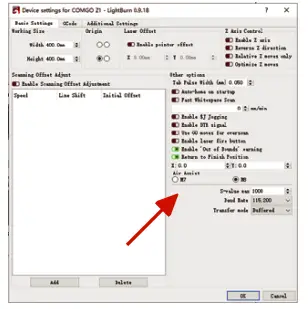 |
| 10.Select “Start From” as “Current Location” on the right, Machine Weight and then adjust “Job Origin” to the bottom left corner. | 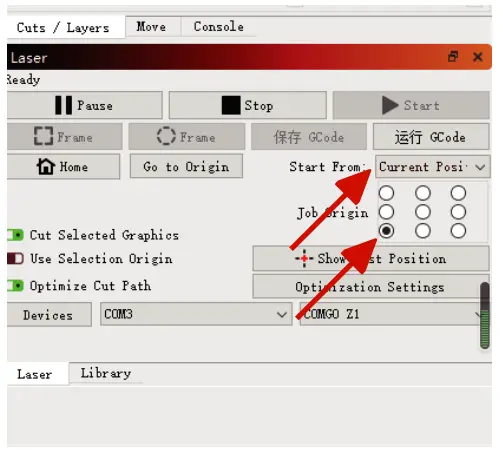 |
| 111.Click “File-Import” to import the engraving file. | 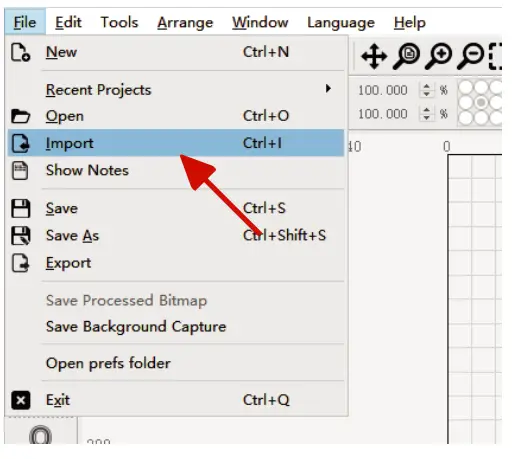 |
| 12.After importing the file, you can modify the engraving size on the top of the interface. | 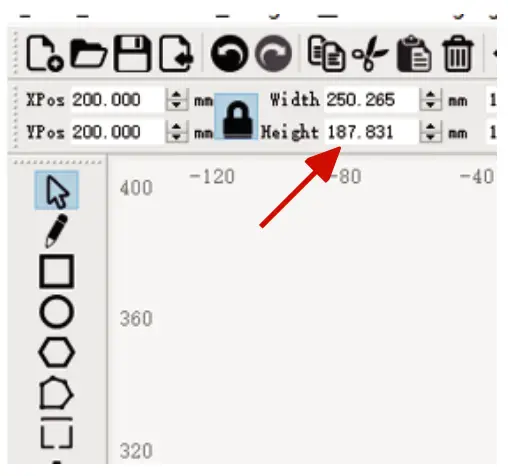 |
| 13.Double click the engraving parameters interface on the right side to set the engraving parameters and engraving mode. | 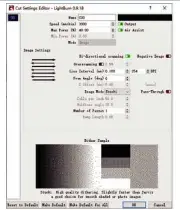 |
| 14.Click “Frame” to preview the engraving range, and click “Start” to start engraving after adjusting the engraving position. | 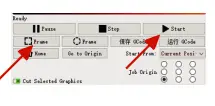 |
Explanation of common codes
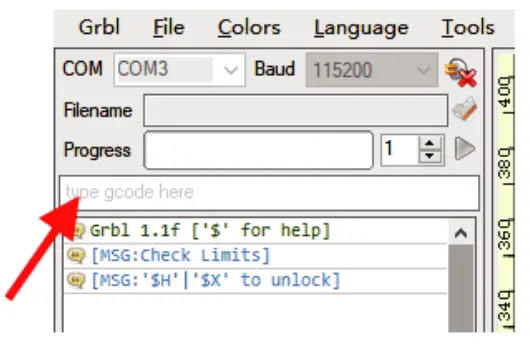
$33=1:Turn on the gyroscope
$33=0:close the gyroscope
$140:set the sensitivity of gyroscope, the sensitivity range is 1-16, when.140=1, the sensitivity is the
highest, when.140=16, the sensitivity is the lowest.
$E:Restore factory setting
Note: You can input the above command in the command field to set.
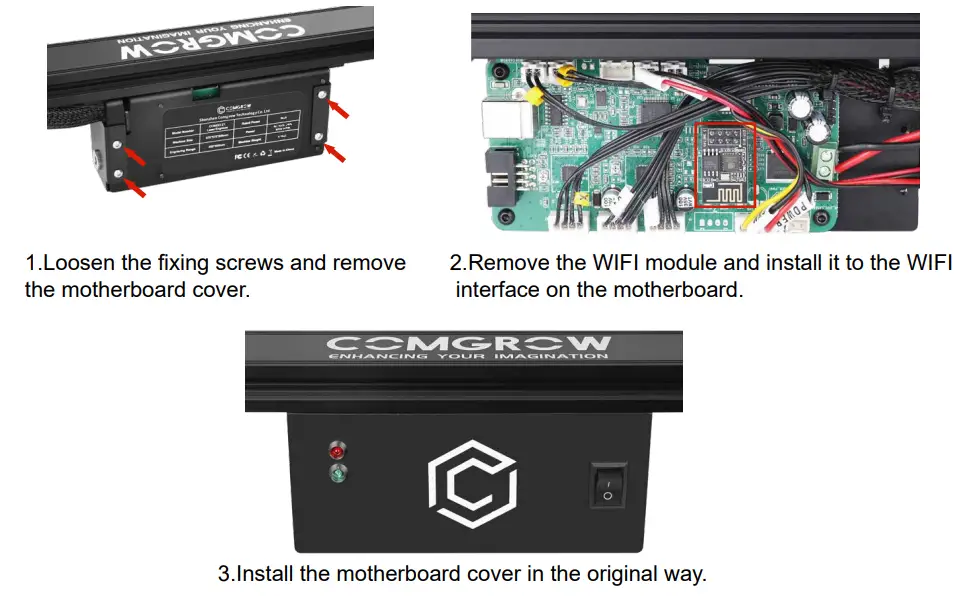
WIFI module installation
Tip: To watch the refresh firmware tutorial video, please visit SD Card.
APP Usage Instruction
Tip: For a more detailed App tutorial, please visit SD Card.
APP Installation
Android user
Android users can search for “Mini laser engraver” in Samsung App Market and Google Play or directly scan the QR code below to download.
 https://acc-huahui.oss-cn-shenzhen.aliyuncs.com/grave/LaserEngrave-V1.0.8_release_200713.apk
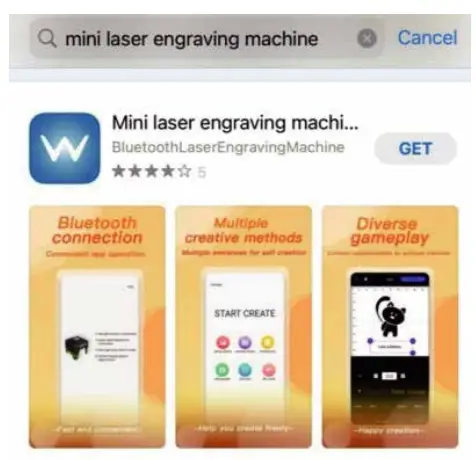
iPhone user
search for “Mini Laser Engraver” in App Store.
Connect the device
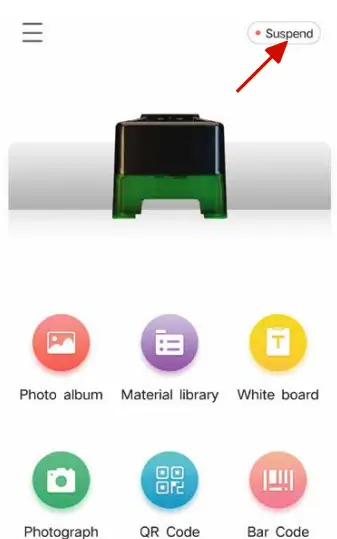
- Open the app, select “COMGO Z1 Engraver” and click on top right corner with a “Suspend” tag.
Note: Please open the positioning function of your phone when you use it!
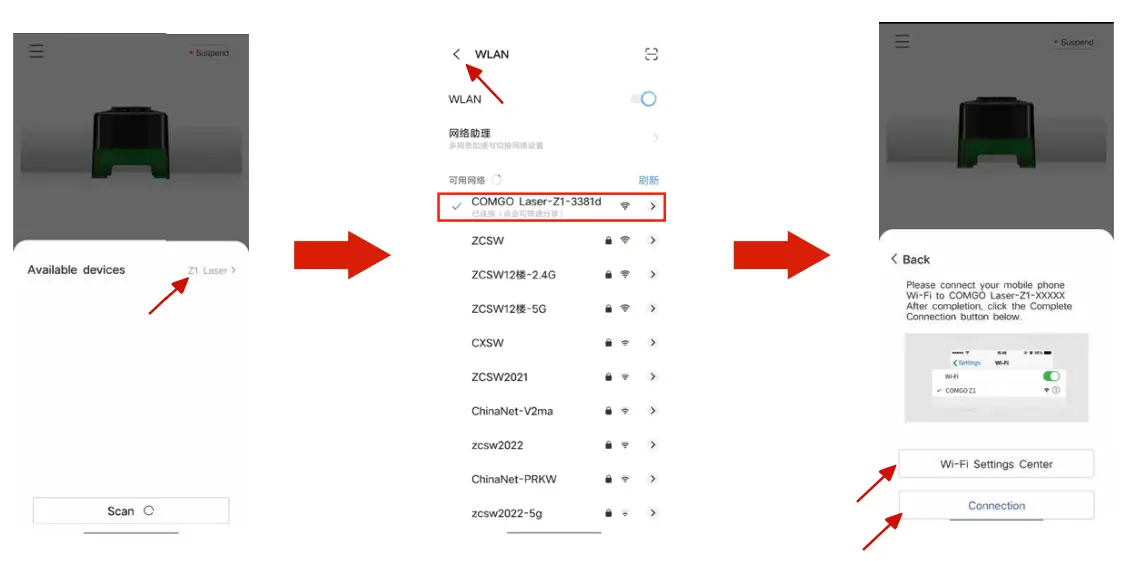
- Click Available devices on the popup screen and select the Wi-Fi Settings Center; then, connect to the network with the WIFI name prefix “COMGO Laser-Z1-xxxxx” and connect to it, then return to the previous level.
- Click on “Connection” to connect to the device.

Adjust the focal length
Turn the knob screws on both sides of the laser slider to adjust the height of the laser module so that the laser beam irradiates to the plane as a fine point.
Note:
1.6W laser module has a focal length of 30-100mm and needs to be focused by turning the lens at this focal length. The focal length of 5W laser module is 20mm. The focal length of 10W laser module is 45mm.
Interface Introduction
There are six engraving modules available in APP, namely: Photo album, Material library, White board, Photograph, QR Code and Bar Code.
Photo album: you can access the photo album through this module and select the pictures in the album for engraving
Material library: here will come with some random engraving and cutting images to choose from, the material images will be updated from time to time.
White board: you can input text for engraving through this module, you can change the text size and font.
Photograph: you can take pictures through the cell phone camera and then engrave them, note that the pixel of the pictures taken will affect the quality of engraving.
QR Code: you can input text to generate QR code for engraving, and you can scan it for recognize- tion after engraving.
Bar Code: can be engraved by entering the text to generate a bar code, which can be scanned and identified after engraving.
Engraving
The following is an example of the “Material library” carving operation.
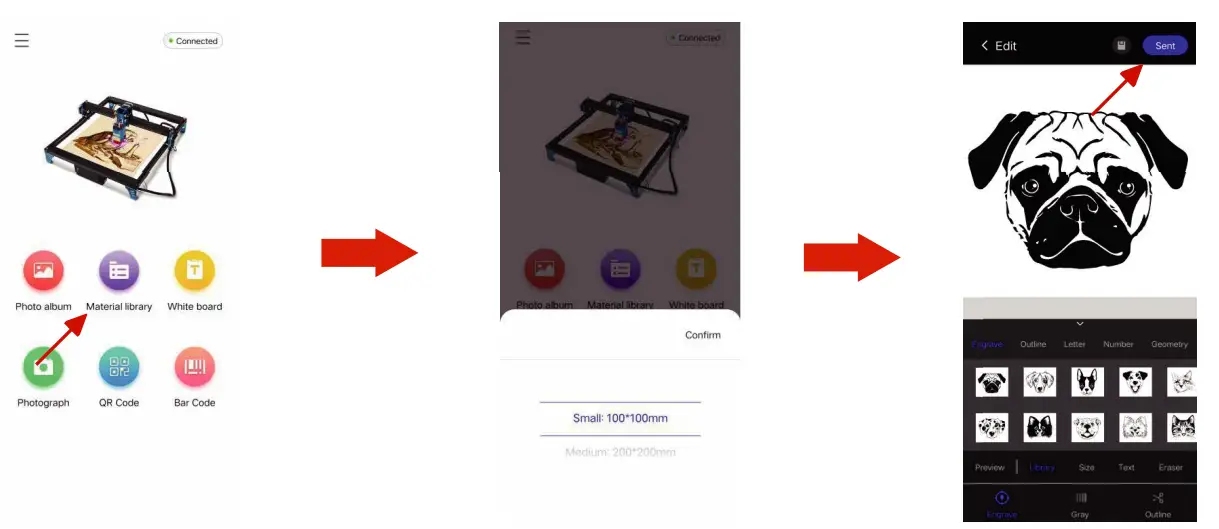
- Click into “Material library”.
- Select the engraving frame.
- Select the engraving material and engraving mode and click “Sent”.

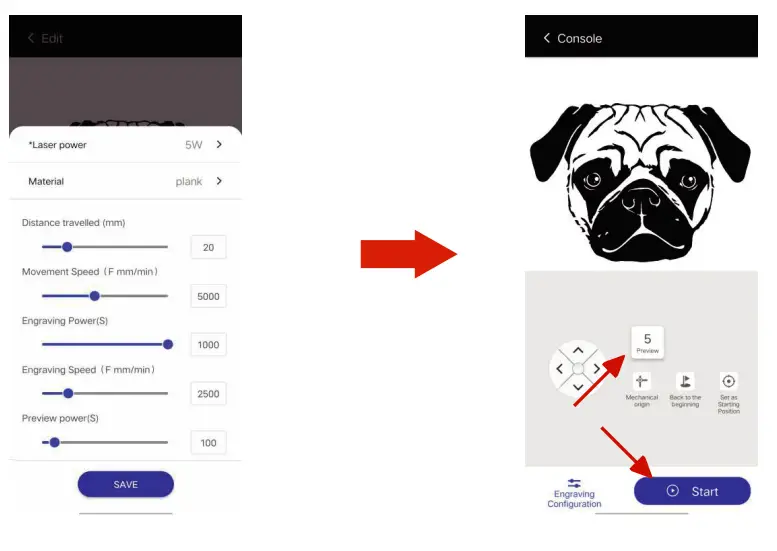
- Select “Laser Power” and “Material” according to the power of the machine, then click “SAVE”.
- Click “Preview” to preview the engraving range, and click “Start” to start engraving after the preview is completed.
Firmware Updates
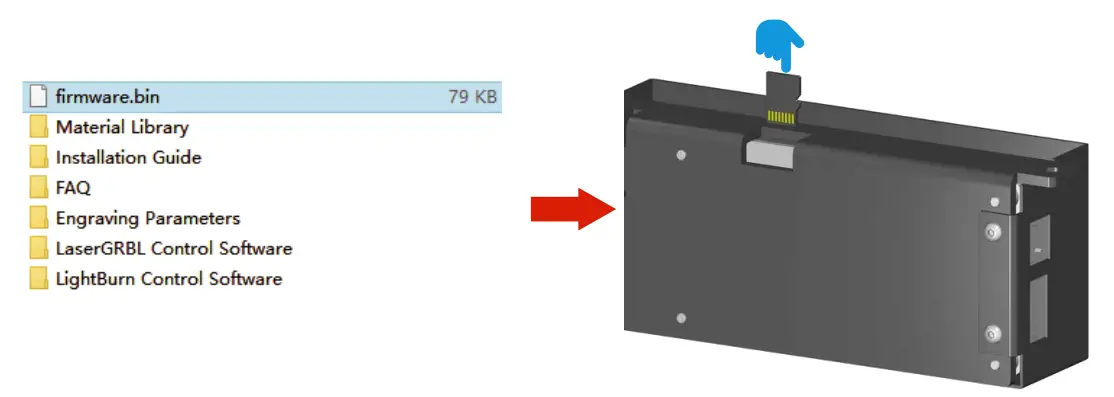
- Copy the firmware named “firmware” to the SD card.
- Turn off the power, insert the SD card into the motherboard card slot, and then power on the SD for about 20 seconds and then remove it.
Engraving Parameters
5W laser module engraving parameters | ||||
| Mode | Materials | Power(%3 | Speed(mm/min3 | NOTE |
| Engraving | Wood board | 100 | 2500 | |
| Bamboo | 100 | 2500 | ||
| Solid wood | 100 | 2500 | ||
| Leather | 100 | 2000 | ||
| Glass | 100 | 700 | Te surface teeds to be painted black or heat transfer paper aplied. | |
| Geramic | 100 | 700 | The surface needs to be heat transfer paper applied. | |
| Acrylic | 100 | 1500 | For transparent surface need to be painted black. | |
| Stainless steel | 100 | 300 | ||
| Anodized metal | 100 | 800 | ||
| Fabric | 40 | 5000 | ||
| Cutting | 2mm thick board | 100 | 180 | |
| 3mm thick board | 100 | 120 | ||
| 4mm thick board | 100 | 90 | Cutting thick boards can reduce the focal length appropriately. | |
| Cardboard | 100 | 1500 | ||
| Leather | 100 | 100 | ||
| Fabric | 100 | 1500 | ||
10W laser module engraving parameters | ||||
| Mode | Materials | Power(%3 | Speed(mm/min3 | NOTE |
| Engraving | Wood board | 100 | 5000 | |
| Bamboo | 100 | 5000 | ||
| Solid wood | 100 | 5000 | ||
| Leather | 100 | 4500 | ||
| Glass | 100 | 1200 | Te surface teeds to be painted black or heat transfer paper aplied. | |
| Geramic | 100 | 1200 | The surface needs to be heat transfer paper applied. | |
| Acrylic | 100 | 2500 | For transparent surface need to be painted black. | |
| Stainless steel | 100 | 600 | ||
| Anodized metal | 100 | 1500 | ||
| Fabric | 20 | 5000 | ||
| Cutting | 2mm thick board | 100 | 300 | |
| 3mm thick board | 100 | 250 | ||
| 4mm thick board | 100 | 200 | ||
| 7mm thick board | 100 | 90 | Cutting thick boards can reduce the focal length appropriately. | |
| Cardboard | 100 | 2500 | ||
| Leather | 100 | 2000 | ||
| Fabric | 100 | 2500 | ||
Troubleshooting
1.The machine moves normally, but the laser head does not light
- Check the main board and the laser module on the power and signal cable connection is loose.
- If the wire connection is correct, but still no light light. Please unplug the laser module wire,and adjust the laser brightness to “Max Brightness” in Laser GRBL, then measure the “POWER” and “PWM” voltage respectively. voltage. If there is voltage at both “POWER” and “PWM”, the laser module is the problem.
2.USB not recognized
- Check if the driver is already installed on the computer, if not, please click “Tools-InstaCH340 Driver” to install it.
- Please check if the baud rate setting on the software is correct. (Baud rate is 115200)
- Please try to replace the USB cable or computer.
- If the above methods do not solve your problem, please contact us.
3.Power on the device does not respond
- If the power indicator does not light up, please check if the power supply wiring is loose.
- If the power terminal is well wired, please measure the voltage at the output of the Powe adapter.
4.Alarm occurs during engraving and engraving stops.
- Check if any object (such as wire, etc.) touches the limit switch of the machine during the carving process.
- If the above reasons can be ruled out, please check whether the connection between the achine and the PC side is normal, you can replace the USB port of the computer to try.
- The machine gyroscope trigger phenomenon is “Laser GRBL” lower right corner of the “Cooling” prompt, the machine shipped gyroscope default sensitivity is “$140 = 8 “Please enter “$140=sensitivity” in the command bar to increase the sensitivity of the gyroscope.
Note: The gyro sensitivity range is 0-16, the smaller the number, the higher the sensitivity.
After Sales Service
![]() Comgrow official will provide you with a one-year warranty service, if you encounter any problems in the process of use, please contact Comgrow offi- cial or visit Comgrow official website for more product information. Comgrow
Comgrow official will provide you with a one-year warranty service, if you encounter any problems in the process of use, please contact Comgrow offi- cial or visit Comgrow official website for more product information. Comgrow
Amazon after-sale service: [email protected]
Comgorw Website after-sale service: [email protected]


