Ohsung Electronics B905A RF Remote Control Unit 

Mechanical Requirements
Design- Dimensions : 170.2 x 43.4 x 17.8mm
| BOTTOM CASE BATTERY COVER | MATERIAL | XG 569C |
| MATERIAL COLOR | BLACK | |
|
RUBBER BUTTON | MATERIAL | SILICONE |
| MATERIAL COLOR | BLACK | |
| PRINT COLOR | WHITE | |
| SURFACE TREATMENT | SILICONE COATING |
Address : #181 GONG DAN-DONG, GUMI, GYEONG BUK, KOREA
TEL : 82-54-468-7063 / FAX : 82-54-461-8368
http://www.ohsungec.com/
Batch Number
Adhesive label is attached at the inside part of the battery cover 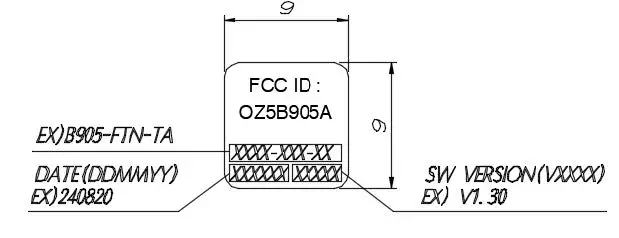
Slip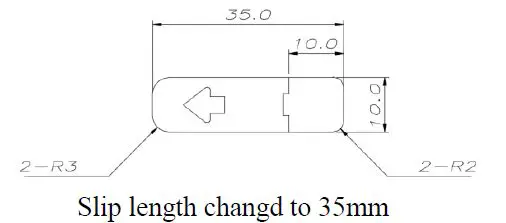
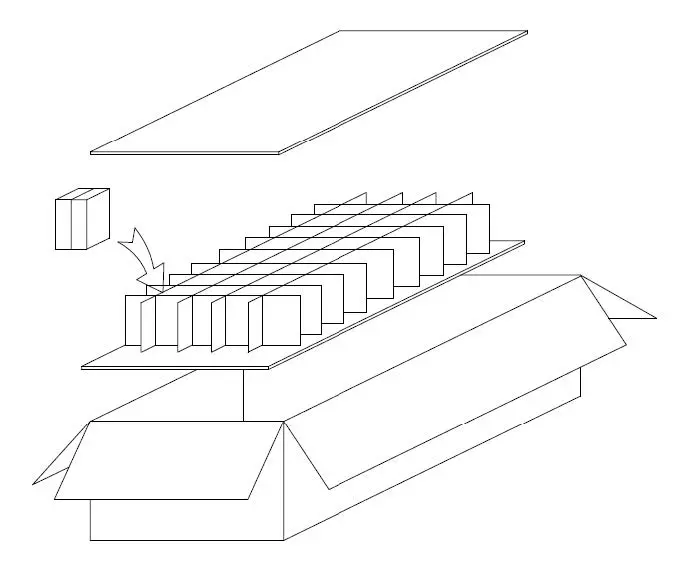
Packing
- Packing Process

- PE bag dimensions : 83 x 286 mm (LDPE 0.05t)
- Quantity Per Box: 140pcs
- Box dimensions : W 600 x D 400 x H 240 mm
Pallet definition
- Pallet dimension : W 1200 x D 800 x H 170 mm
- Full pallet dimension : W 1200 x D 800 x H 1850 mm
- Quantity per pallet : 3,920pcs (4 boxes / layer – 7 layers)
Electrical Requirements
Electrical Characteristic
| Parameter | Condition | Spec | Unit | |
| Frequency Range | Bluetooth Low Energy Specification | 2.402 ~ 2.480 | [GHz] | |
| Channel | 40 | [Num] | ||
| RF Power | 8 | [dBm] | ||
| Test channel |
TC-3000 (RF measuring instrument) | 19 | [Num] | |
| RF Power | PAvg | -20~+10 | [dBm] | |
| PMax | +8 | [dBm] | ||
| Pmin | -20 | [dBm] | ||
|
Modulation Characteristics | ∆f1 avg | 225~275 | [KHz] | |
| ∆f2 avg | ≥ 185 | [KHz] | ||
| ∆f2/∆f1 | 0.8 | |||
| ∆f2min | ≥ 92.5 | [KHz] | ||
| ∆f2rate | ≥ 99 | [%] | ||
| Carrier Frequency Offset and Drift | fTx-fn | ≤ 150 | [KHz] | |
| ∆f0-fn | ≤ 50 | [KHz] | ||
| f1-f0 | ≤ 20 | [KHz] | ||
| ∆fn-f(n-5) | ≤ 20 | [KHz] | ||
| Operating Voltage | RF (Bluetooth) | 2.2~3.6 | [V] | |
| LVI Voltage | Low Voltage Indicate | 2.1±0.1V | [V] | |
| Operating current (IR) | Power: 3V | ≤ 50 | [mA] | |
| Operating current (RF KEY) |
Power: 3V Non-directional distance | ≤ 10 | [mA] | |
| Operating current (RF+Voice) | ≤ 20 | [mA] | ||
| Leakage current | 10 | [㎂] | ||
| RF range (distance) | ≥10 | [m] | ||
| IR Range | Direct | ≥12 | [m] | |
| Horizontal | 7 (±15°) | [m] | ||
Software Requirements
Bluetooth 5.0 LE identification
- a) Device Name: FUNCTION101 RC
- b) Vendor ID: 0x0957
- c) Product ID: 0x1000
Pairing mode
- a) Before RCU paired or after Factory Reset, RCU works in IR.
- b) Press [OK] + [MUTE] keys for longer than 4 seconds.
- c) After 4 seconds, the LED turns ON so that to confirm the remote has entered into pairing mode.
- d) After RCU has entered pairing mode, RCU can send the IR signal.
- e) If pairing is successfully made, the LED blinking 2 times and goes OFF. The remote starts working in Bluetooth.
- f) If pairing is not successfully made for 60 seconds, the LED blinking 5 times quickly and goes OFF.
Re-pairing
- a) After RCU paired, Press [OK] + [MUTE] keys for longer than 4 seconds.
- b) After 4 seconds, RCU erases existing pairing table, and the LED turns ON so that to confirm the remote has entered into pairing mode.
- c) After that, it is the same as in Section 3.2
Un-pairing
- a) After RCU paired, Press [MUTE] + [STOP] keys for longer than 4 seconds.
- b) After 4 seconds, the LED blinking 2 times and goes OFF. RCU deleting the existing pairing table and works in IR.
Initial default set-up
- a) STB ——————- #0001 (Only Apple TV)
- b) TV & Soundbar ——————- #0505 (TV)
TV & Soundbar Key
- a) TV & Soundbar Key: Power, Vol+, Vol-, Mute
- b) This key acts as the key of the last configured device.
Number Call
- a) Press the [MENU] + [OK] key for more than 3 seconds to enter the set-up mode. Then the LED will turn on.
- b) If any key press is not followed for next 20 seconds, LED will be switched OFF and get out of set-up mode automatically.
- c) If [Rewind] key is pressed, LED will blink to indicate the set-up number of TV.
- d) If [Fast Forward] key is pressed, LED will blink to indicate the set-up number of Soundbar. If TV0851 is set up, 10 time blink _ Pause _ 8 tims blinks_ Pause_5 times blinks_Pause _ one times blinks. It should be counted correctly when LED blinks. (if the number is “0”, LED will blink 10 times)
- e) Then LED will be switched OFF and get out of set-up mode automatically.
TV Set-up
Brands Auto Search
– Auto search method for 16 brands. The following Brands Auto Search shall be supported:
| Number | Brand | Number | Brand | Number | Brand |
| 1 | Samsung | 7 | Brandt | 13 | Sanyo |
| 2 | LG | 8 | JVC | 14 | Pioneer |
| 3 | Sony | 9 | Sharp | 15 | Insignia |
| 4 | Philips | 10 | Thomson | 16 | Hisense |
| 5 | Panasonic | 11 | VIZIO | ||
| 6 | TCL | 12 | Toshiba |
- a) Press the [MENU] + [OK] key for more than 3 seconds to enter the set-up mode. Then the LED will turn on.
- b) If any key press is not followed for next 20 seconds, LED will be switched OFF and get out of set-up mode automatically.
- c) If an user presses [P+] key, the remote control will send [VOL+] code of next TV code on every [P+] key press.
- d) If an user presses and holds [P+] key, the remote control will send [VOL+] code of next TV code every 2 seconds.
- e) If the end of the DB is reached, the LED will blink 3 times.
- If the [P+]key is pressed and held, the remote control will repeat [VOL+] commands another cycle.
- f) In set-up mode, an user can test the [VOL+], [VOL-], and [Mute] keys.
- g) If OK key is pressed, the changed setting value is saved and the remote control will exit the set up mode. The remote control will blink the LED three times to let user know that the remote control was exiting set-up mode.
All Brands Auto Search
Auto search method for All Brands.
- a) Press the [MENU] + [OK] key for more than 3 seconds to enter the set-up mode. Then the LED will turn on.
- b) If any key press is not followed for next 20 seconds, LED will be switched OFF and get out of set-up mode automatically.
- c) If an user presses [P-] key, the remote control will send [VOL+] code of the next TV code set on every [P-] key press.
- d) If an user presses and holds [P-] key, the remote control will send [VOL+] code of the next TV code set every 2 seconds.
- e) If the end of the DB is reached, the LED will blink 3 times.
- If the [P-]key is pressed and held, the remote control will repeat [VOL+] commands another cycle.
- f) In set-up mode, user can test the [VOL+], [VOL-], and [Mute] keys.
- g) If OK key is pressed, the changed setting value is saved and the remote control exits the set up mode. Then the remote control will blink the LED three times to let user know that remote control was exiting set-up mode.
Soundbar Set-up
Brands Auto Search
– Auto search method for 17 brands. The following Brands Auto Search shall be supported:
| Number | Brand | Number | Brand | Number | Brand | Number | Brand |
| 1 | Logitech | 6 | Bose | 11 | Vizio | 16 | Nakamichi |
| 2 | Samsung | 7 | JBL | 12 | Pioneer | 17 | Polk Audio |
| 3 | LG | 8 | Harmann Kardon | 13 | Denon | ||
| 4 | Sony | 9 | Arcam | 14 | Onkyo | ||
| 5 | Philips | 10 | Jamo | 15 | Yamaha |
- a) Press the [MENU] + [OK] key for more than 3 seconds to enter the set-up mode. Then the LED will turn on.
- b) If any key press is not followed for next 20 seconds, LED will be switched OFF and get out of set-up mode automatically.
- c) If an user presses [UP] key, the remote control will send [VOL+] code of next Sound Bar code on every [UP] key press.
- d) If an user presses and holds [UP] key, the remote control will send [VOL+] code of next Soundbar code every 2 seconds.
- e) If the end of the DB is reached, the LED will blink 3 times. If the [UP]key is pressed and held, the remote control will repeat [VOL+] commands another cycle.
- f) In set-up mode, an user can test the [VOL+], [VOL-], and [Mute] keys.
- g) If OK key is pressed, the changed setting value is saved and the remote control will exit the set up mode. The remote control will blink the LED three times to let user know that the remote control was exiting set-up mode.
All Brands Auto Search
– Auto search method for All Brands.
- a) Press the [MENU] + [OK] key for more than 3 seconds to enter the set-up mode. Then the LED will turn on.
- b) If any key press is not followed for next 20 seconds, LED will be switched OFF and get out of set-up mode automatically.
- c) If an user presses [DOWN] key, the remote control will send [VOL+] code of the next Soundbar code set on every [DOWN] key press.
- d) If an user presses and holds [DOWN] key, the remote control will send [VOL+] code of the next Soundbar code set every 2 seconds.
- e) If the end of the DB is reached, the LED will blink 3 times.
If the [DOWN] key is pressed and held, the remote control will repeat [VOL+] commands another cycle. - f) In set-up mode, user can test the [VOL+], [VOL-], and [Mute] keys.
- g) If OK key is pressed, the changed setting value is saved and the remote control exits the set up mode. Then the remote control will blink the LED three times to let user know that remote control was exiting set-up mode.
Factory Reset
- a) Press [MENU] + [STOP] key for 3 seconds.
- b) The Factory reset will be initialized as LED blinks 5 times.
- c) Factory Reset initializes the TV settings.
- d) RCU deleting the existing pairing table and works in IR.
Low Voltage Indicate
- a) If the battery power reaches up to (2.0V±0.2V) and any key is pressed and released, LED will blink 10 times to indicate that the battery power is low.
IR Protocol (Apple IR Protocol)
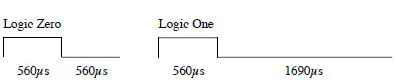
- a) This protocol uses the NEC Infrared remote control transmission format. Each packet in the NEC format contains up to 32 bits of binary data.
- b) IR Carrier
- Carrier frequency = 38 kHz.
- Recommended duty cycle = 0.3 or 30%
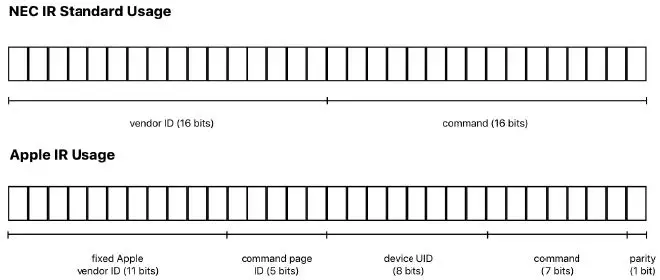
- c) Standard Packet

- Bit Configuration

- The following figure shows the 32 data bits in the NEC format and how they are partitioned in the Apple IR protocol. Each 16-bit data word is transmitted fully before the next word begins. Within each word, the least significant bit (LSB) is transmitted first.

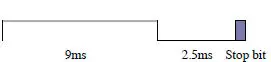
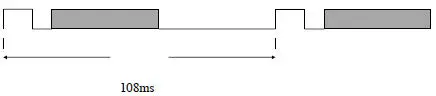
- d) Repeater Packet

- e) Frame Interval

Key codes
Key codes is detailed in Table 1
| KEY LABEL CHART | KEY NAME | FUNCTION | Command Page ID | Command | HID | |||
| Short Key ( < 2sec ) | Long Key ( > 2sec ) | Usage Page | Usage ID | |||||
 | K1 | Power | IR TV Code | N/A | N/A | |||
| K1 | Power | Apple TV | 0x5 | – | 0x15 | 0x0C | 0x0030 | |
| K2 | Menu | Apple TV | 0xE | 0x1 | 0x0C | 0x0046 | ||
| K3 | D-PAD Up | Apple TV | 0x5 | 0x1 | 0x0C | 0x0042 | ||
| K4 | D-PAD Left | Apple TV | 0x5 | 0x3 | 0x0C | 0x0044 | ||
| K5 | OK (Select) | Apple TV | 0x5 | 0x5 | 0x0C | 0x0041 | ||
| K6 | D-PAD Right | Apple TV | 0x5 | 0x4 | 0x0C | 0x0045 | ||
| K7 | D-PAD Down | Apple TV | 0x5 | 0x2 | 0x0C | 0x0043 | ||
| K8 | VOL + | IR TV Code | N/A | N/A | ||||
| K9 | VOL – | IR TV Code | N/A | N/A | ||||
| K10 | Mute | IR TV Code | N/A | N/A | ||||
| K11 | P + | Apple TV | 0x5 | 0x11 | TBD | TBD | ||
| K11 | P+ | Apple TV | 0x5 | 0x20 | TBD | TBD | ||
| K12 | P – | Apple TV | 0x5 | 0x12 | TBD | TBD | ||
| K12 | P- | Apple TV | 0x5 | 0x20* | TBD | TBD | ||
| K13 | Skip Back | Apple TV | 0x5 | 0x13 | 0x0C | 0x00C7 | ||
| K14 | Stop | Apple TV | 0x5 | 0x18 | 0x0C | 0x00B7 | ||
| K15 | Skip Ahead | Apple TV | 0x5 | 0x17 | 0x0C | 0x00C6 | ||
| K16 | Rewind | Apple TV | 0x5 | 0xE | 0x0C | 0x00B4 | ||
| K17 | Play/Pause | Apple TV | 0xE | 0x2F | 0x0C | 0x00CD | ||
| K18 | Fast Forward | Apple TV | 0x5 | 0xD | 0x0C | 0x00B3 | ||
Table 1: Code list
When [P-] Key is pressed more than 2 seconds, Remote send 0x20 Command 2 times.
Environmental Tests
Temperatures Conditions
- a) Operating Temperature: 0°C ~ +50°C
- b) Storage Temperature: -30°C ~ +60°C
Certification
Assesment of compliance of the product to the requirements relating to Electromagnetic Compatibility is based on the following standards:
- – FCC Part 15 subpart C 15.247
Federal Communication Commission
Interference Statement
This equipment has been tested and found to comply with the limits for a Class B digital device, pursuant to part 15 of the FCC Rules. These limits are designed to provide reasonable protection against harmful interference in a residential installation. This equipment generates, uses and can radiate radio frequency energy and, if not installed and used in accordance with the instructions, may cause harmful interference to radio communications. However, there is no guarantee that interference will not occur in a particular installation. If this equipment does cause harmful interference to radio or television reception, which can be determined by turning the equipment off and on, the user is encouraged to try to correct the interference by one more of the following measures:
- Reorient or relocate the receiving antenna.
- Increase the separation between the equipment and receiver.
- Connect the equipment into an outlet on a circuit different from that to which the receiver is connected.
- Consult the dealer or an experienced radio/TV technician for help.
Warning!
Changes or modifications not expressly approved by the manufacturer could void the user’s authority to operate the equipment.
Note: The manufacturer is not responsible for any Radio or TV interference caused by unauthorized modifications to operate the equipment.
FCC Caution
This device complies with Part 15 of the FCC Rules. Operation is subject to the following two conditions:
- This device may not cause harmful interference
- This device must accept any interference received, including interference that may cause undesired operation. Any changes or modifications not expressly approved by the party responsible for compliance could void the authority to operate equipment. The antenna(s) used for this transmitter must not be co-located or operating in conjunction with any other antenna or transmitter.
Federal Communication Commissions (FCC)
Radiation Exposure Statement
This equipment complies with FCC radiation exposure limits set forth for an uncontrolled environment. The device has been evaluated to meet general RF exposure requirements. The device can be used in portable exposure condition without restriction.
Appendix
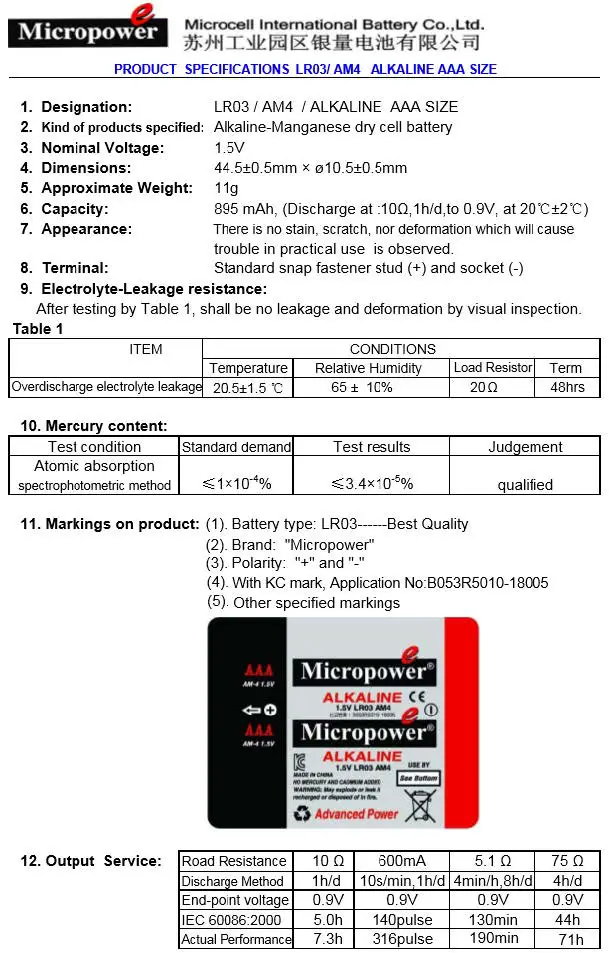
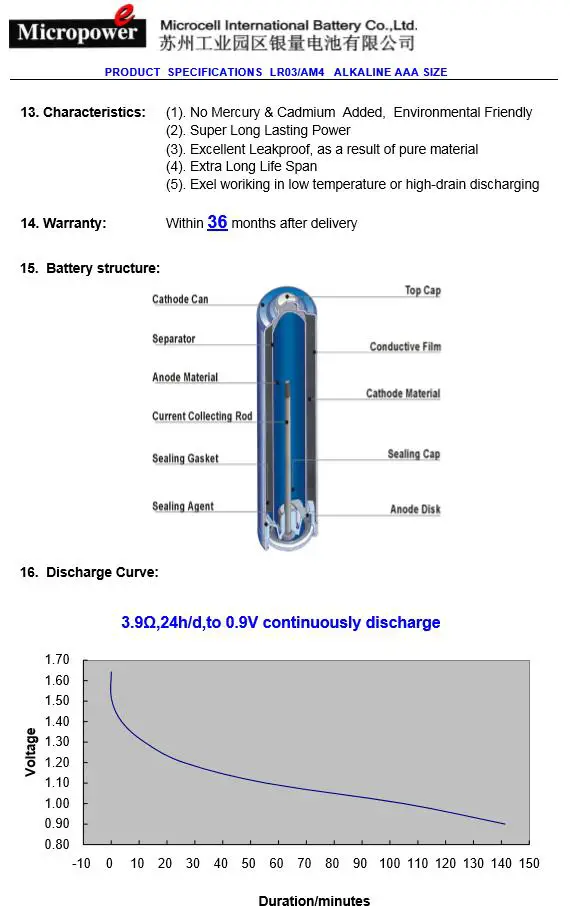
- Appendix 1: Batteries specifications
- Appendix 2: Brand List