
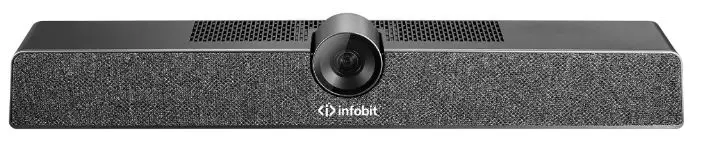
infobit iSpeaker M600 5.8G Wireless Cacading Speakerphones Kit
Speakerphone
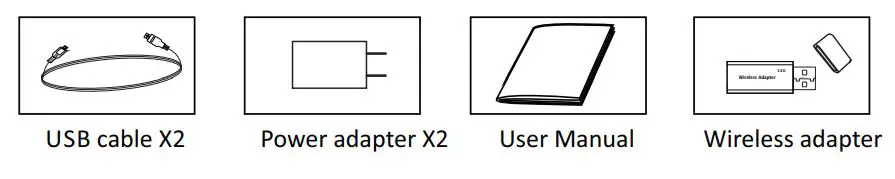
Part List
Optional Accessories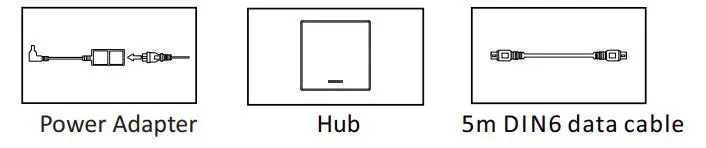
Interface and Display Instruction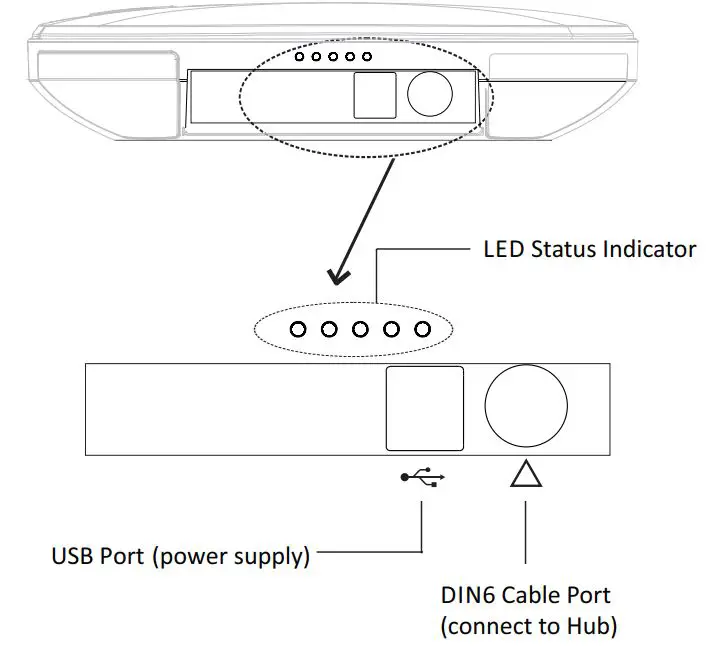
Hub (Optional)
- DIN6 Cable port
- USB port
- Power port
- Turn on/off
- Status Indicator
Introduction to Speakerphone
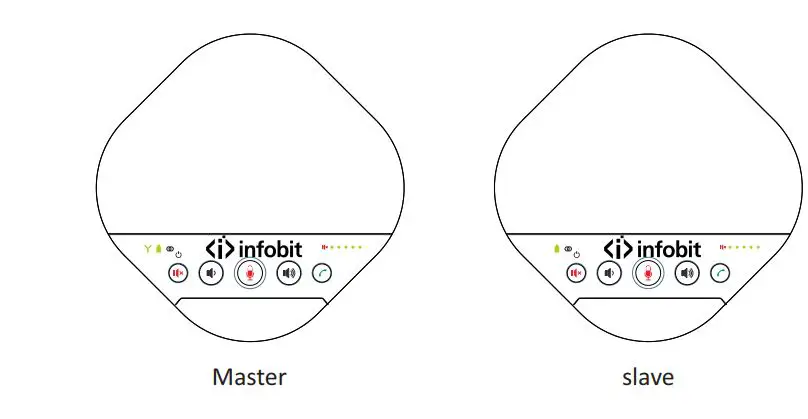
The Master Keypad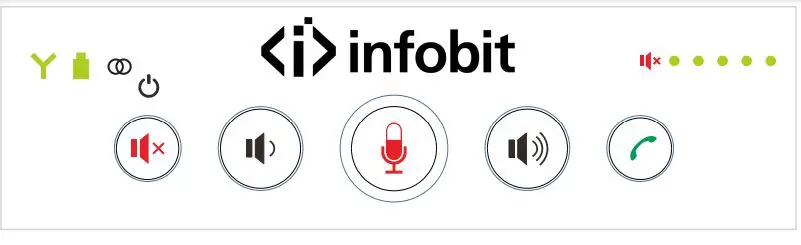
Master LED Status Indicator :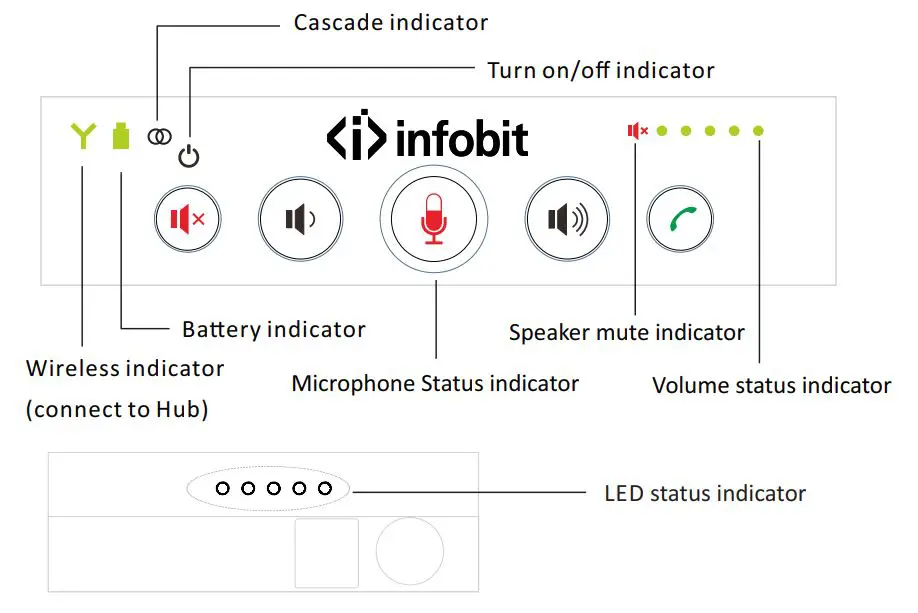
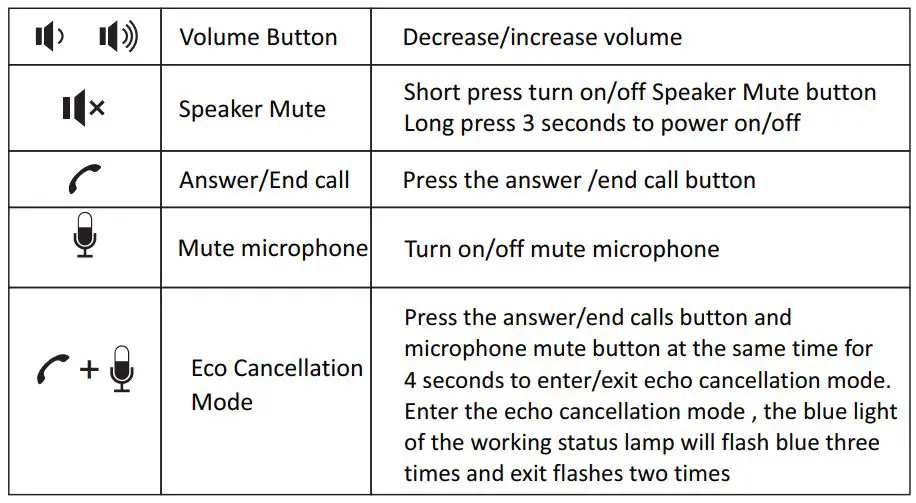
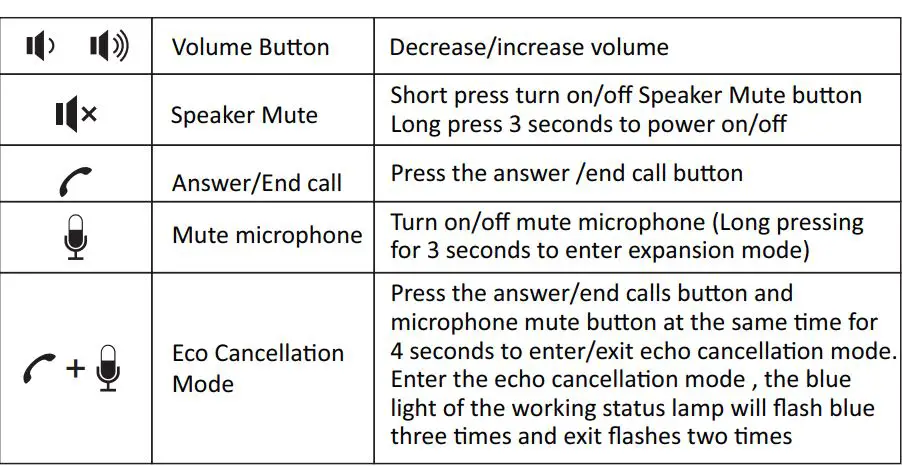
| Microphone status indicator | Red light on | Microphone mute status |
| Green light on | Exit Microphone mute status | |
| Speaker mute indicator | Red light on | Speaker mute status |
| Volume status indicator | Green light on | Current volume status |
|
Cascade indicator | Green light on | Cascade connection |
| Green light off | Cascade disconnection | |
| Red light on | In expansion mode. The cascade condition does not enter the dormant state (allowing cascading connection status) | |
| Red light flashing | In expansion mode. The cascade condition enter the dormant state. (not allow cascading connection status) |
| Wireless indicator | Green light always on | Wireless connection |
| Green light off | Wireless disconnection | |
|
Battery indicator | Green light off | Fully battery |
| Green light flashing | charging | |
| Red light on | Low battery | |
| LED Status indicator | Blue light on | USB connection |
| Red light on | Microphone mute status |
The Slave Keypad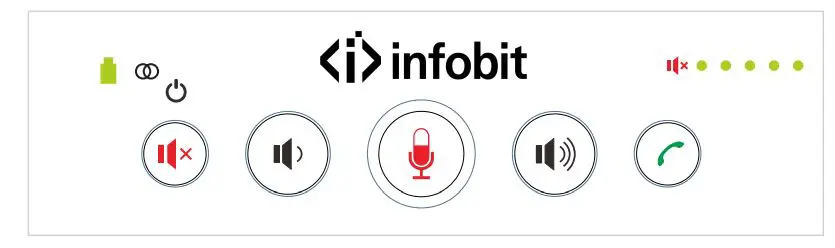
Slave LED Status Indicator :
| Microphone status indicator | Redlighton | Microphone mute status |
| Greenlighton | ExitMicrophone mute status | |
| Speaker mute indicator | Red light on | Speakermute status |
| Volumestatus indicator | Greenlighton | Currentvolumestatus |
|
Cascade indicator | Greenlighton | Cascadeconnect ion |
| Greenlightoff | Cascadedisconnect ion | |
| Redlighton | In expansion mode. The cascade condition does not enter the dormant state (allowing cascading connection status) | |
| Red light flashing | In expansion mode. The cascade condition enter the dormant state. (not allow cascading connection status) |
| Batteryindicator | Greenlightoff | Fullybattery |
| flashing Greenlight | charging | |
| Redlighton | Low battery | |
| LEDStatusindicator | Bluelighton | USBconnection |
| Redlighton | Microphone mute status |
How to Use Speakerphone
USB Connection Steps
- You can connect the power supply equipment with the original power adapter or connect one end of the USB cable to the USB port of the PC and video conference system, and connect the other end to the speakerphone.
- You can connect the speakerphone and Hub{optional) by using the original DIN6 data cable, connect one end of the USB cable to the USB port of the PC or video conference system and connect the other end to the USB socket of the Hub (optional),and connect the power supply equipment with the original power adapter;
- Turn on the power button after the connection was confirmed correct.And wait for the speakerphone self-check completed.
- It will take a few seconds to install the driver automatically for the first setup. Turn on the terminal . Third-party conference software, and select the microphone and speaker driver to start the audio and video conference with the device.
Battery charging instructions:
You can use DIN6 interface or USB interface of the speakerphone to charge. When the DIN6 interface and USB interface are used at the same time, the speakerphone is preferred to use DIN6 interface for charging.
Note: PC Common Reference Settings in USB Mode
- Please adjust the volume of horns and microphones comprehensively to ensure the communication is clear and smooth.
- Don’t turn on the speaker and microphone automatic gain.
- Give priority to turning off the audio processing functions of the PC software/video software (such as turning off automatic gain, echo cancellation, noise, reduction etc.)
- Please use those speeches coding that has a higher sound quality as far as possible.
Cascade
This series has advanced cascade technology, which can be cascaded very conveniently. When it comes to meeting the need for longer collection distances and larger meeting rooms, it can be achieved through double cascading units. A single unit is suitable for a conference room around 30 square meters, and supports within 15 attendees. When two units are cascaded, it can be applied to a conference room of 60 square meters. The double wireless cascade speakerphone adopts advanced 5.8G wireless technology with its own wireless USB dongle. It is convenient to wireless cabling and audio equipment arrangement. The wireless signal coverage can reach 25 meters.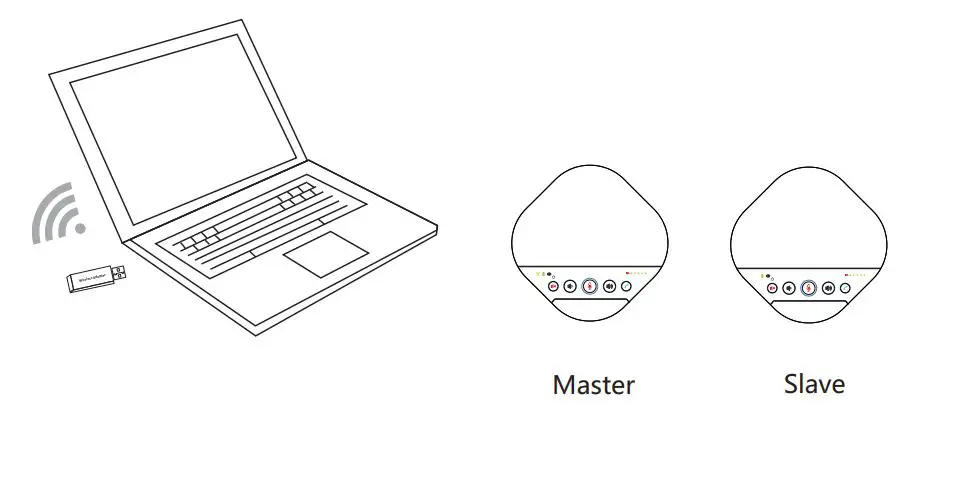
Wireless Cascade Connection Steps:
- Insert the wireless adapter to the USB port of the PC.
- Turn on the master, after 5 seconds, the “Y” wireless indicator keeps on green, indicating that the wireless connection is successful. Turn on the slave within 2 minutes after the master is turned on. Meanwhile, if the cascade indicator keeps the green light on, it’s successful on cascade connection. If there is no cascade connection within 2 minutes, the cascade will go into a dormant state.
- Wireless voice calls can now be made.
Note: If the device go into a dormant state and it needs to be manually awakened. Pressing the microphone mute button for 3 seconds enters the expansion mode to check the dormant status of the module.In the expansion mode, if the cascade indicator on the master is flashing red, it means that the cascade mode on the master is in the dormant state, and it can be awakened by pressing the Answer/end call button. After waking up, the cascade indicator will be steady red. If the cascade indicator on the slave flashes red, it means that the cascade mode on the slave unit is in the dormant state at this time. It can be woken up by pressing the speaker mute button. After waking up, the cascade indicator light will be steady red.
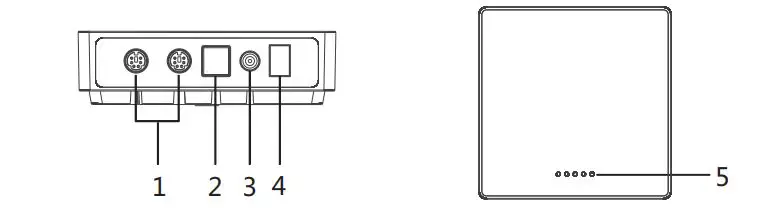
Installation and Use of Optional Hub
- Please use a hub when you need a longer connection and power supply
- Connect the speakerphone and Hubfoptional) by using the original DIN6 data cable.
- And connect the power supply equipment with the original power adapter;
- In the case of using the Hub,lf you need to use the USB interface, you have to connect one end of the USB cable to the USB port of the Hub and connect the other end to the USB port of the PC and video conference terminal.
- Connect one end of the power adapter to the DC12V IN interface of the Hub, and plug the other end into a 100-240v AC power port.
- Turn on the power button after the connection was confirmed correctly.And wait for the speakerphone self-check completed.
note: - When using a hub, do not connect one end of the USB cable to the speakerphone and the other end to a PC, video terminal equipment or power adapter directly to avoid errors.
Technical Specifications
| Model NO. | Speakerphone |
| Voice Technical Parameters | Acoustic Echo cancellation(AEC)>65dB Echo length cancellation:≥500ms Bidirectional noise compression(NC):<25dB Automatic Direction finding Technology of Intelligent microphone(EMI) Automatic gain control(AGC) |
| Audio Parameters | Microphone frequency response:100Hz-22KHz Speaker frequency response:100Hz-22KHz Speaker volume: 90dB at the most Microphone sound-pickup radius: 5 meters, 360 degrees full range |
| Dimensions | 180mm×180mm×42mm(L×W×H) |
| Model NO. | Hub (optional) |
| Interface | DIN6 ×2, Power interface×1; Power switch×1; USB Table B interface X 1 |
| Power Supply | Power Plug (DC12V) Adapter input AC100V-AC240V, output DC12V/2A |
| Connection Cable | DIN6 data cable×1, length: 5 meters |
| USB Cable | USB cable , Length: 3 meters |
| Compatibility | Support Windows, Android, iOS, Linux system Driver-free automatic recognition of cameras, microphones and speakers Compatible with Zoom, Lynch, Vidyo, Skype for business and etc |
| Dimensions | 113.6mm×113.6mm×32.6mm(L×W×H) |
Warranty
Warranty service is an important part in shopping. Please refer to the company’s website if the details and warranty period that not mentioned in the following contents.
The warranty
Customers who purchase this product can enjoy the repair services in defecve of materials and workmanship.By the way, the repair services excluded the terms listed below.
Warranty period
- The warranty period is one year from the date of sale. During the warranty period, the warranty will not be given in the following conditions.
- The product is not stored, used in a reasonable manner or as suggested by theuser’s manual that causes damage;
- Modify, change or use the product with any modified kits, components or accessories not sold by us.
- The product is not installed according to relevant instructions in the user’s manual.
- Ask others who are not authorized by us to repair the product.
- Use those equipment, components or systems that are not manufactured by us to connect with the product.
- The content of the warranty this warranty applies to the product and all standard accessories but does notinclude the paper items such as packaging and instructions.
- The procedures for obtaining warranty services
- If the customer purchases a product that requires a warranty, not only can thecustomer receive the warranty service by mailing the QMC but also they can sendthe customer’s purchase certificate (such as a copy of the sales invoice) to your QMdealer


