
BigBattery 48V Rhino Lithium Solar Panel Battery
Introduction
Introducing the RHINO! BigBattery’s 48V RHINO is a powerful, high-capacity wall-mountable battery, with a design that does not compromise. BigBattery was able to fit this high-performance unit in only 11.2 cm (4.4 in) of thickness, making it the thinnest wall-mounted battery in its class. This User Manual is designed to provide you with an understanding of the specs, features, capabilities, and installation of this 14 kilowatt-hour, 276 amp-hour battery. Please read and take note of all safety information prior to installing or operating your battery. This document applies only to the BigBattery 48V RHINO – FWRHN-48140-G1.
Features & Applications
BigBattery’s 48V RHINO battery (14 kWh, 276 Ah) is the ultimate solution for your solar systems, off-grid power systems, emergency power supply, and more. The RHINO comes equipped with an advanced BMS, and the newest cell technology, allowing it to operate safely within a wide temperature range, as well as charge quickly and store safely at temperatures as low as -20 °C (-4 °F). The 48V RHINO battery is guaranteed to last 5,000 – 8,000 Full Charge/Discharge Cycles. The battery utilizes an Anderson SB175 connection. The RHINO is engineered to accommodate two different methods for installation: both wall mounting and floor storage. The 48V RHINO features a compact, elegant design that affords you versatility, as well as space, which grants an easy connection to your larger power system. You can always monitor your battery’s health and performance with the LED interface located on the side of the unit, which will display BMS status codes alerting you to the condition of your battery. Equipped with the 48V RHINO from BigBattery, you will stay powered and prepared!
Product Specifications
Battery Specs
| Parameter | Specification | Unit |
| System Voltage | 48 | Volts |
| Max Charging Voltage | 58.8 | Volts |
| Capacity (Ah) | 276 | Amp-hours |
| Capacity (kWh) | 14 | Kilowatt-hours |
| Chemistry | Lithium Iron Phosphate, LFP | LiFePO4 |
| Voltage Range | 43 – 58.8 | Volts |
| Charging Current Limit (Continuous) | 175 | Amps |
| Discharging Current Limit (Continuous) | 175 | Amps |
| Normal Operating | -20 – 65 | °C |
| Temperature Range | (-4 – 149) | (°F) |
| Ideal Storage Temperature (Max. 6 mos.) (humidity < 90%) | 15 – 35 (59 – 95) | °C (°F) |
| Weight | 131.5 | kg |
| (290) | (lbs) | |
| Height | 67.8 | cm |
| (26.7) | (in) | |
| Width | 11.2 (4.4) | cm (in) |
| – | – | – |
| Width w/ Wall Mount | 14.4 (5.7) | cm (in) |
| Length | 110 | cm |
| (43.3) | (in) |
| Safety Features | BMS (Battery Management System), Over Voltage, Under Voltage, Over-Current Protection, Thermal Management System, 300A Breaker |
| Max Battery Connections | Series: Not series capable Parallel: Max. 8 connections |
BMS Specs
| Category | Function | Specification | Unit |
|
Charge Voltage Protection | Maximum Charger Voltage (CC-CV) | 58.8 | Volts |
| Overcharge Voltage Limit Cutoff Protection (each cell) | 3.8 | Volts | |
| Overcharge Voltage Limit Protection Delay Time | 2000 | mS | |
| Overcharge Protection Recovery Voltage | 3.45 | Volts | |
| Discharge Voltage Protection | Low Voltage Protection Limit | 2.5 – 2.7 | Volts |
| Low Voltage Protection Delay Time | 2000 | mS | |
| Low Voltage Protection Recovery | 2.9 | Volts | |
|
Overcurrent Protection | Charge Overcurrent Protection Value | 270 – 330 | Amps |
| Charge Overcurrent Delay | 30 | Sec. | |
| Charge Overcurrent Release Recovery Condition | Reconnection delayed 120 seconds | ||
| Scenario 1: Discharge Overcurrent Protection | 300 | Amps | |
| Discharge Overcurrent Protection Delay | 30 | Sec. | |
| Scenario 2 (Likely Short Circuit): Discharge Overcurrent Protection | 800 – 1200 | Amps | |
| Discharge Overcurrent Protection Delay | 600 – 1800 | mS | |
| Discharge Overcurrent Protection Recovery Condition | Reconnection delayed 32 seconds | ||
| Balance Function | Minimum Cell Voltage to Activate Cell Balancing | 3.35 | Volts |
| Voltage Difference to Activate Cell Balancing | 10 | mVolts | |
| Balancing Mode | Balance when charging | ||
| Balancing Current | 100 – 260 | µAmps | |
|
Temperature Protection | High-Temperature Protection Value when Charging | 65 (149) | °C (°F) |
| High-Temperature Protection Release Value when Charging | 55 (131) | °C (°F) | |
| Low-Temperature Protection Value when Charging | -22 (-7.6) | °C (°F) | |
| Low-Temperature Protection Release Value when Charging | -18 (-0.4) | °C (°F) | |
| High-Temperature Protection Value when Discharging | 75 (167) | °C (°F) | |
| High-Temperature Protection Release Value when Discharging | 65 (149) | °C (°F) | |
| Low-Temperature Protection Value when Discharging | -30 (-22) | °C (°F) | |
| Low-Temperature Protection Release Value when Discharging | -27 (-16.6) | °C (°F) | |
| Resistance | Resistance in the Discharge Circuit | 5 – 10 | mΩ |
| Self-Power Consumption | Operating Mode (relay closed) | 35 – 50 | µA |
| Sleep Mode | 0.5 | µA | |
| Sleep Conditions | No current, communication, or prolonged protection states | ||
| Time to Sleep Mode | 18 hours | ||
Warnings & Precautions
Lithium Iron Phosphate (LiFePO4) batteries are inherently safe chemistry. However, safety measures should always be taken. Please adhere to the instructions below for safe handling and operation.
Warnings
- Do not charge with a charge voltage above 58.8V.
- Do not charge nor discharge battery when the temperature is above 65 °C (149 °F).
- Do not install battery where it may contact conductive materials, water, seawater, strong oxidizers, and strong acids.
- Do not install the battery in a location exposed to direct sun, hot surfaces, or hot locations. Do not install batteries in a zero-clearance compartment. Overheating may result.
- Keep any flammable/combustible material that may be ignited by heat, sparks, flames, or any other heat source at a minimum distance of two feet away from the batteries.
- Disconnect batteries immediately if, during operation or charging, they emit an unusual smell, develop heat, or behave abnormally.
- Have a Class ABC or Class BC fire extinguisher on the premises.
Precautions
- Handle batteries and/or battery-powered devices cautiously to not damage the battery casing or connections.
- Do not charge the battery when the temperature is below -20 °C (-4 °F).
- Do not discharge battery when temperature is below -30 °C (-22 °F).
- Before storing battery for more than 6 months, charge the battery to 53V or above.
- For long-term storage, disconnect batteries from your power system.
- Always wear protective gear when handling batteries.
- Do not place any objects on top of batteries.
- Make sure all cable connections are properly tightened.
- Install and remove batteries using the handles provided.
Installation
Installation Safety Guidelines
WARNING: Before installing, make sure to review all safety guidelines, warnings, and precautions in Section 4.
- Inspect batteries upon receipt for any signs of damage before use.
- Use a wrench with a rubber-coated handle.
- Check to ensure that all cables are in good condition.
- When your battery has been charging and has come to maximum charge (up to 58.8V max.), your battery may experience a slight voltage drop either immediately or within the hour after unplugging.
- This is normal and should be no cause for concern.
Parts & Components
| General | |
|
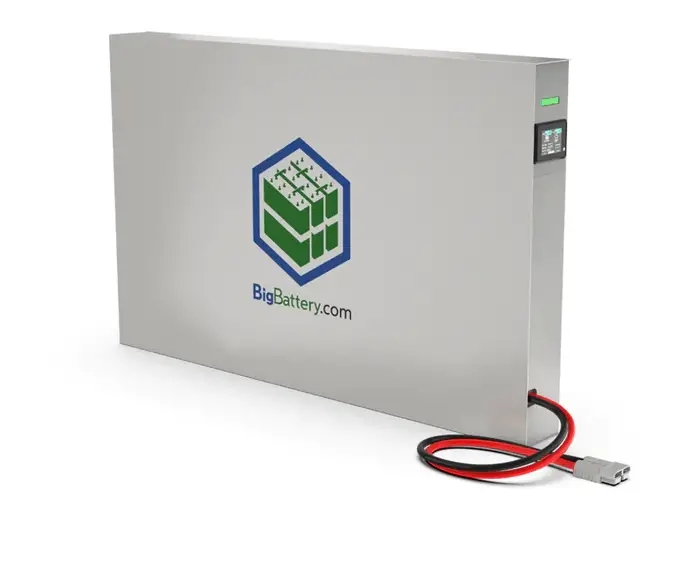
RHINO unit(s) (WR) 110 x 11.2 x 67.8 cm (43.3 x 4.4 x 26.7 in) |  |
| 1x Anderson SB175 to Ring Terminal Cable (SB) 101.6 cm (40 in) |  |
| 2x/4x Rope Handles (RH) 56.4 cm (22.2 in) |  |
| 4x Flat Top Screws (FS) 1.3 cm (0.5 in) | 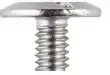 |
| Wall Mount Option | |
| 2x Mounting Cross Bars (A1 & A2) 90.9 cm (35.8 in) |  |
| 2x Spreader Bars (B1 & B2) 57.8 cm (22.75 in) |  |
| 6x Mounting Screws (brick/concrete) (MS1) 5.8 cm (2.3 in) | 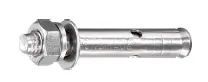
|
| 6x Mounting Screws (drywall) (MS2) 7 cm (2.75 in) | |
| Floor Stand Option | |
| 1x Floor Stand (FLS) 110 x 29.9 x 82.6 cm (43.3 x 11.75 x 32.5 in) |  |
| 2x Crossbar Plates (CP) 11 cm (4.33 in) |  |
| 4x Pan Screws (PS) 1.9 cm (0.75 in) | 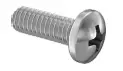 |
Wall Mount
Step 1
If installing onto wood-studded drywall:
- Choose the height you would like to install the battery and locate studs with a stud finder where you will mount the top cross bar (A1).
- Use a small drill bit to find the edges of the stud by drilling several small holes horizontally.
- Mark the center of the studs with a small vertical line.
- Make another set of marks denoting the center of the studs 55.3 cm (21.75 in) below your original markings. These will be for your second mounting bar (A2).
- Place and level the first crossbar (A1) to line up the holes in the first crossbar (A1) with the center stud marks.
- Level and fasten first mounting cross bar (A1) onto the wall where you will be installing your RHINO using the MS2 screws provided. This will be the top crossbar of your wall mount.
If installing onto brick or concrete wall:
- Choose the height you would like to install the battery.
- Place and level the top cross bar (A1).
- In each of the holes on the first crossbar (A1), mark the wall.
- Make another set of marks denoting the center of the studs 55.3 cm (21.75 in) below your original markings. These will be for your second mounting bar (A2).
- Drill holes into the wall over each marking, and place the anchor portion of each of your mounting screws (MS1) in each hole.
- Place the first crossbar (A1) so it lines up with your drilled and anchored holes.
- Level and fasten the first mounting cross bar (A1) onto the wall where you will be installing your RHINO using the MS1 screws provided, as seen in Figure 1. This will be the top crossbar of your wall mount.

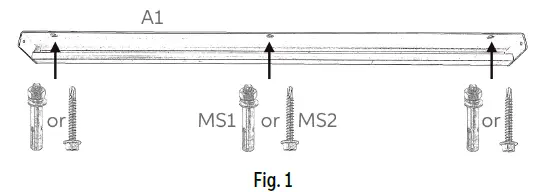
(Make sure to use the appropriate mounting screw – MS1 or MS2 – for the material you will be mounting to)
Step 2
If installing onto wood-studded drywall:
- Place and level the second mounting crossbar (A2) on the wall exactly 55.245 cm (21.75 in) (bottom of A1 to bottom of A2) below the top crossbar (A1). Use the spreader bars (B1 & B2) to determine the appropriate distance, as seen in Figure 2.
- Ensure the holes of the second mounting crossbar (A2) line up with the markings made in Step 1.
- Once a position is set, mount the second crossbar (A2) to the wall using the MS2 screws provided, as seen in Figure 1. This will be the bottom crossbar of your wall mount.
If installing onto brick or concrete wall:
- Drill holes into the wall over each marking made in Step 1, and place the anchor portion of each of your mounting screws (MS1) in each hole.
- Place and level the second mounting crossbar (A2) on the wall exactly 55.3 cm (21.75 in) (bottom of A1 to bottom of A2) below the top crossbar (A1). Use the spreader bars (B1 & B2) to determine the appropriate distance, as seen in Figure 2.
- Ensure the holes of the second mounting crossbar (A2) line up with the drilled and anchored holes.
- Once position is set, mount the second crossbar (A2) to the wall using the MS2 screws provided, as seen in Figure 1. This will be the bottom crossbar of your wall mount.

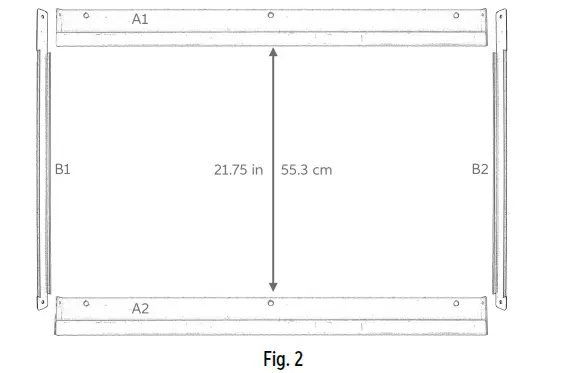
(Spreader bars – B1 & B2 – are not weight-bearing, and are intended for alignment purposes only)
Step 3
- Once both top and bottom mounting crossbars (A1 & A2) are secured to your wall, set your first spreader bar (B1) onto crossbars (A1 & A2). Assuming the crossbars (white) were installed with the appropriate distance between them, the spreader bar (B1) should set cleanly in place.
- Secure first spreader bar (B1) onto crossbars (A1 & A2) with pan screws (PS) provided, as seen in Figure 3.
- Repeat this process for your second spreader bar (B2).


(Image shows top of B2 and right side of A1)
Step 4
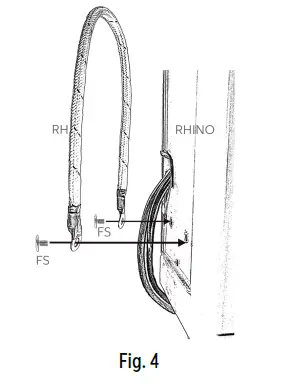
- Attach rope handles (RH) to sides of RHINO using the flat top screws (FS) provided, as seen in Figure 4.

Step 5
- Using rope handles (RH) and supporting the front of the unit with your hand, setRHINO onto mounting crossbars (A1 & A2), as seen in Figure 5. If crossbars are spaced appropriately and level, RHINO should set cleanly onto the crossbars (A1 & A2).

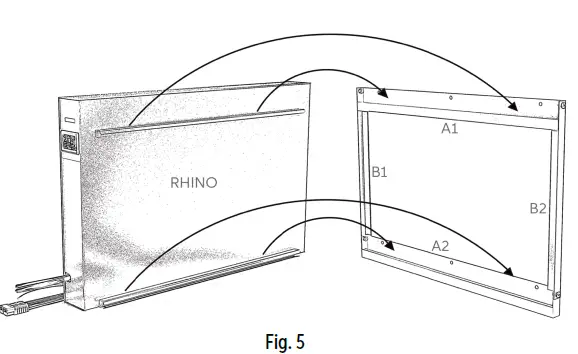
(NOTE: For safety, use at least 3 people when lifting and setting RHINO onto wall mount. 4+ people is recommended for maximum safety.)
Step 6
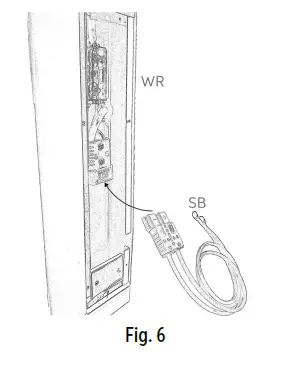
- Connect the Ring Terminals of your Anderson SB175 to Ring Terminal Cable (SB) to your power system.
- With the RHINO now mounted on your wall, remove the side panel of the RHINO.
- Connect Anderson SB175 end of Anderson SB175 to Ring Terminal Cable (SB) to Anderson SB175 cable inside of the RHINO, as seen in Figure 6.
- Reattach side panel of RHINO.

Floor Stand
WARNING: Before installing your RHINOs onto the floor stand (FLS), make sure the wheels are facing outward with the locking mechanism engaged. If wheels are rotated inward, regardless of whether the locking mechanism is engaged, there is a Greater risk of the floor stand (FLS) tipping over which could result in injury.
Step 1
- Attach rope handles (RH) to the sides of the first RHINO unit using the flat top screws (FS) provided, as seen in Figure 4.
Step 2
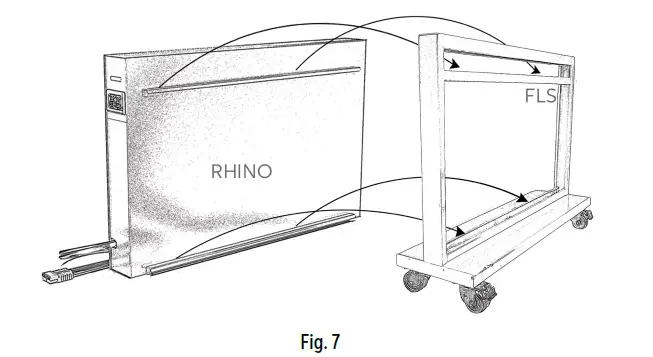
- Set first RHINO onto one side of floor stand. The RHINO should set cleanly into the cutout section of the white mounting bar on the inside the floor stand (FLS), as seen in Figure 7.

(NOTE: For safety, use at least 2 people when lifting and setting RHINO onto floor stand (FLS). 3+ people is recommended for maximum safety.)
Step 3
- Connect the Ring Terminals of your Anderson SB175 to Ring Terminal Cable (SB) to your power system.
- Remove side panel of RHINO.
- Connect Anderson SB175 end of Anderson SB175 to Ring Terminal Cable (SB) to Anderson SB175 cable inside of the RHINO, as seen in Figure 6.
- Reattach the side panel of RHINO.
Step 4
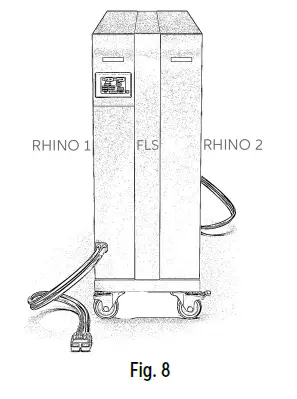
- Repeat Steps 1 – 3 with your second RHINO. When finished, your RHINOs and floor stand should resemble Figure 8.
Step 5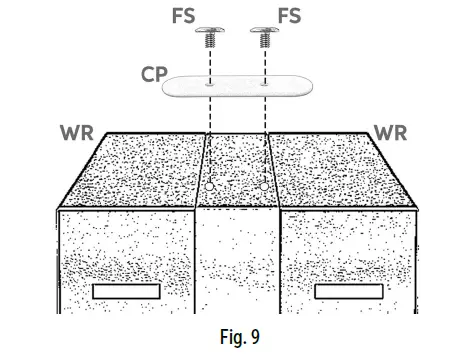
- Once both RHINOs are set into place, set crossbar plates (CP) onto corresponding screw holes on the top of the floor stand
- Secure to floor stand with the flat top screws (FS) provided, as seen in Figure 9.
- Once crossbars are secured, you may unlock wheels and move your RHINOs freely.
Battery Interface
Overview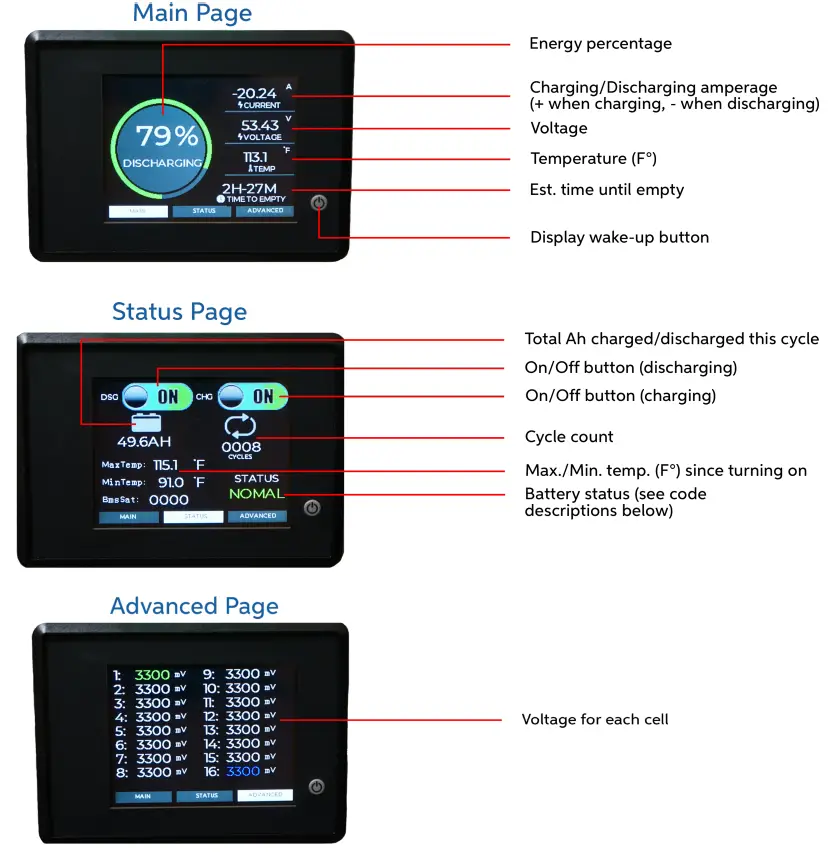
BMS Codes
| Symbol | Category | Description |
| OVP | Voltage Protection | Over-voltage protection by battery cell level |
| UVP | Voltage Protection | Under-voltage protection by battery cell level |
| POVP | Voltage Protection | Whole pack over-voltage protection |
| PUVP | Voltage Protection | The whole pack is under voltage protection |
| COCP | Temperature Protection | Over-temperature protection while charging |
| CUTP | Temperature Protection | Under temperature protection, while charging |
| DOCS | Temperature Protection | Over-temperature protection while discharging |
| DUTP | Temperature Protection | Under temperature protection, while discharging |
| COPY | Current Protection | Over-current protection while charging |
| SCP | Short Circuit | Short circuit protection |
| LOCK | Status | Lock status |
| NOMAL | Status | Normal status |
Warranty & Returns
In the unlikely event you are having an issue with one of our batteries we have developed a straightforward warranty & return policy which includes the following:
- For all returns or warranty claims contact [email protected].
- 30-day money-back guarantee. Returns of undamaged batteries unrelated to warranty claims may be issued full refunds less a 20% restocking fee.
- We have a 10-year warranty on all new batteries. For more information, visit the Policies page atBigBattery.com.
- We offer a 30-day warranty on all cells, accessories & complimentary products (Anderson connectors, wires, chargers, etc.).
- Warranty only applies to the original owner (non-transferable).
- Warranties can be used for an exchange of a component only once per component.
- Operating the battery outside of acceptable parameters, according to our listed battery specs,(ref. Section 3.1) will void your warranty.
- Example: Using an incorrect charger may exceed the max. charging voltage specifications.
- WARNING: Make sure to use the appropriate charger for your battery.
- Customer pays return shipping on returns or warrantied component inspections initiated after the first 30 days of ownership. Please note some battery returns may require special documentation and packaging, and these instances will encounter extra fees. This is to correctly comply with lithium battery shipping regulations.
- If you have a quality issue with a product, please contact our support team to help properly diagnose the problem. If the product you receive does not meet our rigorous quality standards, then we will issue you a replacement component or fix the original at no additional cost.
- Replacement batteries or components will only be sent after we have received your returned battery or component and finished an inspection to determine the cause of any problems.
- BigBattery is not responsible for return shipping.
- DIY modifications or damage due to gross negligence or abuse are not covered by the warranty.
For all returns, please mail your package in a traceable method to the address below. Include a note with your name, your order number and describing your situation and/or request.
BigBattery Inc.
- Technical Support Team
- 9667 Owensmouth Ave.
- Chatsworth, California 91311
For any questions and further assistance, call 1-818-280-3091.


