![]() THRESHOLD SEALS FITTING
THRESHOLD SEALS FITTING
INSTRUCTIONS MANUAL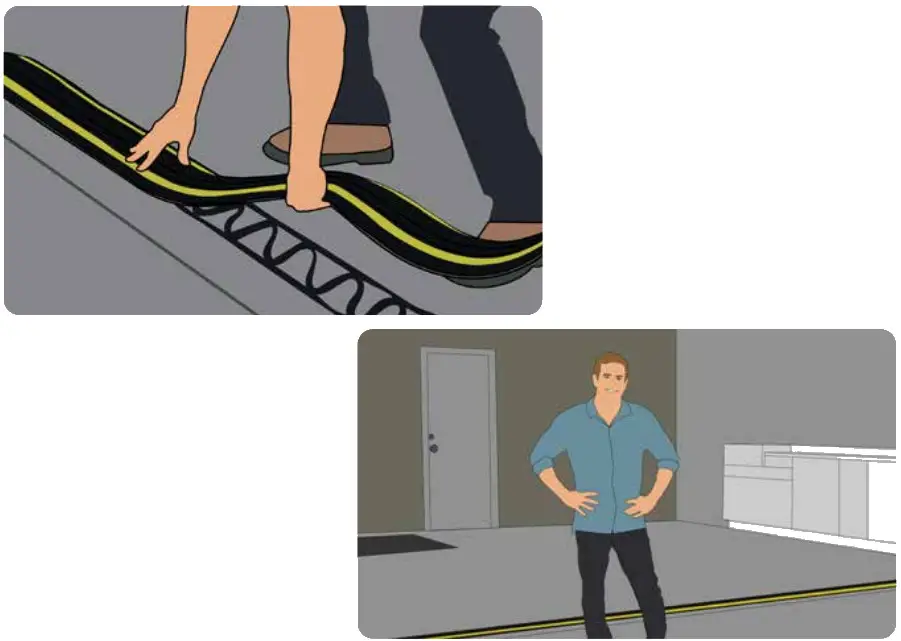
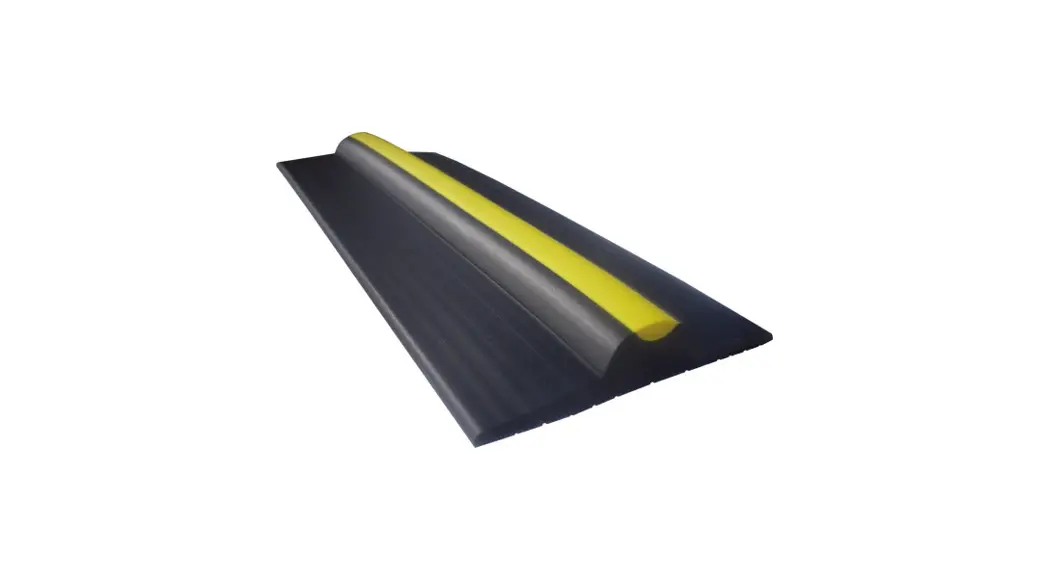
Door Flood Barrier Threshold Kit 1 1/2″ High
![]() [email protected]
[email protected]![]() www.garadry.com
www.garadry.com

TOOLS REQUIRED
| Tape measure | |
| Hacksaw or sharp utility knife | |
| Pencil or marker pen | |
| Straightedge or ruler | |
| Sealant/caulking gun (300ml/10oz or greater cartridge capacity) |
GaraDry threshold seals are suitable for use with the following types of manual and automatic garage doors: up-and-over, sectional, roller-shutter and side-hinged.
The threshold seal should only be installed by a responsible adult and due care and attention should be paid when stepping over the threshold seal.
This product is not suitable for use on loose concrete or gravel surfaces. Unsealed concrete floors that have a dusty or powdery surface must be sealed with a concrete sealer prior to installation.
The threshold can be installed on epoxy floors, but if the surface is very smooth it can prevent the adhesive from bonding properly. If your epoxy floor has a smooth or shiny surface, a low-grit sandpaper can be used to dull the surface slightly before installation. The same can be done for very smooth tiles. Remove any dust and debris left behind before proceeding to installation.
Due to coiling in transport, the threshold seal should be laid flat on a clean surface so that it returns to its original shape.
The adhesive / sealant should be stored at room temperature prior to application so it can flow freely from the tube. The recommended ambient temperature for applying the
adhesive is 5°C to 35°C (40°F to 95°F).
Once fitted allow 24 hours before driving over the threshold.
It is also recommended to test the installation after 24 hours using a bucket of water or a hosepipe to check for water ingress.![]() IMPORTANT
IMPORTANT
Please read through all instructions before beginning installation. Step 1 – Preparing the Installation Area
Clean the installation area to remove dust, debris, oil, and grease prior to fitting. If your floor is painted, use a wire brush to remove any loose paint and provide a sound surface for the adhesive to bond properly. Be sure to remove any dust or debris left behind after doing so.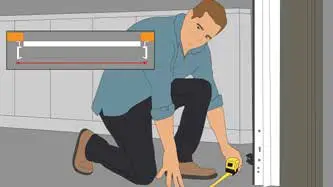 Step 2
Measure the overall width of the opening between frame or side tracks. Allow an additional 40mm (1 ½”) at each end for the threshold seal to be notched back around the door frame and cut the threshold seal to that required length. Step 3
With the door closed, position the threshold seal against the back of the door from inside the garage. Mark where the threshold seal needs to be notched back around the door frame/tracks so it can sit tight against the back of the door. Use a hacksaw or sharp utility knife to cut the threshold seal where you have marked.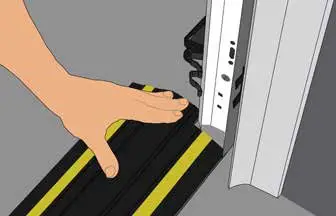 Step 4
With the garage door closed, place the threshold seal in position and push it up against the back of the door to create a tight seal. The garage door should close onto the front face of the seal (please ensure the garage door shuts correctly and locks with the seal in position – if it does not, then move the threshold back slightly and re-check. It is also advisable at this stage if you have an electrically operated door that the motor continues to operate normally).
If there is visible daylight, then the threshold seal may need to be cut back further around the door tracks to ensure a tight seal.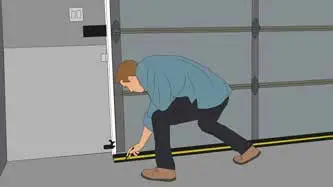 Step 5
With the threshold seal in position, mark along the back edge of the seal inside the garage with a pencil or marker. Step 6
Open the garage door and mark along the front edge of the seal. Remove the threshold seal from the floor and mark two parallel lines approx. 10mm (⅓ ”) inside the existing lines. Then mark an unbroken zigzag line inside the inner parallel lines.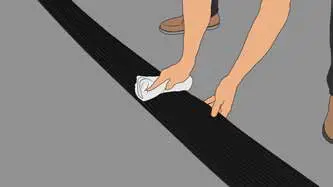 Step 7 – IMPORTANT
Use a clean, dry cloth to remove any dust, debris, oil, and grease from the bottom of the threshold seal. Sweep the floor thoroughly ensuring that it is clean and free from dust, debris, oil, and grease.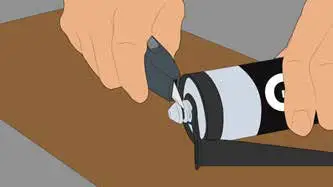 Step 8
Cut the end off the adhesive tube using a hacksaw or sharp utility knife
Important
The adhesive / sealant should be stored at room temperature prior to application so it can flow freely from the tube. The recommended ambient temperature for applying the adhesive is 5°C to 35°C (40°F to 95°F). Step 9
Use a hacksaw or sharp utility knife to cut the adhesive nozzle approx.
15mm (½”) from the tip before fitting the tube into the sealant gun.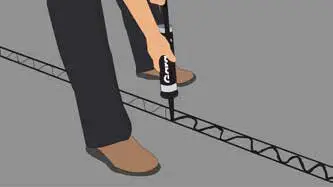 Step 10
Apply the adhesive to the floor in unbroken lines, following the inner parallel lines marked out in Step 6 (page 4). Apply an unbroken zigzag line of adhesive between the parallel lines, following the line marked previously.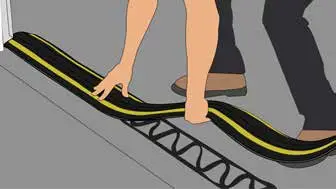 Step 11
Starting at one end, place the threshold seal in position on top of the adhesive and press down firmly. Continue along the length of the threshold seal, pressing down firmly and ensuring good contact in all areas. Take care to keep the threshold seal positioned correctly within the lines marked previously. Remove any excess adhesive from the sides with a clean cloth. Step 12
Apply adhesive around the door frame and ends of the threshold seal to ensure a watertight fit. Take care to check for any remaining gaps and apply more adhesive as required.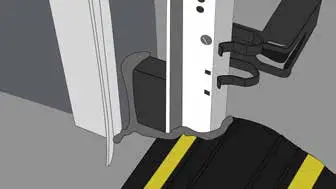 Step 13 – Optional
(For Sectional or roller garage doors with open side tracks)
For doors with open side tracks, GaraDry foam side blocks should be inserted into the space between the wall and the track to prevent water ingress.
- Measure the distance between the wall and the garage door track.
- Cut the side block to size using a hacksaw or sharp utility knife.
- Use plenty of adhesive to stick the side block in position on the floor and wall.
- Apply unbroken lines of adhesive around the side block where it meets the wall, door, and track.
- Check for any remaining gaps and apply more adhesive as required.
![]() IMPORTANT
IMPORTANT
Once installed allow 24 hours before driving over the threshold.It is also recommended to test theinstallation after 24 hours using a bucket of water or a hosepipe from outside to check for water ingress.![]() QUESTIONS?
QUESTIONS?
The GaraDry team is happy to help!
Call: 01704 532 360 (UK)
866-563-2707 (US)
Email: [email protected]
Web: www.garadry.com![]() Happy with your finished installation?
Happy with your finished installation?
Let us know!
We would love to know how your finished installation looks, please feel free to send some photos to: [email protected]
Product Care Guide
| Driving over the threshold seal | When driving across the threshold seal, ensure this is done at a slow speed. Excess speed can put large amounts of stress on the seal and cause damage. It is not a speed ramp! | |
| Heavy weights on the threshold seal | threshold seal Do not overload the threshold seal with excessive weight. The seals are designed for domestic vehicles. If you are unsure about which threshold seal will work with your vehicle, a weight guide is available on our website. | |
| Stepping over the threshold seal | Due care and attention should be taken when stepping over the threshold seal to avoid the risk of tripping. | |
| Avoid exposing the threshold seal to caustic chemicals, petroleum or detergents. This can cause discoloration and may cause the adhesive to fail. | ||
| To clean the threshold seal, simply use a damp cloth. Do not use abrasive cleaners or detergents. | ||
| Do not use a pressure washer to clean the threshold seal. This can damage the seal and adhesive, causing the watertight seal to fail. |
![]()
GaraDry (HQ) | GaraDry Australia Regus – Level 14 380 St Kilda Rd Melbourne Victoria, 3004 |
| GaraDry France Regus – Lyon Part-Dieu, Immeuble Danica B 21, Avenue Georges Pompidou 69486 Lyon CEDEX 03 | GaraDry United States Regus – 100 Hartsfield Center Parkway Suite 500 Atlanta Georgia 30354 |
| GaraDry Germany Regus – Subbelrather Strasse 15a 50823 Köln | GaraDry Italy Regus – Via Caldera, 21 Easypoint (Building F) 20153 Milano |