![]()
E5059
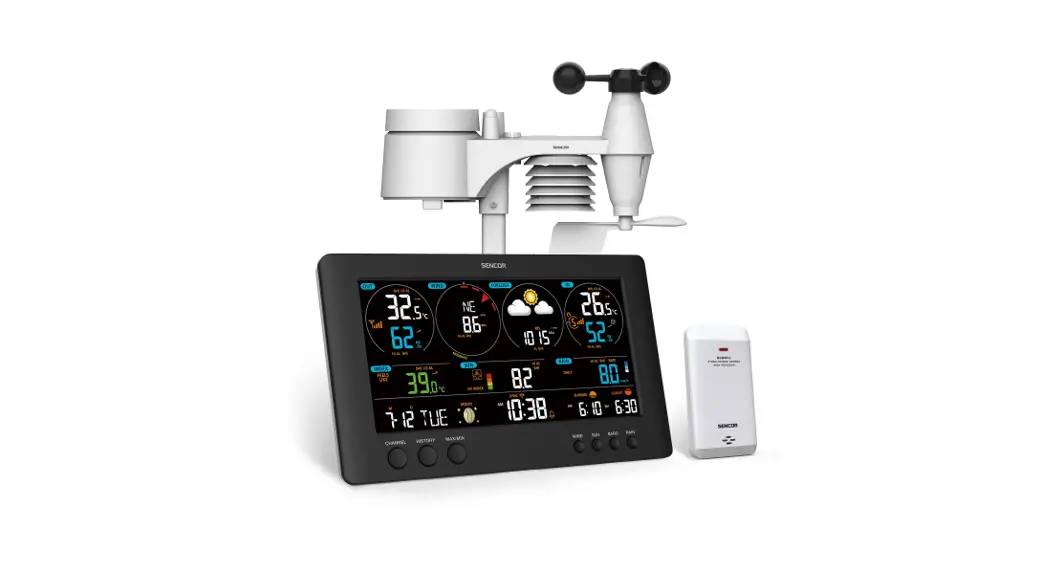
Wi-Fi Wireless Weather Station![]() www.emos.eu
www.emos.eu
E5059 Wi-Fi Wireless Weather Station
 |  |
 |  |
 |  |
| No. | Country/Cities | Abb. | No. | Country/Cities | |||
| 1 |
Australia | Sydney | SYD | 40 |
Germany | Koeln | K |
| 2 | Melboume | MEL | 41 | Kiel | KL | ||
| 3 | Hobart | HBA | 42 | Kassel | KS | ||
| 4 | Adelaide | ADL | 43 | Leipzig | L | ||
| 5 | Perth | PER | 44 | Muenchen | M | ||
| 6 | Darwin | DRW | 45 | Magdeburg | MD | ||
| 7 | Canberra | CBR | 46 | Nuernberg | N | ||
| 8 | Townsville | TSV | 47 | Regensburg | R | ||
| 9 | Alice Springs | ASP | 48 | Stuttgart | S | ||
| 10 | Caims | CNS | 49 | Saarbruecken | SB | ||
| 11 | Broome | BME | 50 | Schwerin | SN | ||
| 12 | Geralton | GER | 51 |
Danmark | Alborg | ALB | |
| 13 | Newcastle | NCL | 52 | Arhus | ARH | ||
| 14 | Rockhampton | ROK | 53 | Copenhagen | CPH | ||
| 15 | Mackay | MKY | 54 | Odense | ODE | ||
| 16 | Carnavon | CAR | 55 |
Spain | Alicante | ALI | |
| 17 | Esperance | EPR | 56 | Andorra | AND | ||
| 18 | Albany | ALB | 57 | Badajoz | BAD | ||
| 19 | Mt.Gambier | MGM | 58 | Barcelona | BAR | ||
| 20 | Warrnambool | WMB | 59 | Bilbao | BIL | ||
| 21 | Albury | AL | 60 | Cadiz | CAD | ||
| 22 | Brisbane | BRS | 61 | Cordoba | COR | ||
| 23 |
New Zealand | Auckland | AKL | 62 | lbiza | IBZ | |
| 24 | Wellington | WLG | 63 | La Coruna | LCO | ||
| 25 | Christchurch | CHC | 64 | Leon | LEO | ||
| 26 | Dunedin | DUD | 65 | Las Palmas | LPA | ||
| 27 |
Germany | Aachen | AC | 66 | Madrid | MAD | |
| 28 | Berlin | B | 67 | Malaga | MAL | ||
| 29 | Dusseldorf | D | 68 | Palma de Mallorca | LPM | ||
| 30 | Dresden | DD | 69 | Salamanca | SAL | ||
| 31 | Erfurt | EF | 70 | Sevilla | SEV | ||
| 32 | Frankfurt | F | 71 | Valencia | VAL | ||
| 33 | Flensburg | FL | 72 | Zaragoza | ZAR | ||
| 34 | Freiburg | FR | 73 |
French | Besancon | BES | |
| 35 | Hannover | H | 74 | Biarritz | BIA | ||
| 36 | Bremen | HB | 75 | Bordeaux | BOR | ||
| 37 | Hamburg | HH | 76 | Brest | BRE | ||
| 38 | Rostock | HRO | 77 | Cherbourg | CHE | ||
| 39 | Stralsund | HST | |||||
| No. | Country/Cities | Abb. | 116 |
ltaly | Palermo | PAL | |
| 78 |
French | Clermferrand | CMF | 117 | Parma | PAR | |
| 79 | Lyon | LYO | 118 | Perugia | PER | ||
| 80 | Marseille | MAR | 119 | Rome | ROM | ||
| 81 | Monaco | MCO | 120 | Torino | TOR | ||
| 82 | Metz | MET | 121 | Trieste | TRI | ||
| 83 | Nantes | NAN | 122 | Venezia | VEN | ||
| 84 | Nice | NIC | 123 | Verona | VER | ||
| 85 | Orleans | ORL | 124 | Ventimiglia | VTG | ||
| 86 | Paris | PAR | 125 | lreland | Dublin | DUB | |
| 87 | Perpignan | PER | 126 | Luxembourg | Luxemburg | LUX | |
| 88 | Lille | LIL | 127 | Norway | Bergen | BGN | |
| 89 | Rouen | ROU | 128 | Oslo | OSL | ||
| 90 | Strasbourg | STR | 129 | Stavanger | STA | ||
| 91 | Toulouse | TOU | 130 |
Netherlands | Amsterdam | AMS | |
| 92 | Finland | Helsinki | HEL | 131 | Arnheim | ARN | |
| 93 |
England | Aberdeen | ABD | 132 | Eindhoven | EIN | |
| 94 | Belfast | BEL | 133 | Enschede | ENS | ||
| 95 | Birmingham | BIR | 134 | Groningen | GRO | ||
| 96 | Bristol | BRI | 135 | Den haag | HAA | ||
| 97 | Edinburgh | EDH | 136 | Rotterdam | ROT | ||
| 98 | Glasgow | GLW | 137 |
Portugal | Evora | AVO | |
| 99 | London | LON | 138 | Coimbra | COI | ||
| 100 | Manchester | MAN | 139 | Faro | FAR | ||
| 101 | Plymouth | PLY | 140 | Leiria | LEI | ||
| 102 | Hungary | Budapest | BUD | 141 | Lisbon | LIS | |
| 103 | Croatia | Zagreb | ZAG | 142 | Porto | POR | |
| 104 |
ltaly | Ancona | ANC | 143 |
Poland | Gdansk | GDZ |
| 105 | Bari | BAl | 144 | Krakow | KKW | ||
| 106 | Bologna | BOL | 145 | Poznan | POZ | ||
| 107 | Cagliari | CAG | 146 | Szczecin | SCZ | ||
| 108 | Catania | CAT | 147 | Warsaw | WAW | ||
| 109 | Firenze | FIR | 148 | Russia | St Petersburg | PET | |
| 110 | Foggia | FOG | 149 | Sweden | Goteborg | GOT | |
| 111 | Genova | GEN | 150 | Malmo | MLO | ||
| 112 | Lecce | LEC | 151 | Stockholm | STO | ||
| 113 | Messina | MES | 152 | Slovakia | Bratislava | BRV | |
| 114 | Milano | MIL | 153 | Slovenia | Ljubljana | L JU | |
| 115 | Napoli | NAP | |||||
| No. | Country/Cities | Abb. | |
| 154 | Serbia | Beograd | BEO |
| 155 |
Austria | Graz | GRZ |
| 156 | lnnsbruck | INN | |
| 157 | Linz | LNZ | |
| 158 | Salzburg | SLZ | |
| 159 | Vienna | VIE | |
| 160 |
Belgium | Antwerp | ANT |
| 161 | Brugge | BRG | |
| 162 | Brussels | BRU | |
| 163 | Charleroi | CHA | |
| 164 | Liege | LIE | |
| 165 |
Switzerland | Basel | BAS |
| 166 | Bern | BER | |
| 167 | Chur | CHR | |
| 168 | Geneva | GNV | |
| 169 | Locarno | LOC | |
| 170 | Lucerne | LUC | |
| 171 | St Moritz | MOR | |
| 172 | St Gallen | SEL | |
| 173 | Sion | SIO | |
| 174 | Vaduz | VDZ | |
| 175 | Zurich | ZUR | |
| 176 | Czech | Prague | PRG |
 |  |
 |  |
 |  |
 |  |
 |  |
 |  |
 |  |
Wi-Fi Wireless Weather Station
Technical specifications: clock controlled by Wi-Fi signal
Time format: 12/24 h
Indoor temperature: -10 °C – +50 °C, 0.1 °C resolution
Outdoor temperature: -40 °C – +70 °C, 0.1 °C resolution
Temperature measurement accuracy: ±1 °C
Indoor and outdoor humidity: 1 % – 99 % RH, 1 % resolution
Humidity measurement accuracy: 3 % for 30 % to 80 % range, 5 % for other ranges
Temperature display unit: °C/°F
Barometric pressure measurement range: 850 hPa to 1 050 hPa
Unit of pressure: hPa/inHg/mmHg
Wind sensor measurement range: 0–215 km/h
Unit of wind speed: km/mph
Rainfall sensor measurement range: 0–999.9 mm
Unit of rainfall: mm/inch
Radio signal range: up to 50 m in an open space Unit interconnection: via 868 MHz radio signal, 25 mW e.r.p. max.
Connection of the main unit to the Wi-Fi network: 2.4 GHz, 25 mW e.i.r.p. max.
Station power supply: 3× 1.5 V AAA batteries (not included) 230 V AC /5 V DC, 1.2 A adapter (included)
Temperature/humidity/wind/rainfall/UV radiation sensor power supply: 1× 3.7 V 4,400 mAh Li-ion 21700T battery (included)
Station dimensions and weight: 30 × 215 × 173 mm; 545 g (without batteries)
Sensor dimensions and weight: 151 × 396 × 313 mm; 972 g (without batteries)
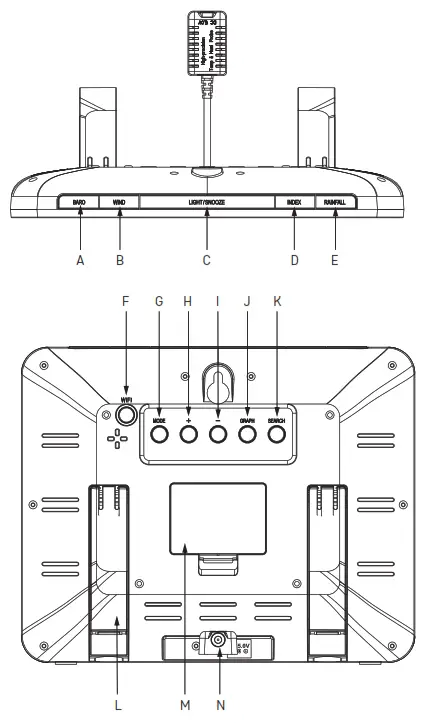
Weather Station – Description of Icons and Buttons (see Fig. 1):
| 1 – outdoor temperature 2 – outdoor temperature trend 3 – sensor batteries low 4 – max/min indoor temperature and humidity values 5 – max/min outdoor temperature and humidity values 6 – outdoor humidity trend 7 – indoor humidity trend 8 – weather forecast 9 – glaze ice 10 – moon phase 11 – wind direction: S – south, W – west, N – north, E – east 12 – wind speed 13 – UV index 14 – pressure history | 15 – data from rainfall sensor 16 – pressure value 17 – day of the week 18 – sunset time 19 – sunrise time 20 – month 21 – day 22 – synchronisation of Wi-Fi connection 23 – Wi-Fi reception 24 – alarm no. 1/no. 2 25 – time 26 – indoor humidity 27 – temperature alert/station batteries low 28 – indoor temperature 29 – indoor temperature trend 30 – comfort level indicator – smiley face 31 – Wi-Fi signal reception LED |
| A – BARO button B – WIND button C – LIGHT/SNOOZE button D – INDEX button E – RAINFALL button F – WIFI button G – MODE button | H – + button I – – button J – GRAPH button K – SEARCH button L – stand M – battery cover N – connector for power adapter |
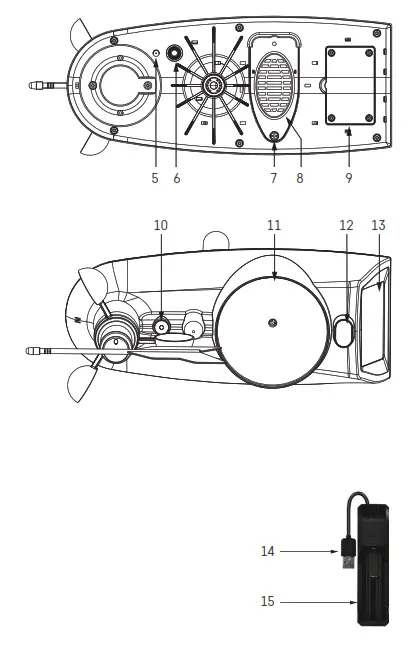
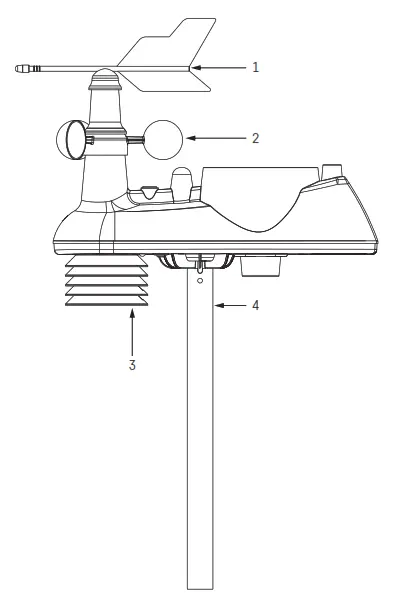
Description of the Multifunctional Sensor and Battery Charger (see Fig. 2)
| 1 – wind direction paddle 2 – wind sensor cups 3 – cover of the temperature and humidity sensor 4 – mounting rod 5 – LED indicator 6 – TX button 7 – rainfall cover screw 8 – rainfall cover | 9 – battery compartment cover 10 – water-level 11 – rainfall dish 12 – UV radiation sensor 13 – solar panel 14 – north indicator 15 – battery charger USB connector 16 – battery compartment |
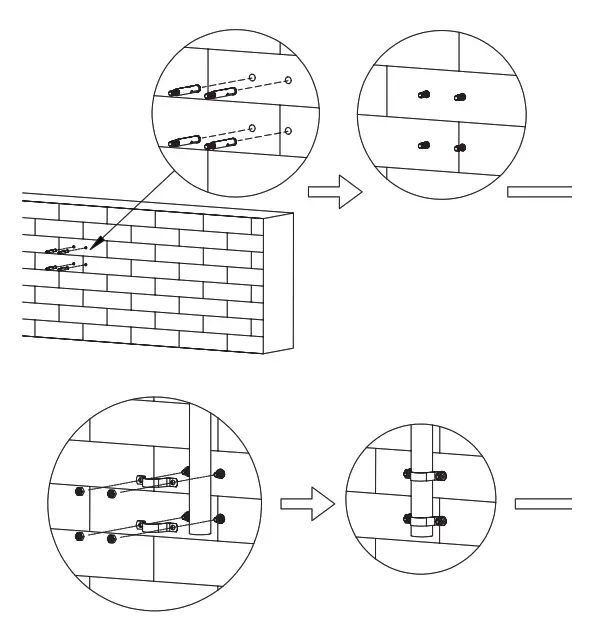
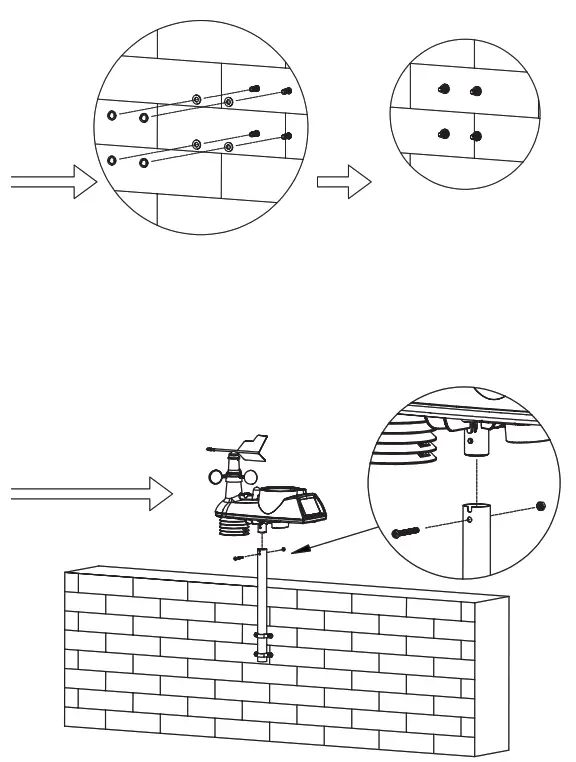
Mounting the Sensor onto a Wall (see Fig. 3)
List of Cities (see Fig. 4)
Getting Started/Installation
- Plug the power adapter into the station, then insert batteries first into the weather station (3× 1.5 V AAA) and then into the outdoor sensor. The battery compartment of the sensor is protected by screws; use a suitable screwdriver.
- When inserting the batteries, make sure to observe the correct polarity to avoid damaging the weather station or sensor. Only use alkaline batteries of the same type. Do not use rechargeable batteries in the weather station.
- Place the two units next to each other. The weather station will automatically start searching for sensor signals within 3 minutes. To speed up the pairing process, you can press the TX button on the sensor (a red LED will flash).
- If the signal from the sensors is not detected, long-press the SEARCH button on the weather station to repeat the search and press the TX button on the sensor.
- To ensure correct measurement, the sensor must be placed higher above the ground (at least 1.5 m) on a horizontal surface outside of buildings and structures. The sensor must be mounted firmly to prevent its damage. First screw the mounting rod onto a wall, then screw the sensor onto the rod according to the figure Mounting the Sensor onto a Wall. The wind must flow freely around the wind sensor from all sides. Check that the wind direction indicator and paddles for measuring wind speed can rotate freely. The north (N) indicator on the front of the sensor must be pointing north. Otherwise, wind direction will always be displayed incorrectly. When choosing a suitable place for mounting the sensor, check before installation that the main station is within range of the sensor. The range of the sensor may decrease substantially in areas with a large number of obstacles.
- Do not place the sensor onto metal objects; this would reduce its transmission range.
- If the low battery icon appears on the screen, replace the batteries in the weather station or recharge the battery in the sensor using the enclosed charger.
Recharging the Sensor Battery
- Place the battery from the sensor into the USB charger. When inserting the battery, make sure to observe the correct polarity to avoid damaging the battery.
- Plug the USB-A connector on the charger cable into an adapter (not included) or another device that will supply power to the charger. Make sure the adapter is plugged into a socket or the device receives sufficient power.
- If connected correctly, the charger will start recharging the battery.
- Charging is indicated by a red LED. Fully charging the battery takes approximately 10 hours.
- When the battery is fully charged, a green LED will light up.
Note: the sensor features an integrated solar panel that continuously recharges the battery. Charging speed is dependent on the intensity of sunlight – it serves only as supplementary charging. In the winter, it is recommended to always recharge the battery using the enclosed USB charger.
Wi-Fi Controlled Clock
The current time/date is loaded into the station automatically once it connects to a Wi-Fi network.
The ![]() icon will be displayed.
icon will be displayed.
Time will be updated automatically every day at 19:00/20:00/21:00.
Long-pressing the WIFI button activates a manual search for a Wi-Fi network.
Short-pressing the WIFI button afterward cancels the search.
Connection is indicated by an LED in the bottom right:
- LED not lit up – no Wi-Fi connection.
- LED flashing red – automatic/manual Wi-Fi search.
- LED lit up in red – Wi-Fi connected.
- LED lit up in blue – Wi-Fi connected to the cloud.
Always have the station connected to a power source when receiving a Wi-Fi signal.
For more info, see the Mobile Application section.
Mobile Application (see Fig. 5)
The weather station can be controlled using a mobile application for iOS or Android.
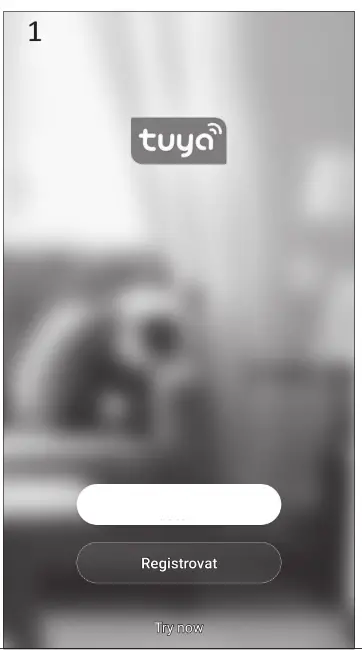
Download the “Tuya Smart” application to your device.
Android  | 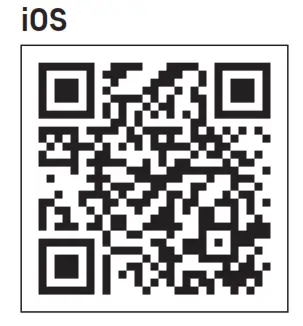 |
| https://play.google.com/store/apps/details?id=com.tuya.smart&hl=cs&gl=US | https://apps.apple.com/us/app/tuyasmart/id1034649547 |
Signing Up in the Application
- Connect your device to the Wi-Fi network. Sign up in the application or enter your login if you are already using the app, see Fig. 5-1.
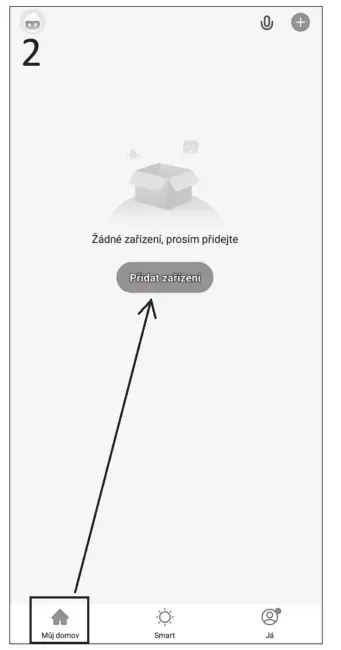
- Log into the application, tap the My Home icon and Add Device, see Fig. 5-2.
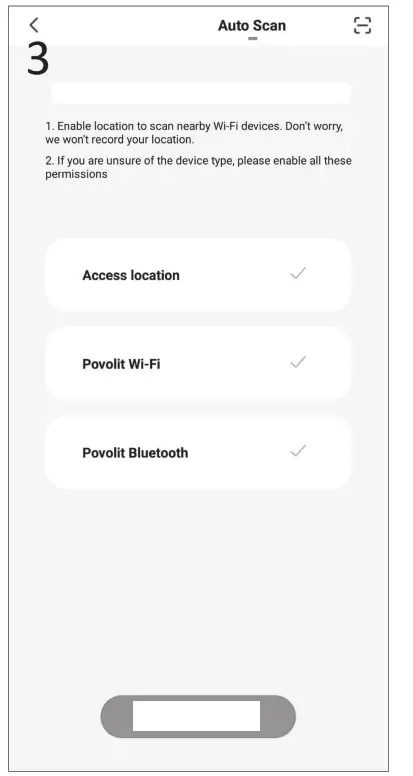
- Enable all 3 methods of device localization (location, wifi, Bluetooth) and tap Start scanning, see Fig. 5-3.
- Long-press the WIFI button on the station; the red LED will start flashing.
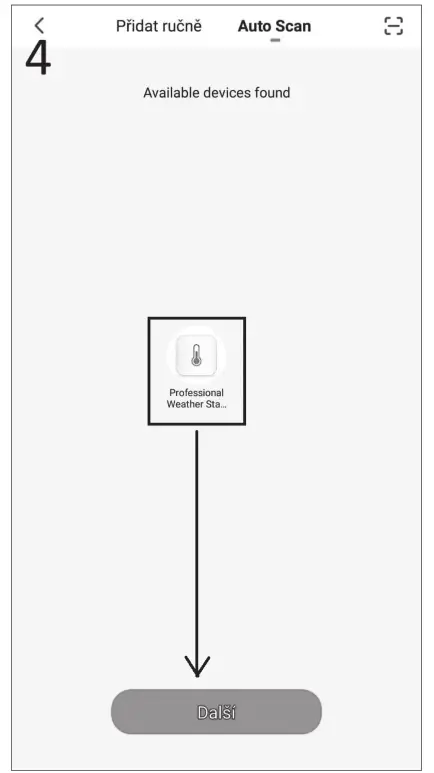
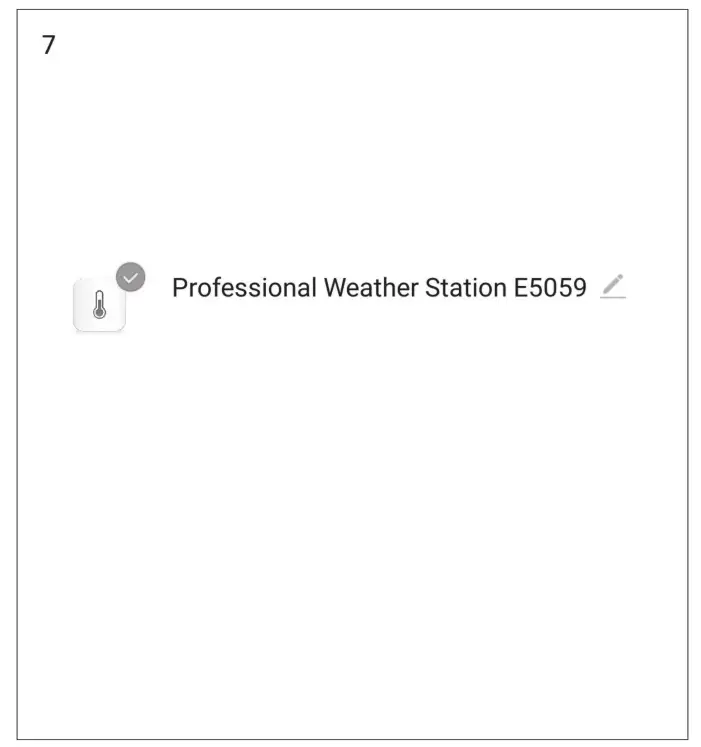
- The application will locate the device and the weather station icon will appear on the screen. Press Next, see Fig. 5-4.
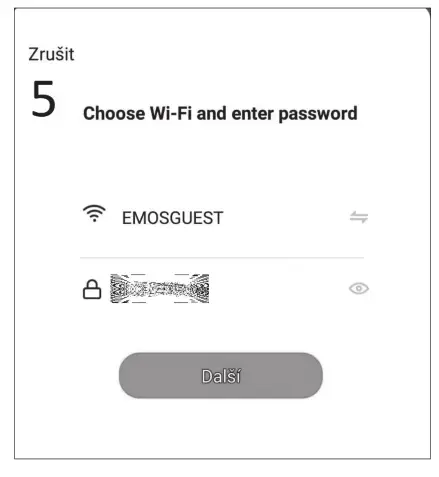
- Select the same Wi-Fi network as you did on the mobile device and press Next, see Fig. 5-5.
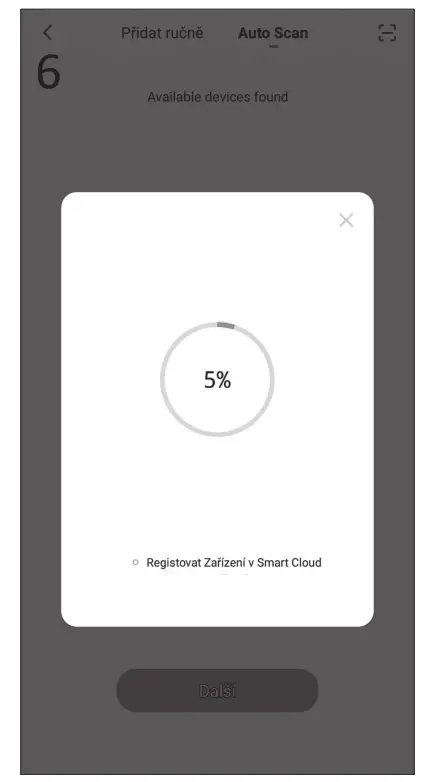
- The application will add the weather station to the Wi-Fi network; wait for 100 % to appear on the screen, see Fig. 5-6.
- The added weather station will be displayed. Press Finish, see Fig. 5-7. The weather station’s will glow blue.
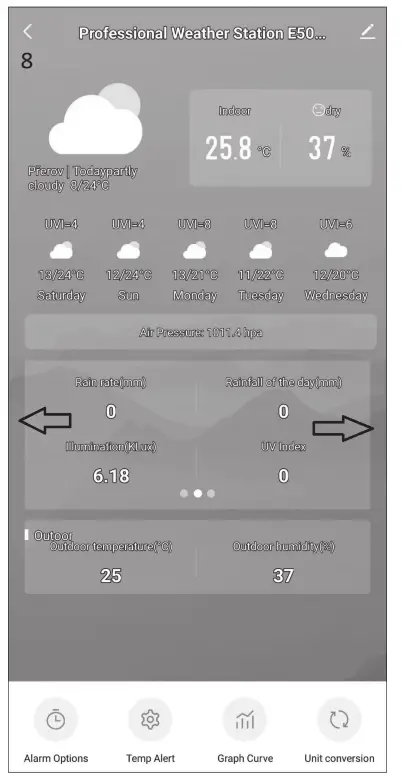
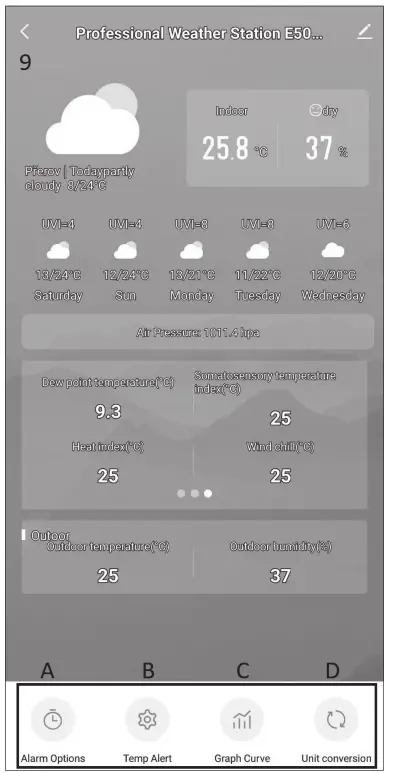
- An overview of measured values and the weather forecast will appear on the screen, see Fig. 5-8. You can view the data in the central table by sliding left/right.
- Settings icons appear at the bottom, see Fig. 5-9:
a) Alarm Options – alarm settings
b) Temp Alert – temperature alert settings
c) Graph Curve – graph of the history of temperature/humidity/pressure/wind/rainfall
d) Unit conversion – selection of temperature/pressure/wind/rainfall units
Note: in order to make changes in settings, the icon on the bottom right of the station must glow blue.
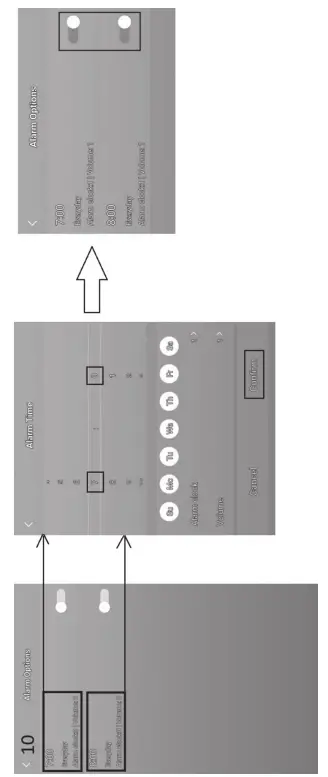
a) Alarm Options – Alarm Settings (see Fig. 5-10)
- Tap Alarm Options and tap on the left to select the top alarm (no. 1) or bottom alarm (no. 2).
- Set the alarm times and tap Confirm.
To activate the alarms, tap the slider on the right (alarm icons will appear on the station‘s screen).
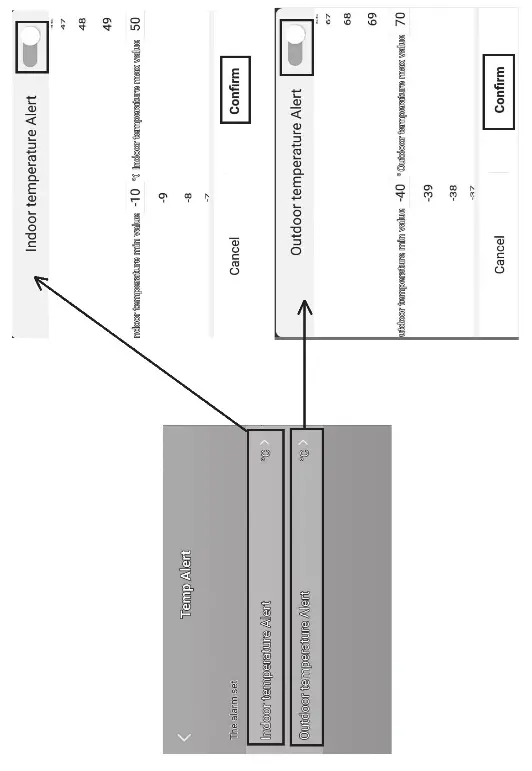
b) Temp Alert – Temperature Alert Settings (see Fig. 5-11)
- Tap Temp Alert.
- Set the indoor temperature (Indoor) and outdoor temperature (Outdoor).
- Activate by tapping the slider on the top right and press Confirm.
c) Graph Curve – Graph of the History of Temperature/Humidity/Pressure/Wind/Rainfall (see Fig. 5-12)
- Tap Graph Curve.
- Select the icon on the top left and select the type of measurement.
- Select the time period for measurement: day, week, month.
- Tap the arrow on the top right and enter your e-mail. Tap Confirm.
- A link to an xlsx file will be sent to your e-mail; the link is valid for 24 hours.
d) Unit conversion – Selection of Temperature/Pressure/Wind/Rainfall Units (see Fig. 5-13)
- Tap Unit Conversion; to change the unit, tap the arrows on the right.
- Tap Confirm.
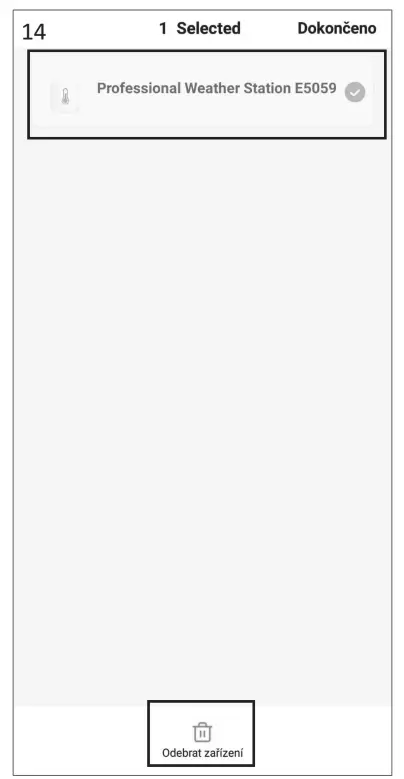
If you wish to delete a station from the application, tap the My Home icon, long-press the name of the station and confirm by pressing Remove Device (see Fig. 5-14).
Manual Setting of Time, Date, Location for Displaying Sunrise and Sunset Time
- Press and hold the MODE button.
- Set the following values using the + and – buttons:
• 12/24 h time format, time zone, date format, year, month, day, hour, minute, calendar language (ENG), city abbreviation.
• For the Czech Republic, use PRG (Prague). Other cities and countries are listed on page 8. - Confirm the selected value by pressing MODE, hold + or – to navigate faster.
Setting an Alarm
The weather station allows setting 2 alarms.
Select the alarm of choice:
- Press the MODE button 1× to view settings for alarm no. 1 (A1).
Press the MODE button 2× to view settings for alarm no. 2 (A2). - Long-press the MODE button – the time settings will start flashing.
- Set the hour and minutes for the alarm by pressing + or –.
Confirm the selected value by pressing MODE; holding the + or – buttons speed up value change.
Alarm Activation/Deactivation
Select the alarm of choice:
- Press the MODE button 1× to view settings for alarm no. 1 (A1).
Press the MODE button 2× to view settings for alarm no. 2 (A2). - Press + or –; the
 or
or icon will appear on the screen – the alarm is now activated and will ring at the set time.
 - If you press + or – again, the alarm icon will disappear and the alarm is deactivated.
 or
or icon will appear on the screen – the alarm is now activated and will ring at the set time.
Snooze Function
Alarm ringing can be postponed by 5 minutes using the LIGHT/SNOOZE button located on the top of the weather station. Press the button when the alarm starts ringing. The alarm icon will start flashing. To cancel SNOOZE mode, press any other button – the alarm icon will stop flashing and will remain on the screen. The alarm will be re-activated the next day.
Setting Altitude and Atmospheric Pressure
The station shows atmospheric pressure in hPa/inHg/mmHg and keeps a history of pressure readings in the last 72 hours.
To achieve a more accurate calculation of pressure values, it is advised to manually set the altitude for the place where the weather station is being used.
- Long-press the LIGHT/SNOOZE button.
- The altitude icon will start flashing. Adjust the value using the + and – buttons. Minimum and maximum altitude settings are -200 m to +2000 m respectively (10 m resolution).
- Confirm the value by pressing LIGHT/SNOOZE.
- The weather forecast icon will start flashing.
- Set the icon based on the current weather using the + and – buttons. This is used to make the forecast calculation more accurate.
- Confirm by pressing LIGHT/SNOOZE.
Setting the Unit of Pressure/Daylight Intensity and Duration Repeatedly pressing the BARO button will display:
- Pressure in hPa.
- Pressure in inHg.
- Pressure in mmHg.
- Daylight intensity in lux.
- Daylight duration.
Setting the Rainfall Unit/Overview of Measured Values Repeatedly pressing the RAINFALL button displays:
- Rainfall for today in mm (TODAY).
- Rainfall for yesterday in mm (YESTERDAY).
- Rainfall in total in mm (TOTAL).
- Rainfall for today in inches (TODAY).
- Rainfall for yesterday in inches (YESTERDAY).
- Rainfall in total in inches (TOTAL).
Long-pressing the RAINFALL button erases the memory of measured values.
Setting the Unit of Wind Speed
Repeatedly pressing the WIND button will display wind speed in miles per hour (mph) or in km per hour (kmh).
Setting Temperature Limits for Maximum and Minimum Temperature Temperature limits can be set for both indoor and outdoor temperatures.
Temperature Limit Ranges
| OUTDOOR | INDOOR | |
| Minimum | -40 °C to +69 °C | -10 °C to 49 °C |
| Maximum | -39 °C to +70 °C | -9 °C to 50 °C |
| Resolution | 1 °C | 1 °C |
- Press the MODE button 3×. The maximum indoor temperature icon
 will start flashing.
 - Long-press the MODE button – the temperature value will start flashing.
- Use the + and – buttons to adjust the value and confirm by pressing MODE.
- The icon will start flashing; to activate the feature, press + or –; the icon will remain in the screen. If you press + or – again, the feature will be deactivated – the
 icon will be flashing.
 - Continue by pressing MODE; the minimum indoor temperature icon will start flashing.
- Long-press the MODE button – the temperature value will start flashing.
- Use the + and – buttons to adjust the value and confirm by pressing MODE.
- The icon will start flashing; to activate the feature, press + or –; the icon will remain in the screen. If you press + or – again, the feature will be deactivated – the icon will be flashing.
- Continue by pressing MODE; the maximum outdoor temperature icon will start flashing.
- The setting process is the same as the one used for setting indoor temperature limits.
When the set temperature limit is exceeded, an audio alarm will sound 5× every 55 seconds and the value will start flashing.
Pressing any button (except LIGHT/SNOOZE) cancels the alert sound, but the icon of an active alert will continue flashing. Once the temperature drops below the set limit, the icon on the screen will stop flashing.
Indoor and Outdoor Temperature Trend
| Rising | |
| Stable | → |
| Falling |
Comfort Level Indicator – Smiley Face
The comfort level indicator (field no. 30) combines indoor air temperature and relative air humidity to determine the apparent temperature – also known as felt air temperature.
The body normally cools by sweating. Sweat is essentially water that conducts heat away from the body through evaporation. If the relative humidity is high, the speed of water evaporation is low and heat dissipates from the body more slowly.
As a result, the body retains more heat than it would in a dry environment.
If humidity is within 40 % – 70 % RH and temperature within 20 °C – 28 °C, the![]() icon (nice environment) will be displayed.
icon (nice environment) will be displayed.
If humidity is lower than 40 % RH, the ![]() icon (dry environment) will be displayed.
icon (dry environment) will be displayed.
If humidity is higher than 70 % RH, the![]() icon (wet environment) will be displayed.
icon (wet environment) will be displayed.
If the temperature is not between 20 °C – 28 °C and humidity is not between 40 % – 70 % RH, no icon will be displayed.
Moon Phase

| 1 – new moon | 5 – full moon |
| 2 – waxing crescent | 6 – waning gibbous |
| 3 – first quarter | 7 – last quarter |
| 4 – waxing gibbous | 8 – waning crescent |
Displaying Maximum and Minimum Temperature and Humidity Readings
Press the + button repeatedly to gradually display the maximum and minimum temperature and humidity readings.
Long-pressing the + button erases the memory.
UV Index/Apparent Temperature/Dew Point/Wind Chill/Heat Index
Repeatedly pressing the INDEX button will display:
- UV INDEX
The UV index is a unit used to measure ultraviolet radiation. It indicates what level of protection we should use.
• 1–2 (low) – wear sunglasses.
• 2–5 (medium) – wear sunglasses and headgear.
• 5–7 (high) – the same protection as with a lower index, but also use a sunscreen with high sun protection factor (SPF).
• 7–11 (very high) – stay out of the sun between 11:00 and 15:00, otherwise use the same protection used for a high index.
• 11 and higher (extreme) – do not go outside during the day; the sunlight is so intense, it could cause photodermatitis (sunburn) within 10 minutes. - FEEL LIKE
• Apparent outdoor temperature. - DEW POINT – outdoor dew point
• Dew point is the temperature at which air becomes fully saturated with water vapour, which then starts condensing in the form of water droplets. - WIND CHILL
• Apparent outdoor temperature, taking into account wind speed. - HEAT INDEX
• Apparent outdoor temperature, taking into account humidity.
Pressure/Temperature/Humidity/Rainfall Graph
Repeatedly pressing the GRAPH button will display:
- BAROMETER – graph of pressure history in up to the last 72 hours.
- IN TEMPERATURE – graph of indoor temperature history in up to the last 72 hours.
- OUT TEMPERATURE – graph of outdoor temperature history in up to the last 72 hours.
- IN HUMIDITY – graph of indoor humidity history in up to the last 72 hours.
- OUT HUMIDITY – graph of outdoor humidity history in up to the last 72 hours.
- RAINFALL – graph of rainfall history in up to the last 7 days.
Station Screen Illumination
1. When powered via an adapter:
Permanent screen illumination is set automatically. Repeatedly pressing the LIGHT/SNOOZE button will allow you to select between 2 modes of permanent illumination (on/off).
2. When powered only by 3× 1.5 V AAA batteries:
Screen illumination is off. Pressing the LIGHT/SNOOZE button will turn screen illumination on for 10 seconds, then it turns off again. When the station is only powered by batteries, permanent screen illumination cannot be activated! Note: The inserted batteries serve as backup for the measured/set data. If batteries are not inserted and you unplug the adapter, all data will be erased.
Weather Forecast
The station uses changes in atmospheric pressure to forecast weather for the next 12–24 hours for an area within a radius of 15–20 km. The accuracy of weather forecasts is 70 % – 75 %. The forecast icon is displayed in field no. 8. As the weather forecast may not always be 100 % accurate, neither the manufacturer nor the seller can be held responsible for any loss caused by an incorrect forecast.
Weather Forecast Icons:
- sunny
- cloudy
- overcast
- rain
- heavy rain
At outdoor temperatures between -1 °C and +1 °C, the glaze ice icon ![]() will be displayed.
will be displayed.
Upkeep and Maintenance
- Read the manual carefully before using this product.
- Do not expose the product to direct sunlight, extreme cold and moisture, and sudden changes in temperature as these may compromise detection accuracy.
- Do not place the product in locations prone to vibration and shocks; these may cause damage.
- Do not expose the product to excessive force, impacts, dust, high temperatures or humidity; they may cause malfunction, shorter battery life, damage to batteries and deformation of plastic parts.
- Do not expose the product to rain or moisture, it is not designed for outdoor use.
- Do not place any open flame sources on the product, e.g. a lit candle, etc.
- Do not place the product in places with inadequate air flow.
- Do not tamper with the internal electric circuits of the product. Doing so might damage it and automatically void the warranty. The product should only be repaired by a qualified professional.
- To clean the product, use a slightly moistened soft cloth. Do not use solvents or cleaning agents; they could scratch the plastic parts and cause corrosion of the electric circuits.
- Do not immerse the product in water or other liquids.
- The product must not be exposed to dripping or splashing water.
- In the event of damage or defect on the product, do not perform any repairs by yourself. Have it repaired in the shop where you bought it.
- Place the product out of reach of children; it is not a toy.
- Remove flat batteries; they could leak and damage the product. Use only new batteries of the recommended type and make sure polarity is correct when replacing them.
- Do not throw batteries into a fire and do not disassemble or short-circuit them.
- This device is not intended for use by persons (including children) whose physical, sensory or mental disability or lack of experience and expertise prevents safe use, unless they are supervised or instructed in the use of the appliance by a person responsible for their safety. Children must always be supervised to ensure they do not play with the device.
![]() Do not dispose with domestic waste. Use special collection points for sorted waste. Contact local authorities for information about collection points. If the electronic devices would be disposed on landfill, dangerous substances may reach groundwater and subsequently the food chain, which it could affect human health.
Do not dispose with domestic waste. Use special collection points for sorted waste. Contact local authorities for information about collection points. If the electronic devices would be disposed on landfill, dangerous substances may reach groundwater and subsequently the food chain, which it could affect human health.
Hereby, EMOS spol. s r. o. declares that the radio equipment type E5059 is in compliance with Directive 2014/53/EU. The full text of the EU declaration of conformity is available at the following internet address: http://www.emos.eu/download.
TIP: E5059
Servis:tel: +386 8 205 17 21
e-mail: [email protected]


