![]()
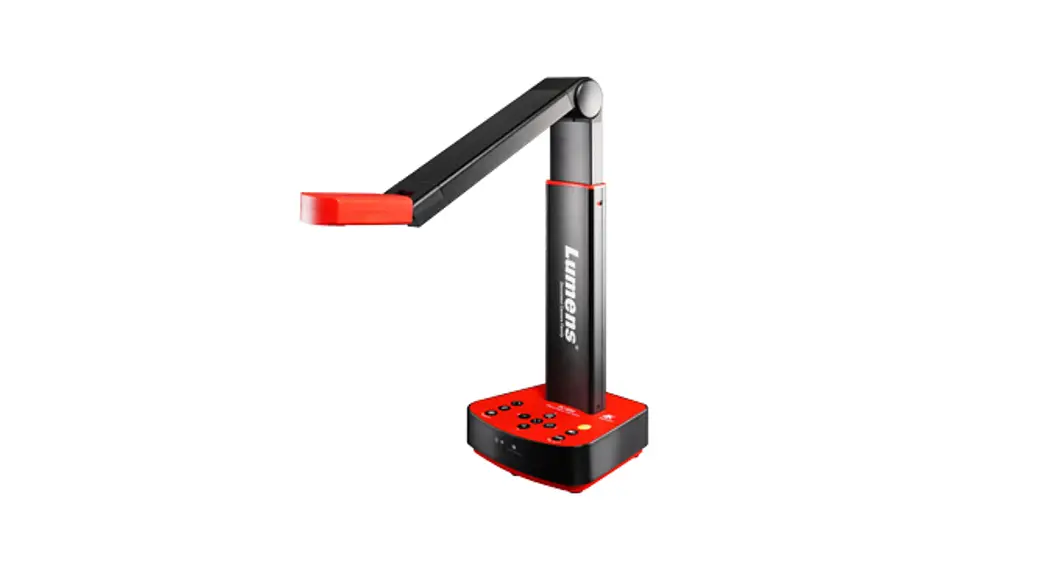
DC-F20
Document Camera
User Manual
[Important]
To download the latest version of Quick Start Guide, multilingual user manual, software, or driver, etc., please visit Lumens http://www.MyLumens.com/Support
Copyright Information
Copyrights © Lumens Digital Optics Inc. All rights reserved.
Lumens is a trademark that is currently being registered by Lumens Digital Optics Inc.
Copying, reproducing or transmitting this file is not allowed if a license is not provided by Lumens Digital Optics Inc. unless copying this file is for the purpose of backup after purchasing this product.
In order to keep improving the product, Lumens Digital Optics Inc. hereby reserves the right to make changes to product specifications without prior notice. The information in this file is subject to change without prior notice.
To fully explain or describe how this product should be used, this manual may refer to names of other products or companies without any intention of infringement.
Disclaimer of warranties: Lumens Digital Optics Inc. is neither responsible for any possible technological, editorial errors or omissions, nor responsible for any incidental or related damages arising from providing this file, using, or operating this product.
Chapter 1 Safety Instructions
Always follow these safety instructions when setting up and using the Document Camera:
- Do not place the product in a tilted position.
- Do not place the Document Camera on an unstable trolley, stand, or table.
- Do not use the Document Camera near water or the source of heat.
- Use attachments only as recommended.
- Place the USB cable of the Document Camera in a place where it can be unplugged easily.
- Unplug the USB cable of the Document Camera before cleaning. Use a damp cloth for cleaning. Do not use liquid or aerosol cleaners.
- Do not block the slots and openings in the Document Camera case. They provide ventilation and prevent the Document Camera from overheating. Do not place the Document Camera on a sofa, rug, or other soft surface or install in a recessed place unless proper ventilation is provided.
- Never push objects of any kind through cabinet slots. Never allow liquid of any kind to spill into the Document Camera.
- Except as specifically instructed in this User Manual, do not attempt to operate this product by yourself. Opening or removing covers may expose you to dangerous voltages and other hazards. Refer all servicing to licensed service personnel.
- Unplug the USB cable during thunderstorms or if it is not going to be used for an extended period. Do not place the Document Camera or remote control on top of heat-emitting equipment or shaking objects such as a car, etc.
- In case of the following situations, please unplug the USB cable and refer servicing to licensed service personnel:
- If the USB port becomes damaged or frayed.
- If the liquid is spilled into it or the Document Camera has been exposed to rain or water.
Precautions
Warning: To reduce the risk of fire or electric shock, do not expose this appliance to rain or moisture.
 | Caution | | |
| Caution: To reduce the risk of electric shock, do not remove the cover (or back). No user-serviceable parts inside. Refer servicing to licensed service personnel. | |||
| This symbol indicates that this equipment may contain dangerous voltage which could cause electric shock. |  | This symbol indicates that there are important operating and maintenance nstructions in this User Manual with this unit. |
FCC Warning
This Document Camera has been tested and found to comply with the limits for a Class A computer device, pursuant to Article 15-J of FCC Rules. These limits are designed to provide reasonable protection against harmful interference in a commercial installation.
This digital apparatus does not exceed the Class A limits for radio noise emissions from digital apparatus as set out in the interference-causing equipment standard entitled “Digital Apparatus,” ICES-003 of Industry Canada.
EN55032 (CE Radiation) Warning
The operation of this equipment in a residential environment could cause radio interference.
This unit is intended to be supplied by a UL Listed product suitable for use at a maximum ambient temperature of 35°C minimum whose output meets LPS (or PS2) and is rating 5Vdc, minimum 500 mA, altitude during operation 2000m minimum.
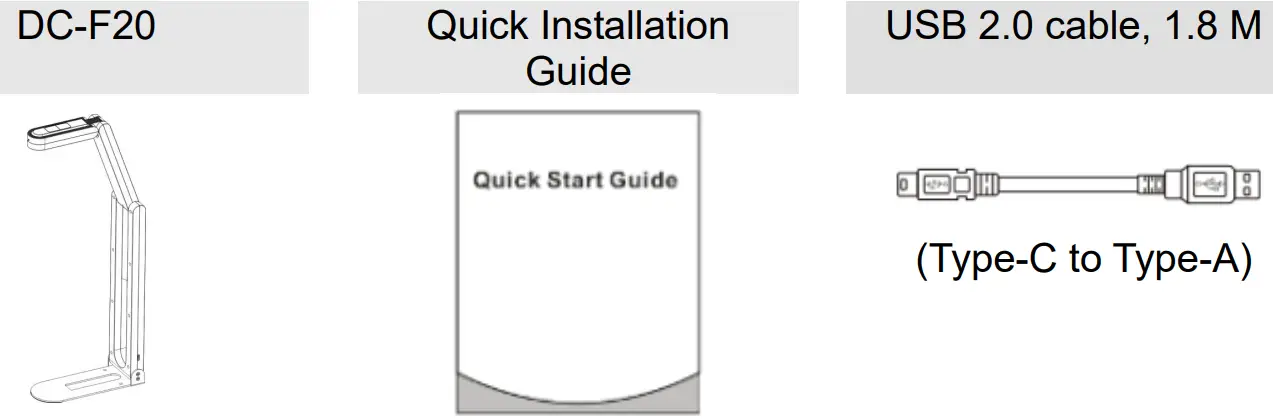
Chapter 2 Package Contents
Chapter 3 Product Function Descriptions
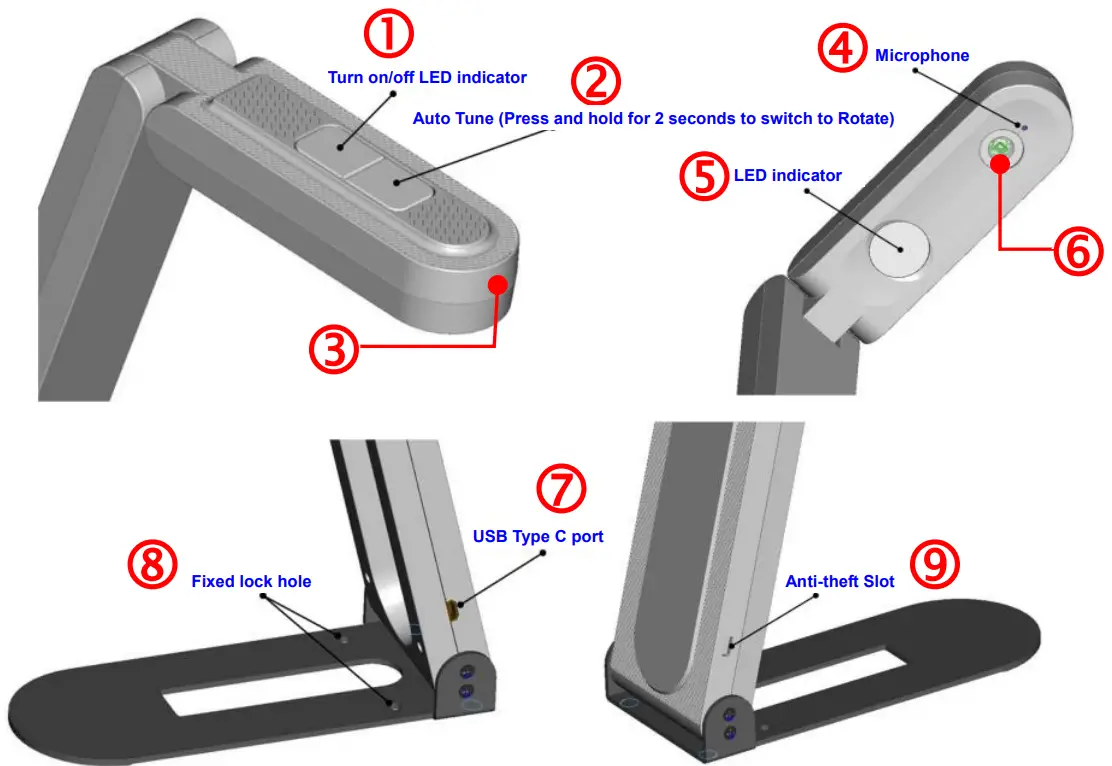
| Items | Function | Description |
| 1 | LED indicator button | Adjust the brightness of LED indicator (High/Intermediate/Low/Off) |
| 2 | Auto-Tune/Rotate button | Short press: Automatically adjust the image to have the best brightness and focusing performance Press and hold for 2 seconds: Rotate the image (0°/180°) |
| 3 | LED Indicator | LED off: Disable the image LED blue indicator: Image Display |
| 4 | Microphone | Built-in microphone |
| 5 | LED indicator | Trigger the brightness switch by pressing the upper button |
| 6 | Camera lens | HD camera lens |
| 7 | USB Type C port | The USB port is for connecting to the USB port of the computer and providing USB signal images |
| 8 | Fixed lock hole | Tighten the screws and place the device on the platform |
| 9 | Kensington lock hole | Safety lock slot |
Chapter 4 Installation and Connections
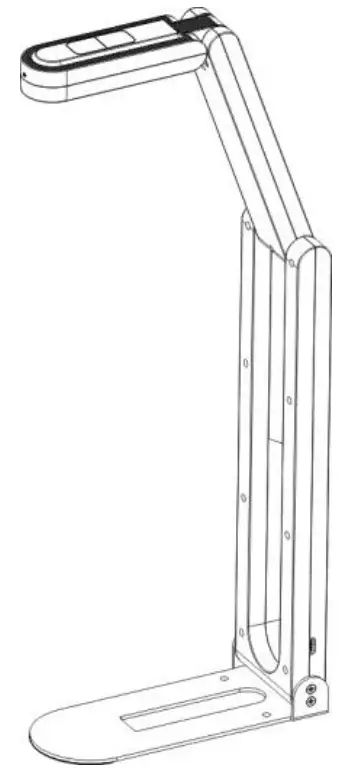
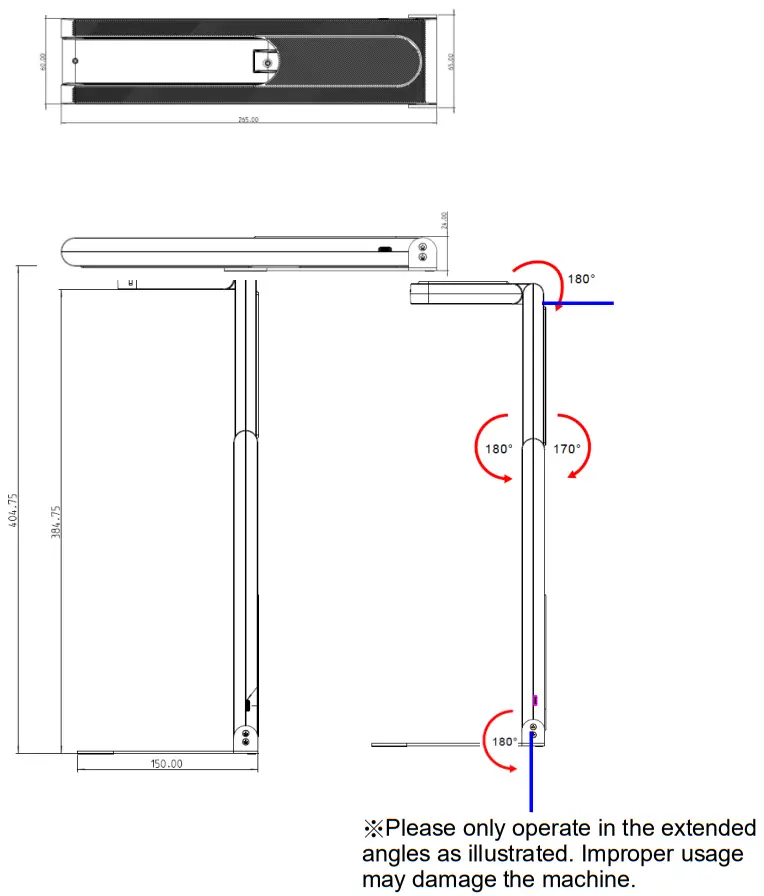
4.1 Document Camera Size
- Length x Width x Height:
Storage compartment: 265 x 65 x 24 mm
Display: 150 x 65 x 404.75 mm - Weight: 310 g
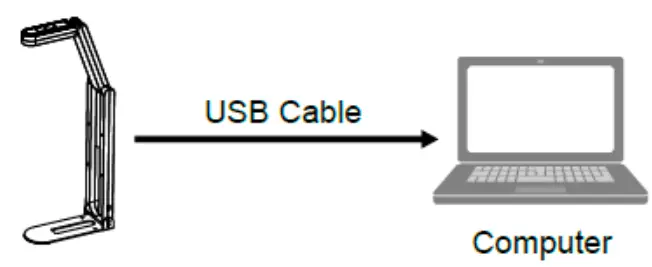
4.2 Connecting to a computer![]() Once the USB is connected to the computer, the power is ON. If the LED is still off, turn on the image via software, and the LED will show blue indicator.
Once the USB is connected to the computer, the power is ON. If the LED is still off, turn on the image via software, and the LED will show blue indicator.
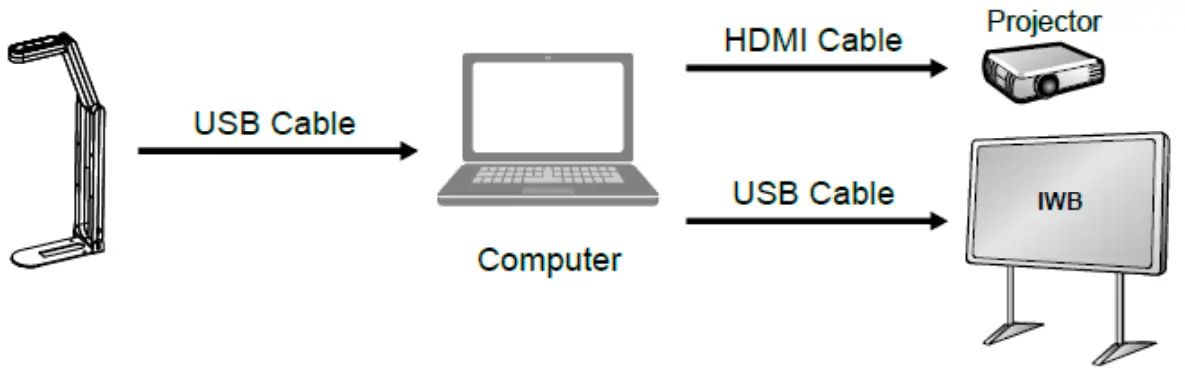
4.3 Connecting to an Interactive Whiteboard (IWB)
4.4 Installing Application Software
The Lumens Ladybug software installed on the computer enables you to:
- Control DC-F20
- Capture and record images
- Annotate the image, highlight important details and save it
- Support the full-screen function.
 Please refer to the software user manual for installation steps and software operation.
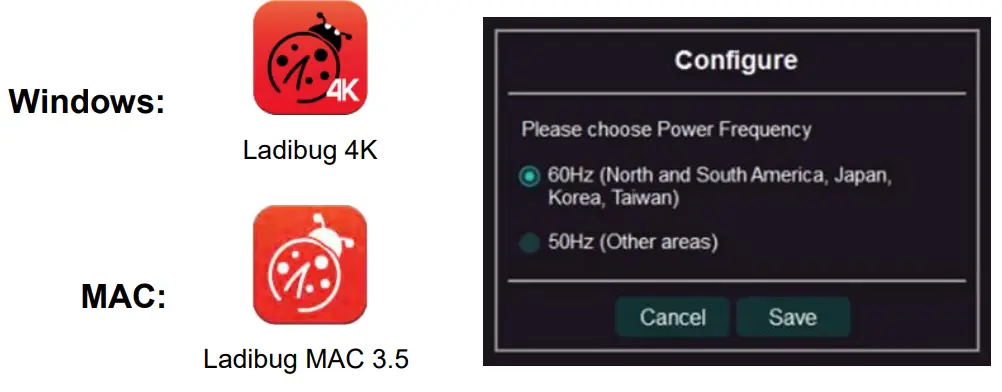
 - Windows: Ladybug 4K Software User Manual
- MAC: Ladybug 3.0 Software User Manual
Chapter 5 Start Using
<Note> Please make sure that the USB cable is connected and Ladybug application software is installed at first. Please refer to Chapter 4 Installation and Connections in this manual.
- After installing Ladybug software, double-click the icon to open the software to view the images and control DC-F20
POWER Frequency setting page will display during the first use, please complete the settings following the instructions on the screen
- Place an object to be displayed under the camera (For placement of document and display direction of monitor, please refer to the picture below)
※DC-F20 camera coverage is 420 mm x 297 mm (4:3, Size A3 is possible)
- Adjust the support arm and lens to the appropriate positions.
- Press the [AUTO TUNE]
 button to optimize the image.
 - You are ready to teach/present.

![]() Please download Ladybug software from Lumens website
Please download Ladybug software from Lumens website![]() When connected to a computer via a USB cable, DC-F20 can also be used with video software, such as Skype and Zoom.
When connected to a computer via a USB cable, DC-F20 can also be used with video software, such as Skype and Zoom.
Chapter 6 Descriptions of Major Functions
6.1 Control the Camera
- Please download Lumens Ladybug software at the Lumens website.
- Please refer to Ladybug Software User Manual for software-related functions.
6.2 Use Skype for Video Conference
Please refer to Chapter 4 Installation and Connections to finish connecting the computer. Start Skype, select a contact, and press ![]() to start the video conference.
to start the video conference.
If it doesn’t work, please refer to the following steps to set up the camera:
- Start Skype -> [Setting] -> [Audio & Video]
- Select [Lumens DC-F20]
- Select [Lumens DC-F20 Audio]
After the setting is completed, the video conference is ready to begin. It can also be used with Zoom, Teams, Google Meet and other video software
Chapter 7 Troubleshooting
This chapter describes problems you may encounter while using DC-F20. If you have questions, please refer to related chapters and follow all the suggested solutions. If the problem still occurred, please contact your distributor or the service center.
| No. | Problems | Solutions |
| 1 | When the device is turned on, the LED indicator is off. | Once the USB is connected to the computer, there is no picture output. If the LED indicator is still off, turn on the image via software, and the LED will show a blue indicator. |
| 2 | No screen with Ladybug software | 1. Change the USB cable 2. Please try the USB port on the back of the computer or other USB port 3. Make sure no other application software has DC-F20 images open at the same time. If other software is already using DC-F20 images, Ladybug software cannot output the screen |
| 3 | Unable to focus | Probably the document is too close. Press the pull away the distance between the lens and the document, and then press the upper Auto Tune button to automatically adjust the focal length of the image. |
| 4 | DC-F20 cannot operate normally | The machine cannot operate normally probably because the power supply of the USB port at the front end of the computer is insufficient. Try to connect to a USB port at the rear end or a USB hub with a power adapter. |
| 5 | Output screen flicker | The presetting value of Ladybug’s current frequency is 60 Hz. If the current frequency of your local country is 50 Hz, output screen flicker may occur during the use of Ladybug. Please refer to the Camera Settings section of the |
![]()


