
![]()
![]() L1000 Element Gen2 Horticulture LED Lighting System
L1000 Element Gen2 Horticulture LED Lighting System
Instruction Manual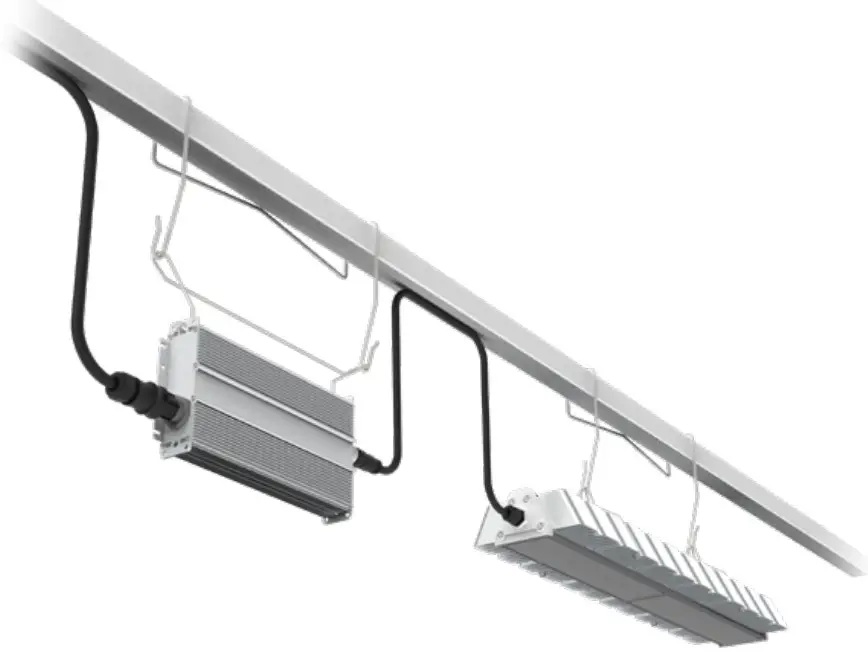
| 220-240V 50-60Hz | 380-415V 50-60Hz | IP66 |
![]() WARNING
WARNING
RISK OF ELECTRIC SHOCK
- Turn the power off before inspection, installation, or removal.
- Properly ground electrical enclosure.
RISK OF FIRE
- Follow all IEC and local building codes.
- Use only IEC-approved wire for input/output connections. Minimum size 3G 0.75mm².
- Minimum 300mm distance from light module & driver to any combustible material.
- Minimum 150mm clearance between light module & driver, light module & light module, driver & driver.
- The light module shall be installed lens down with a minimum of 130mm to anything below.
![]() The LED luminaire must be connected to the mains supply according to its ratings on the product label.
The LED luminaire must be connected to the mains supply according to its ratings on the product label.
CAUTION
- Do not operate the product with damaged parts.
- Turn off power before inspection, installation, or removal.
- The luminaire may fall down if not installed properly.
- Wear work gloves to prevent dirt and oil from being transferred to the luminaire.
- Not for direct exposure to the weather.
- To ensure the product warranty is valid, please ensure all installation instructions and environmental conditions for storage and operation are complied with.
- The light source of this luminaire is not replaceable; when the light source reaches its end of life the whole luminaire shall be replaced.
- Use only in the manner intended by the manufacturer. If you have any questions, contact the manufacturer.
- For safe operation, and to maximize the longevity of the luminaire; ensure that the light module and driver are clean and free of dirt, dust, oil, or any other debris.
- Do not apply any kind of film on the lens or otherwise cover the driver or light engine in any way.
- The external flexible cable or cord of this luminaire cannot be replaced; if the cord is damaged, the luminaire shall be destroyed.
![]() IEC/TR 62778 Risk Group 2 (RG2)
IEC/TR 62778 Risk Group 2 (RG2)
| Part Number | 220–240 VAC Power (W) | 380–415 VAC Power (W) | Risk Group | Min. Viewing Distance (m) |
| GEHE-HPPRB2A | 585 | 589 | 2 | 5.2 |
| GEHE-HPPBB2A | 622 | 626 | 2 | 5.2 |
| GEHE-HPKTB2A | 606 | 610 | 2 | 5.2 |
| GEHE-HPKRB2A | 623 | 628 | 2 | 5.2 |
| GEHE-HPKBB2A | 639 | 643 | 2 | 5.2 |
| GEHE-HPKFB2A | 643 | 647 | 2 | 5.2 |
| GEHE-HBRIB2A | 656 | 660 | 2 | 5.2 |
| GEHE-HBRVB2A | 681 | 684 | 2 | 5.2 |
| GEHE-VPPRB2A | 530 | 533 | 2 | 5.2 |
| GEHE-VPPBB2A | 575 | 580 | 2 | 5.2 |
| GEHE-VPKTB2A | 538 | 542 | 2 | 5.2 |
| GEHE-VPKRB2A | 569 | 573 | 2 | 5.2 |
| GEHE-VPKBB2A | 590 | 594 | 2 | 5.2 |
| GEHE-VPKFB2A | 570 | 575 | 2 | 5.2 |
![]() Suitable for operation in an ambient temperature between 0°C and 40°C.
Suitable for operation in an ambient temperature between 0°C and 40°C.
Mechanical ventilation or cooling system is required to maintain the temperature within the growing space below 40°C when the light module is in operation.
System Component Parts
Please refer to order logic to determine whether included or accessory 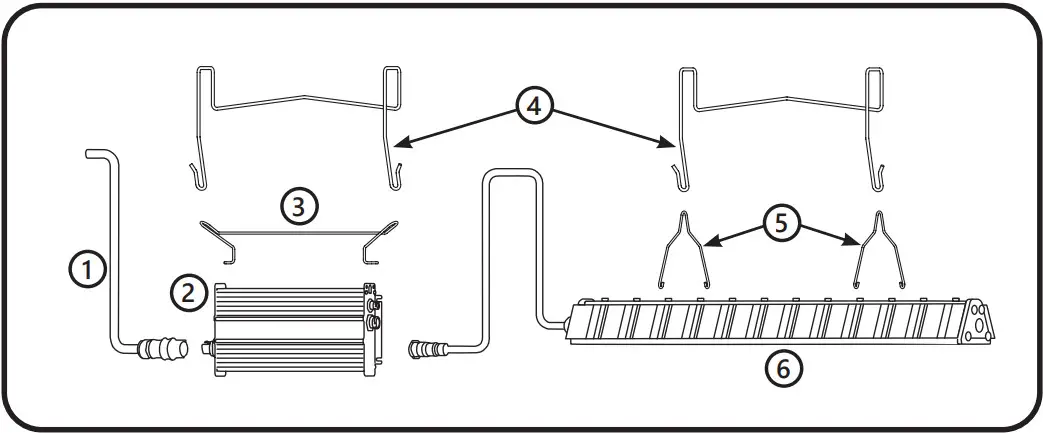
- AC cable
- Driver
- Driver Bracket
- Hanger (2x)
- Light Module Brackets (2x)
- Light Module
Light Module Specifications
| Product Code | Detailed Description | Weight | System Input Current [A] Low Voltage Driver @ 220–240 VAC | System Input Current [A] High Voltage Driver @ 380–415 VAC | Power Factor |
| GEHE-HPPRB2A | Arize Element, L1000, PPR, XW Optic | 4.5 kg | 2.56 | 2.57 | > 0.9 |
| GEHE-HPPBB2A | Arize Element, L1000, PPB, XW Optic | 4.5 kg | 2.73 | 2.74 | > 0.9 |
| GEHE-HPKTB2A | Arize Element, L1000, PKT, XW Optic | 4.5 kg | 2.66 | 2.67 | > 0.9 |
| GEHE-HPKRB2A | Arize Element, L1000, PKR, XW Optic | 4.5 kg | 2.73 | 2.74 | > 0.9 |
| GEHE-HPKBB2A | Arize Element, L1000, PKB, XW Optic | 4.5 kg | 2.8 | 2.81 | > 0.9 |
| GEHE-HPKFB2A | Arize Element, L1000, PKF, XW Optic | 4.5 kg | 2.82 | 2.83 | > 0.9 |
| GEHE-HBRIB2A | Arize Element, L1000, BRI, XW Optic | 4.5 kg | 2.88 | 2.88 | > 0.9 |
| GEHE-HBRVB2A | Arize Element, L1000, BRV, XW Optic | 4.5 kg | 2.99 | 2.99 | > 0.9 |
| GEHE-VPPRB2A | Arize Element, L1000 HE, PPR, XW Optic | 4.5 kg | 2.32 | 2.33 | > 0.9 |
| GEHE-VPPBB2A | Arize Element, L1000 HE, PPB, XW Optic | 4.5 kg | 2.52 | 2.53 | > 0.9 |
| GEHE-VPKTB2A | Arize Element, L1000 HE, PKT, XW Optic | 4.5 kg | 2.36 | 2.37 | > 0.9 |
| GEHE-VPKRB2A | Arize Element, L1000 HE, PKR, XW Optic | 4.5 kg | 2.49 | 2.5 | > 0.9 |
| GEHE-VPKBB2A | Arize Element, L1000 HE, PKB, XW Optic | 4.5 kg | 2.59 | 2.6 | > 0.9 |
| GEHE-VPKFB2A | Arize Element, L1000 HE, PKF, XW Optic | 4.5 kg | 2.5 | 2.51 | > 0.9 |
Driver Specifications
| Description | Weight | Input Voltage |
| GEPSC240-680D-BDGGL-D1 | 3.2 kg | 220-240 VAC |
| GEPSC240-680D-BGJGL-D1 | 3.2 kg | 380-415 VAC |
Interconnection Cable Specifications
| Description | Detailed Description |
| GECA60D16-OL04B | AC Leader Cable, 1219 mm, CE |
| GECA60FNA-NL00B | AC Field Installable Connector, UL and CE (Wieland P.N. 96.031.4155.7) |
| GECA30G14-EN03B | DC Inter-Connection Cable, 914 mm, UL, and CE |
| GECA30G14-EN06B | DC Inter-Connection Cable, 1828 mm, UL, and CE |
| GECA30H20-OO03B | Dimming cable, 914 mm, UL and CE |
Mounting Accessories Specifications
| Description | Detailed Description | Weight |
| GEMB-WAS1 | Wire bracket mounting kit, square 41 mm | 0.4 kg |
| GEMB-WAA1 | Wire bracket offset mounting kit, square 41 mm | 0.6 kg |
| GEMB-WAS2 | Wire bracket mounting kit, square 70 mm | 0.4 kg |
| GEMB-CBH1 | 457 mm, cable universal mounting kit | 0.1 kg |
| GEMB-CBH2 | 1524 mm, cable universal mounting kit | 0.1 kg |
| GEMB-PAU1 | Perpendicular (90°) universal mounting kit | 0.5 kg |
![]() CAUTION
CAUTION
Installation instructions and specifications for accessories can be found in the accessory package.
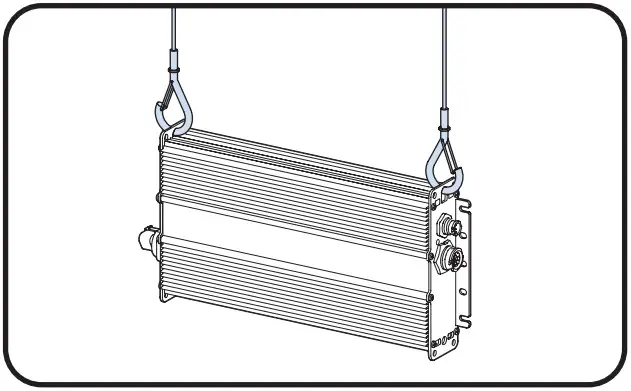
Sample Base Installation Diagram

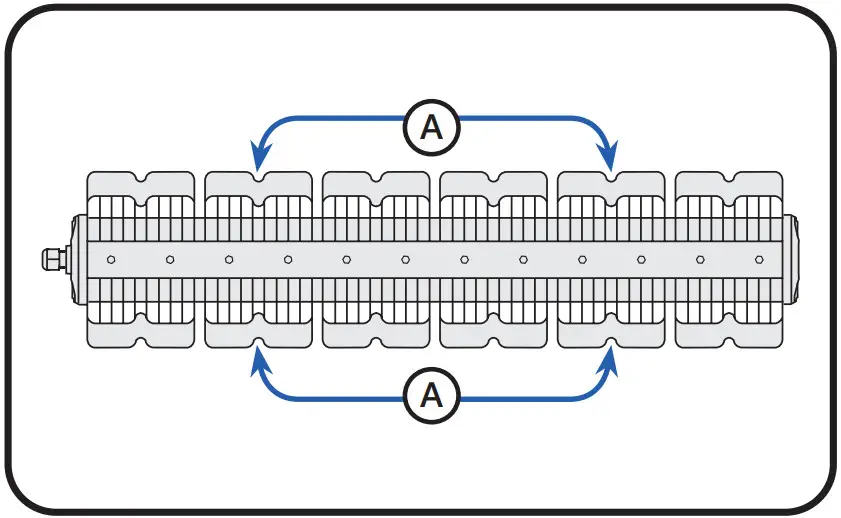
Installation of the Light Module
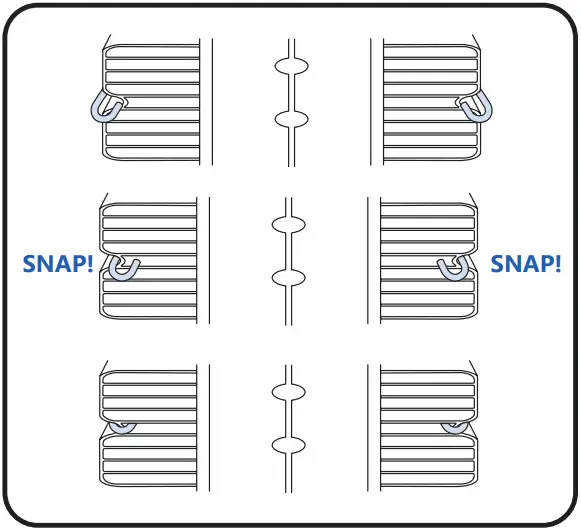
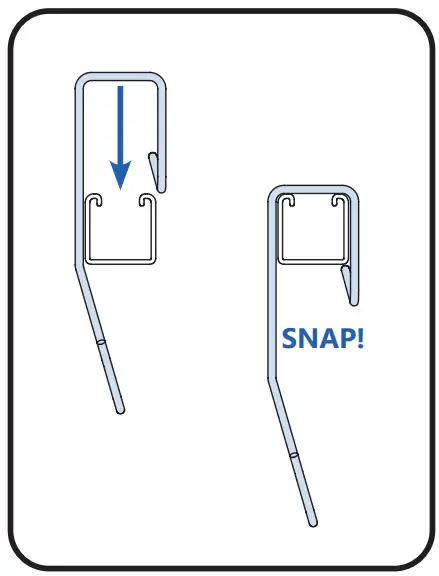
1.1 Installation of Module Brackets
If not preassembled, install light module brackets on the light module.
- Install brackets at location A.

- Slide down bracket along channels.

- Press down on the bracket until hooks snap into place. Ensure bracket hooks catch the bottom edge of the heatsink.
Selection of Mounting Hardware
Based on the cross-section of the structural member select the correct hanger or mounting cable.
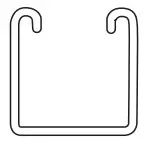 |  |  |
| Unistrut 41 mm Use standard hanger 41 mm OR Offset hanger 41 mm to clear the bottom of the Unistrut | Square 70 mm Use standard hanger 70 mm | Other Structural Members Use 0.5 m or 1.5 m universal cable OR Perpendicular (90°) universal mounting kit |
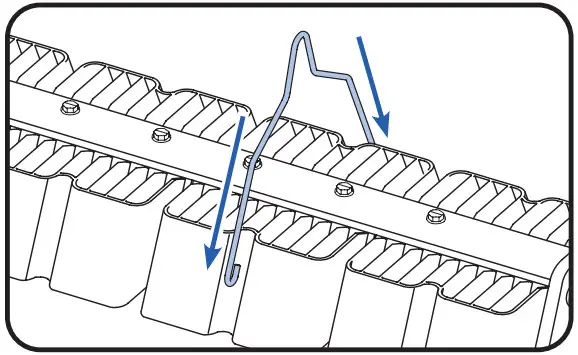
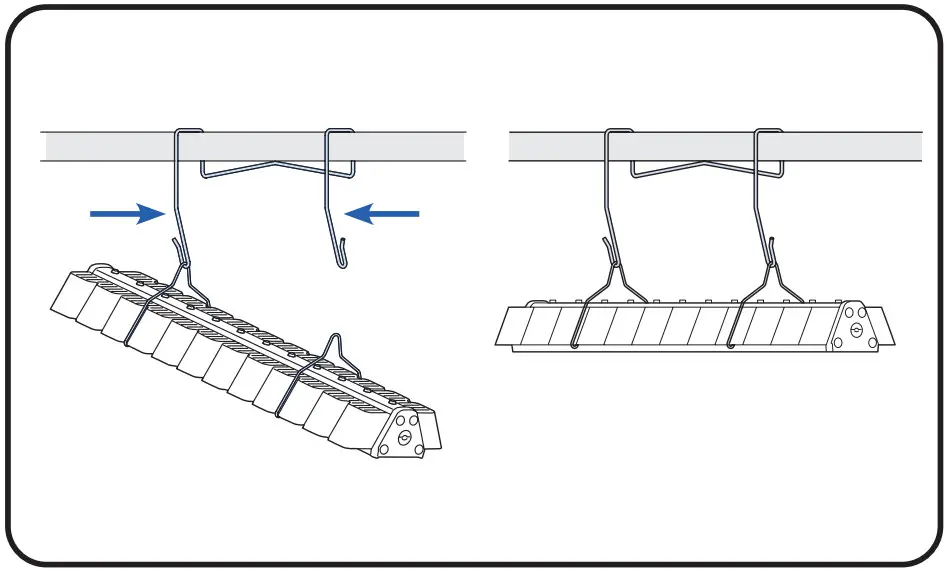
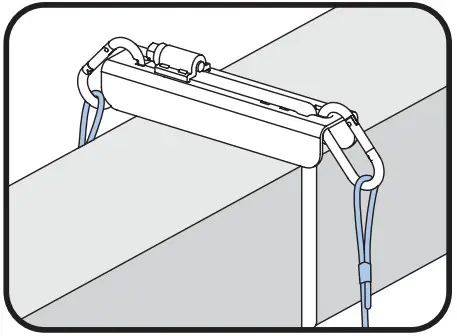
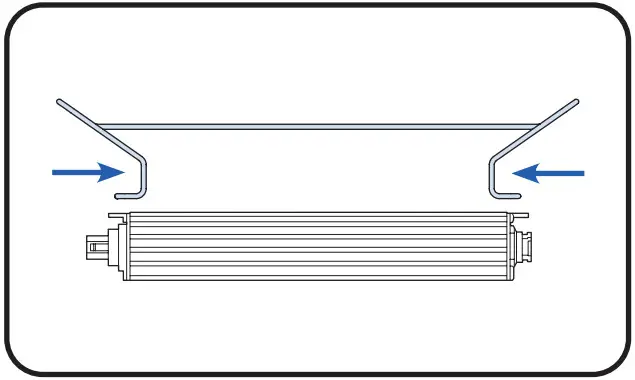
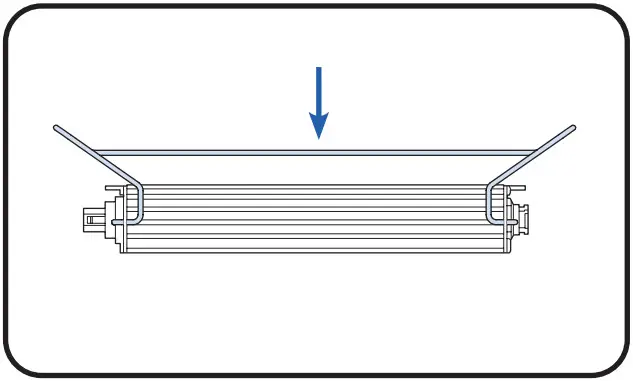
Installation with Standard and Offset Hangers
- Place light module hanger over structural member and snap hanger in place.

- Hang one fixture bracket on one hook, and hang the opposite fixture bracket onto another hook by pressing hanger arms together.

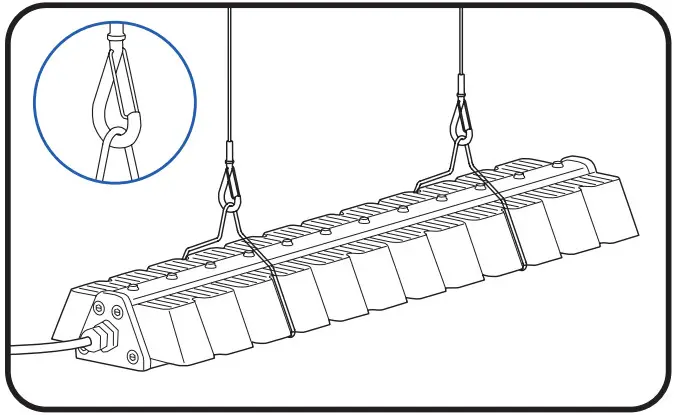
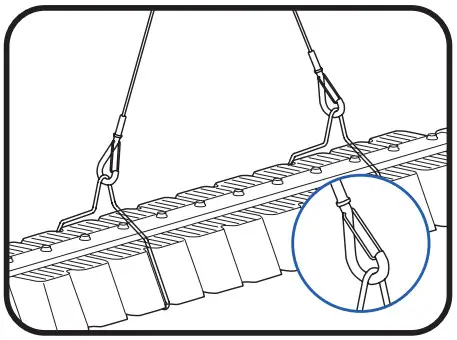
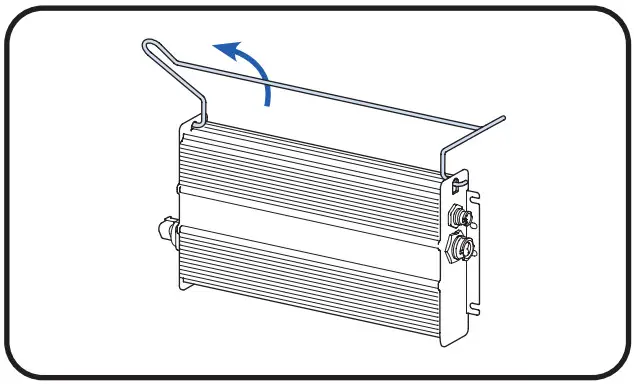
Installation with Universal Cables
- Wrap loop end of the cable over structural member. Insert hook through the loop end.

- Attach hooks to light module brackets. Ensure the hook gate is closed.


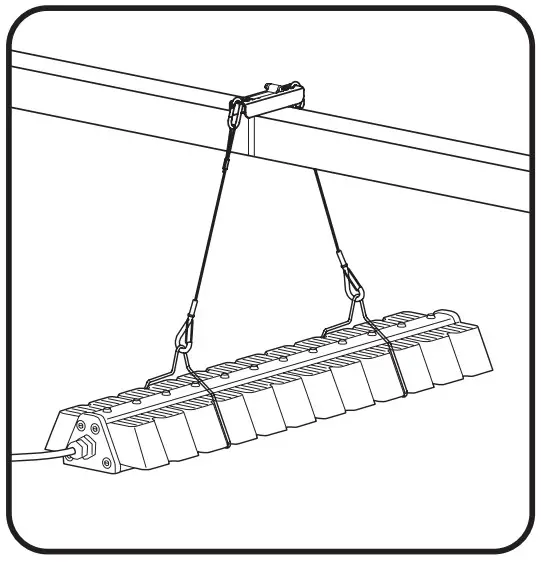
Installation with Perpendicular 90° Universal Mounting Kit
Kits Contents (SKU: 93139057)
 Tools Required
 5/16” hex socket or flat-blade screwdriver
Installation Steps for Perpendicular 90° Universal Mounting Kit
 |  |  |
| 1. First determine which 2 slots on the metal bracket most closely correspond to the structural member width. Insert strap of the worm drive clamp through the first slot of the metal bracket from the top. | 2. Place the metal bracket on top of the structural member and wrap the strap around the bottom of the structural member and back up through the second slot. | 3. Secure the metal bracket onto the top of the structural member by inserting the strap into the open end of the clamp and tightening down the screw. |
 |  |  |
| 4. Attach a carabiner to each side of the metal bracket. | 5. Attach a support cable to each carabiner and ensure the gates are closed. | 6. Attach another end of cables to the light module. Ensure hook gates are closed. |
Installation with Custom Brackets
If you choose to use your own custom mounting method, attach to points A. 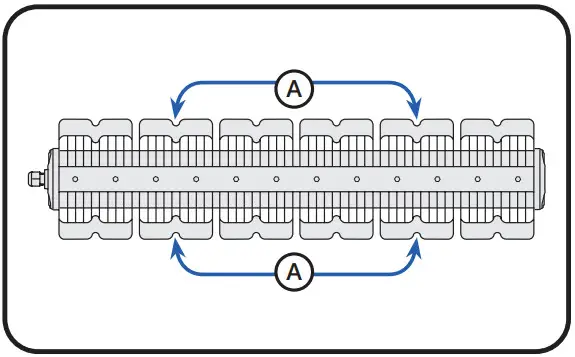
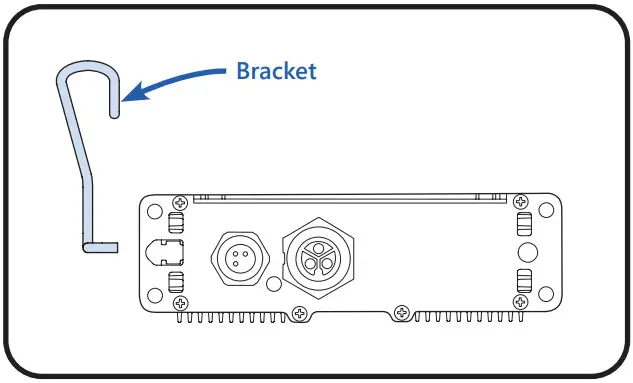
Installation of the Driver
Installation of Driver Bracket
If not preassembled, install a driver bracket onto the driver.
 |  |  |
| 1. Orient the driver perpendicular to the bracket. | 2. Ensure the first end of the bracket hook is lined up with the oval mounting hole of the driver. | 3. Squeeze bracket arms together & slide the hook into the first driver mounting hole. |
 |  | |
| 4. Repeat on the opposite driver mounting hole. | 5. Let driver swing free upright & ensure hooks on both sides are correctly engaged. | |
Selection of Mounting Hardware
Based on the cross-section of the structural member select the correct hanger or mounting cable.
| | |
| Unistrut 41 mm Use standard hanger 41 mm OR Offset hanger 41 mm to clear the bottom of the Unistrut | Square 70 mm Use standard hanger 70 mm | Other Structural Members Use 0.5 m universal cable |
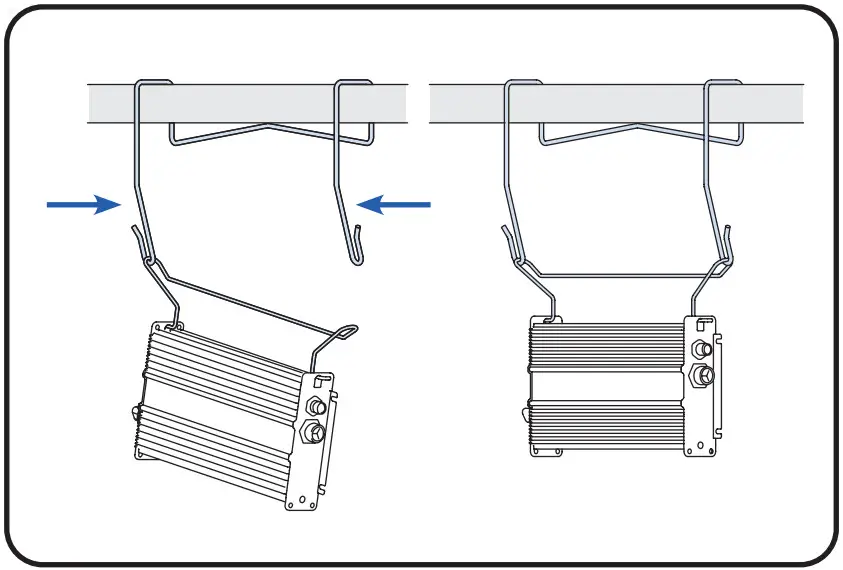
Installation with Hangers
- Hang brackets of driver module onto the hanger and push down until brackets snap into place.
- Hang driver bracket from one hook, then hang other driver bracket end by pressing hanger arms together.

Installation with Universal Cables
- Wrap loop end of the cable over structural member. Insert hook through the loop end.
- Attach hooks to oval driver mounting holes. Ensure the hook gate is closed.

Installation with Custom Brackets
If you choose to use your own custom mounting method, attach to oval driver mounting holes A and B for hanging.
No side forces should be applied to mounting holes A and B. 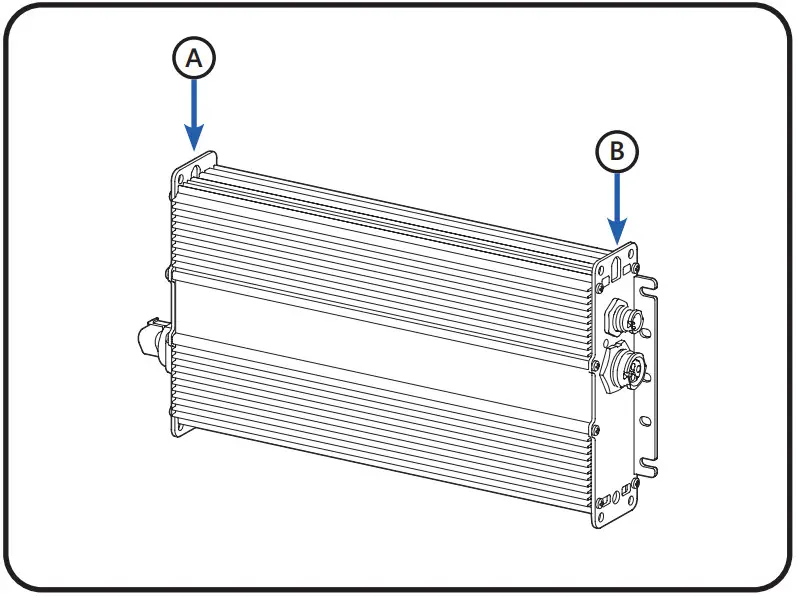
Electrical Connections
![]() WARNING
WARNING
RISK OF ELECTRIC SHOCK
Turn power OFF before inspection, installation, or removal. 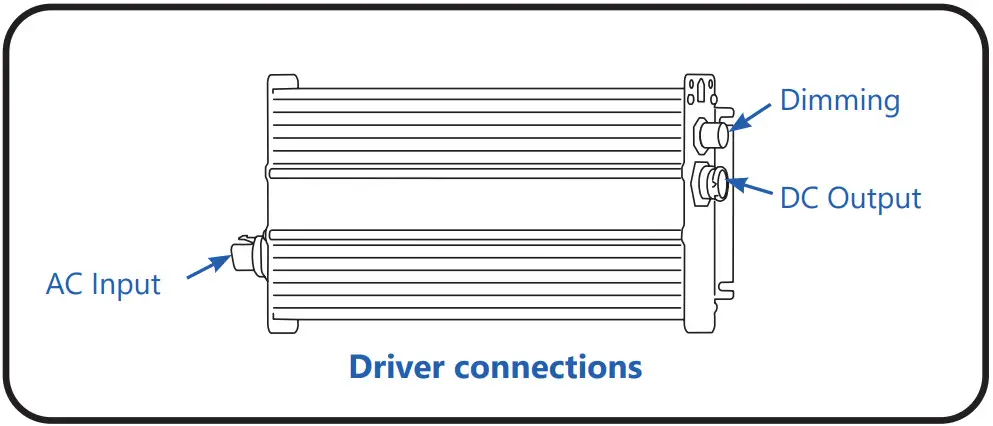
Connect the Driver Output to Light Module
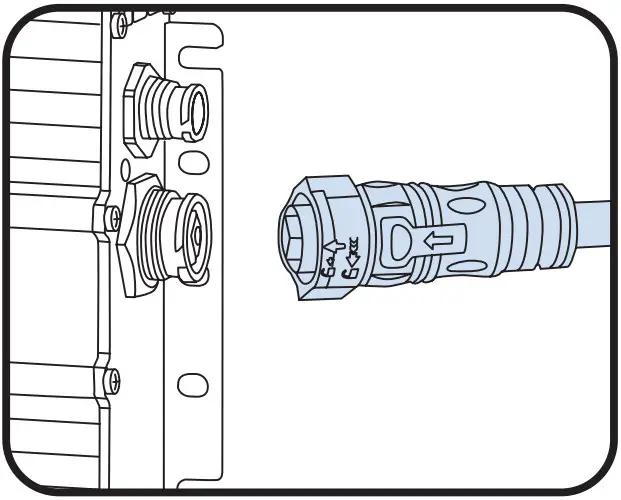
- Align keying features of a larger output connector on the driver with the connector on the light module cable.

- Push connectors together until the lock ring has snapped into place and a click is heard.

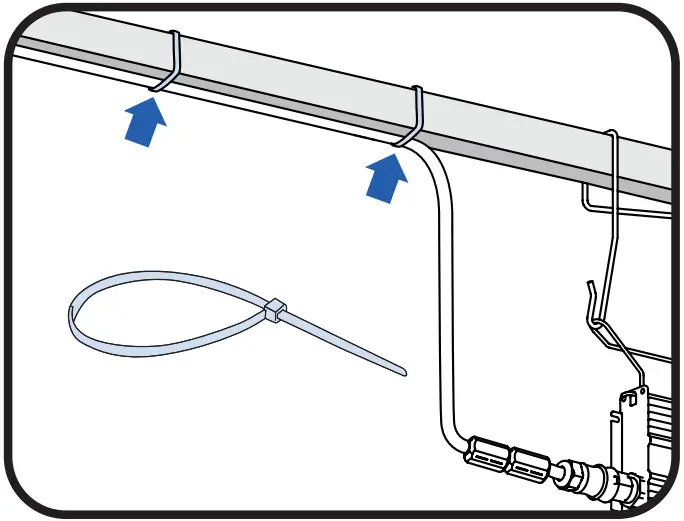
- Recommended: secure light module cable.

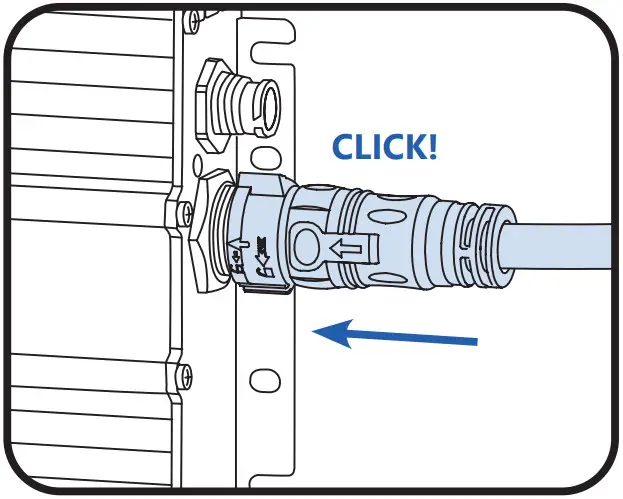
NOTE 1: Use 914 mm or 1828 mm extension cables if the driver and light module are more than 0.6 m apart.
NOTE 2: To disassemble connectors, turn the locking ring 1/8 of a turn counter-clockwise and separate connectors.
Connect the Driver Input
- Align keying features on the driver with the connector on the selected leader cable.

- Push connectors together until a click is heard.
- Secure AC input leader cable, away from driver and light module.

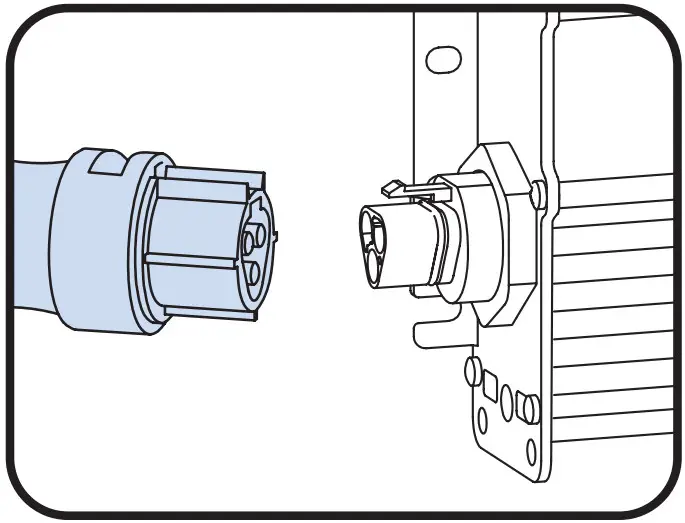
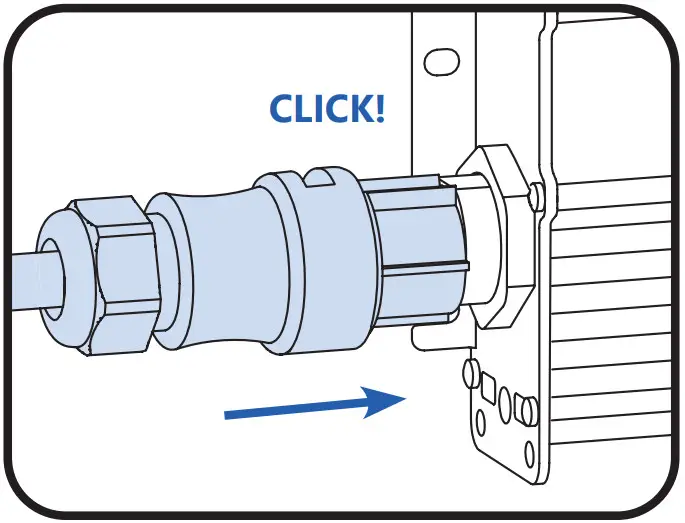
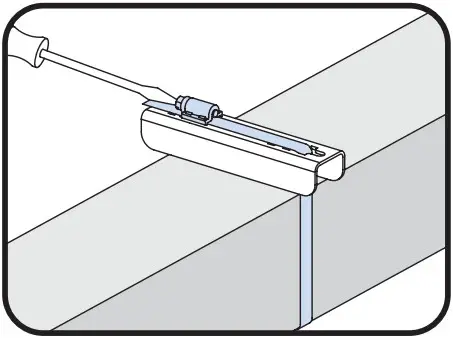
NOTE: To disassemble connectors, insert and twist a small blade screwdriver and then separate connectors. 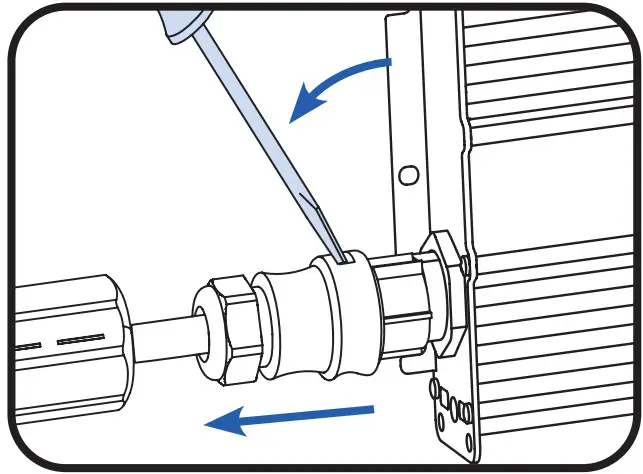
Connector pin-out
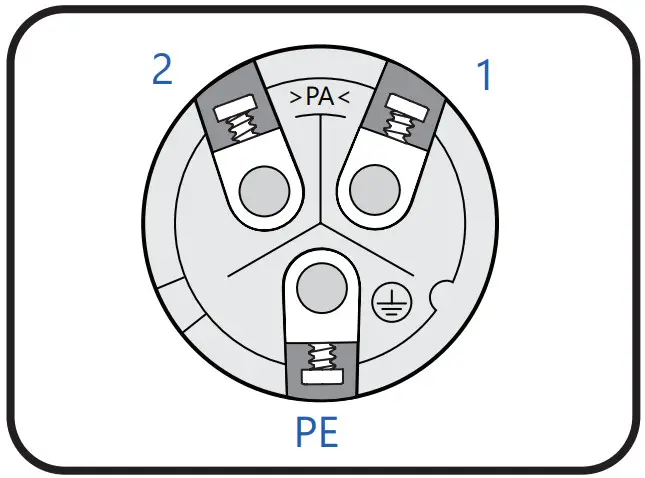
| Pin | Line-to-Line Voltage | Line-to-Neutral Voltage | ||||
| 1 | L2 | L1 | L1 | L1 | L2 | L3 |
| 2 | L3 | L2 | L3 | N | N | N |
| PE | PE | PE | PE | PE | PE | PE |
| L=Line / N=Neutral / PE=Protective Earth | ||||||
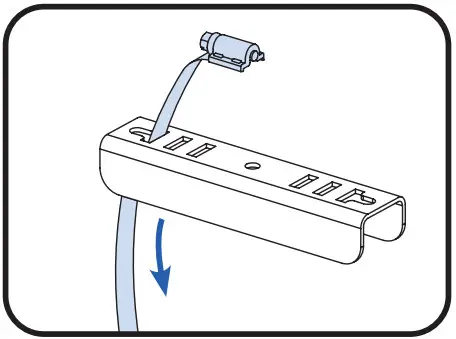
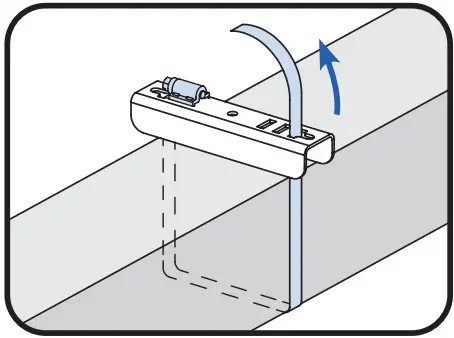
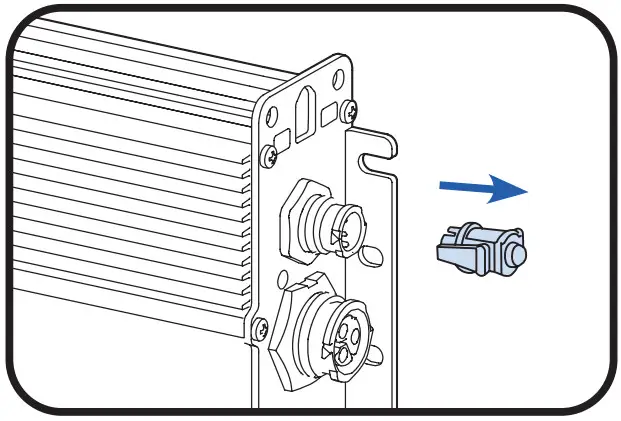
Using Custom AC Inputs
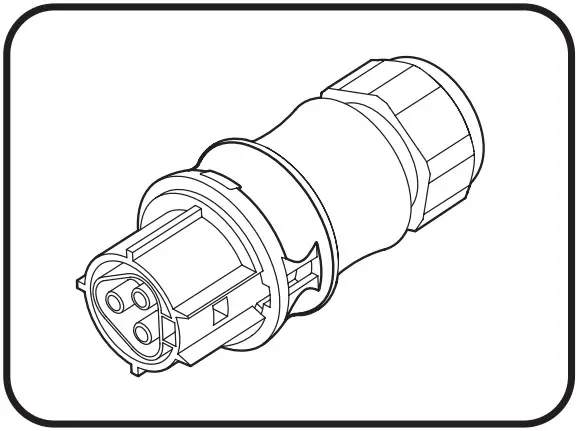
If you choose to use your own custom AC input connection, use a Wieland RST20i3 green connector (96.031.4055.7 OR 96.031.4155.7 OR 96.031.0055.7 OR 96.031.1055.7) and plug into the male AC connector of the driver.
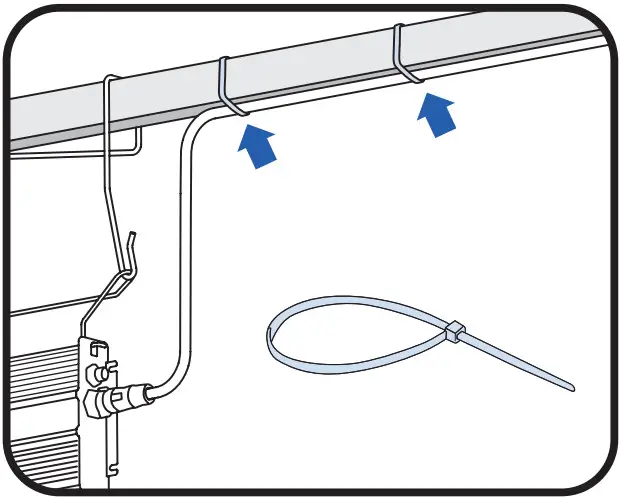
Connect Bead to AC Input Leader Cable
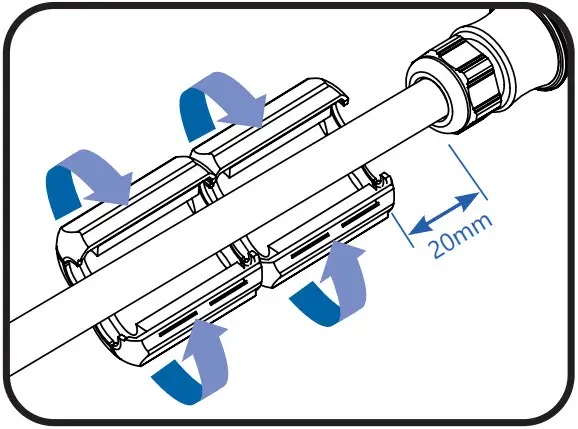
Connect 2 beads provided, the first bead should be no more than 20 mm from the input connector.
Connecting Driver to AC Line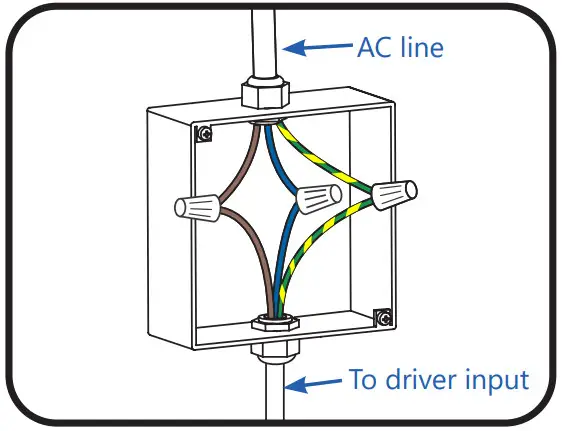
Connect the yellow/green wire to the incoming ground conductor. Connect the brown wire to Line 1 and blue wires to Neutral or Line 2 of the incoming AC line.
Connection Schematic
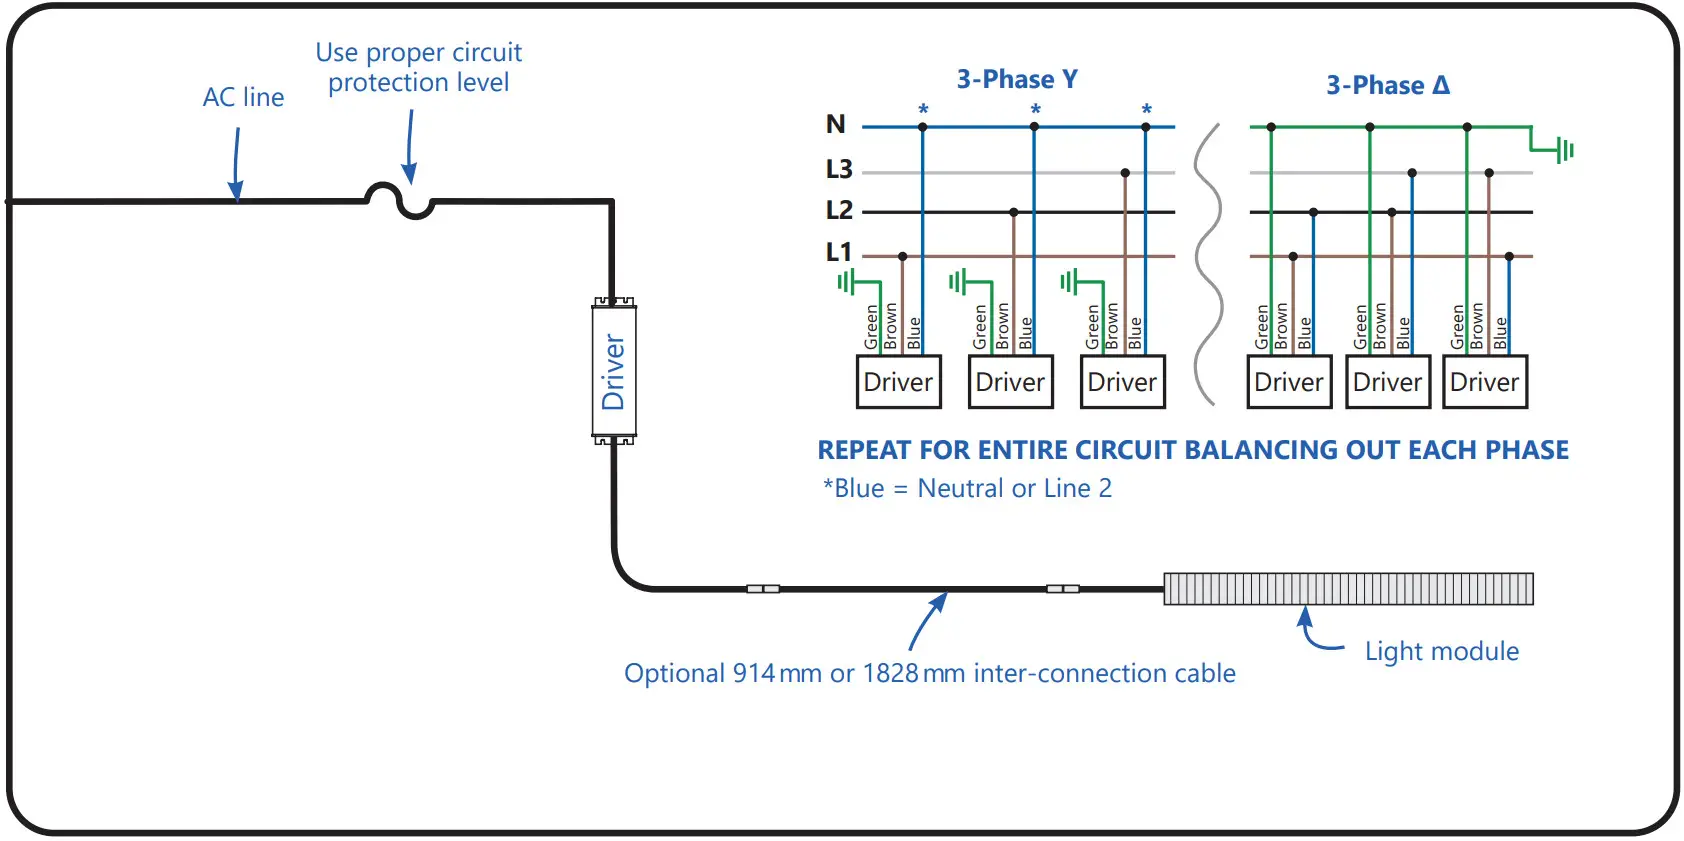
Driver Input Wire Colors
Brown = Line 1
Blue = Neutral or Line 2
Yellow/Green = Ground![]() WARNING
WARNING
The ambient temperature surrounding each driver must be lower than 40°C.
NOTE: Maximum cumulative length of inter-connection cable is 3.6 m.
Connecting Wired Dimming (Optional)
![]() WARNING
WARNING
RISK OF ELECTRIC SHOCK
Turn the power off before installation, inspection, cleaning, or removal. And follow appropriate lock-out/tag-out safety procedures.
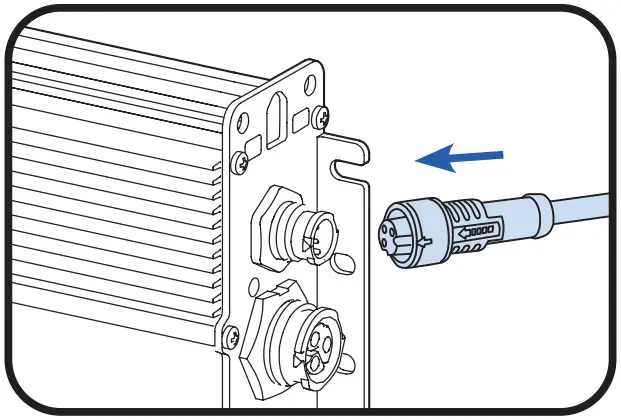
- Remove the cap from the dimming connector.

- Plug dimming cable: align keying features and push connectors together until the lock ring has snapped into place and a click is heard. To remove the dimming cable, turn the locking ring 1/8 of a turn counter-clockwise and separate connectors.

- Connect the appropriate wiring to Dim+(0-10V) and Dim – (0-10V) from the driver. Insulate the black wire. Follow dimming switch instructions for the rest of the connection.
 *The black/white wire is a 12V auxiliary output that can support up to 250mA of current.
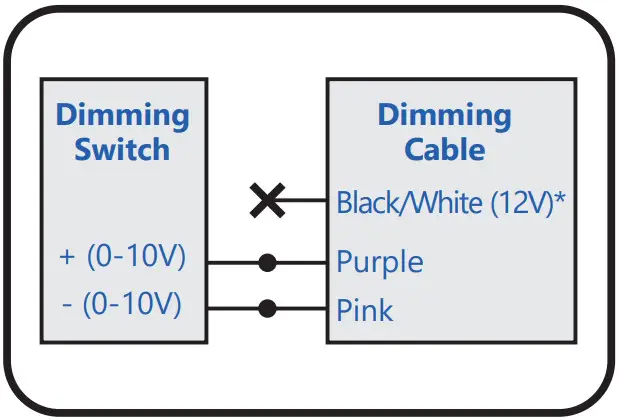 *The black/white wire is a 12V auxiliary output that can support up to 250mA of current.
Save These Instructions
Use only in the manner intended by the manufacturer. If you have any questions, contact the manufacturer.![]() Electrical products must not be thrown out with domestic waste. They must be taken to a communal collecting point for environmentally friendly disposal in accordance with local regulations. Contact your local authorities or stockist for advice on recycling. The packaging material is recyclable. Dispose of the packaging in an environmentally friendly manner and make it available for the recyclable material collection service.
Electrical products must not be thrown out with domestic waste. They must be taken to a communal collecting point for environmentally friendly disposal in accordance with local regulations. Contact your local authorities or stockist for advice on recycling. The packaging material is recyclable. Dispose of the packaging in an environmentally friendly manner and make it available for the recyclable material collection service.![]() For the latest install guides for your product go to: https://www.gecurrent.com/eu-en/indoor-lighting/horticulture-led-grow-lights
For the latest install guides for your product go to: https://www.gecurrent.com/eu-en/indoor-lighting/horticulture-led-grow-lights
 https://www.gecurrent.com/eu-en/indoor-lighting/horticulture-led-grow-lights
Call us today! 1-888-694-3533
Email us: [email protected]
![]()
Current Lighting Limited, 3rd Floor, 1 Ashley Road, Altrincham, UK, WA14 2DT
Current Netherlands B.V., Programmeurstraat 6, 1033MT Amsterdam, Netherlands
www.gecurrent.com
© 2022 Current Lighting Solutions, LLC. All rights reserved. GE and the GE monogram are trademarks of the General Electric Company and are used under license. Information provided is subject to change without notice. All values are design or typical values when measured under laboratory conditions.
HORT162 (Rev 02/25/22)


