
SALUS SD600 Smoke Detector
Introduction
SD6
00 is a smart photoelectric smoke sensor, with ultra-low-power ZigBee wireless network technology design. It is capable of real-time detecting the presence of smoke. Once it detects danger of fire smoke, the red LED flashes rapidly and the sound alarm will alert you timely. For an internet connection (Online Mode), SD600 must be used with the Universal Gateway UG600/UGE600 and the SALUS Smart Home App. You can also use SD600 without an internet connection (Offline Mode).
Product Compliance
This product complies with the essential requirements and other relevant provisions of the following EU Directives: RED 2014/53/EU and RoHS 2011/65/EU. Full text of the EU Declaration of Conformity is available on www.saluslegal.com
2405-2480MHz; <14dBm
Safety Information
Use in accordance to national and EU regulations. Use the device as intended, keeping it in dry condition. Product for indoor use only. Installation must be carried out by a qualified person in accordance to national and EU regulations.
Warning
Do not install the smoke detector in places with high temperature, high humidity, high noise area or high frequency interference.
This product is a household smart smoke detector and it can trigger the flash and sound alarm when it detects smoke, but it cannot put out a fire.
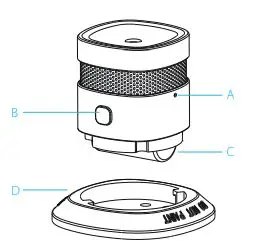
- Network Button
- Test / Mute Button
- Battery
- Bracket
Proper Placement
Flat Ceiling
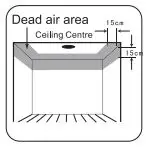
The preferred location to install the smoke detector is in the centre of the ceiling because smoke, heat and combustible products rise to the ceiling and will laterally spread. Keep at least 30 cm distance from lights and decorations and at least 15 cm distance from walls and corners.
Sloping Ceiling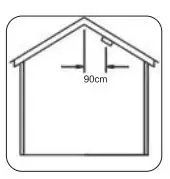
Please install the smoke detector at 90 cm horizontal distance from the ceiling top.
To set the device into pairing mode, press and hold the network button for 3 seconds.
To disconnect the device from the network, press and hold the network button for 5 seconds.
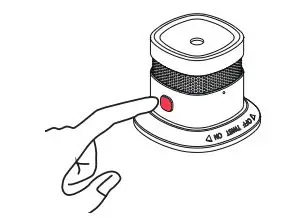
To test or to mute the alarm, press and hold the Test / Mute Button for 3 seconds.
LED Indication
| Status | LED | Alarm Ton |
| Standby | Rote LED blinkt alle 53 Sek | N/A |
| Test | Rote LED blinkt schnell | Schnelles “Di- Di-Di” |
| Alarm | Rote LED blinkt schnell | Schnelles “Di- Di-Di” |
| Stumm | Rote LED blinkt alle 10 Sek | N/A |
| Niedrige Energie | Rote LED blinkt einmal | “Di” alle 53 Sek |
| Fehler | Rote LED blinkt zweimal alle 53 Sek | “DI-Di” 2 mal alle 53 Sek. |
| Verbindungs- modus | Grübe LED blinkt 5 mal in der Sek | N/A |
| Verbindung erfolgreich | Grüne LED leuchtet für 3 Sek | N/A |
| Verbindung fehlgeschla- gen | Grüne LED blinke lang- sam ( 2mal je Sekunde) sechs mal | N/A |
| Trennen | Rote LED geht an dann blinkt Grüne LED langsam 6 mal | N/A |
Installation
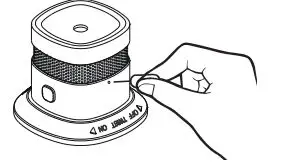
- Rotate the sensor anticlockwise to separate it from the bracket.
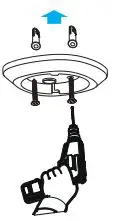
- Install the bracket using the screws or the provided double-sided tape.
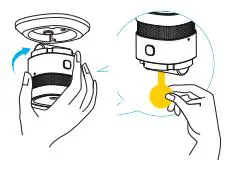
Remove the double-sided tape and stick the alarm into the ceiling.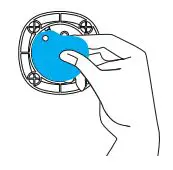
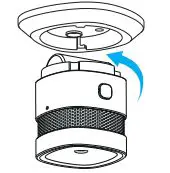
- Remove the battery insulating strip to turn on the detector and rotate the sensor clockwise into the bracket.
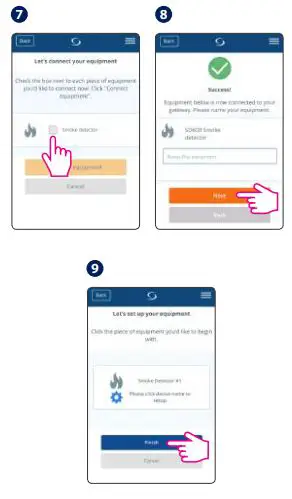
App Pairing
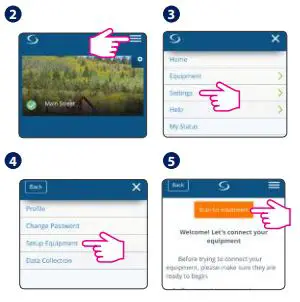
- Go to the App

- see fig2
- see fig 3
- see fig4
- see fig5
- Press and hold the network button for 3 seconds.
- see fig 7
- see fig 8
- see fig 9
Dashboard display
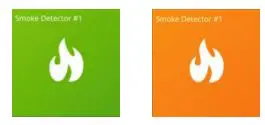
Green: Smoke
yellow: no smoke
Battery replacement
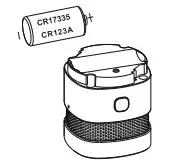
Replace the battery following the correct polarity.


