ASSEMBLY INSTRUCTIONS
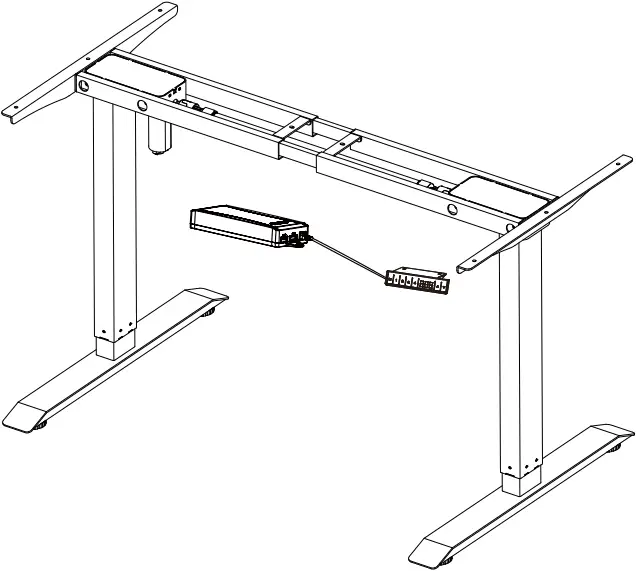
Single-motor Electric Standing Desk
USER MANUAL
Rated Voltage:100-240v
Continuous Working 2 Minutes, rest at least 18 minutes.
CAUTION / INFORMATION
IMPORTANT: Please read this manual carefully.
- This height adjustable desk has electric motors and is designed for use in dry work areas only.
- Make sure no obstacles are in the desk’s path.
Make sure the desktop is not touching any walls.
Make sure all cords are appropriate length to accommodate the change in height. - Do not sit or stand on the desk frame.
Do not crawl or lie under the desk frame. - Do not place any objects taller than 20″ underneath the desk.
- Do not open any of the components – the legs, control box or switch.
There is a risk of injury and electric shock. - Make sure that the power supply is between 110v and 240v before plugging the control box into it.
- This product is designed with a duty cycle of 10% (2 min. on ,18 min. off).
- Under no circumstances does the manufacturer accept warranty claims or liability claims for damages caused from improper use or handling of the desk frame.
TOOLS REQUIRED
|
|
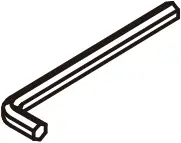 Hexagonal Wrench 4mm
 Screwdriver
HARDWARE
I | J | K | L |
A | B | C | D |
E | F | G | H |


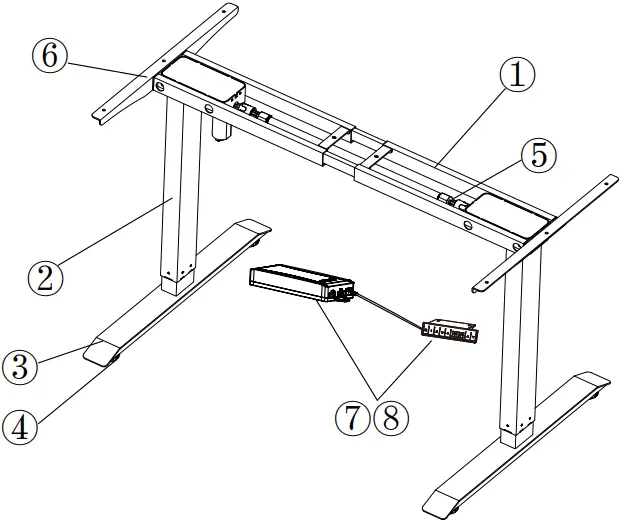
PART DIAGRAM
No. | Description | Qty |
1 | Crossbar Assembly | 1 |
2 | Legs | 2 |
3 | Feet | 2 |
4 | Adjustable Foot | 4 |
5 | Transmission Bar | 1 |
6 | Desktop Bracket | 2 |
7 | Keypad | 1 |
8 | Controller | 1 |
INSTALLLATION STEPS
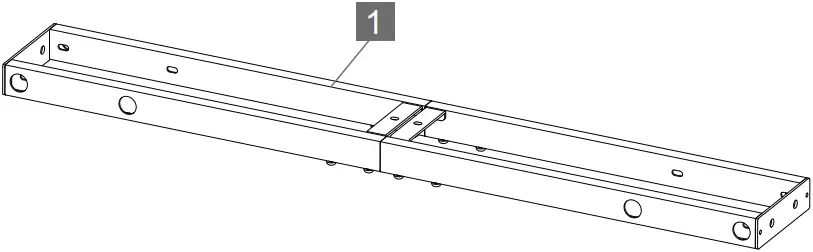
Step 1
Using Hexagonal wrench 4mm to loosen the screws, and adjust the crossbar according to the size of desktop.
G  M4
M4
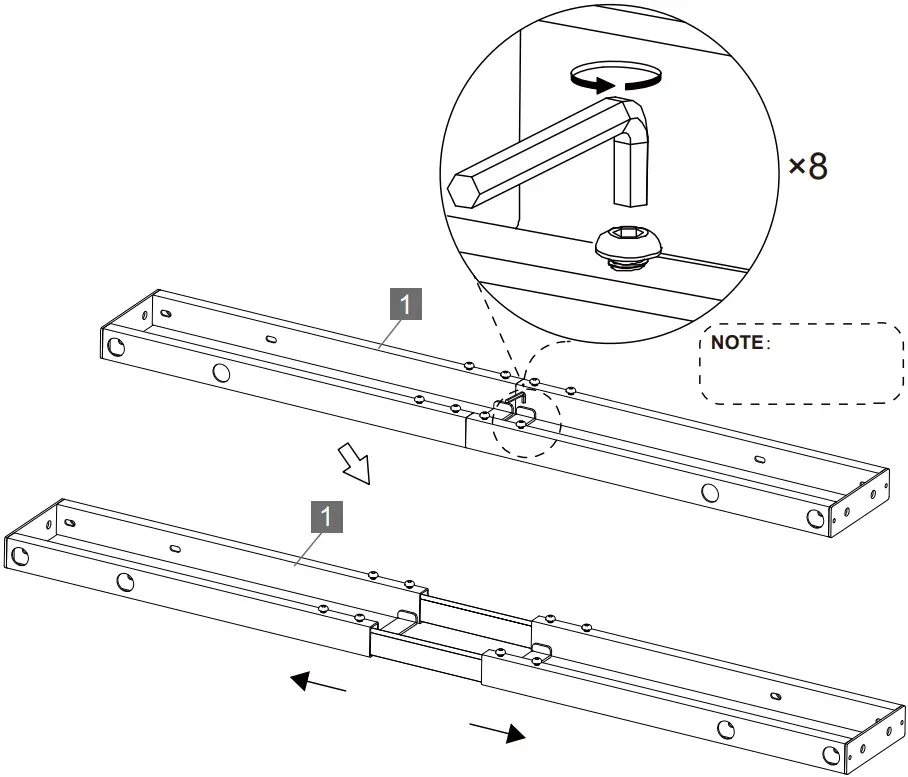
NOTE:
Please loosen the screws.
Step 2
Assembly Left/right Legs
A | |
| G |
|
 Step 3
 Step 3
Assembly desk feet
B | |
| G |
|
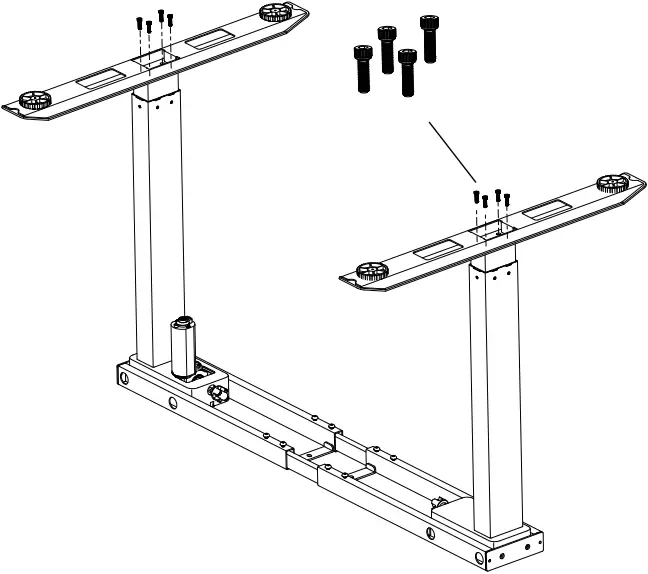
Step 4
Attach the desktop bracket
A | |
| G |
|

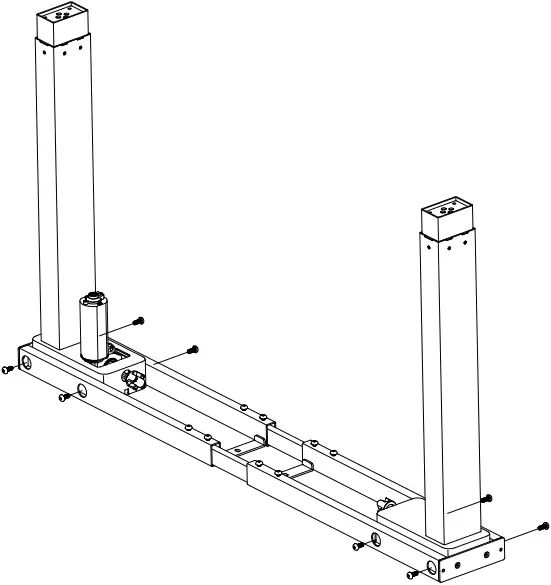
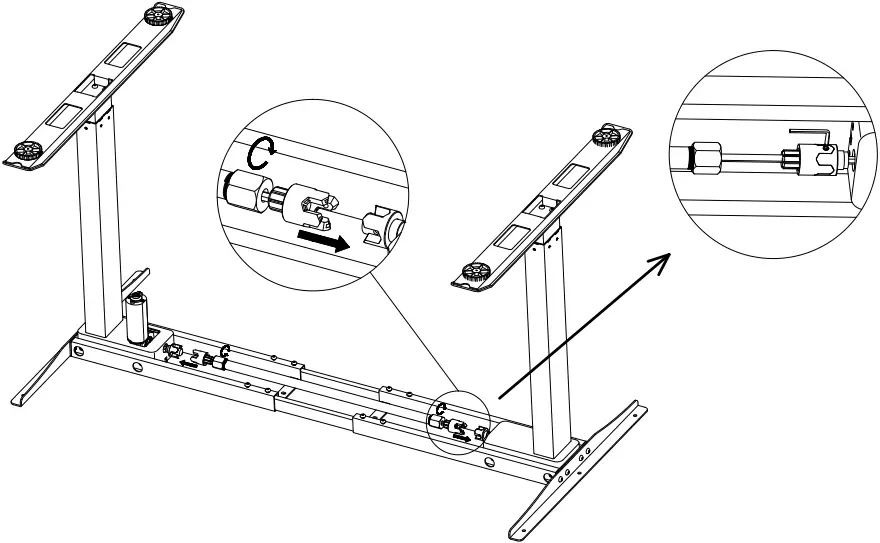
Step 5
Assemble the Transmission Bar
- Loosen the screws of the hexagonal tube
- Insert transmission bar
- Adjust the length according the size of desktop
- Tighten the screws on the hexagonal tube.
| F |
|
Step 6
Insert the desk gaskets on the desktop bracket.
| E |
|
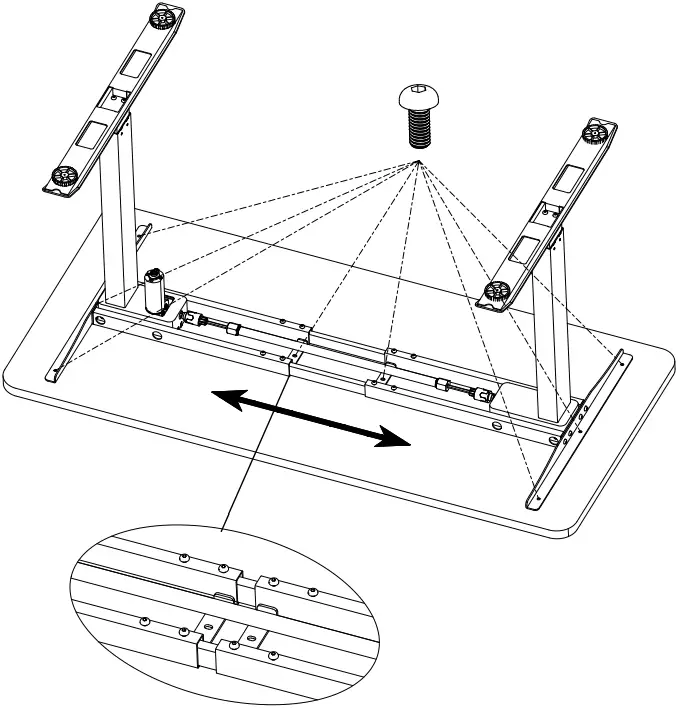
Step 7
Adjust the width of the crossbar according to desktop size and fit the desktop on the frame.
| A |
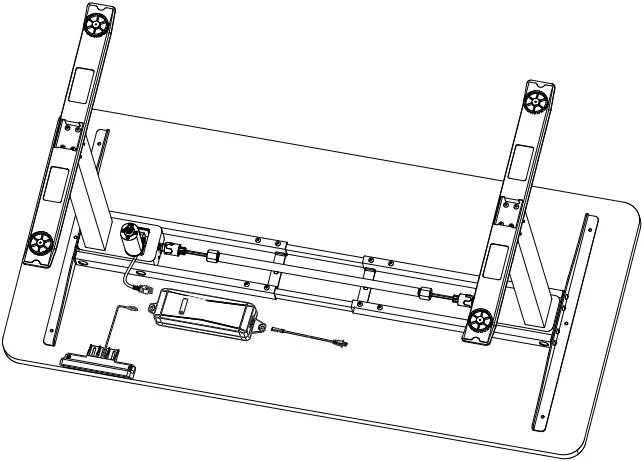
Step 8
Connection and installation of Control box and keyboard
- Plug cables from the motor to the control box.
- Plug the cable from the keyboard to the control box.
- Plug the power cable to the other side of control box.
- Use the ST 4.8*1 9/ 3.5*19 screws fix the keyboard and control box under the desktop.
| C | |
| D |
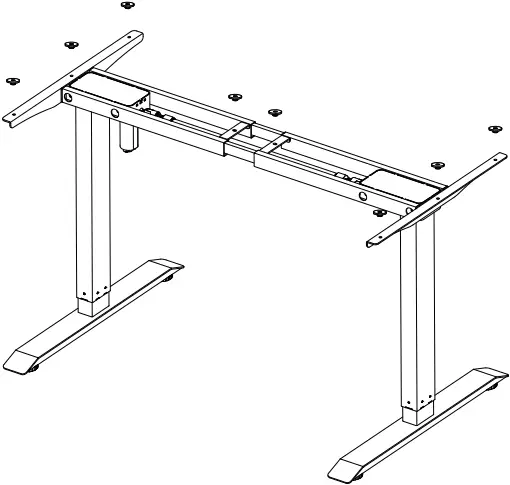
Step 9
Complete the installation, need two people carry the desk and put it in the right place.

Digital Keyboard Manual
1. Overview
Main features of the programmable Keyboard are showed in the figure below:
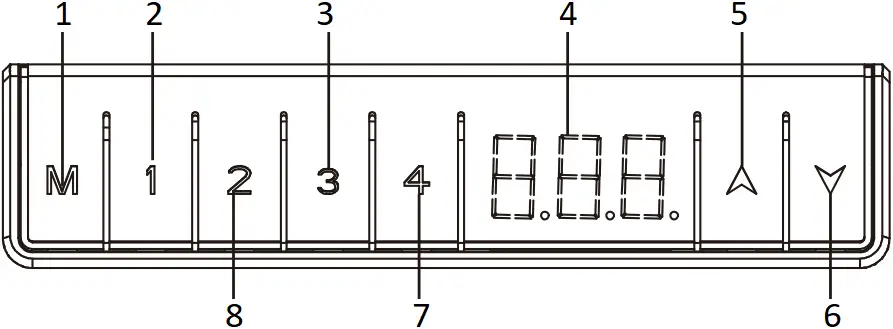
- Store Memory Key
- Memory Position Key 1
- Memory Position Key 3
- Height Display
- Desktop Up Key
- Desktop Down Key
- Memory Position Key 4
- Memory Position Key 2
2. Keyboard Function and Operation
Function | Description | Note | |
| Desk Upwards | Desk push this button. Push this button until the desired height of the desk has been reached. | The desk will continue driving upwards until you release the button, or the maximum height is reached. |
| Desk Downwards | Desk push this button. Push this button until the desired height of the desk has been reached. | Downwards until you release the button, or the minimum height is reached. |


3. Reset Procedure
IMPORTANT: You must reset the desk prior the use.
Make sure no obstacles are in the desk’s path.
Make sure the desktop is not touching any walls.
Make sure all cords are appropriate length to accommodate the change in height.
a. Press the “![]() ” and “
” and “![]() ” at the same time for 3 seconds until the display show ” RES “, and the system will make a sound beep, reset is complete.
” at the same time for 3 seconds until the display show ” RES “, and the system will make a sound beep, reset is complete.
b. If the Position of desktop is not at the lowest height. Please press the “![]() ” and “
” and “![]() ” at the same time until the desk reaches its lowest height, and the system will make a sound of beep, reset is complete.
” at the same time until the desk reaches its lowest height, and the system will make a sound of beep, reset is complete.
4. Storing a Position
You can use this function to adjust the desktop to a saved height with 4 positions. If you are switching on the control unit for the first time, all the saved position are set to the lowest desktop height, to change to a saved position proceed as follows:
![]() a. Press the UP or DOWN key to adjust the desktop to the desired height, the display will show the desktop height.
a. Press the UP or DOWN key to adjust the desktop to the desired height, the display will show the desktop height.
![]() b. Press and hold the “M” Key for 3s until the numbers on the display started flashing.
b. Press and hold the “M” Key for 3s until the numbers on the display started flashing.
![]() c. Press memory position Key 1 to save the desk position in memory.
c. Press memory position Key 1 to save the desk position in memory.
![]() d. The display will read “P 1” the memory position number you saved.
d. The display will read “P 1” the memory position number you saved.
- The other position may be stored in the same way.
- The desk base can be adjusted by pressing and holding either the UP or DOWN button until the desired height is reached.
- To program up to four presets : Use the up/down buttons to find a desired height, then press “M” followed by a number 1 – 4.
CAUTION: Once a preset button is pushed, the desk will move to the programmed height.
5. Switch the unit between CM and Inch
The height unit can be switched between CM and Inch, check the proceed as follows:
a. Press the “![]() ” and “
” and “![]() ” at the same time for 3 seconds.
” at the same time for 3 seconds.
b. Display started flashing and read “C-E”.
c. Press the “![]() ” within 10 seconds, the display show “C”, and switched the unit to CM; Press the “
” within 10 seconds, the display show “C”, and switched the unit to CM; Press the “![]() “, the display show “E”, and switched the unit to “inch”.
“, the display show “E”, and switched the unit to “inch”.
d. The display stopped flashing, and the switch is complete.
6. SETTING THE LED RETRACTED HEIGHT
Press the DOWN button on the memory controller until the frame reaches its lowest position. Measure the height of the frame from the floor and if the number on the LED display does not match your measurement, follow these steps:
a. Press and hold the DOWN button (about 5 seconds) until the LED displays the flashing starting height.
b. Press the UP or DOWN button to increase or decrease the height (1unit / click).
c. Then press “M” and stop flashing, your desk is now ready to use.
Note: the LED display has a ± 0.1 tolerance.
7. Trouble Shooting
Below are the possible errors which can be displayed. The errors will only be displayed when a button is pressed.
Error code | Description | Resolve |
E01 | Lifting speed of two legs are not able to sync or HALL signal failure | Confirm that all wired connections are secure (legs to cables, cables to control box). |
E04 | Leg 1 has overload, over-current protection | Remove everything from the desktop and perform the reset procedure outlined in the Digital Memory Controller section. (better to hold for 18 minutes) |
E08 | Leg 2 has overload, over-current protection | Remove everything from the desktop and perform the reset procedure outlined in the Digital Memory Controller section. (better to hold for 18 minutes) |
E10 | Leg 1 has collided and rebounded | The desk will automatically stop and bounce back 2 cm. Perform the reset procedure outlined in the Digital Memory Controller section |
E20 | Leg 2 has collided and rebounded | The desk will automatically stop and bounce back 2 cm. Perform the reset procedure outlined in the Digital Memory Controller section |
HOT | Over heating protection | Hold for 18 minutes to restart |
If the error message persists after the reset procedure, please contact seller.


