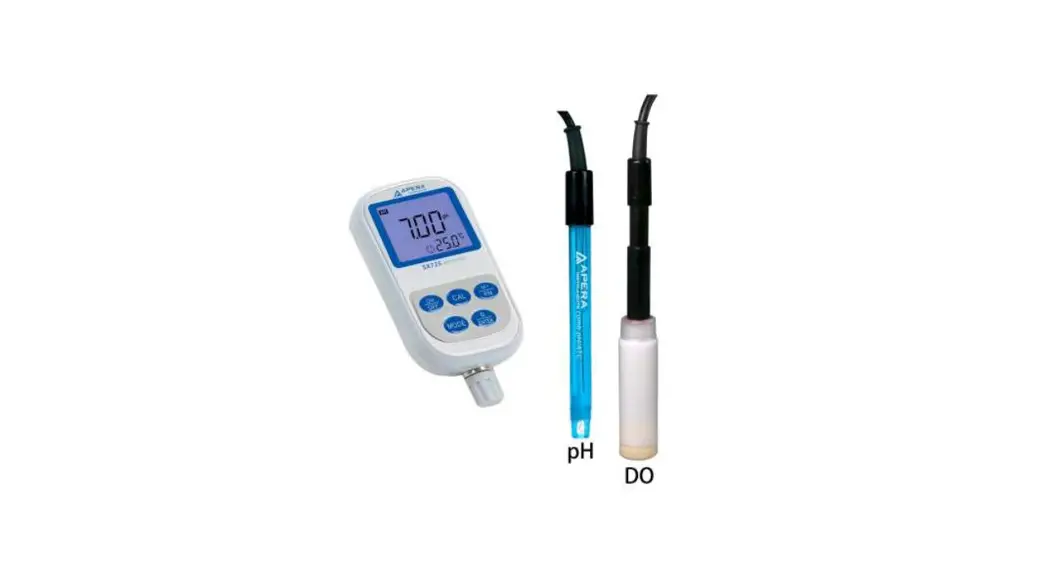
![]() SX725 Portable pH and DO Meter
SX725 Portable pH and DO Meter
User Manual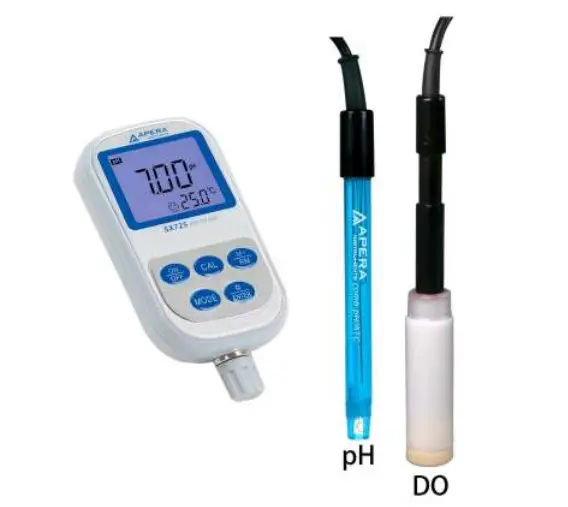
ATTENTION
- Water droplets are added during production to maintain the moisture of the probe. This is normal practice and should not be attributed to the used products.
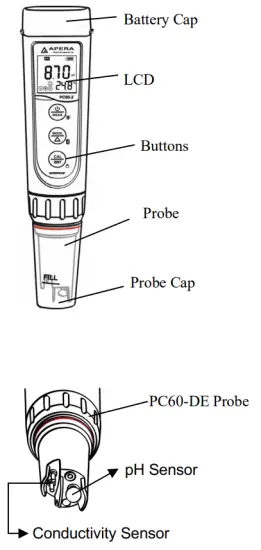
- The latest PC60-Z Tester comes with an upgraded probe structure equipped with a sensor shield that prevents glass bulb breakage from accidental collisions (see picture below). Users can remove the shield when cleaning the sensor and put it back on after cleaning.
Introduction
Thank you for choosing Apera Instruments PC60-Z Smart Multi-Parameter Water Tester. This product is designed for accurate measurement of pH, conductivity, TDS, salinity, resistivity, and temperature for general water solution applications such as pools and spas, hydroponics, water treatment, aquarium, environment monitoring, etc.
1.1 Search “contest smart” in Apple App Store or Google Play App Store to download the latest App for your tester. Turn on the Bluetooth of your phone, go to ZenTest App, tap on the upper right corner, then select your tester to connect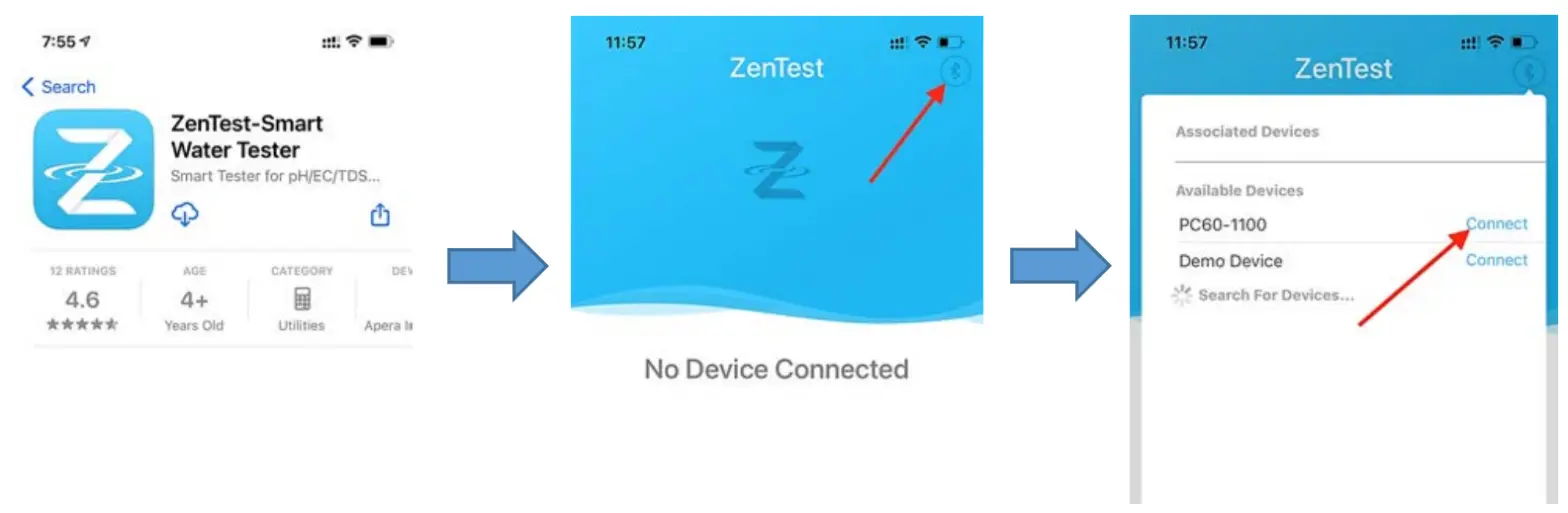
1.3 For video tutorials on how to get the most out of ZenTest®, please go to support.aperainst.com
1.4 This product is designed with a two-way control on both the tester and ZenTest App. Please refer to the functions available on each platform in the following table. This manual shows you how to operate the tester without connecting to a smartphone.
Table 1: Functions on 60-Z Tester and ZenTest Mobile App
| Functions | 60-Z Tester | ZenTest Mobile App | |
| Display | LED display | 1. Basic Mode: digital display+calibration info | Swipe to switch among various modes |
| 2. Dial Mode: digital display+dial display | |||
| 3. Graph Mode: digital display+graph display | |||
| 4. Table Mode: digital display+real time measurement and history display | |||
| Calibration | Press buttons to operate | Operate on smartphone following graphic guides | |
| Self-Diagnosis | Er1 — Er6 icons | Detailed problem analysis and solutions | |
| Parameter Setup | Press buttons to set up (except for P7 and P11) | All parameters can be set up in Settings. | |
| Alarm | The screen turns red when the alarm is triggered; cannot be setup | Alarm display and alarm values can be preset for each parameter | |
| Data Management | N/A | Manual or Auto. Datalogger; notes can be added to saved data | |
| Data Output | N/A | Share data via Email | |
Keypad Functions
Short press—— < 2 seconds ,Long press——- > 2 seconds
| 1. When turned off, short press to turn on the tester; long press to enter parameter setting. 2. In calibration mode or parameter setting, short press to return to measurement mode. 3. In measurement mode, long press to turn off the tester, short press to turn on/off the backlight. | |
| 1. In measurement mode, short press to switch parameter→Cond→TDS→Sal→Res 2. In measurement mode, long press to turn on/off Bluetooth® receiver. When turned on, will be flashing; when connected to smartphone, will stay on. 3. In parameter setting, short press to change parameter (Unidirectional). | |
| 1. Long press to enter calibration mode. 2. In calibration mode, short press to confirm calibration. 3. In measurement mode, when the automatic lock is turned off, short press to manually lock or unlock readings. |
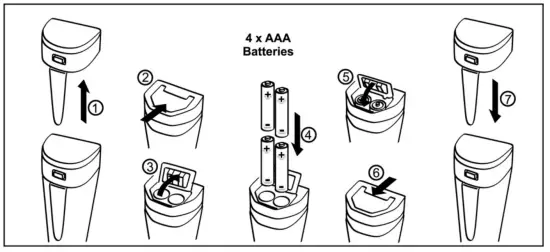
Battery Replacement
Please install batteries according to the following steps. *Please note the correct direction of battery installation: The Positive Side (“+”) OF EVERY SINGLE Battery MUST FACE UP.
(WRONG INSTALLATION OF BATTERIES WILL CAUSE DAMAGE TO THE TESTER AND POTENTIAL HAZARDS!)
Preparation before Use
Pull out the battery insulation slip, and take off the probe cap.
Rinse off the probe in pure water (preferably distilled or deionized water. RO water or tap water is the alternative) , then shake off excess water. 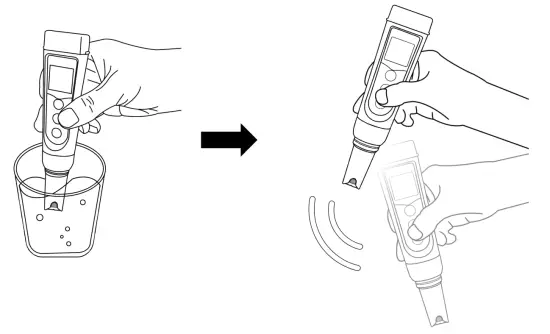
Perform calibration. For pH calibration tutorial, refer to Section 6; for conductivity calibration, refer to Section 8.
If the tester hasn’t been used for a long time (over 1 month), please soak the probe in the 3M KCL soaking solution for 15 minutes, then calibrate it before test.
pH Calibration
6.1 Short press![]() to turn on the meter; rinse the probe in pure water. Shake off excess water.
to turn on the meter; rinse the probe in pure water. Shake off excess water.
6.2 Pour ![]() 7.00 and pH 4.00 buffer solution in the corresponding calibration vials (to about half the volume of the vials).
7.00 and pH 4.00 buffer solution in the corresponding calibration vials (to about half the volume of the vials).
6.3 Long press to enter calibration mode (screen turns green);
6.4 Insert the probe into pH 7.00 buffer solution, make a quick stir, and hold still. When the reading is stabilized (![]() stays on screen), short press
stays on screen), short press![]() to start 1st point calibration. After calibration is completed, the tester will return to measurement mode. The icon
to start 1st point calibration. After calibration is completed, the tester will return to measurement mode. The icon![]() will appear at the bottom left of the LCD screen, indicating a successful 1 st point pH calibration.
will appear at the bottom left of the LCD screen, indicating a successful 1 st point pH calibration.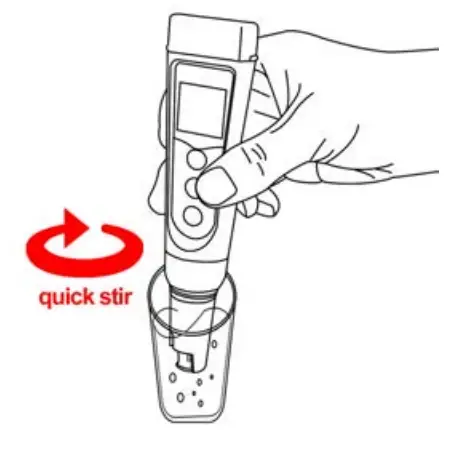
6.5 To calibrate 2nd point, use 4.00 pH buffer and repeat steps 6.3 to 6.4
(Do NOT turn off the tester after you finish pH 7 calibration). ![]() will display next to
will display next to![]() , indicating a successful 2-point pH calibration (low and middle points).
, indicating a successful 2-point pH calibration (low and middle points).
6.6 If necessary (target pH>8.00), calibrate 3rd point using 10.01 standard pH buffer and repeat Steps 6.3 to 6.4,![]() will show up next to
will show up next to![]() and,
and,![]() indicating a successful 3-point calibration (high, low, and middle points).
indicating a successful 3-point calibration (high, low, and middle points).
6.7 Notes about Calibration
- The 1st point calibration must be 7.00 pH. Perform the 2nd and 3rd point calibrations (4.00, 10.01, 1.68, or 12.45) immediately after the 1st point calibration is finished. Do NOT turn off the meter before you calibrate 2nd or 3rd point. Otherwise, you will need to restart the calibration process with 7.00 pH first.
- The pH 4.00 and 7.00 buffer solutions poured into the calibration vials can be used for up to 10 times as long as they are not contaminated and the bottles are capped when not in use. pH 10.01 can only be used up to 5 times as it will lose its accuracy much faster. After that, replace the buffer solutions in the calibration vials with new ones to keep the accuracy. Keeping the freshness and cleanliness of calibration buffers is essential for accurate pH measurement.
- The tester can perform 1 to 3 points of automatic calibration and can recognize 5 types of pH standard solutions. For details, please refer to the following table:
| Calibration | USA Series | NIST Series | Indication icon | Recommended | ||
| 1-pt | 7.00 pH | 6.86 pH | Accuracy requirement 0.1 pH Range < 7.00 pH | |||
| 2-pt | Option A | 1st pt: 7.00 pH 2nd pt: 4.00 pH or 1.68 pH | Option A | 1st pt: 6.86 pH 2nd pt: 4.01 pH or 1.68 pH | ||
| Option B | 1st pt: 7.00 pH 2nd pt: 10.01 pH or 12 45 nH | Option B | 1st pt: 6.86 pH 2nd pt: 9.18 pH or 12 45 nH | Range >7.00 pH | ||
| 3-pt | st 1 pt: 7.00 pH nd 2 pt: 4.00 or 1.68 pH rd 3 pt: 10.01 or 12.45 pH | 1st pt: 6.86 pH nd 2 pt: 4.01 or 1.68 pH rd 3 pt: 9.18 pH or 12.45 pH | Range: 0 to 14.00 pH |
6.8 For the self-diagnosis information, please refer to the table below:
| Symbol | Self-Diagnosis information | Potential problems and how to fix |
| The pH calibration solution cannot be recognized by the meter. | 1. Make sure the probe is fully immersed in the calibration solution. 2. Check if the calibration solution is expired or polluted. 3.1st point of pH calibration must be pH 7.00 or 6.86. See 6.6. 4. Please check whether the pH probe is damaged or broken. If so, please replace it with a new one. 5. The glass bulb or junction is severely contaminated. Please use a soft brush with soapy water to clean it thoroughly. Then soak it in 3M KCL 3-5 hours before performing calibration again. | |
| Wait to | ||
| During calibration, readings being unstable for over 3 minutes. | 1. Please check whether pH probe is damaged or broken. If so, please replace it with a new one. 2. The glass bulb or junction is severely contaminated. Please use a soft brush with soapy water to clean it thoroughly. Then soak it in 3M KCL overnight before performing calibration again. 3. The probe is aged (used for over a year and has a much slower response). A replacement is needed. | |
| pH probe zero electric potential out of range (<-60mV or >60mV) | 1. Check whether pH buffer solutions comply with the USA or NIST standards. 2. Check whether pH buffers are expired or contaminated. 3. Please check whether pH probe is damaged or broken. If so, please replace it with a new one. 4. The probe is aged (used for over a year and has a much slower response). A replacement is needed. 5. The probe is invalidated (Er4/Er5 repetitively appears, and problems 1, 2, 3 are excluded). Probe replacement is needed. | |
| pH probe slope out of range (<85% or >110%) | ||
| The calibration reminder is triggered. It’s time to perform a new pH calibration. | Perform pH calibration or cancel calibration reminder in ZenTest App settings. |
pH Measurement
7.1 How to take pH measurements
Short press![]() to power on the tester. Rinse the probe in pure water, and shake off excess water. Insert the probe in your sample solution, make a quick stir and hold still. Record the reading when it is stabilized (
to power on the tester. Rinse the probe in pure water, and shake off excess water. Insert the probe in your sample solution, make a quick stir and hold still. Record the reading when it is stabilized ( ![]() appears and stays on screen).
appears and stays on screen).
7.2 Pure Water pH Measurement
When testing pure water like tap water, drinking water, RO water, and distilled water, it will take longer for the readings to get fully stabilized (typically 1-5 minutes). Please be patient. If still not working, add Apera 3M KCL (AI1107) to your pure water at the ratio of 1:1000 (e.g. 1 ml KCL to 1000 ml water) to accelerate stabilization while minimizing pH change. If the accuracy is not meeting your requirement, please contact us at [email protected] to find the specialized meter designed for pure water pH test.
Conductivity Calibration
How to calibrate
8.1.1 Power on the tester. Press to switch to conductivity (Cond) measurement mode. Rinse the probe in pure water and shake off excess water.
8.1.2 Pour 1413 μS and 12.88 mS conductivity calibration solution into the corresponding calibration vials to about half the volume.
8.1.3 Long press![]() to enter calibration mode (screen turns green).
to enter calibration mode (screen turns green).
8.1.4 Dip the probe into 1413 μS/cm conductivity calibration solution, stir gently, and hold still. When the reading is fully stabilized ( stays on screen), short press![]() to start one-point calibration, the tester returns to measurement mode and
to start one-point calibration, the tester returns to measurement mode and![]() will appear at the bottom left of the screen, indicating a successful 1st point conductivity calibration.
will appear at the bottom left of the screen, indicating a successful 1st point conductivity calibration.
8.1.5 If needed (your target conductivity level is greater than 2 mS or 2000 μS), insert the probe into the 12.88 mS conductivity calibration solution. Follow the steps in 8.1.3 to 8.1.4 to complete the 2nd point of calibration using the 12.88 mS standard solution![]() . will appear next to
. will appear next to![]() , indicating a successful 2-point conductivity calibration.
, indicating a successful 2-point conductivity calibration.
Conductivity Calibration Notes
The tester can calibrate 84μS, 1413 μS/cm, and 12.88 mS/cm conductivity calibration solution. User can conduct 1 to 3 points calibration. Refer to the table below. Usually calibrating the tester with 1413 μS/cm conductivity buffer solution alone shall meet the testing requirement.
| Calibration Indication Icon | Calibration Standards | Measuring Range |
| 84 RS/cm | 0 – 200 RS/cm | |
| 1413 RS/cm | 200 – 2000 RS/cm | |
| 12.88 mS/cm | 2 – 20 mS/cm |
For conductivity calibration solutions, we recommend that users replace new solutions after 5 times of use to keep the standard solution’s accuracy. Do NOT pour the used calibration solutions back into the solution bottles in case of contamination.
For the self-diagnosis information, please refer to the table below:
| Symbol | Self-Diagnosis information | How to fix |
| The meter cannot recognize the conductivity standard solutions. | 1. Make sure the probe is fully submerged in the solution. 2. Check if the standard solution is expired or contaminated. 3. Check if the conductivity probe (two black rods) is damaged. 4. Check if the conductivity probe is contaminated. If so, please use a soft brush with warm water to clean up. | |
| Wait for ® to come up and stays on screen before pressing ET | ||
| During calibration, readings being unstable for over 3 minutes | 1. Shake the probe to remove the air bubbles on the surface of the black rods 2. Check if the conductivity probe is contaminated. If so, please use a soft brush with warm water to clean up. 3. Soak the probe in 12.88mS/cm solution for 10 minutes, then rinse with distilled water. | |
| The calibration reminder is triggered. It’s time to perform a new conductivity calibration. | Perform conductivity calibration or cancel calibration reminder in ZenTest settings. |
Conductivity Measurement
How to Measure Conductivity, TDS, Salinity, and Resistivity
Short press to turn on the tester. Rinse the probe in distilled water and dry it. Dip the probe into your sample solution, make a quick stir, and hold still. Record the reading after it is fully stabilized ( comes up and stays). Press to switch from conductivity to TDS, salinity, and resistivity.
Unit Conversion
a) 1000 µS/cm = 1 mS/cm = 1 EC (In conductivity mode, the unit will automatically turn from µS to mS if the reading is greater than 1999 µS, meaning you will only see 2.XX mS instead of 2XXX µS)
b) 1000 ppm = 1 ppt (In TDS mode, the unit will automatically turn from ppm to ppt if the reading is greater than 999 ppm, meaning you will only see 1.XX ppt instead of 1XXX ppm)
c) The TDS and Salinity values are converted from the conductivity values via a certain conversion factor. TDS and conductivity is linear related, and its conversion factor is 0.40 to 1.00. Adjust the factor in parameter setting P5 based on the requirements in different industries. The factory default setting is 0.71.
d) Salinity and conductivity is linear related, and its conversion factor is 0.5.
e) The tester only needs to be calibrated in Conductivity mode.
f) Conversion Example: if conductivity measurement is 1000µS/cm, then the default TDS measurement will be 710 ppm (under the default 0.71 conversion factor), and the salinity be 0.5 ppt. If TDS conversion rate is changed to 0.5, then the TDS measurement will be 500 ppm.
Temperature compensation factor
The default setting of the temp. The compensation factor is 2.0%/˚C. User can adjust the factor based on test solution and experimental data in parameter setting P10. The following table is some common examples for setting up the temp. compensation factor.
ORP Measurement
ORP stands for Oxidation-Reduction Potential, measured in mV. It’s also called redox. ORP is a measure of the cleanliness of the water & its ability to break down contaminants. A separate ORP probe (ORP60-DA) needs to be installed to be able to measure ORP.
Power on the PC60-Z tester, unscrew the original probe and install the ORP60-DA probe, then the tester will automatically switch to ORP measurement mode (Refer to Section 16 for how to replace a probe).
Rinse the probe in pure water and shake off excess water. Dip the probe in the sample solution, shake for a few seconds, and allow it to stand still. Record the ORP reading after stays on the screen.
Probe Cleaning
- The tester is only as accurate as the probe is clean. Always thoroughly rinse off the probe before and after each measurement with pure water in a container or with a wash bottle.
- For tough contaminants, detach the sensor shield, and soak the probe in Apera probe cleaning solution (AI1166) or detergent water for 30 minutes. Then use a soft brush to remove the contaminants. Afterward, soak the probe in 3M KCL soaking solution for at least 1 hour. Rinse it off, then re-calibrate the tester before using again.
Probe Storage
- Under regular usage (daily or weekly use), make sure the probe cap is wet, and tightly close the cap with the O-ring.
- For long-term storage (you are not going to use the product for a while), add 3M KCL soaking solution to the Fill line in the probe cap and store the probe in it. Close on the probe cap tightly with the O-ring.
- If you find white crystals inside or outside the probe cap, it is perfectly normal. It is the 3M KCL soaking solution that crystalizes over time by its nature. Just rinse them off and add in a new soaking solution. This chemical is not poisonous nor dangerous, and the probe’s performance will not be affected at all.
- NEVER store the probe in pure water like tap, RO, distilled, or deionized water as they could damage the pH probe. If this happens, immediately soak the pH probe Apera 3M KCL soaking solution overnight, then re-calibrate it before using. Pure water is only for rinsing the probe.
Parameter Settings
Table of Settings
| Symbol | Parameter Setting Contents | Content | Factory Default |
| P1 | Temperature Unit | °C — °F | °F |
| P2 | Select automatic lock | 5-20 seconds — Off | Off |
| P3 | Automatic Backlight Off | 1-8 minutes — Off | 1 |
| P4 | Automatic Power Off | 10-20 minutes — Off | 10 |
| P5 | pH Buffer Series Selection | USA — NIST | USA |
| P6 | pH Resolution | 0.1 — 0.01 | 0.01 |
| P7 | pH Calibration Reminder | H-hours D-Days (set up in ZenTest App) | / |
| P8 | pH back to factory default | No — Yes | No |
| P9 | Conductivity Reference Temperature | 15°C to 30°C | 25°C |
| P10 | Temp. Compensation Coefficient | 0 to 9.99 | 2.00 |
| P11 | Conductivity Calibration Reminder | H-hours D-Days (set up in ZenTest App) | / |
| P12 | Conductivity Back to Factory Default | No — Yes | No |
| P13 | TDS Factor | 0.40 to 1.00 | 0.71 |
| P14 | Salinity Unit | ppt — g/L | ppt |
Parameter Settings
- When the meter is turned off, long press
 to enter parameter setting →short press to switch P01-P02… →P14. Short Press
 , parameter flashes → short press to adjust parameter → short press to confirm →Short press to exit parameter setting and go back to measurement mode.
 - Auto. Lock (P02) – You can set the auto-lock time from 5 to 20 seconds. For example, if 10 seconds is set, when the measured value is stable for more than 10 seconds, the measured value will be automatically locked, and the HOLD icon will be displayed. Short press to release the lock. When the setting is “Off” , the Auto. the lock function is turned off, that is, the measured value can only be manually locked. Short press to lock or unlock the measured value. The HOLD icon will be displayed when the reading is locked.
- Auto. Backlight (P03) ─ You can set the automatic backlight time for 1 to 8 minutes. For example, if 3 minutes is set, the backlight will turn off automatically after 3 minutes; when the “Off” is set, the auto. backlight function will be turned off, and short press to manually turn the backlight on or off.
- Auto. Power off (P04) ─ The auto. power off time can be set to 10 to 20 minutes. For example, if 15 minutes is set, the meter will automatically shut down after 15 minutes if no operation; when “Off” is set, the auto. power off function will be turned off. Long press to manually shut down the meter.
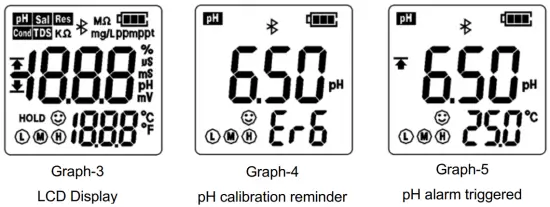
- pH Calibration Reminder (P07) and Conductivity Calibration Reminder (P11) – set XX hours (H) Or XX days (D) in ZenTest mobile app – settings – Parameter – pH – Calibration Reminder. On the meter, you can only check the values that have been set up on ZenTest App. For example, if 3 days is set up, the Er6 icon (see Figure-4) will appear in the lower right corner of the LCD screen in 3 days to remind you to perform calibration, also in the ZenTest App there will be a pop-up reminder. After calibration is finished or the reminder setting is canceled in the ZenTest App, the Er6 icon will disappear.
- pH Back to Factory Default (P08) and Conductivity Back to Factory Default (P12) – Select “Yes” to recover instrument calibration to the theoretical value. This function can be used when the instrument does not work well in calibration or measurement. Calibrate and measure again after setting the instrument back to factory default.
Technical Specifications
| pH | Range | -2.00 to 16.00 pH |
| Resolution | 0.01 pH | |
| Accuracy | ±0.01 pH ±1 digit | |
| Calibration Points | 1 to 3 points | |
| Auto. Temperature Compensation | 0 — 50°C (32 — 122°F) | |
| Conductivity | Range | 0 to 199.9 pS, 200 to 1999 pS, 2 to 20.00 mS/cm |
| Resolution | 0.1/1 pS, 0.01 mS/cm | |
| Accuracy | ±1% F.S | |
| Calibration Points | 1 to 3 points | |
| TDS | Range | 0.1 ppm to 10.00 ppt |
| TDS Factor | 0.40 to 1.00 | |
| Salinity | Range | 0 to 10.00 ppt |
| Resistivity | Range | 500 to 20MD |
| ORP (mV) | Range | -1000 mV to 1000 mV |
| Accuracy | ±0.2% F.S | |
| Temperature | Range | 0 to 50°C (32-122°F) |
| Accuracy | ±0.5°C |
Icons and Functions
| Calibrated points | L M H | Self-Diagnosis Symbol | Er1, Er2, Er3, Er4, Er5, Er6 |
| Stable reading indicator | Waterproof Rating | IP67 floats on water | |
| Reading Lock | HOLD | Power | DC3V, AAA batteries*4 |
| Bluetooth Signal | Battery Life | >200 Hours | |
| Low power reminder | Backlight | White: Measurement; Green: Calibration; Red: Alarm | |
| Auto. Power Off | Automatically power off if no operation for 10 minutes | ||
| Dimension/Weight | Instrument : 40x40x 178mm/133g; case : 255x210x5Omm/680g; | ||
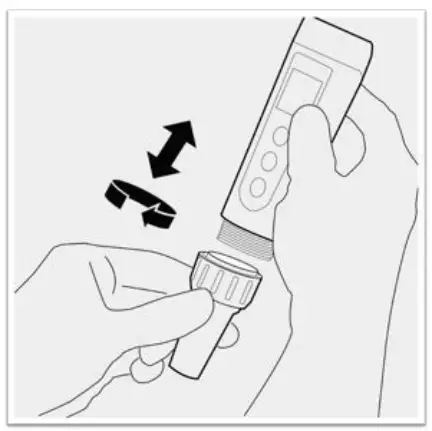
Probe Replacement
To replace a probe:
- Take off the probe cap;
- Screw off the probe ring
- Unplug the probe;
- Plugin the new replacement probe (pay attention to the probe’s position);
- Screw on the probe ring tightly. Soak the probe in 3M KCL for 5-15 minutes. Then perform calibration before testing.
The replacement probes that are compatible with PC60-Z are:
- PC60-DE (Default pH/conductivity probe), PH60-DE (Regular pH probe for water solutions), PH60S-DE (spear pH probe for food testing), PH60F-DE (flat pH probe for surface testing)
- EC60-DE (conductivity probe)
- ORP60-DA (ORP probe).
*Probes don’t last forever. Every probe will eventually age and fail even if you don’t use it that often. The typical service life of Apera probes is 12-24 months depending on the frequency of usage and how well you keep it clean and properly stored. We recommend replacing your probe every 1 to 2 years to ensure the best performance.
Troubleshooting Guide
| Trouble | Reason | How to fix |
| Cannot calibrate | Incorrect calibration order | Power on the tester, calibrate pH 7 first, then pH 4. After pH 4 is calibrated, if you want to calibrate pH 7 again, you need to reboot the tester. |
| Poor quality standard solutions | Replace with fresh and clean standard calibration solutions made by legitimate scientific instrument manufacturers. | |
| Contaminated probe | Clean the probe with Apera’s cleaning solution or detergent water. | |
| Aged probe | Replace the probe. | |
| Dried-out probe | Soak the probe in the 3M KCL soaking solution for at least 15 minutes. | |
| The probe is not fully submerged in the solution | Make sure the probe is fully immersed in the solution at least 1 inch deep. | |
| Air bubbles around the sensor | Make a quick stir in the solution to remove air bubbles. | |
| Reading is always slowly changing, won’t stabilize. | Contaminated probe | Clean the probe with Apera’s cleaning solution or detergent water. |
| Clogged junction | Clean the probe with Apera’s cleaning solution, then soak it in 3M KCL soaking solution overnight. | |
| Aged probe | Replace the probe. | |
| Testing pH of low ionic strength solutions like tap water, drinking water, RO water | Be patient, wait for 1-5 minutes to reach a fully stabilized reading. If still not stabilizing, add all of Apera 3M KCL solution to 1000m1 of test solution (or 1 teaspoon to 1 gallon). | |
| Display similar readings in any solutions or always display 7.0 pH | Broken probe | If you don’t find any visible damage to the probe and it’s within the 1-year probe warranty, contact your point of purchase for warranty fulfillment; If there is visible damage or the probe is more than 1-year old, replace the probe. |
| Reading keeps jumping | The probe is not fully submerged in the solution | Make sure the probe is fully immersed in the solution at least 1 inch deep. |
| Air bubbles around the sensor | Make a quick stir in the solution to remove air bubbles. | |
| The probe is not properly connected or the pin connector is broken. | Check the probe’s connector, make sure it’s not broken and is correctly connected. Align the probe and instrument correctly before plugging in. Never force it. Ensure that the probe connector is not exposed in the air for too long. | |
| Calibration is successful, but reading is not accurate | Aged probe | Replace the probe. |
| Air bubbles around the sensor | Make a quick stir in the solution to remove air bubbles. | |
| Clogged junction | Clean the probe with a cleaning solution, then soak it in 3M KCL soaking solution overnight | |
| Comparison with other testers, test strips, or drop tests | To compare with other testers, make sure to perform a 2-point calibration for all testers in the same standards, then test a 3’d point. Whichever gives a more accurate reading in the 3’d point standard is the more accurate one. Test strips or drop tests’ accuracy is not comparable to pH meters’. |
FCC Warning Statement
Changes or modifications not expressly approved by the party responsible for compliance could void the user’s authority to operate the equipment. This equipment has been tested and found to comply with the limits for a Class B digital device, pursuant to Part 15 of the FCC Rules. These limits are designed to provide reasonable protection against harmful interference in a residential installation. This equipment generates uses and can radiate radio frequency energy and, if not installed and used in accordance with the instructions, may cause harmful interference to radiocommunications. However, there is no guarantee that interference will not occur in a particular installation. If this equipment does cause harmful interference to radio or television reception, which can be determined by turning the equipment off and on, the user is encouraged to try to correct the interference by one or more of the following measures:
— _Reorient or relocate the receiving antenna.
— _Increase the separation between the equipment and receiver.
— _Connect the equipment into an outlet on a circuit different from that to which the receiver is connected.
— _Consult the dealer or an experienced radio/TV technician for help.
APERA INSTRUMENTS, LLC
Address: 6656 Busch Blvd, Columbus Ohio 43229
Tel : 1 -614-285-3080
Email: [email protected]
Website: aperainst.com![]()


