![]()
Premium Series PH5 pH Tester
User Manual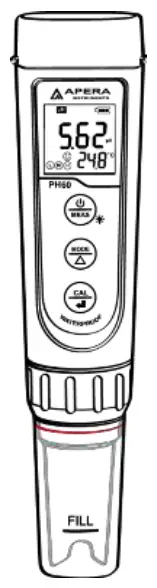
![]()
APERA INSTRUMENTS (Europe) GmbH
www.aperainst.de
v7.7
Thank you for purchasing Apera Instruments PH5 Premium pH Tester. Please read this manual before use in order to properly use and maintain the product.
For video tutorials, please go to support.aperainst.de
ATTENTION
- Water droplets are added during production to maintain the moisture of the probe. This is normal practice and should not be attributed to used product.
- Never use the product when it’s freezing cold. Let it warm to room temperature before using.
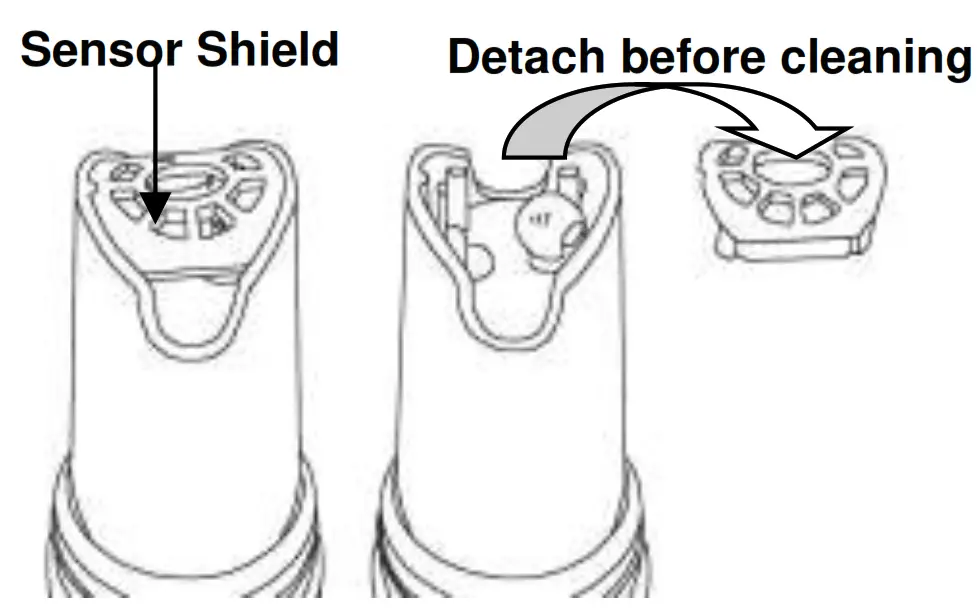
- There is a sensor shield on top of the pH sensor, protecting the glass bulb sensor from accidental damage. You can detach the sensor shield when rinsing and cleaning the sensor as shown in the graph below. Put back the sensor shield after cleaning.
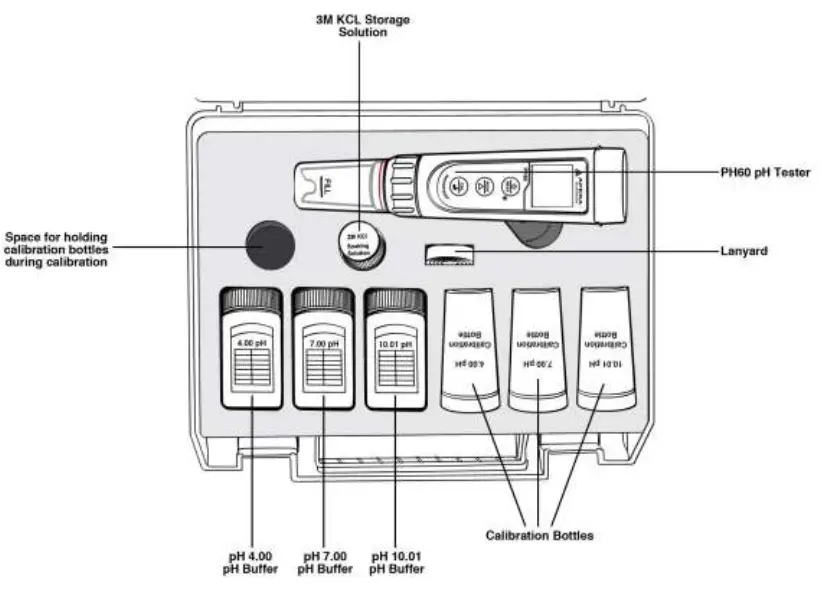
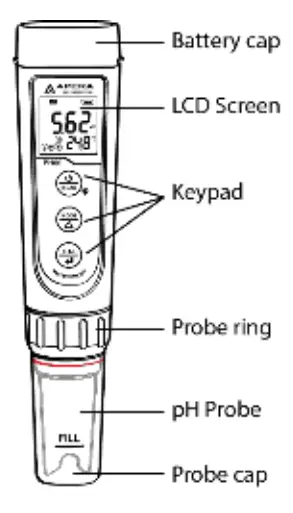
What’s in the Kit
Keypad Functions
Short press: < 2 seconds
Long press: > 2 seconds
| 1. Short press to turn on the tester and long press to turn off the tester. 2. When turned off, long press to enter parameter setting. 3. In measurement mode, short press to turn on backlight. 4. In calibration mode, short press to cancel calibration. | |
 | 1. In measurement mode, short press to switch between pH and mV. 2. In settings, short press to change parameters (Unidirectional). |
 | 1. Long press to enter calibration mode. 2. In calibration mode, short press to confirm calibration. 3. When reading is locked, short press to unlock. |
Preparation Before Use
3.1 Pull out the battery insulation slip, and take off the probe cap.
3.2 Rinse off the probe in pure water (preferably distilled or deionized water, alternatively RO water or tap water), then shake off excess water.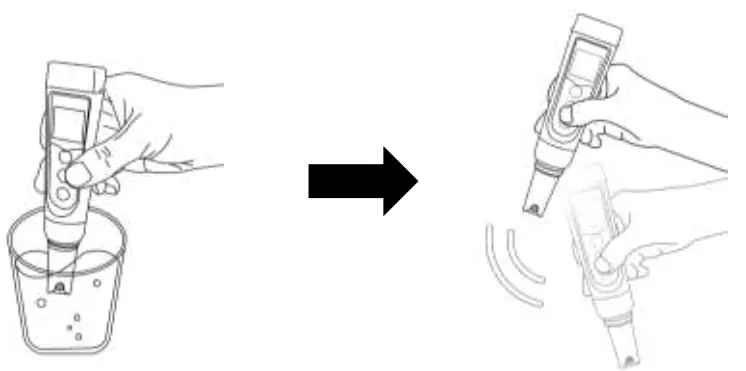
3.3 Perform at least a 2-point calibration at pH 7.00 and pH 4.00. For tutorial, refer to Section 4.
3.4 If the tester hasn’t been used for a long time (over 1 month), please soak the probe in the 3M KCL soaking solution for at least 30 minutes, then calibrate it before test.
pH Calibration
4.1 How to Calibrate:
4.1.1 Short press ![]() to power on.
to power on.
4.1.2 Pour pH buffer solutions in the correspondent calibration vials to about half volume.
4.1.3 Rinse the probe in pure water; Shake off excess water. Dip the probe in the pH 7.00 buffer solution first, and make a quick stir in the solution, then hold still.
4.1.4 Long press![]() to enter calibration mode, screen will turn green (Short press
to enter calibration mode, screen will turn green (Short press![]() if you decide to quit calibration and return to measurement mode).
if you decide to quit calibration and return to measurement mode).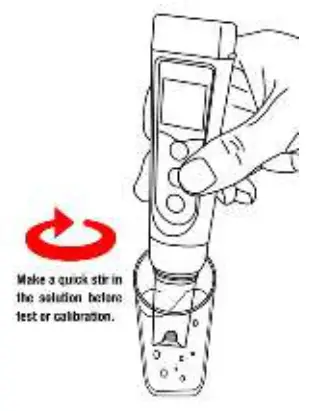 4.1.5 Wait for the reading to stabilize (when
 ![]() stays on the screen), then short press
stays on the screen), then short press ![]() to start the 1 st point calibration. After calibration is completed, the tester will return to measurement mode. Icon will appear at the bottom left of the screen, indicating a successful 1-point calibration (middle point).
to start the 1 st point calibration. After calibration is completed, the tester will return to measurement mode. Icon will appear at the bottom left of the screen, indicating a successful 1-point calibration (middle point).
4.1.6 To calibrate 2 nd point, use 4.00 pH buffer and repeat Step 4.1.3 to
4.1.5 (Do NOT turn off the tester after you finish pH 7 calibration). L will display next to 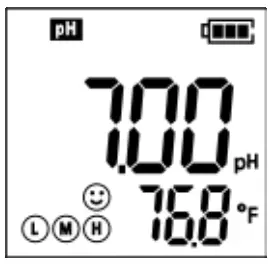 , indicating a successful 2-point calibration (low and middle points).
4.1.7 If necessary (target pH > 8.00), calibrate 3rd point using 10.01 standard pH buffer and repeat Step 4.1.3 to 4.1.5, H will show up next L to M and , indicating a successful 3- point calibration (high, low, and middle points).
4.2 Notes about Calibration
a) The 1 st point calibration must be 7.00 pH. Perform the 2 nd rd and 3 point calibrations (4.00, 10.01, 1.68, or 12.45) immediately after the 1 st point calibration is finished. Do NOT turn off the meter before you calibrate 2 nd rd or 3 point. Otherwise, you will need to restart the calibration process with 7.00 pH first.
b) The pH 4.00 and 7.00 buffer solutions poured into the calibration vials can be used for up to 10 times as long as they are not contaminated, and the bottles are capped when not in use. pH 10.01 can only be used for up to 5 times as it will lose its accuracy much faster. After that, replace the buffer solutions in the calibration vials with new ones to keep the accuracy. Keeping the freshness and cleanliness of calibration buffers is essential for accurate pH measurement.
c) The tester can perform 1 to 3 points of automatic calibration and can recognize 5 types of pH standard solutions. For details, please refer to the following table:
| Calibration | USA Series | NIST Series | Indication icon | Recommended | ||
| 1-pt | 7.00 pH | 6.86 pH | M | Accuracy requirement ≥ 0.1 pH | ||
|
2-pt | Option A | 1st pt: 7.00 pH 2nd pt: 4.00 pH or 1.68 pH | Option A | 1st pt: 6.86 pH 2nd pt: 4.01 pH or 1.68 pH | L M
| Range < 7.00 pH |
| Option B | 1st pt: 7.00 pH 2nd pt: 10.01 pH or 12.45 pH | Option B | 1st pt: 6.86 pH 2nd pt: 9.18 pH or 12.45 pH | M H | Range > 7.00 pH | |
| 3-pt | 1st pt: 7.00 pH 2nd pt: 4.00 or 1.68 pH 3rd pt: 10.01 or 12.45 pH | 1st pt: 6.86 pH 2nd pt: 4.01 or 1.68 pH 3rd pt: 9.18 or 12.45 pH | L M H | Range: 0 to 14.00 pH | ||
pH Measurement
5.1 How to take pH measurements
Short press![]() to power on the tester. Rinse the probe in pure water, shake off excess water. Dip the probe in your sample solution and make a quick stir, then hold still. Record the reading after it is stabilized (
to power on the tester. Rinse the probe in pure water, shake off excess water. Dip the probe in your sample solution and make a quick stir, then hold still. Record the reading after it is stabilized (![]() appears and stays on the screen).
appears and stays on the screen).
5.2 Pure Water pH Measurement
When testing pure water like tap water, drinking water, RO water and distilled water, it will take longer for the readings to get fully stabilized (typically 1-5 minutes). Please be patient. If still not working, add Apera 3M KCL (AI1107) to your pure water at the ratio of 1:1000 (e.g. 1 ml KCL to 1000 ml water) to accelerate stabilization while minimizing pH change. If the accuracy is not meeting your requirement, please contact us at [email protected] to find the specialized meter designed for pure water pH test.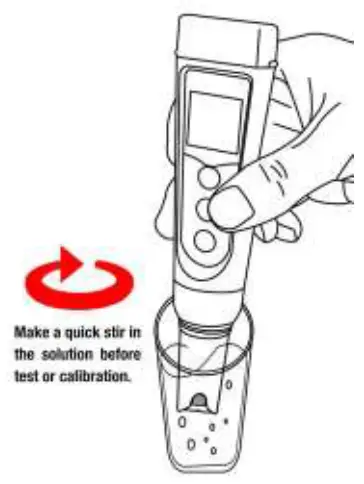
Probe Cleaning
6.1 The tester is only as accurate as the probe is clean. Always thoroughly rinse off the probe before and after each measurement with pure water in a container or with a wash bottle.
6.2 For tough contaminants, detach the sensor shield, soak the probe in Apera probe cleaning solution (AI1166) or detergent water for 30 minutes. Then use a soft brush to remove the contaminants. Afterwards, soak the probe in 3M KCL soaking solution for at least 1 hour. Rinseit off, then re-calibrate the tester before using again.
Probe Storage
7.1 Under regular usage (daily or weekly use), make sure the probe cap is wet, and tightly close the cap with the O-ring.
7.2 For long-term storage (you are not going to use the product for a while), add 3M KCL soaking solution to the Fill line in the probe cap and store the probe in it. Close on the probe cap tightly with the O-ring.
7.3 If you find white crystals inside or outside the probe cap, it is perfectly normal. It is the 3M KCL soaking solution that crystalizes over time by its nature. Just rinse them off and add in new soaking solution. This chemical is not poisonous nor dangerous, and the probe’s performance will not be affected at all.
7.4 NEVER store the probe in pure water like tap, RO, distilled, or deionized water as they could damage the pH probe. Pure water is only for rinsing the probe.
Parameter Setting
8.1 Setup Menu
| Symbol | Contents | Parameter | Factory Default |
| P1 | Select pH buffer solution | USA – NIST | USA |
| P2 | Low value measurement alarm setting | 0 to 14.00 pH | 0 |
| P3 | High value measurement alarm setting | 0 to 14.00 pH | 14.00 |
| P4 | Select automatic lock | Off – On | Off |
| P5 | Select backlight | Off – 1 – On | 1 |
| P6 | Select temperature unit | °C – °F | °F |
| P7 | Restore to factory default | No – Yes | No |
8.2 Parameter Setup
When turned off, long press![]() to enter parameter settings → Short press
to enter parameter settings → Short press![]() to switch P1-P2-
to switch P1-P2-
P3…P7 → Short press![]() to select parameter (selected parameter starts flickering) → Short press
to select parameter (selected parameter starts flickering) → Short press ![]() to change parameter → Short press
to change parameter → Short press![]() to confirm the change → Long press
to confirm the change → Long press![]() to go back to measurement mode.
to go back to measurement mode.
8.3 Parameter Setting Instruction
8.3.1 Select standard pH buffer solution (P1):
There are two options of standard buffer solutions: USA series and NIST series. Factory default is USA series, for details see clause 4.2.
8.3.2 Alarm Function (P2&P3)
Examples:
- Alarm triggered when measurement ≤ 3.20 pH:
Preset lowest value (P2) = 3.20 pH, highest value (P3) = 14.00 pH, when measured value ≤ 3.20 pH (stable displays on screen); screen turns red.
 - Alarm triggered when measurement ≥ 8.60 pH:
Preset highest value (P3) = 8.60 pH, lowest value (P2) = 0.00 pH, when measured value ≥ 8.60 pH (stable displays on screen); screen turns red. - Alarm triggered when measurement ≤ 3.20 pH or ≥ 8.60 pH:
Preset lowest value (P2) = 3.20 pH, highest value (P3) = 8.60 pH, when measured value is lower than 3.20 pH or higher than 8.60 pH (stabledisplays on screen), screen turns red.
8.3.3 Automatic Lock (P4)
Select “On” to activate auto lock function. When reading is stable for more than 10 seconds, the tester will lock the value automatically, and HOLD icon will display on LCD. Short press key again to cancel the lock.
8.3.4 Backlight (P5)
“Off”-turn off backlight, “On”-always turn on backlight, “1”- backlight will last for 1 minute.
8.3.5 Temperature Unit (P6)
Select between C˚ and F˚.
8.3.6 Factory default setting (P7)
Select “Yes” to recover instrument calibration to the theoretical value (pH value in zero potential is 7.00 pH, slope is 100 %), parameter setting return to initial value. This function can be used when instrument does not work properly in calibration or measurement. Calibrate and measure again after recovering the instrument to factory default status.
ORP Measurement
ORP stands for Oxidation-Reduction Potential. ORP is a measure of the cleanliness of the water & its ability to break down contaminants. An ORP probe is needed to test ORP (sold separately, SKU: AI1207). After powering on the tester, press ![]() to enter ORP mode (mV). Rinse the probe in
to enter ORP mode (mV). Rinse the probe in
distilled water and dry it. Dip the probe in your sample solution, make a quick stir, and hold still. Record the reading after it is fully stabilized.
Technical Specifications
| pH | Measuring Range | -2.00 – 16.00 pH |
| Resolution | 0.01 pH | |
| Accuracy | ±0.01 pH (±1 digit) | |
| Calibration Points | 1 – 3 points | |
| Automatic Temperature Compensation (ATC) | 0 – 50 ˚C (32 – 122 ˚F) | |
| ORP (mV) | Measuring Range | ±1000 mV |
| Resolution | 1 mV | |
| Accuracy | ±0.2 % F.S | |
| Temp. | Measuring Range | 0 – 50 ˚C (32 – 122 ˚F) |
| Resolution | 0.1 ˚C | |
| Accuracy | ±0.5 ˚C |
Other Specifications
| Screen | 3-color LCD screen, Blue: Measurement; Green: Calibration; Red: Alarm |
| Reading Lock | HOLD |
| Low-Voltage Warning | |
| Auto. Power-Off | In 8 minutes without operation |
| Waterproof Rating | IP67 |
| Power | DC3V, AAA alkaline batteries×4 |
| Battery Life | Operation up to 2000 hours |
| Dimension & Weight | Tester: 40×40×178mm/133g; Case: 255×210×50mm/700g |
Probe Replacement
12.1 Every pH probe gradually loses its sensitivity and will eventually fail. A typical service life of a pH probe is 1-2 years depending on many factors such as frequency of use, nature of test samples, and how well it is maintained, etc. Apera Instruments recommends replacing the pH probe every 1 to 2 years to guarantee the optimal performance.
12.2 To replace a probe: 1) Take off the probe cap; 2) Screw off the probe ring; 3) Unplug the probe; 4) Plug in the new replacement probe (pay attention to the probe’s position); 5) Screw on the probe ring tightly. Soak the probe in 3M KCL for 5-15 minutes. Then perform calibration before testing.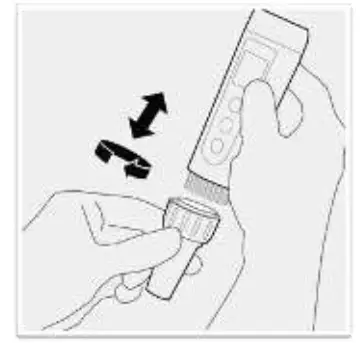 12.3 The replacement probes compatible with PH5:
- AI1201 PH60-E (Regular pH glass bulb probe for general water solutions)
- AI3711-E PH60-DE (Double-junction pH glass bulb probe for complex solutions)
- AI1205 PH60S-E (Spear pH probe for soft-solids pH testing)
- AI1203 PH60F-E (Flat pH probe for surface pH testing)
- AI1207 ORP60-E (ORP probe)
Notes
a) Avoid testing in very high (> 113 °F/ 45°C) or very low (< 41 °F/ 5°C) temperature solutions as it will cause greater measurement error and potential damage to the probe. Test your samples and perform calibration close to room temperature as much as possible.
b) NEVER store the probe in pure water like tap, RO, distilled, or deionized water as they could damage the pH probe. If this happens, immediately soak the pH probe Apera 3M KCL soaking solution overnight, then re-calibrate it before using. Pure water is only for rinsing the probe.
c) Never use your finger to touch the glass membrane or use other material to rub it. Doing so could generate static electricity and cause measurement errors. Never test oily liquids.
d) Make sure the battery cap is completely closed with the red O-ring. Otherwise, the waterproof rating could be compromised.
Battery Installation
Please install batteries according to the following steps. *Please note direction of batteries: All POSITIVE SIDES (“+”) FACING UP
(Wrong installation of batteries will cause damage to![]() the tester and potential hazards)
the tester and potential hazards) 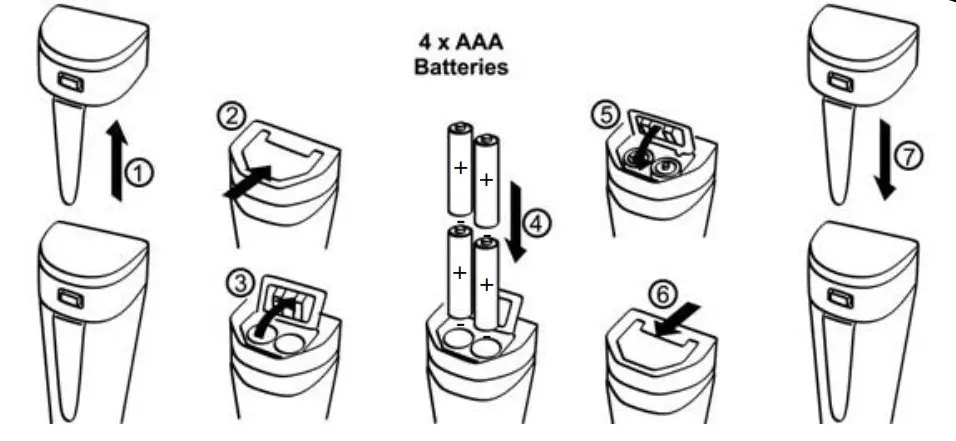
- Pull the tester’s cap up
- Slide the battery cap along to the direction of arrow
- Open the battery cap
- Insert the batteries (ALL POSITIVE SIDES FACING UP) (see graph)
- Close the battery cap
- Slide and lock the battery cap along to the direction of arrow
- Fit the tester’s cap while making sure to push all the way down. The tester’s waterproof design may be compromised if the cap is not fitted correctly.
Troubleshooting Guide
| Trouble | Reason | How to fix |
|
Cannot calibrate | Pressing | Wait for |
| Incorrect standard solutions (showing | Reboot tester, calibrate pH 7 first, then pH 4. For details refer to Section 4.2 (a). | |
| Poor quality standard solutions (showing | Replace with fresh and clean standard calibration solutions made by legitimate scientific instrument manufacturers. | |
| Contaminated probe (showing | Use a soft brush to clean the probe with Apera probe cleaning solution or detergent water. | |
| Aged probe (showing | Replace the probe. | |
| Dried-out probe (showing | Soak the probe in Apera 3M KCL solution for at least 30 minutes. | |
| Probe is not fully submerged (showing | Make sure the probe is fully immersed in the solution at least 1 inch. | |
| Air bubbles around the sensor shield (showing | Make a quick stir in the solution to remove air bubbles. | |
|
Reading is always slowly changing, won’t stabilize | Contaminated probe | Use a soft brush to clean the probe with Apera probe cleaning solution or detergent water. |
| Clogged junction | Use a soft brush to clean the probe with Apera probe cleaning solution or detergent water, then soak it in Apera 3M KCL soaking solution overnight. | |
| Aged probe | Replace the probe. | |
| Testing pure water pH like tap/drinking/RO/distilled water | Be patient, wait for 1-5 minutes to reach a fully stabilized reading. If still not stabilizing, add Apera 3M KCL solution to test water at 1:1000 ratio. | |
| Display similar readings in any solutions or always display 7.0 pH | Broken probe | If you don’t find any visible damage of the probe, contact us for warranty fulfillment; If there is visible damage, replace the probe. |
| Instrument defect | Contact us for warranty fulfillment. | |
| Reading keeps jumping | Probe is not fully submerged in the solution | Make sure the probe is fully immersed in the solution at least 1 inch. |
| Air bubbles around the sensor shield | Make a quick stir in the solution to remove air bubbles. | |
| Probe is not properly connected, or the pin connector is broken. | Check the probe’s connector, make sure it’s not broken and is correctly connected. Align the probe and instrument correctly before plugging in. Never force it. Ensure that the probe connector is not exposed to air too long. | |
| Calibration is successful, but reading is not accurate | Aged probe | Replace the probe. |
| Air bubbles around the sensor shield | Make a quick stir in the solution to remove air bubbles. | |
| Clogged junction | Clean the probe with probe cleaning solution, then soak it in 3M KCL soaking solution overnight. | |
| Comparison with other testers, test strips, or drop tests | To compare accuracy with other testers, make sure to perform calibration for all testers in the same standard, then test another standard. Whichever gives more accurate reading is the more accurate one. Test strips or drop tests’ accuracy in not comparable to pH meters‘. | |
| Poor quality standard solutions | Replace with fresh and clean standard calibration solutions made by legitimate scientific instrument manufacturers. | |
| The probe is not suitable for your application. | Contact us to find the most appropriate product for your specific application. |
Warranty
We warrant this instrument to be free from defects in material and workmanship and agree to repair or replace free of charge, at option of APERA INSTRUMENTS (Europe) GmbH, any malfunctioned or damaged product attributable to responsibility of APERA INSTRUMENTS (Europe) GmbH for a period of TWO YEARS (SIX MONTHS for the probe) from the delivery.
This limited warranty does NOT cover any damages due to: Accidental damage, transportation, storage, improper use, failure to follow the product instructions or to perform any preventive maintenance, unauthorized repair or modifications, normal wear and tear, or other external causes or actions beyond our reasonable control.
APERA INSTRUMENTS (Europe) GmbH
Wilhelm-Muthmann-Straße 18
42329 Wuppertal, Germany
Contact: [email protected]
Website: www.aperainst.de
Tel. +49 202 51988998


