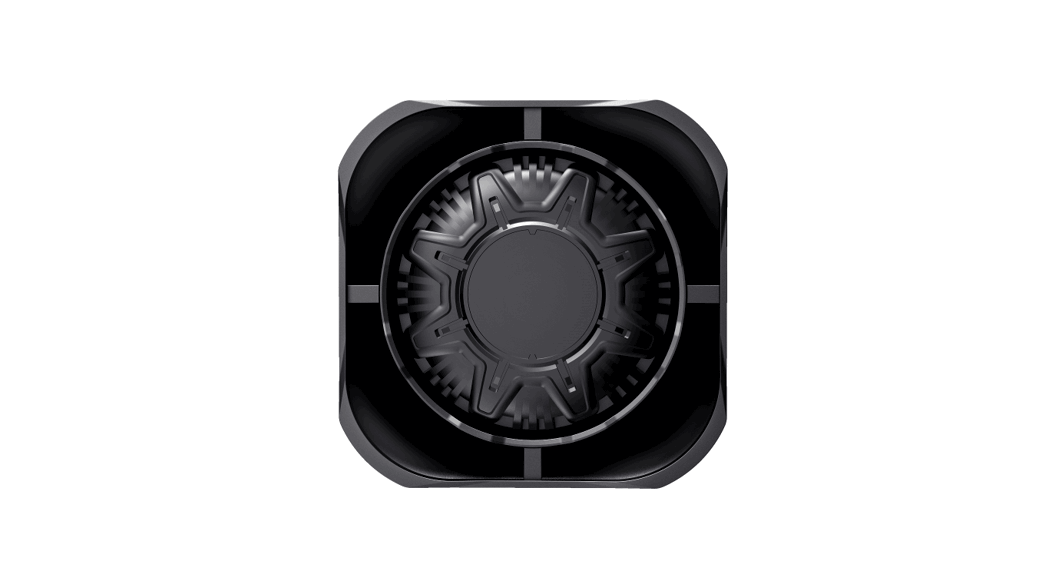
![]() JS100-C1 Siren Speaker
JS100-C1 Siren Speaker
User Manual
JS100-C1 Siren Speaker
Content:
| A JS100-C1 Speaker | X1pe |
| B L-Bracket | X1pe |
| C1 1/47-20 Hex Bolt | x3 pes |
| C2 1/4″ Flat Washer | x3 pes |
| C3 1/4″ Split Washer | x3 pes |
| D1 5/16” Hex Bolt | x2 pes |
| D2 5/16″ F l a t Washer | x4 pes |
| D3 5/16″ Split Washer | x2 pes |
| D4 5/16” Hex Nut | x2 pes |
Wiring:
WHITE……………………………………..to Siren SPK+
BLACK……………………………………. to Siren SPK-

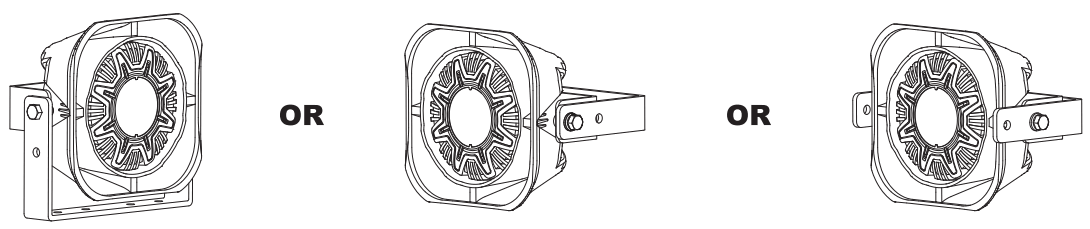
Application Example
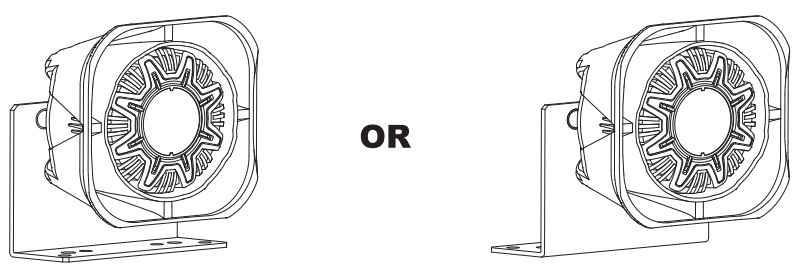
The bracket may be mounted in any direction as long as the speaker “TOP” marking is oriented upwards for proper drainage.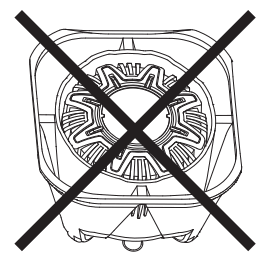
Do not mount the speaker with the bell opening facing upward.
Before Installation
- Select a desired mounting location. The mounting surface should be strong enough to support the weight of the speaker and (if possible) should be perpendicular to the moving axis of the vehicle to best project its sound volume forward.
- Simulate the mounting area clearance and wiring route with the speaker and the bracket before proceeding with the next step.
- When mounting, choose to assemble the bracket onto the speaker first or to assemble the bracket onto the mounting surface first base on the ease of the installation and the possible workflow.
Assembling the bracket onto the speaker
- Orient the speaker so that the “TOP” marking is oriented upwards for proper drainage. The bracket may be mounted in any direction as long as the speaker is properly oriented. Nevertheless, DO NOT mount the speaker with the bell opening facing upward.
- Remove only 3 of the 4 pre-assembled bolts at the back of the speaker (DO NOT remove the last bolt on the speaker; at least one bolt is needed to hold the speaker driver and the housing properly together.); align the screw hole with the mounting hole on the bracket then replace the screw with provided longer screw and secure the bracket onto the speaker. [Set torque force @70-90 kgf-cm (60.8-78.1 lbf-in)]
Assembling the bracket onto the mounting surface
- Use the bracket as a template, mark and drill respective mounting holes into the mounting surface.
- Secure the bracket onto the mounting surface with the supplied bolts and nuts.
Wirin
- Extend WHITE (+) and BLACK (-) speaker wires t o your siren amplifier and connect as shown i n its user manual.
![]() Warning
Warning
Sound Hazard – Sound level from a siren speaker (>120dBA @ 10 feet) may cause hearing damage. Do not operate the siren without adequate hearing protection for you and anyone i n immediate vicinity.
(Ref. OSHA 1910.95 for occupational noise exposure guidelines)
Content:
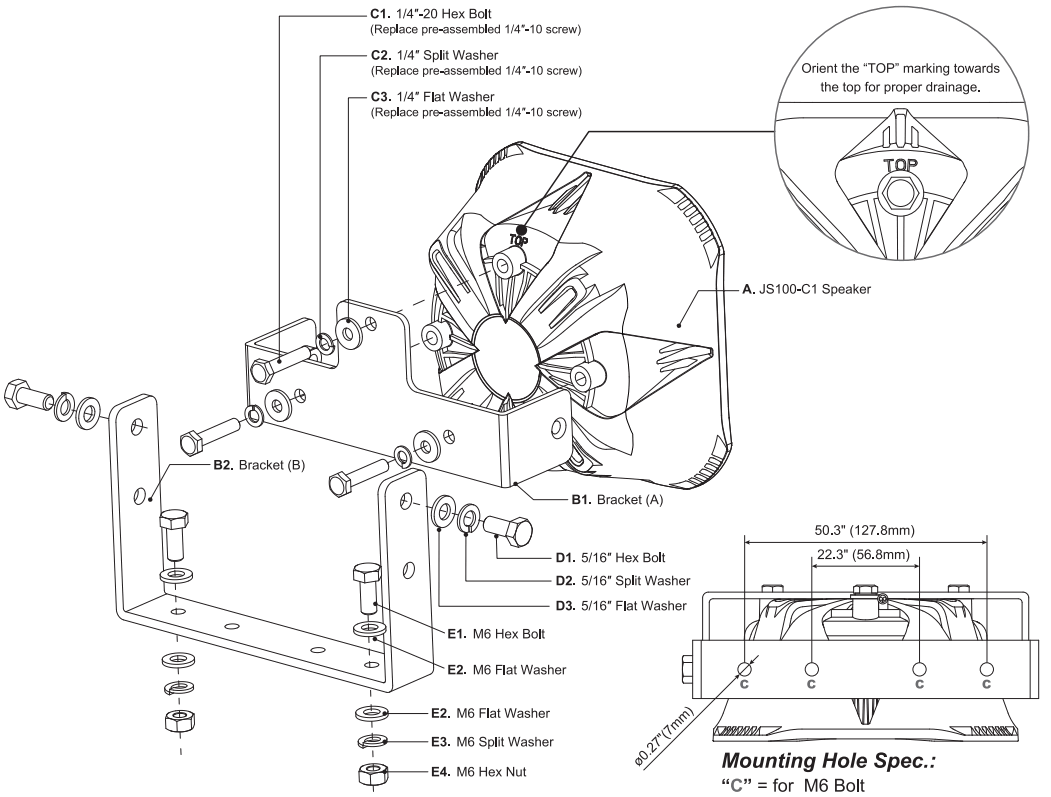
| A JS100-C1 Speaker | x1 pe |
| B1 U-Bracket (A) | x1 pe |
| B2 U-Bracket (B) | x1 pc |
| C1 1/4″-20 Hex Bolt | x3 pes |
| C2 1/4″FlatWasher | x 3 pcs |
| C3 1/4″ Split Washer | x3 pes |
| D1 5/16″ Hex Bolt | x2 pes |
| D2 5/16″ Flat Washer | x2 pes |
| D3 5/16″ Split Washer | x2 pes |
| E1 M6 Hex Bolt | x2 pes |
| E2 M6 Flat Washer | x4 pes |
| E3 M6 Split Washer | x2 pes |
| E4 M6 Hex Nut | x2 pes |
Application Example
The bracket may be mounted in any direction as long as the speaker “TOP” marking i s oriented upwards for proper drainage.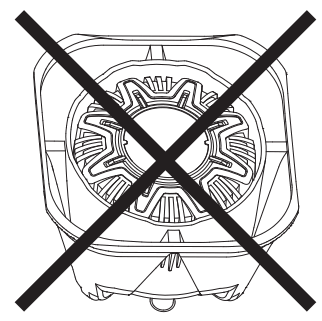
Do not mount the speaker with the bell opening facing upward.
Before Installation
- Select a desired mounting location. The mounting surface should be strong enough to support the weight of the speaker and (if possible) should be perpendicular to the moving axis of the vehicle to best project its sound volume forward.
- Simulate the mounting area clearance and wiring route with the speaker and the bracket before proceeding with the next step.
- When mounting, choose to assemble the bracket onto the speaker first or to assemble the bracket onto the mounting surface first base on the ease of the installation and the possible workflow.
Assembling the bracket on to the speaker
- Orient the speaker so that the “TOP” marking is oriented upwards for proper drainage. The bracket may be mounted in any direction as long as the speaker is properly oriented. Nevertheless, DO NOT mount the speaker with the bell opening facing upward.
- Remove only 3 of the 4 pre-assembled bolts at the back of the speaker (DO NOT remove the last bolt on the speaker; at least one bolt is needed to hold the speaker driver and the housing properly together.); align the screw hole with the mounting hole on the bracket then replace the screw with provided longer screw and secure the bracket onto the speaker. [Set torque force @70-90 kgf-cm (60.8-78.1 lbf-in)]
- Choose the suitable mounting height and assemble the Bracket-A and the Bracket-B with the supplied bolts. Adjust the Bracket-B to the desired angle before tightening the bolt. [Set torque force @90-110 kgf-cm (78.1-95.5 lbf-in)]
Assembling speaker onto the mounting surface
- Use the Bracket-B as a template, mark and drill respective mounting holes into the mounting surface.
- Secure the Bracket-B onto the mounting surface with the supplied bolts and nuts. Wiring 1. Extend W HO M (+) and BLACK (-) speaker wires to your siren amplifier and connect as shown in its user manual.
![]() WARNING
WARNING
Sound Hazard – Sound level from a siren speaker (>120dBA @ 10 feet) may cause hearing damage. Do not operate the siren without adequate hearing protection for you and anyone in immediate vicinity.
(Ref. OSHA 1910.95 for occupational noise exposure guidelines)
![]()


