![]() HomeFlex 4G LTE WiFi Router
HomeFlex 4G LTE WiFi Router
Mobile Hotspot Device
User Manual
Product Overview
 Function Introduction
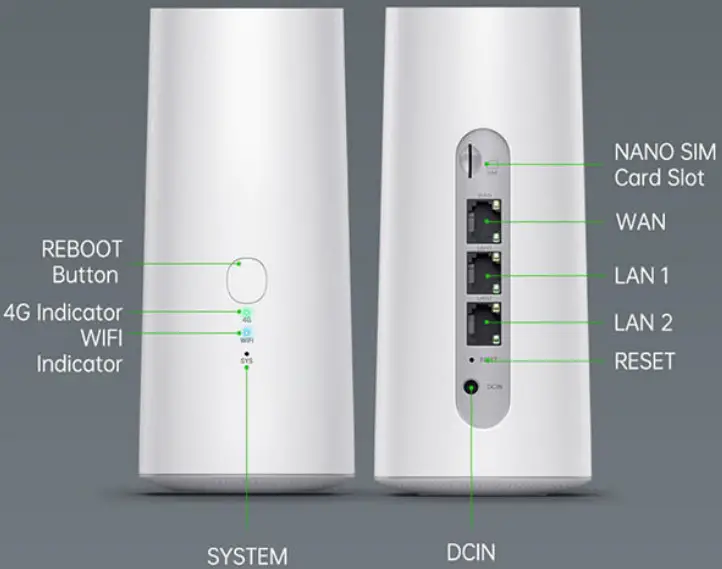
4G Indicator: When the Internet mode is ‘4G LTE’, the light is green when in connected status. If light is red and flashes (no dial), or green and flashes (dialing), it is in the unconnected status. Select other internet mode, the light turns off.
WIFI Indicator: When there is data transmission the light is blue and flashes continuously.
SYSTEM Indicator: The system light will flash during boot or upgrade, and turns to be constant on after boot or upgrade is finished
REBOOT: When the device is powered on, long press the button for 3s twice to reboot.
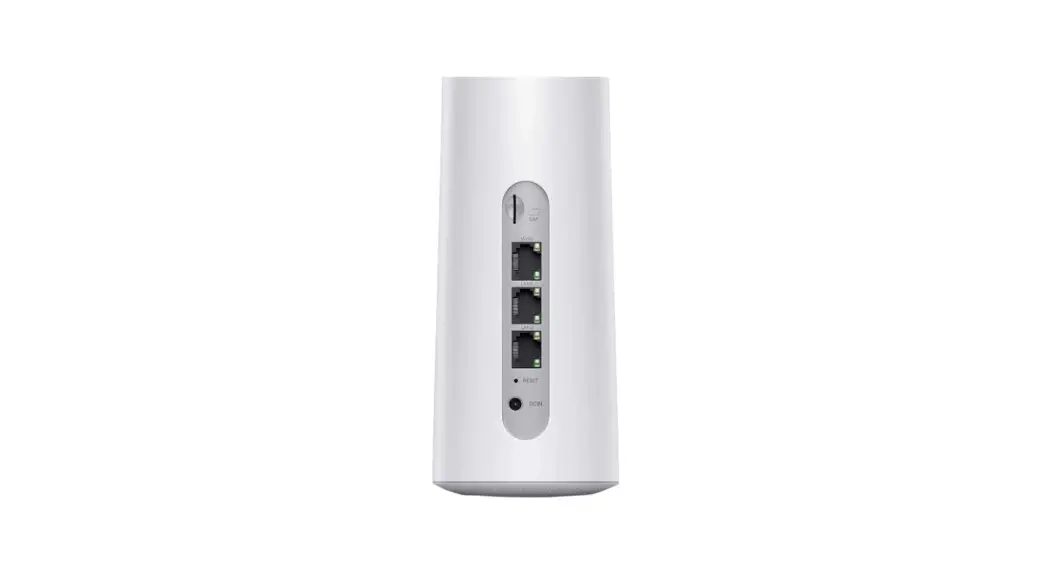
NANO SIM card slot: When the device is powered off, insert the card into the slot according to the indication direction of the silk screen.
RESET: In standby mode, long press the RESET button for more than 6s to restore to factory setting.
Technical Specification
Brand: HomeFlex Box content:
Technical Specifification:
Application Environment: Home. office. IOT. security
CPU: QM215
Network port: 1*WAN, 2*LAN 10/100Mbps
Button: REBOOT Button, RESET Button
Power input: DC12V/2A
SIM card: NANO SIM
Maximum wireless connections: 31
LED: SYSTEM indicator, WIFI indicator, 4G indicator
Dimension: length 12.8cm*width 8.7cm* height 18.6cm
Antenna: 2*2.4G, 2*5G, 2*4G
Radio frequency: 2.4GHz, 5GHz
Wireless standard: IEEE802.11 a/b/g/n/ac
LTE FOD Band: B1/2/3/4/5/7/8/9/12/13/17/18/19/20/25/26/28/66
LTE TOD Band: B34/38/39/40/41(194M)
WCDMA: B1/2/4/5/6/8/9/19
GSM: B2/3/5/8
4G LTE theoretical maximum upstream: SOMbps
4G LTE theoretical maximum downlink:1SOMbps
Working environment
Working Temperature: Normal O°C to +45°C
Storage Temperature: -20°C to 75°C
Working Humidity: 10% to 90%
Storage Humidity:10% to 90%
Quick Start Guide
- Download GlocalMe APP
Download and install GlocalMe app on your mobile phone
 https://www.glocalme.com/download/downloadPage?goto=default
 - Register a GlocalMe Account(in App)
Press “Login””Register”
Follow the step to register an account (You can register by email or mobile number) - Activate HomeFlex
GlocalMe AppDeviceAdd Device
Scan the device QR-code at the bottom of HomeFlex
Ornd device IMEI/Password for manual setup - Turn on HomeFlex
Plug in adapter, it will power on automatically,4G/WIFI/SYS indicator lights are on - Connect the Wi-Fi
Find SSID and Password at the bottom of HomeFlex Connect your mobile device in Wi-Fi setting


Or you can also plug in the network cable through the LAN port and connect to your computer and other devices 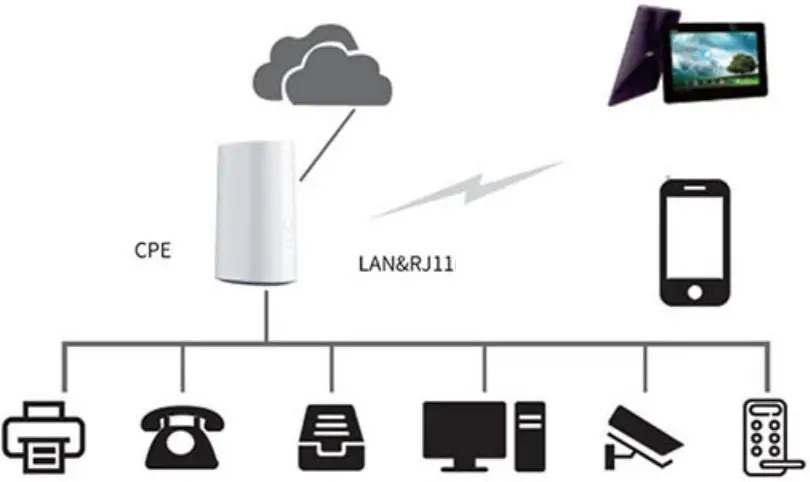
General questions
- How t o deal with the problem if I can’t access to network?
1. Please confirm whether the input information of connecting to the HOMEFLEX WIFI is correct, such as username and password, etc.
2. If step! didn’t solve your problem, please reboot HOMEFLEX and try to connect
3. If step! and step 2 still didn’t solve the problem, please restore the HOMEFLEX to factory setting and try again after reboot
4. Contact customer service for technical support - How to deal with the problem if | forget the WIFI password?
@® Try to use default password s7wks68q to log in
@ Log into the HOMEFLEX background, click network wireless 5GHz/wireless 2.4GHz in the navigation bar to obtain WIFI password
® If you forget the login password of HOMEFLEX background , try to restore factory setting. - How to restore factory setting?
Method 1: long press the RESET button for 6s until all the indicator flashes, release the button and wait until the HOMEFLEX reboot is finished.
Method 2: log into the HOMEFLEX background, click system reboot->execute reboot in the navigation bar, after the reboot is finished the reset is done. - How to deal with the problem if | can’t log into HOMEFLEX
1. 1)If you connect to HOMEFLEX with cable, please check if the connection is normal
2. Please confirm that the IP address of HOMEFLEX background is correct, the right IP is 192.168.169.1.
3. Restore factory setting and try again.
HOMEFLEX Background Management Interface Guide
- 1Log into the system management background
Power on HOMEFLEX and wait a few seconds until it start-up normally, you can use phone or computer to connect to the WIFI named *”LTE-2.4GHz-xxxxxx’ and ‘LTE-5.8GHz-xxxxxx’, the default password is sS7wks68q. You can also use cable to connect the device LAN with computer network port.
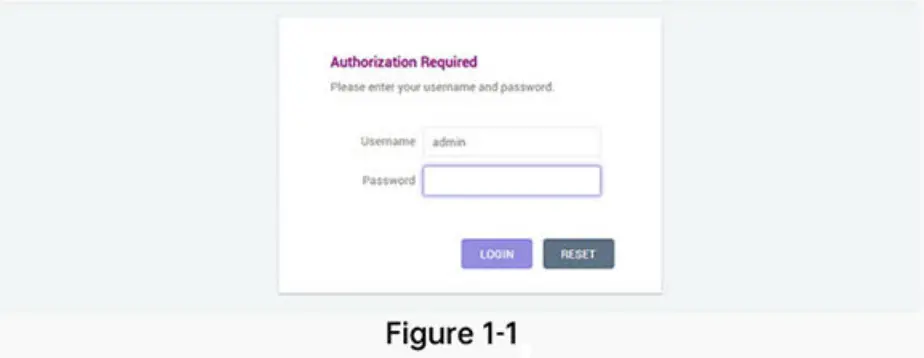
After connect to HOMEFLEX successfully, open the browser of your phone or computer, enter the HOMEFLEX background IP address 192.168.169.1 into the browser address bar, press enter key and it will jump to the background page , as shown in Figure 1-1. The default login username and password is the same: ‘admin’.
Click the “Login” button to log in to the management background, and click the “Reset” button to clear the password field. - Overview of management background interface
The page after entering the management background is shown in Figure 2-1. The management background interface is mainly divided into two parts, the left side is the guide bar, and the middle part is the content bar. The guide bar displays various function menus of the management background, and the content bar displays detailed content corresponding to each function guide. The specific function configuration of the guide bar i s shown in Table 1.
Table 1 Function Configuration of the Guide BarFirst-level guide bar Secondary guide bar Description Status Overview Current device system status, network status, DHCP allocation status, DHCPv6 allocation status, and dynamic DNS status Internet WAN The connection setting includes five ways to access to internet: DHCP, wired connection, Static (static IP address) , PPPOE (dial-up internet) and 4G LTE LAN LANLAN address settings, DHCP server settings Firewall Enable and disable Firewoll, port forwarding Wireless 2.4GHz Wireless 2.4GHz setting, wireless MAC filter setting Wireless 5GHz Wireless 5GHz setting, wireless MAC filter setting System Administration authority Change the administrator’s password of the device, select language Reset/Upgrade Restore to factory setting, flash new firmware Reboot Reboot system Service Dynamic DNS The dynamic DNS supports users in setting a fixed accessible domain name for host with dynamic IP Logout Click to exit the management interface - Status Overview
Click “Status – Overview”, as shown in Figure 3-1, users can view the current system status, network status, DHCP allocation, DHCPvé allocation status, and dynamic DNS status of the device in the content bar. The status overview is shown in Table 2. Table 2 Status overview
Category Content Description System Model GLMR21A02 Firmware Version Display the current firmware version of the device SN Unique identifier of the device Local Time Current local time Run time Device runtime Internet IPv4 WAN status IPv4 WAN status IPv6 WAN status IPv6 WAN status DHCP Allocation DHCP assigns device host name, IPv4-address, and MAC-address Service DHCPv6 assigns device host name, IPv6-address, DUID (DHCP unique identifier) Logout Dynamic DNS Configuration, next update, host name l domain name, registered IP address, network
 The default login username and password is the same: ‘admin’.
 The specific function configuration of the guide bar i s shown in Table 1.
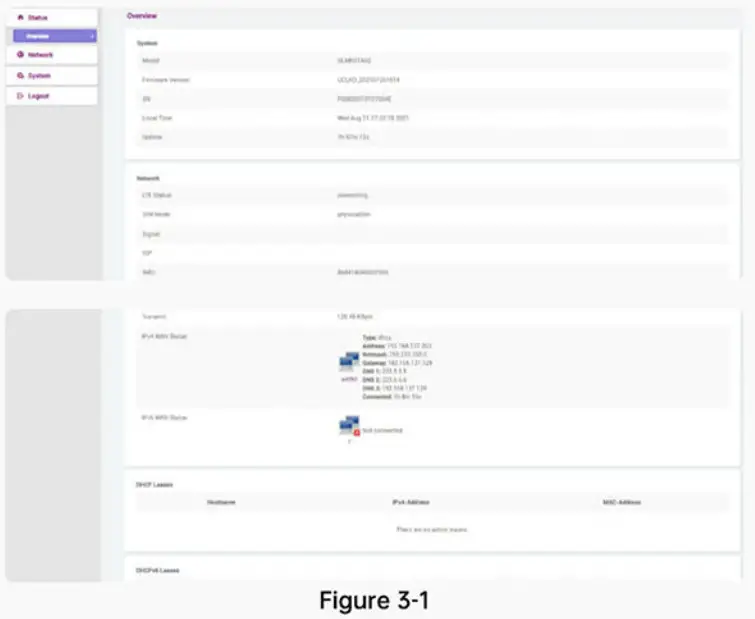 Table 2 Status overview
Network
4.1 Wireless 5GHz setting
Click “Network – Wireless 5GHz” in the navigation bar to enter the 5GHz wireless WiFi setting interface, as shown in Figure 4-1 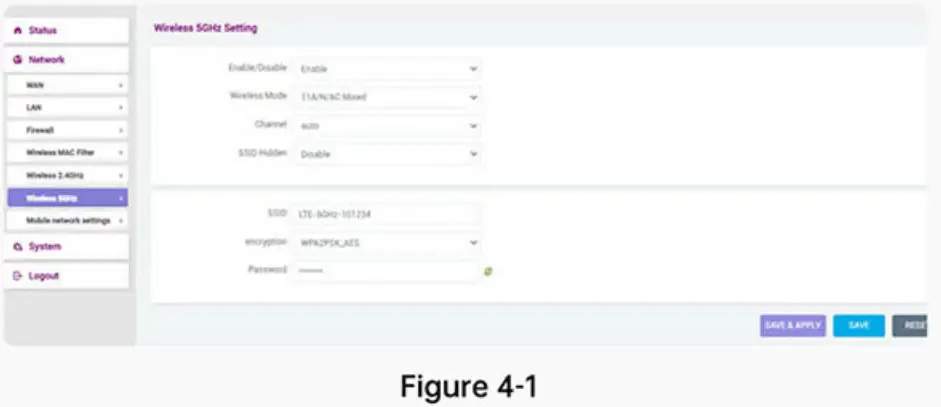 Setting Description:
Enable/Disable – Select “Enable” to turn on 5GHz wireless WiFi on the HOMEFLEX device, and select “Disable” to turn off 5GHz wireless WiFi on the HOMEFLEX device. Users can choose according to actual use.
Channel —‘Auto’,149′,’153′,’157′,’161′,’165’are optional
Hidden SSID — Select “Enable” to hide the 5GHz wireless WiFi name, and the user cannot directly search for 5GHz wireless WiFi through the mobile phone or computer. Select “Disable” to allow the 5GHz wireless WiFi name to be searched normally by the mobile phone or computer.
SSID – If you need to modify the 5GHz wireless WiFi name of the HOMEFLEX device, you can enter the new name in the box here
Authorization ways – There are six options for encrypting the5GHz
wireless WiFi: WPAPSK_TKIP, WPAPSK_AES, WPA2PSK TKIP, WPA2PSK_ AES, WPA WPA2 Mixed, NONE.
Password – If you need to change the WIFI password, you can type new password in the box here, click to display the new password
Click the “Save & Apply” button for the settings to take effect; click the “Save” button to save the settings; click the “Reset” button to restore to the original settings.
4.2 Wireless 2.4GHz setting
Click “Network – Wireless 2.4GHz” in the navigation bar to enter the 2.4GHz wireless WiFi setting interface, as shown in Figure 4-2 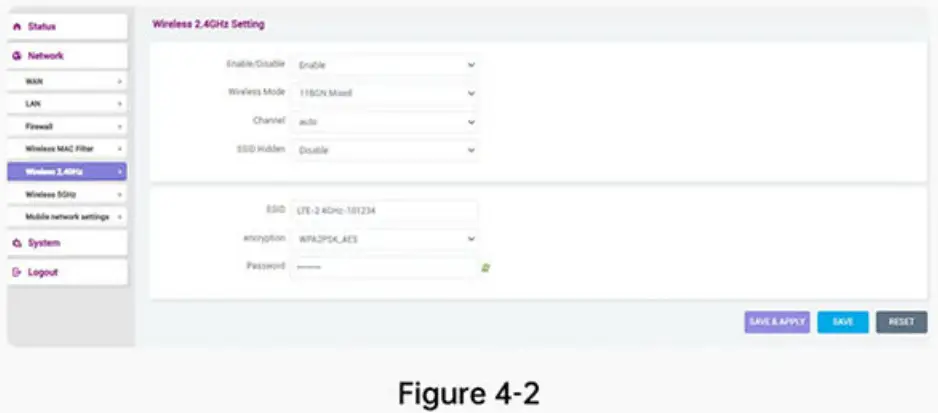 Setting Description:
Enable/Disable – Select “Enable” to turn on 2.4GHz wireless WiFi on the HOMEFLEX device, and select “Disable” to turn off 2.4GHz wireless WiFi on the HOMEFLEX device. Users need to choose according to actual use
Channel – channels 1 – 13 are optional
Hidden SSID — Select “Enable” to hide the 2.4GHz wireless WiFi name, and the user cannot directly search for 2.4GHz wireless WiFi through the mobile phone or computer. Select “Disable” to allow the 2.4GHz wireless WiFi name to be searched normally by the mobile phone or computer.
SSID – If you need to modify the 5GHz wireless WiFi name of the HOMEFLEX device, you can enter the new name in the box here
Authorization ways – There are six options for encrypting the 2.4GHz wireless WiFi: WPAPSK_TKIP, WPAPSK_AES, WPA2PSK_TKIP, WPA2PSK_A E S , WPA WPA2 Mixed, NONE.
Password – If you need to change the WIFI password, you can type new password in the box here, click ![]() to display the new password
to display the new password
Click the “Save & Apply” button for the settings to take effect; click the “Save” button to save the settings; click the “Reset” button to restore to the original settings.
4.3 Wireless MAC Filter
Click “Network – Wireless MAC filter” in the navigation bar to enter the wireless MAC filter setting interface, as shown in Figure 4-3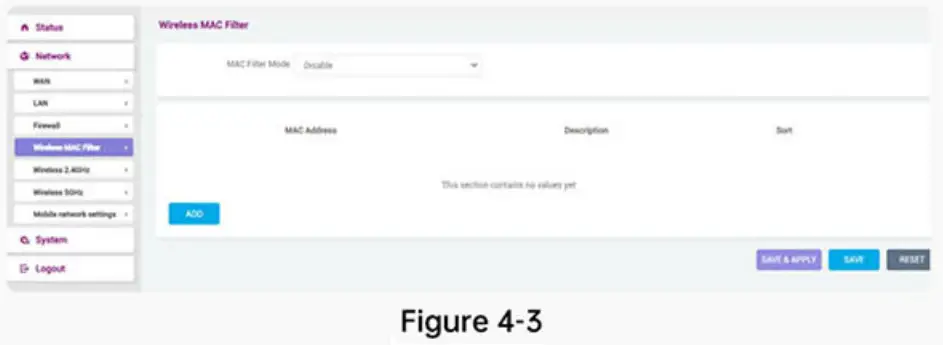 Setting Description:
Wireless MAC Filter – You can select disable, whitelist or blacklist in the MAC filter bar. ‘Disable’ means closing the filter function. If you choose whitelist or blacklist, you need to click” ![]() “button to type address in address bar or customized address bar. The description box is a brief introduction of the address. Click “
“button to type address in address bar or customized address bar. The description box is a brief introduction of the address. Click “![]() “to remove selected MAC address.
“to remove selected MAC address.
Click the “Save & Apply” button for the settings to take effect; click the “Save” button to save the settings; click the “Reset” button to restore to the original settings.
4.4 WAN Setting
Click “Network – WAN” in the navigation bar to enter the external network connection settings. The default external network connection mode is “4G LTE”, as shown in Figure 4-4(1). 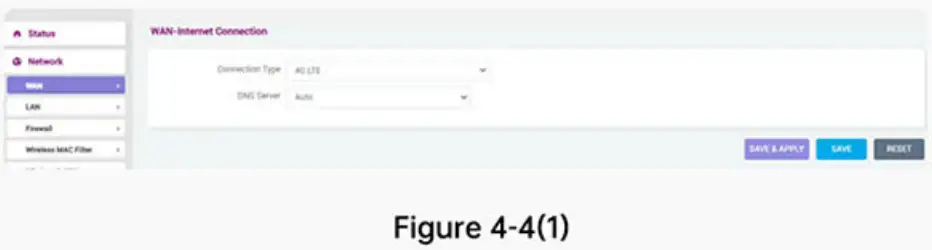 The HOMEFLEX device includes five ways to access to internet: DHCP, wired connection, Static (static IP address), PPPOE (dial-up internet ) and 4G LTE.
Click ‘network mode’ to select one, as shown in figure 4-4(2). 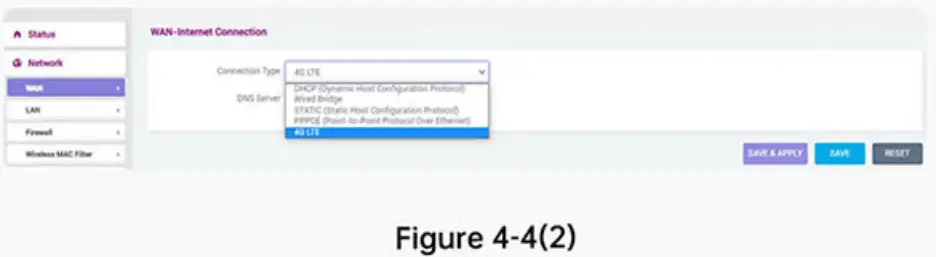 If you choose the other four network modes except ‘4G LTE’, you need another router for HOMEFLEX and choose ‘static IP’, make sure the IP address is on the same network segment with the external router.
4.4.1 4G LTE
Select the mode “4G LTE” to switch to 4G Internet access, as shown in Figure 4-1-1. The initial default WAN-Internet connection mode is “4G LTE”. 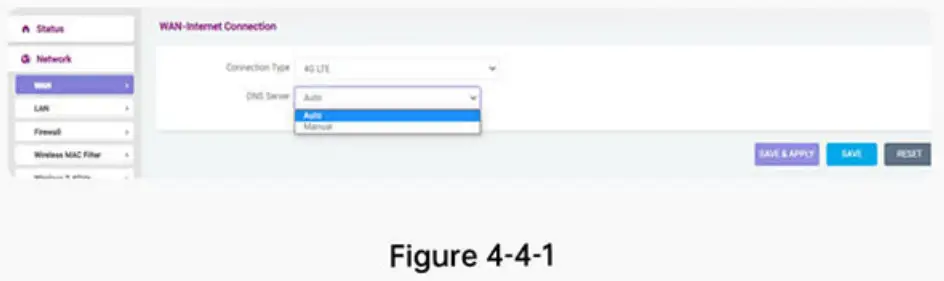 Setting Description:
Network Type – 4G LTE
DNS Server – Users can choose automatic allocation or manual allocation, depending on situation
DNS Server 1 -Enter the manually assigned DNS server address. DNS server addresses do not support domain names, only IP addresses
DNS Server 2 -Enter the manually assigned DNS server address. DNS server addresses do not support domain names, only IP addresses
Click the “Save & Apply” button for the settings to take effect; click the “Save” button to save the settings; click the “Reset” button to restore to the original settings.
4.4.2 Mobile network settings
Click ‘system – mobile network settings’ in the navigation bar, the interface of the mobile network settings is as follow: 
- Select card mode
If you choose cloud card in the drop-down list, it means registering network with cloud card. If you choose physical card, it means registering network with physical card. Don’t forget to power off HOMEFLEX when you install/uninstall the physical card. - One-key switch network
Click ‘One-key switch network’, the HOMEFLEX will search the local place for all mobile network and report them to server. The server selects a better operator as cloud card. - APN setting in physical Sim mode
 Click ‘edit’ button , the APN information form switch to edit mode and the edit button change to save button. Edit the APN information then click save button.
 - Reset mobile network setting
Click the button to restore the mobile network setting to factory setting. If you have problem in using mobile network, you can try to use the reset function.
 Click ‘edit’ button , the APN information form switch to edit mode and the edit button change to save button. Edit the APN information then click save button.
4.4.3 DHCP (automatic acquisition)
Select “DHCP (automatic acquisition)” to switch to the DHCP Internet access mode, as shown in Figure 4-4-3.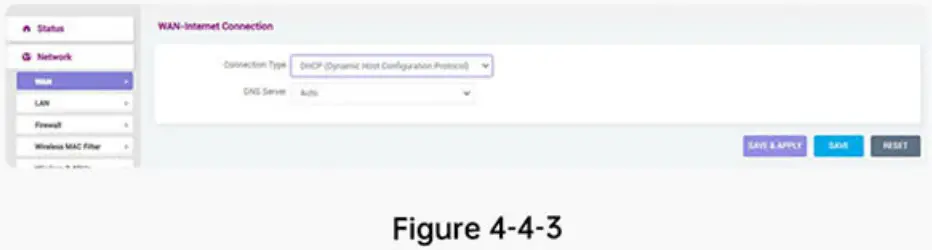 Setting Description:
Network Type – DHCP (automatic acquisition)
DNS Server – Users can choose automatic allocation or manual allocation, depend on situation
DNS Server 1 – Enter the manually assigned DNS server address. DNS server addresses do not support domain names, only IP addresses
DNS Server 2 -Enter the manually assigned DNS server address. DNS server addresses do not support domain names, only IP addressesc
Click the “Save & Apply” button for the settings to take effect; click the “Save” button to save the settings; click the “Reset” button to restore to the original settings.
4.4.4 Wired Bridge
Select “Wired Bridge” to switch to “Wired Bridge Internet Mode”, as shown in Figure 4-4-4. 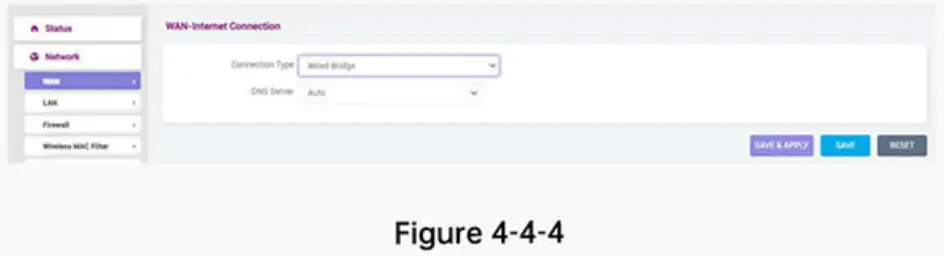 Setting Description:
Network Type – Wired Bridge
DNS Server – Users can choose automatic allocation or manual allocation, depending on situation
DNS Serverl – Enter the manually assigned DNS server address
DNS Server2 – Enter the manually assigned DNS server address
Click the “Save & Apply” button for the settings to take effect; click the “Save” button to save the settings; click the “Reset” button to restore to the original settings.
4.4.5 Static (static IP)
Select “Static (Static IP)” to switch to the static IP Internet access mode, as shown in Figure 4-4-5. 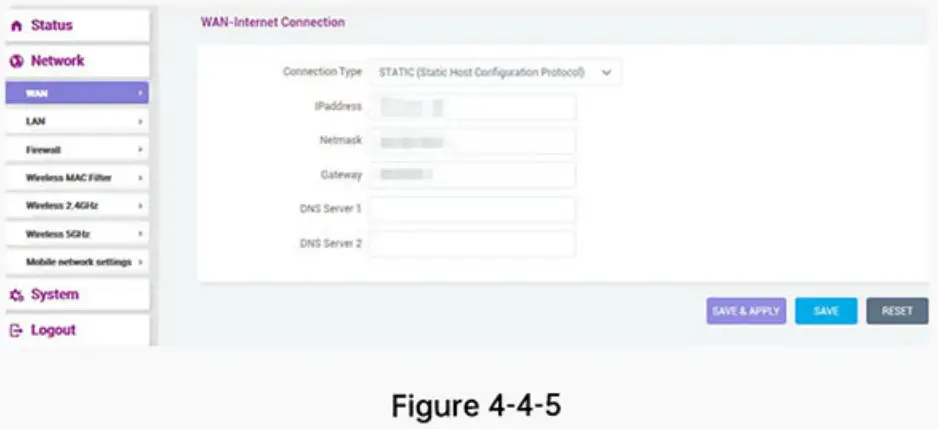 Setting Description:
Network Type – Static (static IP)
IP address – static IP address
Subnet mask – Subnet mask
Gateway – Address of the superior gateway
ONS Server1 – Enter the manually assigned DNS server address. DNS server addresses do not support domain names, only IP addresses.
DNS Server2 – Enter the manually assigned DNS server address. DNS server addresses do not support domain names, only IP addresses
Click the “Save & Apply” button for the settings to take effect; click the “Save” button to save the settings; click the “Reset” button to restore to the original settings.
4.4.6 PPPOE Mode (PPPOE dial-up internet)
Select “PPPOE (PPPOE dial-up internet)” to switch to PPPOE dial-up Internet access mode, as shown in Figure 4-4-6. 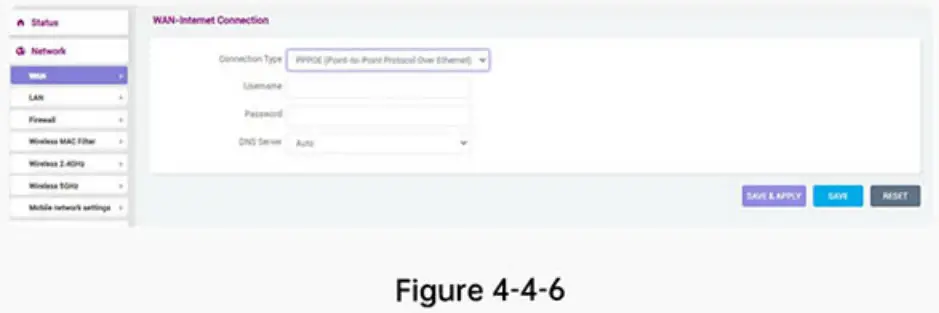 Setting Description:
Username – dial-up account name
Password – dial password
DNS Server – Users can choose automatic allocation or manual allocation, depending on situation
ONS Server1 – Enter the manually assigned DNS server address. DNS server addresses do not support domain names, only IP addresses.
DNS Server2 – Enter the manually assigned DNS server address. DNS server addresses do not support domain names, only IP addresses
Click the “Save & Apply” button for the settings to take effect; click the “Save” button to save the settings; click the “Reset” button to restore to the original settings.
4.5 LAN Setting
4.5.1 LAN address setting
Click “Network – LAN” in the navigation bar to enter the intranet settings interface, as shown in Figure 4 – 5 – 1. 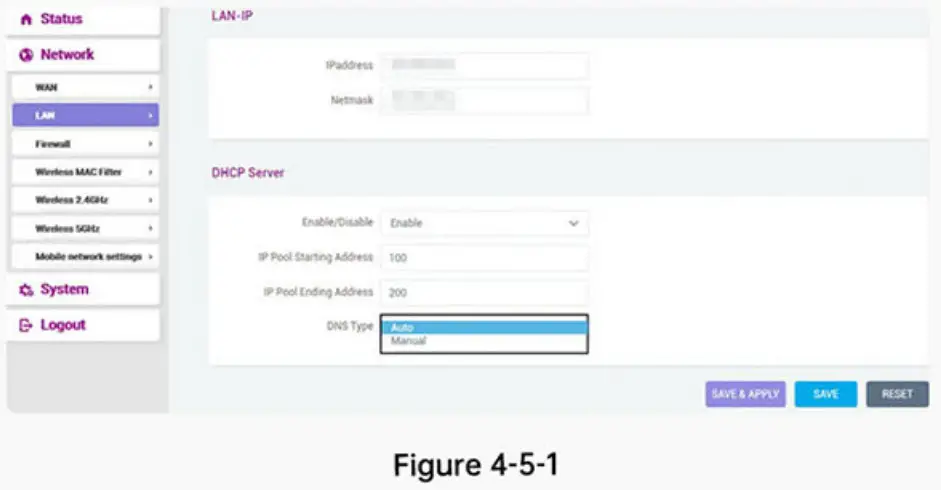 Setting Description:
IP address – Type IP address
Subnet mask — Type Subnet mask
Click the “Save & Apply” button for the settings to take effect; click the “Save” button to save the settings; click the “Reset” button to restore to the original settings.
4.5.2 DHCP Server
Click “Network – LAN” in the navigation bar to enter the DHCP server setting interface, as shown in Figure 4-5-2. 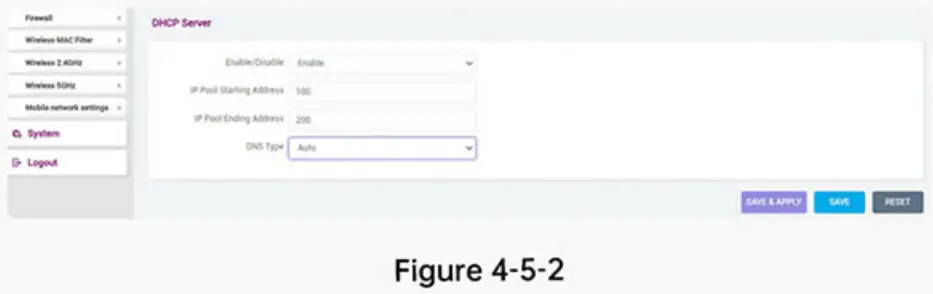 Setting Description:
Enable/disable – Select “Enable” to start the HOMEFLEX device DHCP server, and select “Disable” to stop the HOMEFLEX device DHCP server. It depends on the using case.
DHCP start address – Type DHCP start address
DHCP end address – Type DHCP end address
DNS Server1 – Enter the DNS server address. DNS server addresses do not support domain names, only IP addresses
DNS Server2 – Enter the DNS server address. DNS server addresses do not support domain names, only IP addresses
Click the “Save & Apply” button for the settings to take effect; click the “Save” button to save the settings; click the “Reset” button to restore to the original settings.
4.6 Firewall
4.6.1 Basic setting
Click “Network – Firewall- General Settings” in the navigation bar to enter the firewall setting interface. You can set the firewall on / off, as shown in Figure 4-6-1 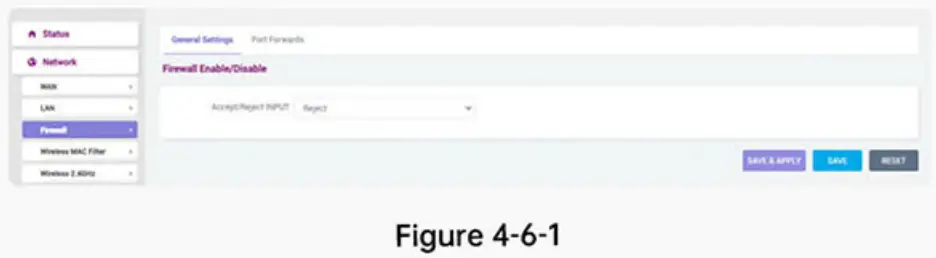 Setting Description:
Allow / Deny access – You can choose ‘deny’ or ‘allow’ according to your requirement.
Click the “Save & Apply” button for the settings to take effect; click the “Save” button to save the settings; click the “Reset” button to restore to the original settings.
4.6.2 Port forwarding
Click “Network – Firewall-Port Forwarding” in the navigation bar to enter the firewall – port forwarding setting interface, you can view the port name, matching rules, forwarding conditions and enabling conditions, you can also create new port forwarding. As shown in Figure4-6-2. 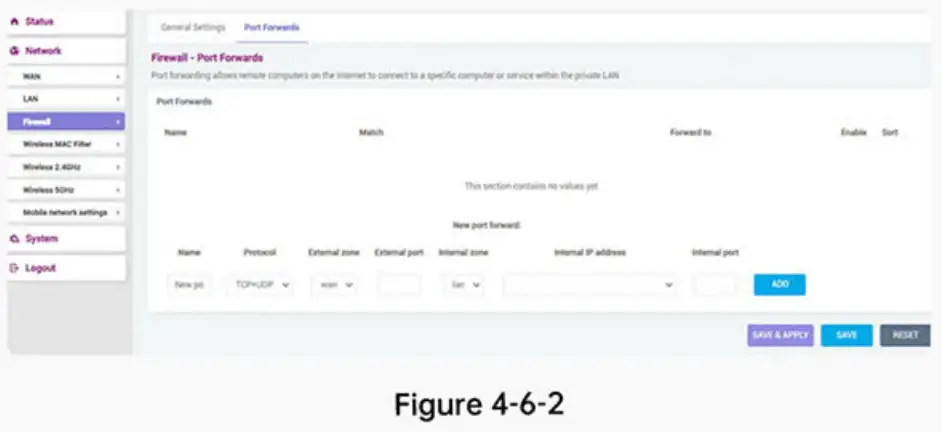 Setting Description:
Name – Set up a new port forwarding
Protocol – Users can select “TCP + UDP”, “TCP”, “UDP” and “Other” options
External zone – Users can only select “WAN”
External port – Type external port manually
Internal zone – Users can only select “LAN”
Internal IP address – Type internal address manually
Internal port – Type internal port manually
Click” ![]() “to finish adding the port.
“to finish adding the port.
Click the “Save & Apply” button for the settings to take effect; click the “Save” button to save the settings; click the “Reset” button to restore to the original settings.
System
5.1 Administration authority
Click “System – Administration” in the navigation bar to enter the setting interface of the host password and HOMEFLEX device language, as shown in Figure 5-1 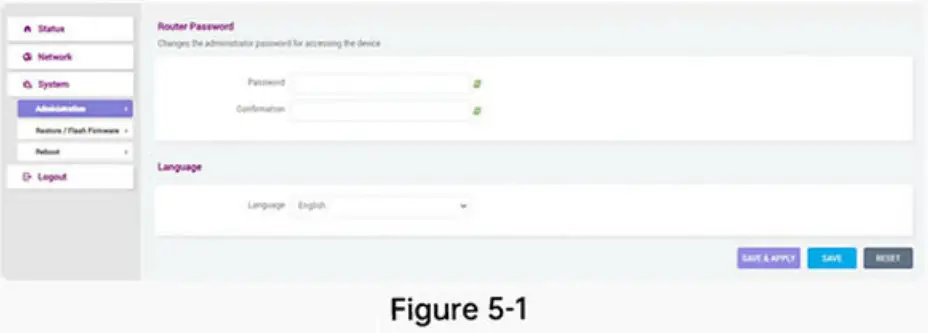 5.1.1 Router password
Click ‘system – administration’ in the navigation bar to enter the Router password setting interface, as shown in figure 5-1-1.  Setting Description:
Password – If you need to change the administrator password, you can type new password in the box here. Click ![]() to display new password.
to display new password.
Password confirmation – Type the new password again to see if it is correct.
Click ![]() to display the new password.
to display the new password.
Click the “Save & Apply” button for the settings to take effect; click the “Save” button to save the settings; click the “Reset” button to restore to the original settings.
5.1.2 Language
Click “System – Administration” in the navigation bar to enter the HOMEFLEX device language setting interface, as shown in Figure 5-1-2.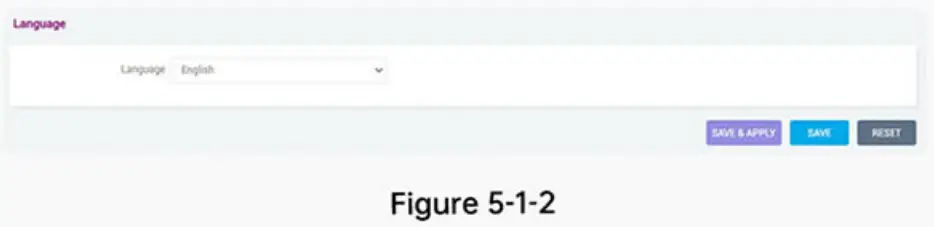 Setting Description:
Language – ‘Simplified Chinese and’ and ‘English’ are optional Click the “Save & Apply” button for the settings to take effect; click the “Save” button to save the settings; click the “Reset” button to restore to the original settings.
5.2 Reset/Upgrade
Click ‘system – restore/flash firmware’ in the navigation bar to enter restore/flash firmware setting interface, as shown in figure 5-2-1.
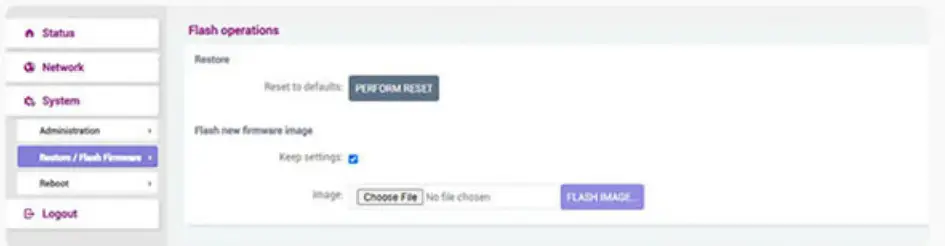 Figure 5-2-1
Setting Description:
Restore – You can click “![]() “to restore to factory setting.
“to restore to factory setting.
Flash new firmware image – Click “![]() “in the file bar, open the local file, and then click”
“in the file bar, open the local file, and then click” ![]() “, the system will save the configuration by default, as shown in figure 5-2-2.
“, the system will save the configuration by default, as shown in figure 5-2-2. 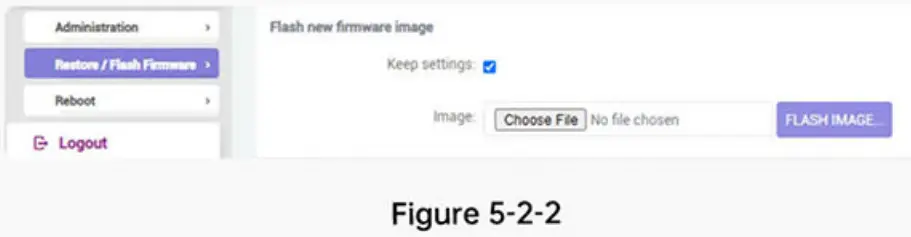 5.3 Reboot
Click ‘system – reboot’ in the navigation bar to enter the reboot system interface. Click “![]() ” to reboot the system, as shown in figure 5-3.
” to reboot the system, as shown in figure 5-3. 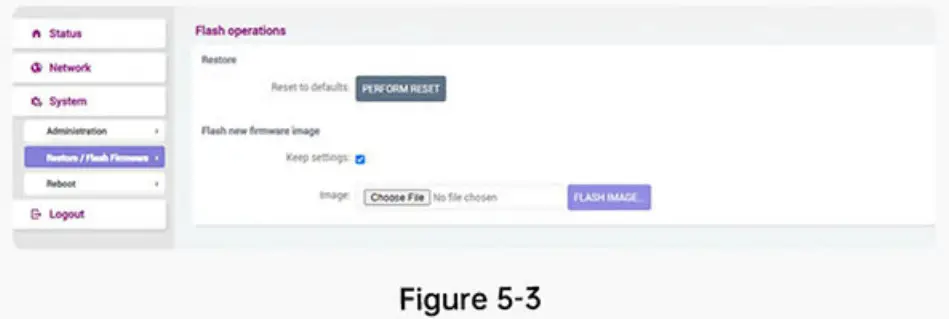
Logout
Click ‘logout’ in the navigation bar to logout HOMEFLEX management background and back to login interface.
Warning
EU Regulatory conformance
This device should be operated with a minimum distance of 20 cm between the radiator and your body. × Hereby, HONG KONG UCLOUDLINK NETWORK TECHNOLOGY LIMITED declares that this device is in compliance with the essential requirements and other relevant provisions of Directive (RED) 2014/53/EU..
FCC Regulatory conformance
This device should be operated with a minimum distance of 20 cm between the radiator and your body. × This device complies with part 15 of the FCC Rules. Operation is subject to the following two conditions: (1) This device may not cause harmful interference, and (2) this device must accept any interference received, including interference that may cause.
Undesired operation. Any Changes or modifications not expressly approved by the party responsible for compliance could void the user’s authority to operate the equipment.
Note: This equipment has been tested and complies with the limits for a Class B digital device, pursuant to part 15 of the FCC Rules. These limits are designed to provide reasonable protection against harmful interference in a residential installation. This equipment generates uses and can radiate radio frequency energy and, if not installed and used in accordance with the instructions, may cause harmful interference to radio communications. However, there is no guarantee that interference will not occur during installation. If the device does cause harmful interference to radio or television reception, which can be determined by turning the equipment off and on, the user is suggested to try to correct the interference by the following measures:
- Reorient or relocate the receiving antenna.
- Increase the distance between the equipment and receiver.
- Connect the equipment to an outlet on a different circuit to the receiver.
- Consult the manufacturer or an experienced radio/TV technician for help.
 Information on the disposal and recycling of the device.
This symbol (with or without a solid bar) on the device, batteries (if included), and/or the packaging, indicates that the device and its electrical accessories (for example, a headset, adapter, or cable) and batteries should not be disposed of as household garbage. These items should not be disposed of as unsorted municipal waste and should be taken to a certified collection point for recycling or proper disposal. For detailed information about device or battery recycling, contact your local city office, household waste disposal service, or retail store.
Disposal of the device and batteries (if included) is subject to WEEE.
Directive Recast (Directive 2012/19/EU) and Battery Directive (Directive 2006/66/EC). The purpose of separating WEEE and batteries from other waste is to minimize the potential environmental impacts and human health risk of any hazardous substances that may be present. Do not disassemble or modify, donot short-circuit, do not dispose in fire, do not expose to high temperature, be disable after soaking. Do not squeeze or bump the battery. Do not continue to
Hong Kong uCloudlink Network Technology Limited
E-mail: [email protected]
Hotline: +852 8191 2660
Address: Suit 603, 6/F, Laws Commercial Plaza 788 Cheung Sha Wan Road, Kowloon, Hong Kong
![]() GlocaIMe
GlocaIMe![]() GlocaIMe
GlocaIMe![]() @GlocaIMeMoments
@GlocaIMeMoments![]() @GlocaIMeMoments
@GlocaIMeMoments
 This product and reloted system are protected by one or more of uCloudlink’s patents
detoils please refer to https://www.ucloudlink.com/potents
Copyright ©2021 uCloudlink. All Rights Reserved


