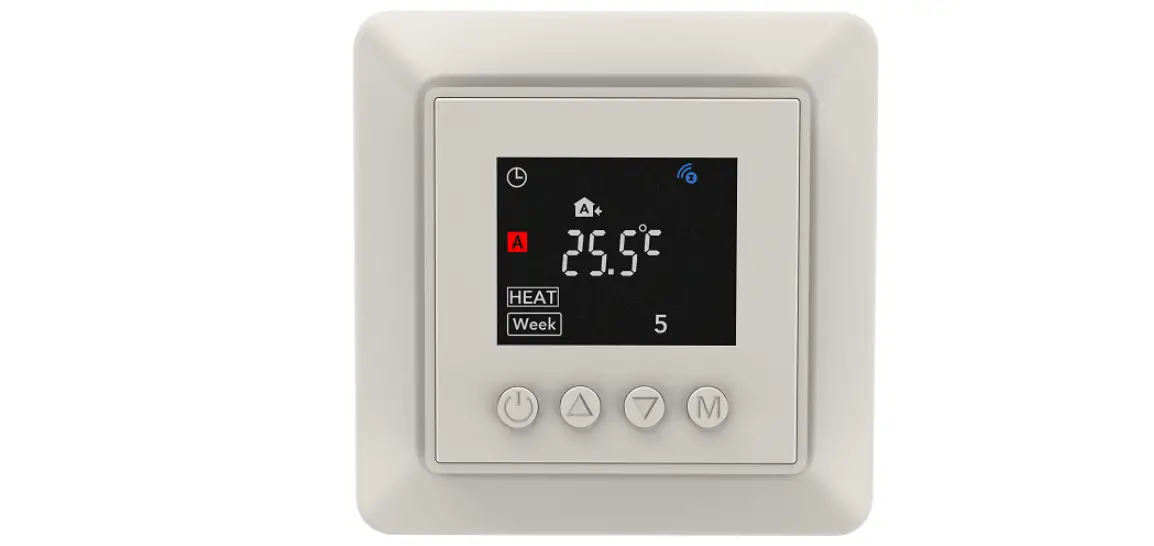
namron 4512757 Z-Wave Termostat
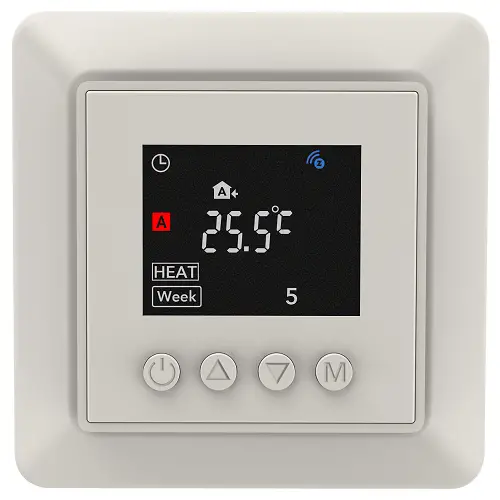
NAMRON Z-WAVE TERMOSTAT
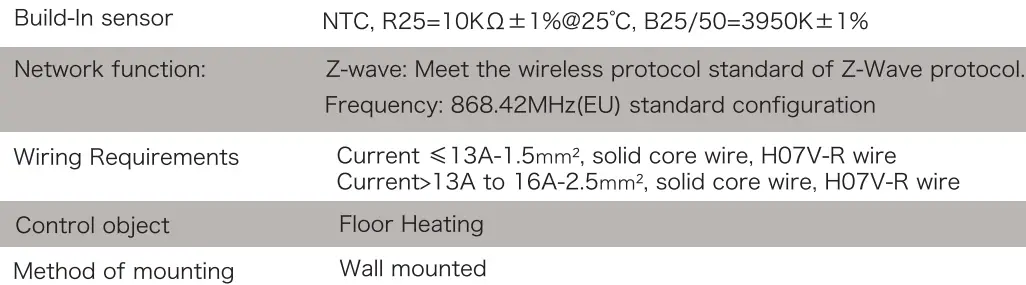
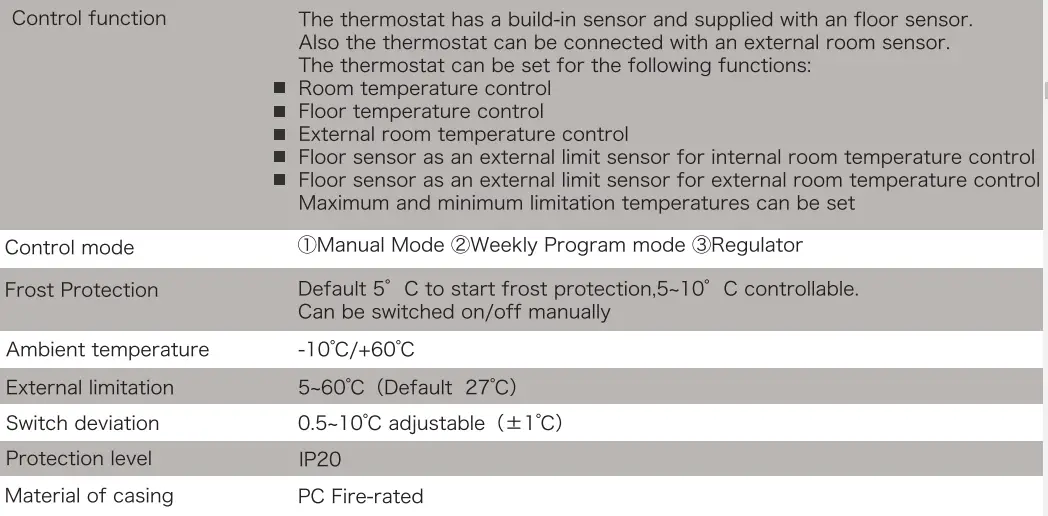
Technical Data

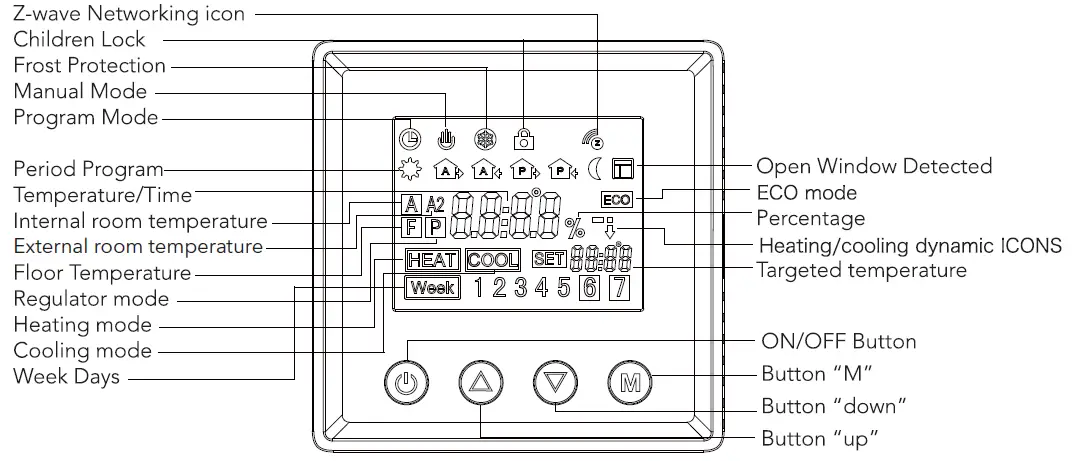
Symbol overview
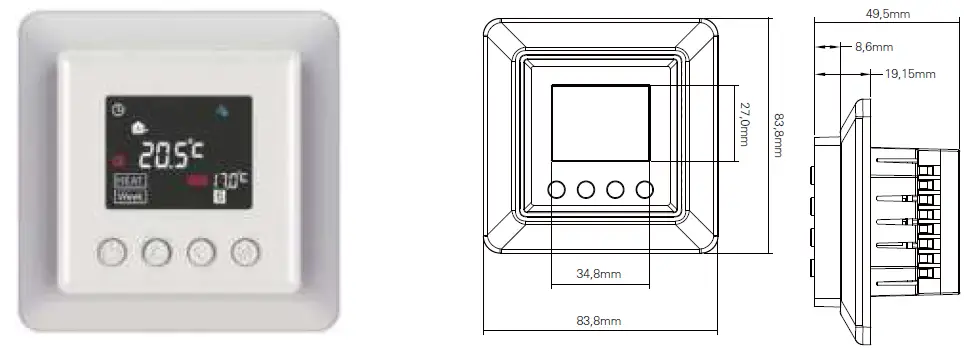
Installation
The thermostat is applied to full load in areas with the altitude of less than 2500m above sea level. Power rating of external load should be less than or equal to 80% rated power of the thermostat in areas with altitude of 2500m to 4200m .
WARNING
- Installation must be carried by a qualified electrician.
- Before installation, please check whether it conforms to local electric standards.
- Power supply must be turn off when install and clean the thermostat.
Wipe the surface dust or dirt with soft cloth or tissue, do not use the detergent or other corrosive chemical solution.
Please match with the 86 type standard wall outlet to ensure the Normal installation operation.
Do not connect the L&N, LO&NO reversely.
Please place and protect the cover properly when it’ s in installation to avoid the damage.
When connected to AC230V, the surface cover must be installed. Thermostat is not the SELV product, all the voltage part should be regarded as 230V.
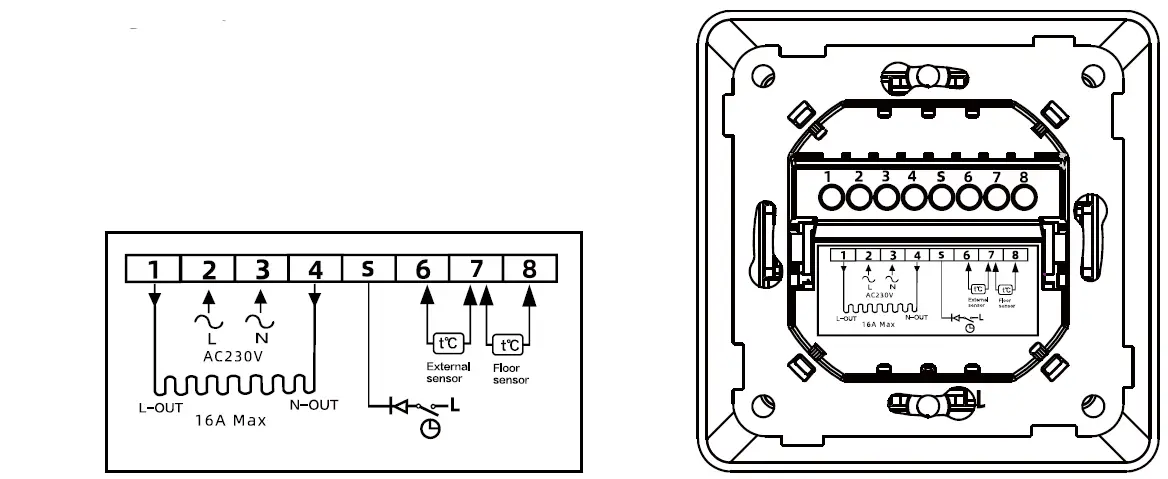
Wiring Diagram
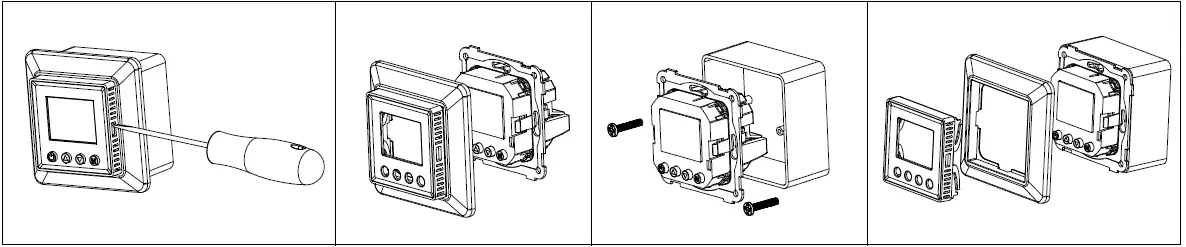
Mounting
Operation
Time setting
When you connecting the thermostat for the first time, you must set the year, day, month, hours and minutes before other settings.
- To set the Year:
Press and hold button “M” and” ” 3 seconds at the same time to enter the “Year” setting mode, short press” “or “‘
 ” to adjust the “Year” value.
 - After settled then press “M” to enter the “Day” setting.
- To set the Day:
During the “Day” setting short press”“or “‘” to choose the “Day” - After settled then press “M” to enter the “Month” setting.
- To set the Month:
During the “Month” setting short press”“or “‘” to choose the “Month” - After settled then press “M” to enter the “Time ” setting
- To set the Time (Hour):
During the “Time” setting short press”“or “‘” to choose the “Hour” . - After settled then press “M” to enter the “Minute” setting.
- To set the Minute:
During the “Minute” setting short press”“or “‘” to choose the “Minute” - After settled then press “M” to back to the main display and the time setting has been completed.
Weekly Programmed setting
- To start setting the weekly programmed schedule, go advanced setting and confirm the weekday setting
schedule first, The schedule has four mode: 5-2 6-1 7-0 0-7 - After confirm the schedule back to the menu and press and hold ” ” and “‘” 3s for weekly setting.
- Please note only in non-regulator mode the thermostat can be enter weekly programmed mode.
- The thermostat will be run as default weekly programmed schedule below when user is not plan to set the schedule.
| Time period | Time symbol | Time | Temperature | |||
| default | adjust | default | adjust | |||
| Workingman | 1 |  | 06:00 | ” adjust time and time period | 21°C | ” adjust the temperature |
| 2 | 08:00 | 17°C | ||||
| 3 | 11:30 | 17°C | ||||
| 4 | 13:30 | 17°C | ||||
| 5 | 17:00 | 21°C | ||||
| 6 |  | 22:00 | 17°C | |||
| Non-Workingman | 1 |  | 06:00 | 21°C | ||
| 2 | 22:00 | 17°C | ||||
Normal operation guidance
- Short press the
 ON/OFF key to ON/OFF the backlight on the thermostat display. When it shows bon, means that backlight is ON, shows boFF, means OFF.
 - Long press the ON/OFF button 3s to ON/OFF the Thermostat
- Under manual control or programmed control mode, short press button “M” to have mode change.
- During the heating(not in regulator P mode), long press” M” 2s to switch Co to f (o mode.
- During the normal mode(Not P mode), short press” “or “‘” to adjust the current temperature.
- During the Programmed mode, short press” “or “‘” to adjust the contemporary time setting temperature which enter the temporary control mode.
- In regulator P mode, short press” “or “‘” to adjust the heating percentage of the current mode, short press “M” to confirm the setting.
- Under main screen at any mode press hold the “M” and “.” 3s at same time to enter the date/time setting.
- Under main screen at any mode press hold the “M” and “” 3s at same time to open/close child lock.
Regulator setting
- Enter the Advanced setting and find Sensor mode Snod press M
- Find P and long press button M until see OK confirm the regulator heating mode
- To choose the heating time period go to advance setting
- Find Regulator,-E 61: and press M to enter the time setting. Long press M to confirm.
- Back to Home page use .. and to select heating percentage
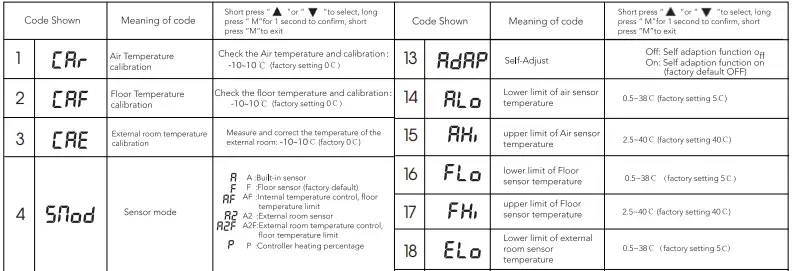
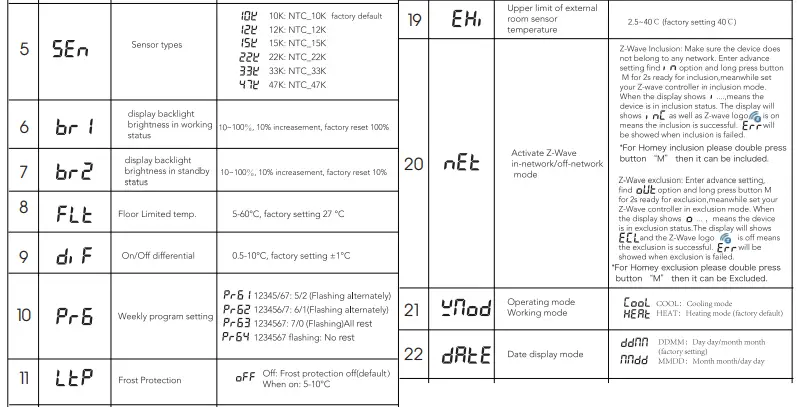
Advanced setting;
Long press button “M” for Seconds at any control mode

Open window function:
During A or AF mode, when build-in sensor has detected that temperature has dropped 5 degree within 10 minutes, then the open window function will activated , in the meantime the heating processing will be stopped.
The open window function will be off and back to heating mode when this status has been activated over 30 minutes or build-in sensor has detected that the temperature has increase 3 degree within l O minutes.
During A2 or A2F mode, when external sensor has detected that temperature has dropped 5 degree within l 0 minutes, then the open window function will activated, in the meantime the heating processing will be stopped.
The open window function will be off and back to heating mode when this status has been activated over 30 minutes or the external sensor has detected that the temperature has increase 3 degree within l O minutes.
Under the F mode when the external room sensor (the external room sensor is normal) or the built-in room sensor (external room sensor is not connected or abnormal) drops by more than 5 degrees within 10 minutes, the open window function will be activated and the heating function is disabled.
30 minutes after the open window function activated or the external room sensor is detected (the external room sensor is normal) or the built-in sensor (external room sensor is not connected or abnormal) rises more than 3 degrees within 10 minutes, the open window detection will be canceled and the heating will be resumed.
Under P mode there is no Open window function activated.
Power consumption checking
Enter the Advanced setting and find category SMOD Snod and press M and Upper button A over 3 seconds to enter the power consumption checking platform.
- Constantly press the button” M” you may check the following value:
- Output current , (unit value: A)
- Output voltage U (unit value: V)
- Output wattage !:’ (unit value: W)
- Output total KWH (unit value ; KWH)
Please note the every 1 kwh the thermostat will save and recording in this device long press M for 5s to reset the data and exit
Troubleshooting and Additional Information
- Please choose the proper sensor working. Improper using or sensor defective will stop the thermostat from working when the screen shows ER3 ER4 or ER5 this means Build-in sensor, floor sensor or external room sensor error.
- When the temperature detected by the temperature sensor is lower than – 10 degrees or higher than 60 degrees, ER3, ER4 or ER5 will also appear accordingly, Indicates that the temperature detected by the built-in room, floor, or external room sensor respectively exceeds the temperature measurement range of the thermostat.
When the display shows ER7, it means that the power supply of the thermostat is faulty or the current passing through the relay has exceed over 17.6A and the thermostat stops working until the fault is removed.
Z-Wave Technical Data
Security and non-Security features of the Thermostat
The function of the Thermostat as a security and non-security device is identical.
When a node includes into a SO, S2 Z-Wave network, the nodes supports SO, S2 unauthenticated class, S2 authenticated and so do the supported CCs.
Supported Security Levels
- ECURITY _KEY S2_AUTHENTICATED_BIT
- ECURITY _KEY S2_UNAUTHENTICATED_BIT
- ECURITY _KEY S0_BIT
Library
Basic Device Class: BASIC_ TYPE_ROUTING_SL.AVE
Generic Device Class: GENERIC_ TYPE_ THERMOSTAT
Specific Device Class: SPECIFIC_ TYPE_ THERMOSTAT _GENERAL_ V2
Commands List
| Command Classes Command Class BASIC V2 | Version | Required Security Class |
| COMMAND_CLASS_ZWAVEPLUS_INFO_V2 | 2 | None |
| COMMAND_ CLASS_ TRANSPORT _SERVICE_ V2 | 2 | None |
| COMMAND_ CLASS _ SECURITY _Vl | l | None |
| COMMAND_CLASS_SECURITY_2_Vl | l | None |
| COMMAND _CLASS_ SUPERVISION _Vl | l | None |
| COMMAND_CLASS_NOTIFICATION_VB | 8 | SO or S2 Authenticated/Unauthenticated |
| COMMAND_CLASS_BASIC | 2 | SO or S2 Authenticated/Unauthenticated |
| COMMAND_CLASS_CONFIGURATION_V4 | 4 | SO or S2 Authenticated/Unauthenticated |
| COMMAND_CLASS_ASSOCIATION_V2 | 2 | SO or S2 Authenticated/Unauthenticated |
| COMMAND_ CLASS_ ASSOCIATION _GRP_INFO _Vl | 3 | SO or S2 Authenticated/Unauthenticated |
| COMMAND_ CLASS_ VERSION _ V2 | 3 | SO or S2 Authenticated/Unauthenticated |
| COMMAND_CLASS_ MANUFACTURER_ SPECIFIC_V2 | 2 | SO or S2 Authenticated/Unauthenticated |
| COMMAND_ CLASS_ DEVICE _RESET _LOCALLY _Vl | l | SO or S2 Authenticated/Unauthenticated |
| COMMAND _CLASS _ POWERLEVEL _Vl | l | SO or S2 Authenticated/Unauthenticated |
| COMMAND _CLASS _FIRMWARE _UPDATE _MD _V5 | 5 | SO or S2 Authenticated/Unauthenticated |
| COMMAND_CLASS _MULTI _CHANNEL _ASSOCIATION _V3 | 3 | SO or S2 Authenticated/Unauthenticated |
| COMMAND_CLASS _INDICATOR _V3 | 3 | SO or S2 Authenticated/Unauthenticated |
| COMMAND_ CLASS _ THERMOSTAT _MODE | 3 | SO or S2 Authenticated/Unauthenticated |
| COMMAND_CLASS_ THERMOSTAT_ OPERATING_STATE | l | SO or S2 Authenticated/Unauthenticated |
| COMMAND_ CLASS _ THERMOSTAT _SETPOINT | 3 | SO or S2 Authenticated/Unauthenticated |
| COMMAND_ CLASS _TIME _PARAMETERS | l | SO or S2 Authenticated/Unauthenticated |
| COMMAND_ CLASS _TIME | 2 | SO or S2 Authenticated/Unauthenticated |
| COMMAND_ CLASS _ SENSOR_ MULTILEVEL _ Vl l | 11 | SO or S2 Authenticated/Unauthenticated |
| COMMAND_CLASS_SWITCH_BINARY | 2 | SO or S2 Authenticated/Unauthenticated |
| COMMAND_CLASS_PROTECTION | 2 | SO or S2 Authenticated/Unauthenticated |
| COMMAND_CLASS_METER V3 | 3 | SO or S2 Authenticated/Unauthenticated |
Special Rule of Each Command
z-Wave Plus Info Report Command Class
Z-Wave Plus Version:0x02
Role Type:0x05(ZWAVEPLUS_INFO_REPORT ROLE_ TYPE_SLAVE_ALWAYS_ON)
Node Type:0x00(ZWAVEPLUS_INFO_REPORT NODE_ TYPE_ZWAVEPLUS_NODE)
Installer Icon Type:0x1200(ICON_TYPE_GENERIC_THERMOSTAT)
User Icon Type:0x1200(1CON_TYPE_GENERIC_THERMOSTAT)
Multilevel Sensor Command Class
Supported the sensor type for Temperature.
Meter Command Class
Supported the meter type for Electric Meter.
| Meter Type | Precision | Scale | Size |
| Electric Meter | Ox02 | OxOO(kWh) | 4 |
| Power | OxOl | OxOO(W) | 4 |
| Voltage | OxOO | OxOO(V) | 4 |
| Current | Ox02 | OxOO(A) | 4 |
Association Command Class
The Thermostat supports l association groups and max 5 nodes for each group.
| Grouping Identifier | Max Nodes | Send Commands |
| Group l | Ox05 | DEVICE_RESET _LOCALLY _NOTIFICATION SENSOR_MULTILEVEL_REPORT BINARY_SWITCH_R EPORT NOTIFICATION_REPORT CONFIGURATION_REPORT THERMOSTAT_MODE_REPORT THERMOSTAT_SETPOINT_REPORT PROTECTION_REPORT M ETER_REPORT COMMAND_CLASS_INDICATOR |
Notification Command Class
| Type | Event | Event Parameter |
| Ox06 | NOTIFICATION_EVENT_ACCESS_CONTROL_WINDOW_DOOR_IS_OPEN (Oxl 6) | OxOO |
| Ox09 | NOTIFICATION_EVENT_SYSTEM_HARDWARE_FAILURE_WITH_MANUFACTURER – PROPRIETARY _FAILURE_CODE (Ox03) | See below |
| Ox08 | NOTIFICATION_EVENT_POWER_MANAGEMENT_POWER_HAS_BEEN_APPLIED (OxOl) This event for the thermostat switch on by panel or was powered on. |
Fault Alert
| l Byte | ||||||||
| Bits | Bit7 | Bit6 | Bit5 | Bit4 | Bit3 | Bit2 | Bitl | BitO |
| Error Code | Undefined | ER7 | Undefined | ER5 | ER4 | ER3 | Undefined | Undefined |
Basic Command Class
For switch on/off the thermostat device. You can send Basic Set command to the switch on or off. And the the thermostat switch on/off by press button on the device. The device will send Basic Report to the gateway.
Binary Switch Command Class
For switch on/off the thermostat device, you can send Binary Switch Set command to the switch on or off. And the the thermostat switch on/off by panel. the device will send Binary Switch Report to the gateway.
Protection Command Class
Protection CC for child lock function. Supported the O and l protection level.
Thermostat Mode Command Class
| Thermostat Mode Value | Supported Thermostat Mode | Defined By |
| OxOl | THERMOSTAT _MODE_REPORT _MODE_HEAT _V3 | ZWave Standard |
| OxOO | THERMOSTAT _MODE_REPORT _MODE_OFF_V3 | ZWave Standard |
| Ox02 | THERMOSTAT _MODE_REPORT _MODE_COOL_ V3 | ZWave Standard |
Thermostat Setpoint Command Class
Supported the Setpoint type.
- THERMOSTAT MODE REPROT MODE HEAT
- THERMOSTAT=MODE=REPROT=MODE=COOL
Configuration Command Class
| Parameter | Parameter Name | Size | Default Value(dec) | Descriptions |
| (0x04) | ECO Mode | 4 | 0x00 | 0: OFF l: ON |
| (0x08) | Window check | 4 | 0x0l | 0: OFF l: ON |
| (0x0A) | Frost | 4 | 0x00 | 0: OFF l: ON |
| (0xl 7) | Temp Unit | 4 | 0x00 | 0: °C l: °F |
| (0xl B) | Temp correction | 4 | 0x00 | -10-10 |
| (0xl F) | Work days set | 4 | 0x00 | 0x00: 5_2 0x0l: 6_1 0x02: 7_0 0x03: 0_7 |
| (0x28) | Child lock | 4 | 0x00 | 0x00: OFF 0x0l: ON |
| (0x2B) | Sensor mode | 4 | 0x0l | 0x00: A 0x0l: F 0x02: AF 0x03: A2 0x04: A2F 0x06: P |
| (0x3A) | Run mode | 4 | 0x0l | 0x00: Manual 0x0l: Program |
| (0x70) | Adaption | 4 | 0x00 | 0x00: OFF 0x0l: ON |
| (0x76) | Regulator | 4 | 0x0lE | 0:OFF l—– 30Min |
| (0x7B) | LCD backlight standby | 4 | 0x0A | l 0-100 Step :l 0 |
| (0x7C) | LCD backlight work | 4 | 0x64 | l 0-100 Step: l 0 |
| (0x7F) | Regulator percentage | 4 | 0xl4 | 0-100 Step: l 0 |
| (0x86) | DIF Celsius | 4 | 0x0A | 5 – l 00, Step: 5, l 0(1°C) |
| (0x87) | DIF Fahrenheit | 4 | 0x0014 | l 0 – 180, Step: l 0, 20(2°F) |
| (0x88) | Frost Celsius | 4 | 0x32 | 50 – l 00, Step: l 0, 50(5°C) |
| (0x89) | Forst Fahrenheit | 4 | 0x019A 41 | 0 – 500, Step: 20, 410(41°F) | |
| (0xB7) | Dry | 4 | 0xlE 0: | OFF, 5 – l 20Min, Step: 5 | |
| (0xB9) | Celsius FLT | 4 | 0xOl0E 50 | “”‘600 C5″”’60°C), Step:5 ·c | |
| (0xBA) | Fahrenheit FLT | 4 | 0x032A 41 | 0- 1400, Setp: 10, 810(81°F) | |
| (0xBC) | LCD display switch | 4 | 0x0l | 0x00: OFF 0x0l: ON | |
| (0xBD) | Automatically get network time | 4 | 0x00 | 0x00: OFF 0x0l: ON | |
| (0xC7) | Week program time | 4 | 0x00000600 | Byte 1: 0x00:working day, 0x0 1:rest day | |
| (0xC8) | Week program Celsius Temp | 4 | 0x000000D | Byte 1: 0x00:working day 0x0 1: rest day Byte 2: schedule time. value range 0-5, means schedule time 1-6 Byte 3: target heating setting high byte Byte 4: target heating setting low byte Target temperature setting range: 0-400(0 means OFF) Ex: working day schedule time 1 21·c, then send report 0x00 0x00 0x00 0xD2 | |
| (0xC9) | Week program Fahrenheit Temp | 4 | 0x000002BC | Byte 1: 0x00:working day 0x0 1: rest day Byte 2: schedule time. value range 0-5, means schedule time 1-6 Byte 3: target heating setting high byte Byte 4: target heating setting low byte Target temperature setting range: 320-1040(320 means OFF) Ex: working day schedule time 1 7Q°F, then send report 0x00 0x00 0x02 0xBC |
Importer:
Namron AS
Nedre kalbakkvei 88B
1081 Olso
Norway
Made in China


