
PASCO PS-3209 Wireless Weather Sensor with GPS
Included Equipment
- Wireless Weather Sensor with GPS
- USB-to-Micro-USB Cable
Required Equipment:
- Data collection software (PASCO Capstone or SPARKvue)
Recommended Equipment:
- Weather Vane Accessory (PS-3553)

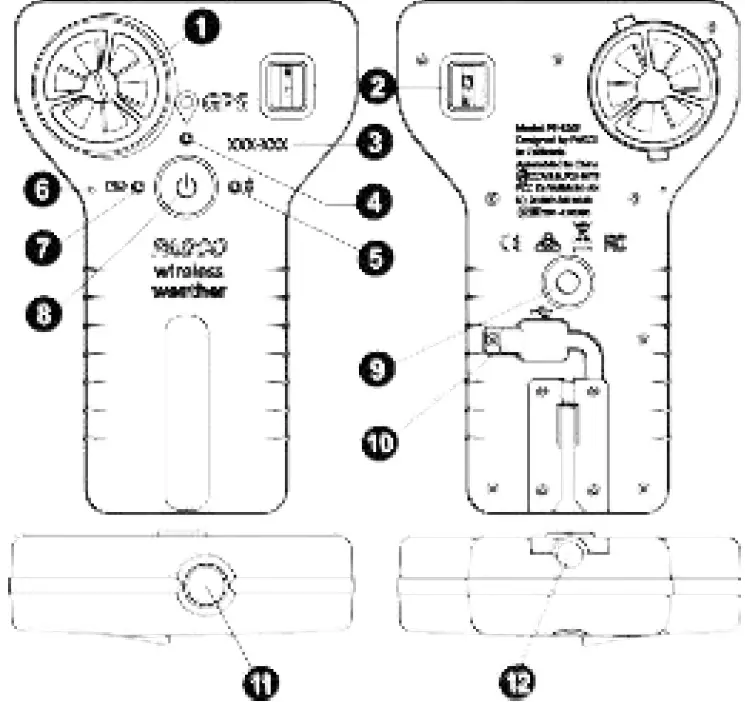
Features:
- Turbine for Anemometer
- Temperature, Pressure, and Humidity Sensor
- Device ID
- GPS Status LED
- Bluetooth Status LED
- Drain hole
- Battery Status LED
- ON/OFF button
- Threaded hole for Weather Vane (accessory)
- Flexible cover for USB port
- Light Sensor
- Hole for Pivot Post (accessory)
Introduction
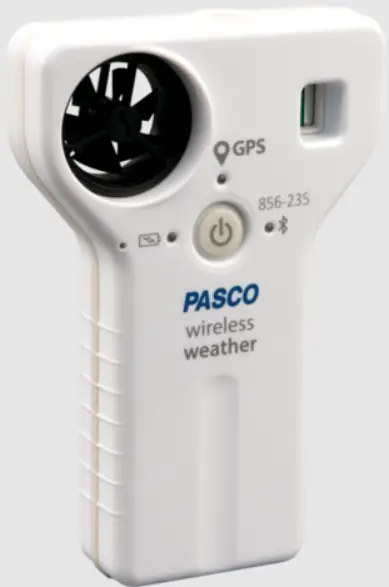
The Wireless Weather Sensor with GPS is a versatile instrument with multiple sensors, including a Global Positioning System (GPS) module. The sensor is durable and weather-resistant, and it can connect wirelessly via Bluetooth to a computing device such as a tablet or computer using PASCO Capstone or SPARKvue. The software supports data logging when the instrument is not connected to a computing device. The Wireless Weather Sensor has a rechargeable battery pack. The sensor measures wind speed, barometric pressure, relative humidity, ambient temperature, illuminance, UV index, solar irradiance, solar PAR, magnetic heading, and wind direction. The GPS module reports latitude, longitude, altitude, horizontal velocity, and satellite count. The software can calculate dew point, true heading, wind chill, absolute humidity, and heat stress index.
First step: charge the battery
Charge the battery by connecting the micro USB port on the back of the sensor to any standard USB charger. To access the micro USB port, gently pull the tab of the flexible cover to the right. The Battery Status LED is solid yellow while charging. When fully charged, the light changes to solid green.
Get the software
You can use the sensor with SPARKvue or PASCO Capstone software. If you’re not sure which to use, visit pasco.com/products/guides/software-comparison.
SPARKvue is available as a free app for Chromebook, iOS, and Android devices. We offer a free trial of SPARKvue and Capstone for Windows and Mac. To get the software, go to pasco.com/downloads or search for SPARKvue in your device’s app store. If you have installed the software previously, check that you have the latest update:
SPARKvue
Go to Main Menu > Check for Updates
PASCO Capstone
Go to Help > Check for Updates.
Check for a firmware update
SPARKvue
- Press the power button until the lights turn on.
- Open SPARKvue.
- Select Sensor Data on the Welcome Screen.

- Select the sensor that matches its device ID. A notification appears if a firmware update is available. Click Yes to update the firmware.
- Close SPARKvue.

PASCO Capstone
- Press and hold the power button until the lights turn on.
- Open PASCO Capstone.
- Click Hardware Setup.

- Select the sensor that matches its device ID. A notification appears if a firmware update is available. Click Yes to update the firmware.
- Close Capstone.

Status LED information
The Bluetooth, GPS, and Battery Status LEDs operate as follows:
| Bluetooth/GPS LED | Status |
| Red blink | Ready to pair |
| Green blink | Connected |
| Yellow blink | Remotely logging data (Bluetooth only) |
NOTE:
When the Wireless Weather Sensor is connected to a computer via the provided micro USB cable, the Bluetooth LED will be disabled. For information on using remote data logging with PASCO sensors, see the PASCO Capstone or SPARKvue online help.
| Battery LED | Status |
| Red blink | Low power |
| Yellow ON | Charging |
| Green ON | Charged |
Turn on the sensor
To turn on the sensor, press the ON/OFF button. All three status LEDs will shine momentarily. If the battery is charged, the Battery Status LED will stop shining; the GPS Status and Bluetooth Status LEDs will continue to blink red. This indicates that the device is ready to connect to GPS satellites and connect wirelessly via Bluetooth to a computing device such as a computer or tablet. To turn off the sensor, press and hold the ON/OFF button until the Battery Status LED shines red momentarily and the other status LEDs stop shining.
Connecting to the software
The Wireless Weather Sensor can connect to either PASCO Capstone or SPARKvue using a wireless Bluetooth connection or the provided micro USB cable.
SPARKvue
Connecting via Bluetooth:
- Turn on the Wireless Weather Sensor. Check to make sure the GPS and Bluetooth Status LEDs are blinking red.
- Open SPARKvue, then select Sensor Data from the main menu.
- From the list of available wireless devices on the left, select the sensor that matches the device ID printed on your Wireless Weather Sensor.
Connecting via micro USB:
- Turn on the Wireless Weather Sensor.
- Start SPARKvue, then select Sensor Data from the main menu.
- Gently pull the tab of the flexible cover on the back of the sensor to the right to access the micro USB port.
- Use the provided micro USB cable to connect the micro USB port on the Wireless Weather Sensor to a USB port or powered USB hub connected to the computer. The sensor will connect to SPARKvue automatically.
Once the sensor is connected to SPARKvue, a list of available measurements will appear in the Select Measurements for Templates column.
Collecting Data with SPARKvue:
- Select the measurements you intend to record by clicking the checkboxes next to those measurements’ names in the Select Measurements for Templates column.
- Select an appropriate template from the Templates section to open the Experiment Screen. The template will auto-populate with the measurements you selected.
- When you are ready, click Start to begin collecting data.
For more information on collecting and displaying data, see the SPARKvue online help.
PASCO Capstone
Connecting via Bluetooth:
- Turn on the Wireless Weather Sensor. Check to make sure the GPS and Bluetooth Status LEDs are blinking red.
- Start Capstone, then select Hardware Setup from the Tools palette.
- From the list of Available Wireless Devices, select the sensor which matches the device ID printed on your Wireless Weather Sensor.
Connecting via micro USB cable:
- Turn on the Wireless Weather Sensor.
- Start Capstone. If desired, open Hardware Setup to check the connection status of the sensor.
- Gently pull the tab of the flexible cover on the back of the sensor to the right to access the micro USB port.
- Use the provided micro USB cable to connect the micro USB port on the Wireless Weather Sensor to a USB port or powered USB hub connected to the computer. The sensor will connect to SPARKvue automatically.
Upon connecting to the Wireless Weather Sensor, all of the sensor’s measurements are enabled in Capstone by default. Undesired measurements can be disabled through the Data Summary tool.
Collecting data with PASCO Capstone:
- Double-click the appropriate template from the Displays palette to create a display.
- To add measurements to the template, click each <Select Measurement> box and select the appropriate measurement from the list.
- When you are ready, click Record to begin collecting data.
For more information on collecting and displaying data, see the PASCO Capstone online help.
Measurement tips
Equilibration time
After a rapid change in temperature or humidity, the sensor may take several seconds to come to equilibrium with the environment. Observe the measurements and wait for them to stabilize.
Alignment with wind
Hold the sensor so that wind blows straight into the front of the anemometer.
Shade
The sensor, especially the temperature and humidity transducers, must be out of direct sunlight to make accurate measurements.
Moisture
Protect the sensor from liquid water. The sensor is rugged and weather-resistant, but not waterproof. Exposure to liquid water is likely to cause inaccuracies in collected data.
Weather Vane Accessory
When measuring weather conditions like wind speed and direction, consider using the PS-3553 Weather Vane Accessory to maximize accuracy of the data collected.
Wireless Weather Sensor
measurements
Primary measurements
The Wireless Weather Sensor’s primary measurements are Wind Speed, Temperature, Relative Humidity, and Barometric Pressure.
Wind Speed
The sensor determines Wind Speed from the rate of rotation of the anemometer (wind turbine). It assumes that air is flowing directly into the turbine. Wind speed must be at least 0.5 m/s to be measured accurately. Wind Speed can be reported in units of m/s, cm/s, mm/min, km/h, mph (miles per hour), knots, or ft/s
(feet per second).
CAUTION:
Do not try to measure high-speed wind, such as from leaf-blowers or severe storms.
Temperature
Temperature is measured by the thermistor temperature transducer. To work accurately, the transducer must be in shade. Temperature can be reported in °F, °C, or K.
Relative Humidity
Relative Humidity is measured by the humidity transducer. To work accurately, the transducer must be in shade and at air temperature. Relative Humidity is reported as a percentage representing the ratio of the partial pressure of water vapor to the saturated vapor pressure.
Barometric Pressure
Barometric Pressure is measured by a pressure transducer in the sensor’s “window”. The reported Barometric Pressure is the actual air pressure, not the sea-level corrected pressure. Barometric Pressure can be reported in units of kPa (default), psi, N/m2, atm, torr, hPa, inHg, mmHg, mbar, Pa, or inH2O.
Secondary measurements
Each secondary measurement is a calculation based on one or more of the primary measurements.
Absolute Humidity
Absolute Humidity (or water vapor density) is a measure of the mass of water vapor present in a given volume. It is reported in units of g/m3. The sensor calculates Absolute Humidity with the following formula: where RH is the Relative Humidity (as a percentage) and T is Temperature in °C.
Dew Point
Dew Point is the temperature to which air must be cooled at constant pressure for water vapor to condense. Dew Point is reported as a temperature in °C or °F. The sensor calculates Dew Point (in °C) with the formula: In this formula, RH is the Relative Humidity (as a percentage), T is Temperature in °C, and SatVP is the saturation water vapor pressure, given by:
![]() Wind Chill
Wind Chill
Wind Chill (or Wind Chill Index) indicates a combined effect of temperature and wind speed. It is reported as an apparent temperature in °F or °C. The sensor calculates Wind Chill (in °F) using the formula:![]() where T is air temperature (in °F) and v is wind speed (in mph). Wind Chill is defined for temperatures at or below 50 °F and wind speed above 3 miles per hour; outside of those limits, the sensor reports a value equal to Temperature.
where T is air temperature (in °F) and v is wind speed (in mph). Wind Chill is defined for temperatures at or below 50 °F and wind speed above 3 miles per hour; outside of those limits, the sensor reports a value equal to Temperature.
Heat Stress Index (Humidex)
Heat Stress Index (or Humidex) indicates a combined effect of temperature and humidity. It is reported as an apparent temperature in °F or °C. The sensor calculates Humidex (in °C) using the formula: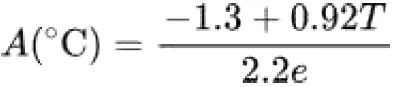 where T is the ambient air temperature in °C and e is the water vapor pressure in kPa.
Sea-level corrected pressure
A typical weather station does not report the actual measured barometric pressure. Rather, it reports a “sea-level corrected” value. The sea-level corrected pressure is not calculated automatically but can be found using this equation:![]() where h is the sensor’s elevation in meters and BP is the Barometric Pressure in mbar. To have this calculation done automatically, type this equation into the Calculator tool in PASCO Capstone or SPARKvue.
where h is the sensor’s elevation in meters and BP is the Barometric Pressure in mbar. To have this calculation done automatically, type this equation into the Calculator tool in PASCO Capstone or SPARKvue.
Wireless GPS Sensor
The Wireless GPS Sensor uses signals received from the Global Positioning System (GPS) to determine its latitude, longitude, altitude, and horizontal velocity anywhere on Earth. This sensor can be used alone or in conjunction with other sensors for outdoor experiments in environmental science, physics, and other subjects. Data from the Wireless GPS Sensor can be relayed via Bluetooth or micro USB cable to PASCO Capstone or SPARKvue.
Theory of operation
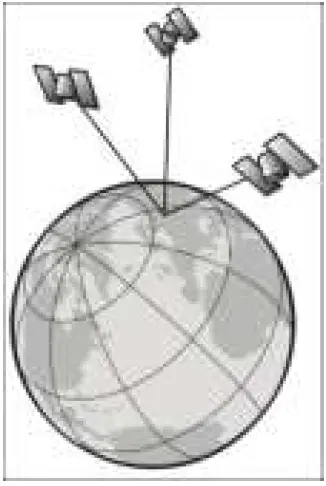 The Wireless GPS Sensor must receive data from at least three GPS satellites to determine its position. When the sensor is first powered on, it searches the sky for available satellites. This process typically takes between 30 seconds and 2 minutes. Once satellites have been identified, the sensor actively tracks them and acquires new satellites as they come into view. The Wireless GPS Sensor performs best outdoors, with a clear view of the sky.
Sensor set-up
Orientation and positioning
It is important to orient the sensor properly to receive signals from satellites overhead, especially during initial search mode (when the GPS Status LED is blinking red). The antenna detects signals through the top side of the sensor. The antenna is located above the rectangular window which houses the temperature, pressure, and humidity sensing elements. Hold the sensor with the top side up and approximately horizontal, facing the sky. Do not cover the antenna area.
Modes
The color of the GPS Status LED indicates whether or not the sensor is ready to make measurements. At initial power on, the sensor enters “search mode”, in which it searches the sky for available satellites. During “search mode”, the LED blinks red. When the sensor is actively tracking three or more satellites, the LED blinks green. If the sensor cannot track at least three satellites, it enters “lost mode”. In this mode, the sensor continues to report its most recent position measurements. Use this “stale” data with caution, as it is incorrect if the sensor has moved since its last valid measurement. In lost mode, the GPS Status LED blinks red and the sensor searches for available satellites again.
If the Wireless GPS Sensor is turned off in the data collection software, or if there is a hardware problem, the GPS Status LED does not shine.
Wireless Light Sensor
The Wireless Light Sensor measures four quantities: Illuminance, Ultraviolet Index, Solar Irradiance, and Solar PAR.
- Illuminance is a measure of the amount of light that reaches a surface. It is reported in lux (lx), also called lumens per square meter.
- The Ultraviolet Index, or UV Index, is a linear scale measurement proportional to the amount of ultraviolet radiation the sensor detects; this value indicates the time it takes for harm to occur due to ultraviolet radiation in the vicinity of the sensor. The UV Index does not include a unit.
- Solar Irradiance refers to the amount of power the sun’s light delivers to a given area. Solar irradiance can be reported in W/m2 (watts per square meter), mW/m2, µW/m2, or µW/cm2.
- Solar PAR (Photosynthetically Active Radiation) measures the number of photons within the range of wavelengths conducive to photosynthesis which fall on a given surface area per second. Solar PAR can be reported in µmol/m2/s (micromoles per square meter per second) or mol/m2/s.
For greatest accuracy when using the Wireless Light Sensor, ensure that the white disk on top of the sensor is clean and dry.
Wireless Compass
The Wireless Compass measures Magnetic Heading and reports it in either degrees (°) or radians (rad). In addition, the Wireless Compass provides two calculations based on the magnetic heading: Wind Direction and True Heading, both of which have the same unit options for reporting data.
- Wind Direction: When used with the PS-3553 Weather Vane Accessory, this calculation accurately measures the direction of the wind relative to magnetic north.
- True Heading: This calculation combines the Wind Direction with the GPS position data to measure the direction of the wind relative to true north.
Battery life
Battery usage
Battery life is very important to making the Wireless Weather Sensor simple and always ready to use. Therefore, this sensor, like all PASCO wireless products, is designed for long battery life. For example, after a brief time of inactivity, the Weather Sensor turns itself off to conserve battery life. The battery life between charges for the Weather Sensor ranges from two days to more than a week, depending on active sensors and sample rate. If the Battery Status LED blinks red, connect the Weather Sensor to the USB Charger or a USB port.
Maximizing battery life
One of the factors that affects battery life is the storage temperature. Therefore, avoid storing the Weather Sensor in very cold or very hot environments. If the battery will not hold a charge, contact PASCO Technical Support.
Replacement items
The wind turbine of the Wireless Weather Sensor with GPS can be replaced with the PS-9879 Impeller Replacement Anemometer. Check with Technical Support regarding possible replacement items.
Software help
The SPARKvue and PASCO Capstone Help provide additional information on how to use this product with the software. You can access the help within the software or online.
SPARKvue
Software: Main Menu > Help
Online: help.pasco.com/sparkvue
PASCO Capstone
Software: Help > PASCO Capstone Help
Online: help.pasco.com/capstone
Specifications and accessories
Visit the product page at pasco.com/product/PS-3209 to view the specifications and explore accessories. You can also download experiment files and support documents from the product page.
Experiment files
Download one of several student-ready activities from the PASCO Experiment Library. Experiments include editable student handouts and teacher notes. Visit
pasco.com/freelabs/PS-3209.
Technical support
Need more help? Our knowledgeable and friendly Technical Support staff is ready to answer your questions or walk you through any issues.
- Chat pasco.com
- Phone1 -800-772-8700 x1004 (USA)
+1 916 462 8384 (outside USA) - Email [email protected]
Regulatory information
Limited warranty
For a description of the product warranty, see the Warranty and Returns page at www.pasco.com/legal.
Copyright
This document is copyrighted with all rights reserved. Permission is granted to non-profit educational institutions for reproduction of any part of this manual, providing the reproductions are used only in their laboratories and classrooms, and are not sold for profit. Reproduction under any other circumstances, without the written consent of PASCO scientific, is prohibited.
Trademarks
PASCO and PASCO scientific are trademarks or registered trademarks of PASCO scientific, in the United States and in other countries. All other brands, products, or service names are or may be trademarks or service marks of, and are used to identify, products or services of, their respective owners. For more information visit www.pasco.com/legal.
Product end-of-life disposal
This electronic product is subject to disposal and recycling regulations that vary by country and region. It is your responsibility to recycle your electronic equipment per your local environmental laws and regulations to ensure that it will be recycled in a manner that protects human health and the environment. To find out where you can drop off your waste equipment for recycling, please contact your local waste recycle or disposal service, or the place where you purchased the product. The European Union WEEE (Waste Electronic and Electrical Equipment) symbol on the product or its packaging indicates that this product must not be disposed of in a standard waste container.
CE statement
This device has been tested and found to comply with the essential requirements and other relevant provisions of the applicable EU Directives.
FCC statement
This device complies with part 15 of the FCC Rules. Operation is subject to the following two conditions:
- This device may not cause harmful interference, and
- this device must accept any interference received, including interference that may cause undesired operation.
Battery disposal
- Batteries contain chemicals that, if released, may affect the environment and human health. Batteries should be collected separately for recycling and recycled at a local hazardous material disposal location adhering to your country and local government regulations. To find out where you can drop off your waste battery for recycling, please contact your local waste disposal service, or the product representative. The battery used in this product is marked with the European Union symbol for waste batteries to indicate the need for the separate collection and recycling of batteries.
References
 PASCO Capstone Help
-
SPARKvue Help
 PASCO scientific | Science Lab Equipment and Teacher Resources
-
Popular Downloads | PASCO
-
Lab Experiment Library - Resources | PASCO
-
Wireless Weather Sensor with GPS - PS-3209 - Products | PASCO
-
Software Comparison: SPARKvue or Capstone? | PASCO
-
Privacy Policies | PASCO
-
Wireless Weather Sensor with GPS - PS-3209 - Products | PASCO
-
Privacy Policies | PASCO


