ToolPRO PLU 583633 Radiator Pressure Test Kit
Important Safety Information
- TO PREVENT STEAM BURNS, DO NOT OPEN CAP OF HOT OR WARM RADIATOR.
- Pressurize only with hand pump. Do not use engine to pressurize system.
- Loosen the radiator cap slowly.
- Keep away from hot engine parts and fluids.
- Use this product only according to these instructions. Improper use can create hazards.
- Wear safety goggles and heat resistant work gloves during product assembly and use.
- Refer to the vehicle’s service manual for specific radiator pressure testing instructions before use.
- Clean up coolant spills immediately. Dispose of fluids according to local, state, and federal codes and regulations.
- Keep work area clean and well lit.
- Do not overreach. Keep proper footing and balance at all times.This enables better control of the product in unexpected situations.
- Keep bystanders out of the area during assembly and use.
- Do not assemble or operate when tired or when under the influence of drugs or medication.
- This product is not a toy. Do not allow children to play with or near this product.
- Use as intended only.
- Inspect before every use. Do not use if parts missing or damaged.
Operating Instructions
- Refer to the vehicle’s service manual for specific radiator pressure testing instructions.
- Loosen the vehicle’s radiator cap slowly to relieve any excess pressure before removing the cap completely. Do not open the cap of a hot radiator.
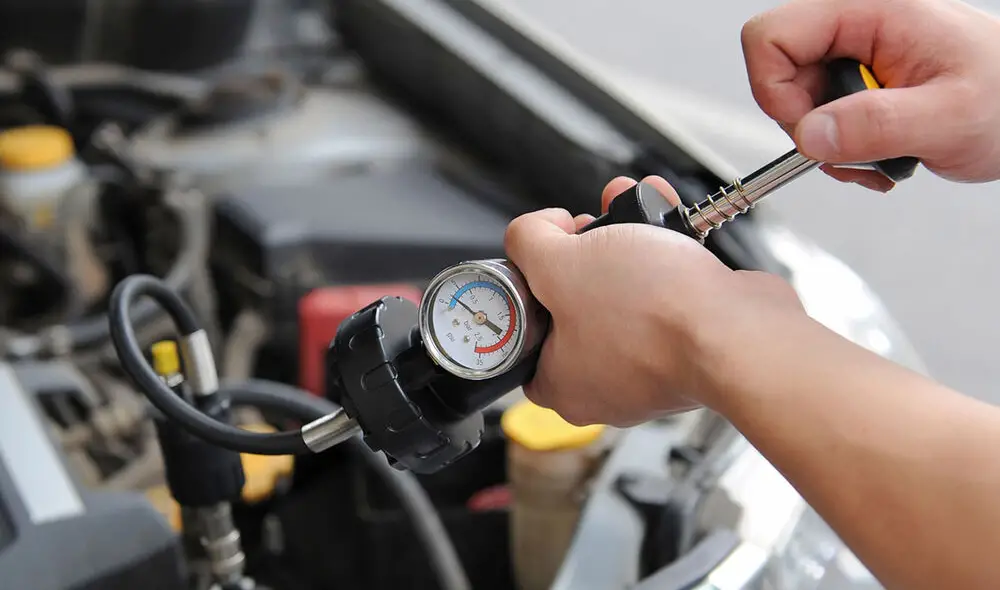
- Select the Proper Adapter and configuration of the Stationary Seat accessories. Securely attach the adapter to the filler neck of the radiator or expansion tank.
- Attach the Quick Connector of the Hand Pump onto the Adapter.
- Rapidly pump the Hand Pump while watching the pressure gauge. Pressurize the radiator up to the optimal pressure only – Do not over pressurize the radiator. Readings normally range 12 ~15 PSI. If the pressure level is too low, there may be a leak in the radiator or hose.
- Once the test is complete, release the air pressure by pressing the Pressure Release Valve on the Hand Pump. Then disconnect the Quick Coupler and Adapter assembly.
- Store the Kit in its Case in a clean, dry, safe location out of reach of children.
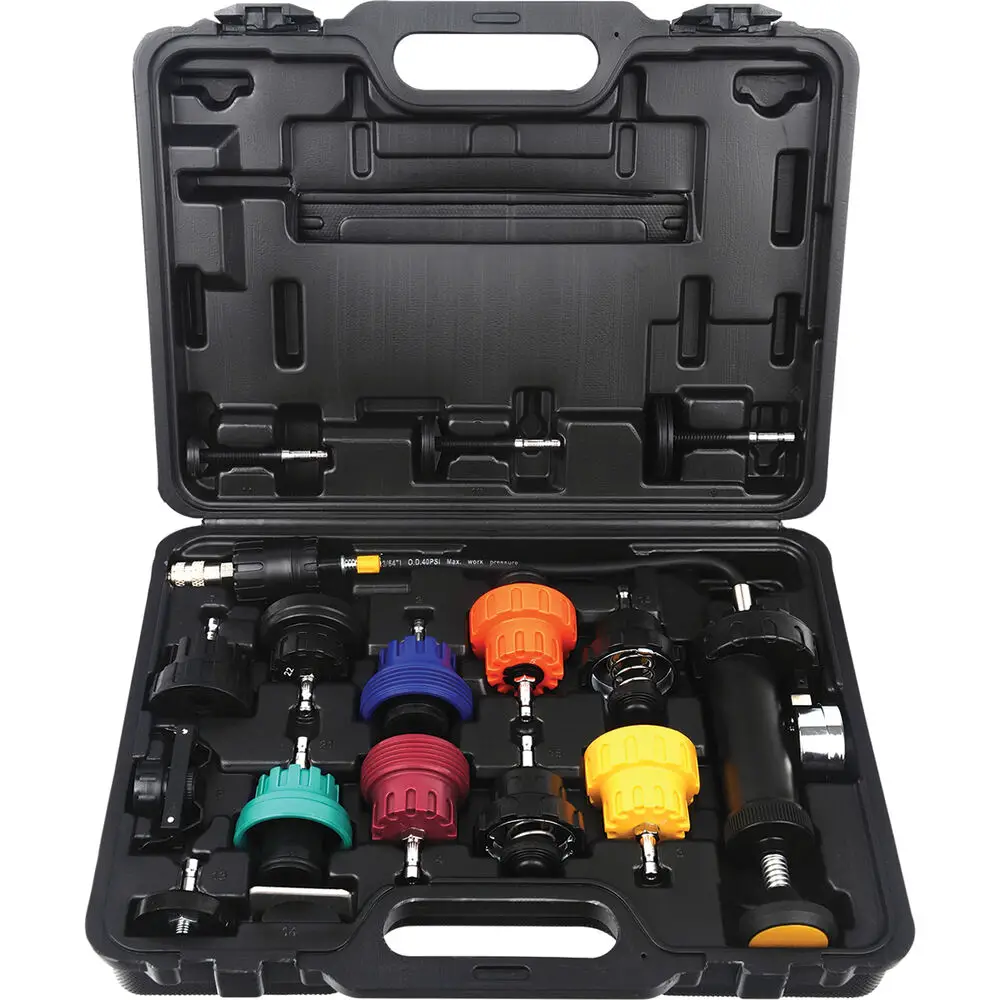
Parts List and Diagram
Part | Description | Function* |
1 | Pump | |
2 | Blue Adapter | Skoda®, SAAB®, Ford®, Daewoo®, Audi® A4, A5, A6 |
3 | Yellow Adapter | Skoda, Seat®, Audi, Opel®, VW®, Ford |
4 | Purple Adapter | Seat, Alfa Romeo®, Audi, BMW® |
5 | Orange Adapter | Land Rover®, BMW |
7 | Adapter | Lancia®, Volvo®, Land Rover®, Renault®, Peugeot®, Opel®, Honda®, Fiat®, Citroen®, Audi, VW® |
8 | Adjustable Seat | Toyota®, Suzuki®, Nissan®, Mitsubishi®, Mercedes®, Chrysler®, Citroen |
9 | 50mm Seat | Use with item 8 for Japanese and European cars |
10 | 35mm Seat | Use with item 8 for Japanese and European cars including: Suzuki, Nissan, Mitsubishi, Chrysler, Citroen, Mercedes |
11 | 27mm Seat | Use with item 8 for Japanese and European cars including: Toyota, Suzuki, Nissan |
13 | Adapter | Kia® |
14 | Clip | Use with adapters and seat accessories for: Toyota, Suzuki, Mitsubishi, Nissan |
15 | Adapter | Honda, Toyota |
16 | Adapter | Opel, Hyundai®, Honda, Mitsubishi, Ford, Nissan, Mazda®, Toyota |
21 | Green Adapter | GM® |
22 | Adapter | GM, Ford |
19 | Case |
NOTE: Kit may work for only some models under each indicated make.
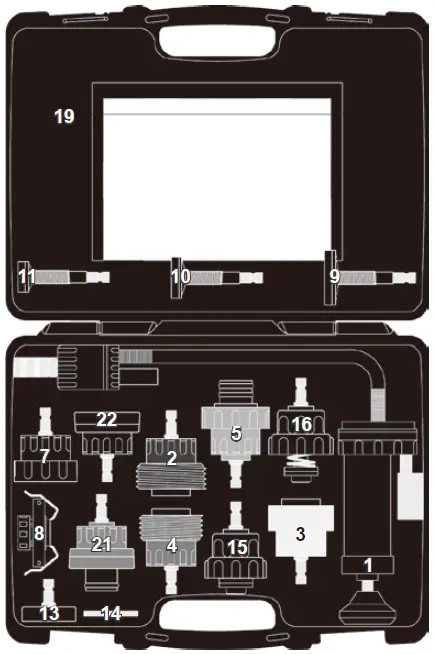
NOTE: Some parts are listed and shown for illustration purposes only, and are not available individually as replacement parts.
![]()


