Steves Exterior Door Installation

INSTALLATION INSTRUCTIONS
Thank you for purchasing a Steves & Sons Exterior Door. This document covers recommended installation for our basic door configurations: Single prehung, prehung with sidelites, double prehung, center hinge and french patio doors
- Please read the instructions completely prior to the installation of door. The instructions work with most applications when installing our doors. Any changes made to installation process is done at installers risk and may void the warranty.
- A copy of the installation instructions should be provided to the homeowner and remain on site for final building code inspection.
- Not all door types can be installed in all locations. We recommend you contact building code compliance in your area prior to installation to verify product meets code for your application and location.
- Coastal areas may require different products and additional anchoring methods. Information on coastal products and installation requirements can be located at www.tdi.texas.gov or www.floridabuilding.org
Inspect Rough Opening
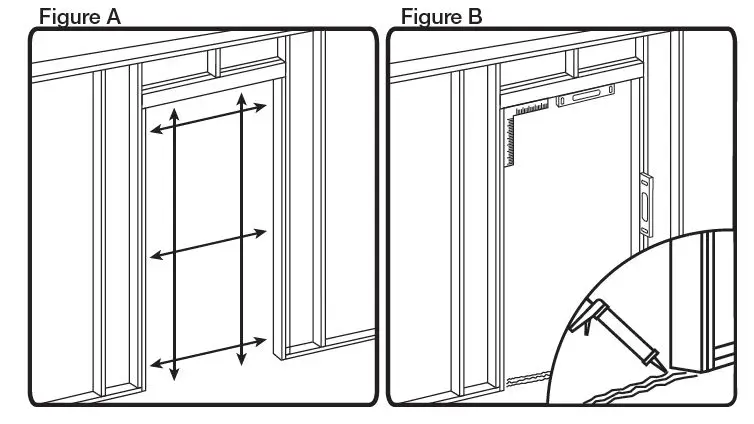
- Measure the height of the rough opening on both sides. We recommend the opening be 1/2” taller than door unit. (Figure A)
- Measure the width of the rough opening at top, center and bottom. We recommend opening be 1” wider than door unit. (Figure A)
- Verify your rough opening is square. This can be done by measuring diagonally from corner to corner. Maximum allowable deviation should not exceed 1/4”.
- Verify rough opening is level and plumb. (Figure B)
- Verify threshold is level and clear of debris.
Remove the Door from Pallet
- Remove shrink wrapping from door and inspect for cosmetic or freight damages. Verify that you received the correct product, style, size, color, handling and swing. If you have any concerns with the product you received DO NOT INSTALL. Contact point of purchase to discuss options or conact Steves & Sons, Inc. at 1-800-617-8586
- Remove shrink wrapping from door and inspect for cosmetic or freight damages. Verify that you received the correct product, style, size, color, handling and swing. If you have any concerns with the product you received DO NOT INSTALL. Contact point of purchase to discuss options or conact Steves & Sons, Inc. at 1-800-617-8586
- We recommend a minimum of 2 people when removing the door from pallet and installing.
- Follow the instructions attached to the pallet to remove the door. Remove all shipping materials such as corner, hinge, and sill protectors. Select doors have a wood protector on the bottom of sill which must be removed.
Prepare Rough Opening for Door Unit
- Apply 3 continuous 3/8” beads of silicone caulk across the sill of the opening. (Figure B)
- If installing on wood subfloor, we recommend using a sill pan prior to installing door unit.
Installing Door Unit
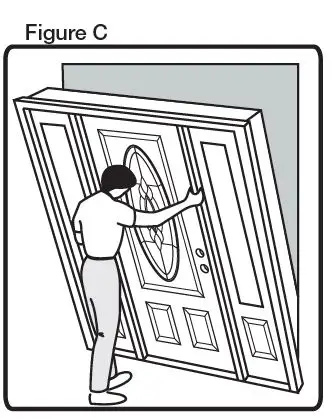
- With top edge of door tilted away from opening, place bottom of door in center of opening onto caulk. Then tilt top of door into opening. (Figure C)
- Place shims behind each hinge and plumb hinge jamb, then secure 2-1/2” trim screws through each hinge and shims. If unit includes 2 sidelites, place shims on outside of sidelite on hinge side of unit.
- DO NOT drive screws completely in because you may need to adjust to plumb and square door.
Plumb and Fasten Hinge Jamb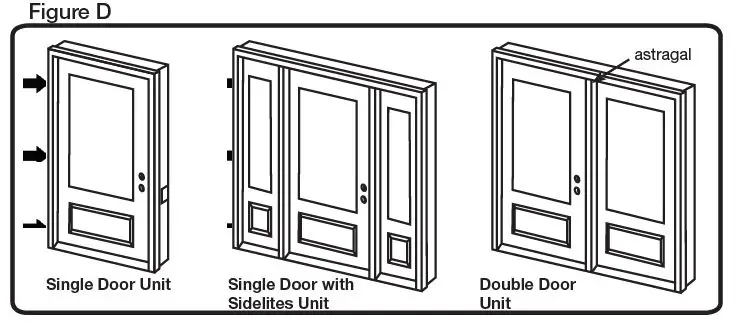
- Work from hinge side using a 4-foot level, plumb the side of frame and tighten the 2-1/2” trim screws.
- Doors with sidelites and double doors, plumb and tighten screws on the hinge side of door unit first. (Figure D)
Plumb and Fasten Lockset Jamb
- Work from lockset side using a 4-foot level plumb and square the lockset side of door and check weather-strip margins for consistent contact to door slab.
- Work from lockset side using a 4-foot level plumb and square the lockset side of door and check weather-strip margins for consistent contact to door slab.
- Shim the lockset jamb and secure with 2-1/2” trim screws.
- Once door is plumb, level, and secured in opening, make sure the gap between frame and door viewed from inside is consistent from top to bottom of door
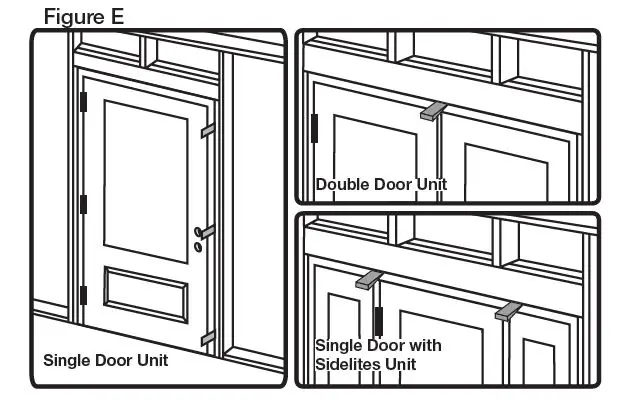
- Doors with sidelites shim above mull post and install screws behind weatherstrip. (Figure E)
- Patio and Center Hinge doors shim at astragal/mull and install screws behind weatherstrip. (Figure E)
- Verify door with astragal is plumb and square in the opening. Drill hole in header & sill for flush bolt.
Check Door Operation
- With the door open, remove 2 screws from the top hinge near the weather-strip and replace with the 2-1/2” hinge screws provided.(Figure F) This process will prevent door from sagging over time.
- On Double Doors, screws need to be installed in both doors.
- Caution! Over-tightening screws can cause the door to bind and not close properly.

Adjust Sill
- Using a screwdriver you will need to adjust the center cap on the sill.
- Once adjusted, it should be snug and difficult to pull the paper out from under door when closed. (Figure G)
- This process needs to be completed at each screw location to insure a snug fit.
Install Hardware
- Install lockset and deadbolt according to manufacturer specifications
- Patio Doors may require adjustments to the astragal for the lockset to latch properly.
- Coastal areas may require specific lockset models. Information on coastal products and installation requirements can be located at www. tdi.texas.gov or www.floridabuilding.org
Weatherproof Door
- Caulk around entire outside of door where exterior trim meets jamb and exterior wall. (Figure H)
- Caulking is also required where sill meets the jamb and slab.
- Install wedge pads at bottom of both side of frame. (Figure I)


Finishing the Door
- All unfinished steel and fiberglass doors must be finished with exterior stain or paint within 1 week of installation.
- All wood doors require finishing at time of installation.
- Doors must be finished on all six sides and door frame must be finished.
- Doors with minimal overhang or facing sun most of the day will require refinishing more frequently.
PRODUCT WARRANTY SUMMARY
Steves & Sons Products are designed and built to provide lasting value for your home. We warrant to the original owner, if your Steves & Sons Inc. Product exhibits a defect in material or workmanship within the time periods outlined below from the initial purchase.
| Product | Door Slab | Glass | Factory Finish |
| Interior Doors | 5 Years | 1 Year | 1 Year |
| Steel Doors | 10 Years | Clear – 5 Years Decorative – 10 Years | 1 Year |
| Fiberglass Doors | 25 Years | Clear – 5 Years Decorative – 10 Years | 1 Year |
| Exterior Wood Doors | 1 Year | 1 Year | 1 Year |
- Steves & Sons, at its sole discretion, will repair, replace warranted door or refund the original purchase price.
- STEVES & SONS, INC. MAXIMUM LIABILITY IS LIMITED TO THE AMOUNT OF THE ORIGINAL PURCHASE PRICE AND WILL NOT COVER THE COSTS OF LABOR, INSTALLATION OR FINISHING FOR ANY REPLACEMENT DOOR.
- The manufacturer will not be liable for any door(s) repaired or replaced without prior written consent.
- THIS WARRANTY IS IN LIEU OF ANY OTHER WARRANTIES, EXPRESSED OR IMPLIED, INCLUDING IMPLIED WARRANTIES OF FITNESS FOR A PARTICULAR PURPOSE AND MERCHANTABILITY. MOREOVER, IN NO EVENT WILL STEVES & SONS, INC. BE LIABLE FOR SPECIAL, INCIDENTAL OR CONSEQUENTIAL DAMAGES.
- This warranty protects your legal rights. Other rights vary from state and may apply to you. Some states and federal laws do not allow the exclusion of implied warranties. In the event these laws apply, the length of any implied warranty shall be one (1) year or the shortest time in excess of one year permitted under applicable law. Similarly, some states do not allow exclusions or limitation of consequential damages and, if applicable, this limitation will not apply.
- Action on any claims for warping or for photographs may be deferred, at the option of the manufacturer for a period not to exceed 12 months from date of claim. Please see care and handling instructions for additional information.
This warranty does not cover the following circumstances and are not considered the responsibility of Steves & Sons.
- Locksets or components not provided by Steves & Sons
- Normal wear and tear, and natural weathering of surfaces
- Problems resulting from misuse and or abuse and failure to follow care and maintenance instructions
- Problems related to improper finishing of all surfaces, front, back, sides, top and bottom of the door, door unit, sidelines and or transom
- Natural variations in color or texture in any finish shall not be considered a defect
- Failure to provide a proper overhand; damage caused by extreme temperature, either from direct sunlight and or installation of a storm door
This is a summary of Steves & Sons’ warranty. For more detailed warranty information, technical information, or parts visit www.stevesdoors.com or contact Steves & Sons at 1-800-617-8586.


