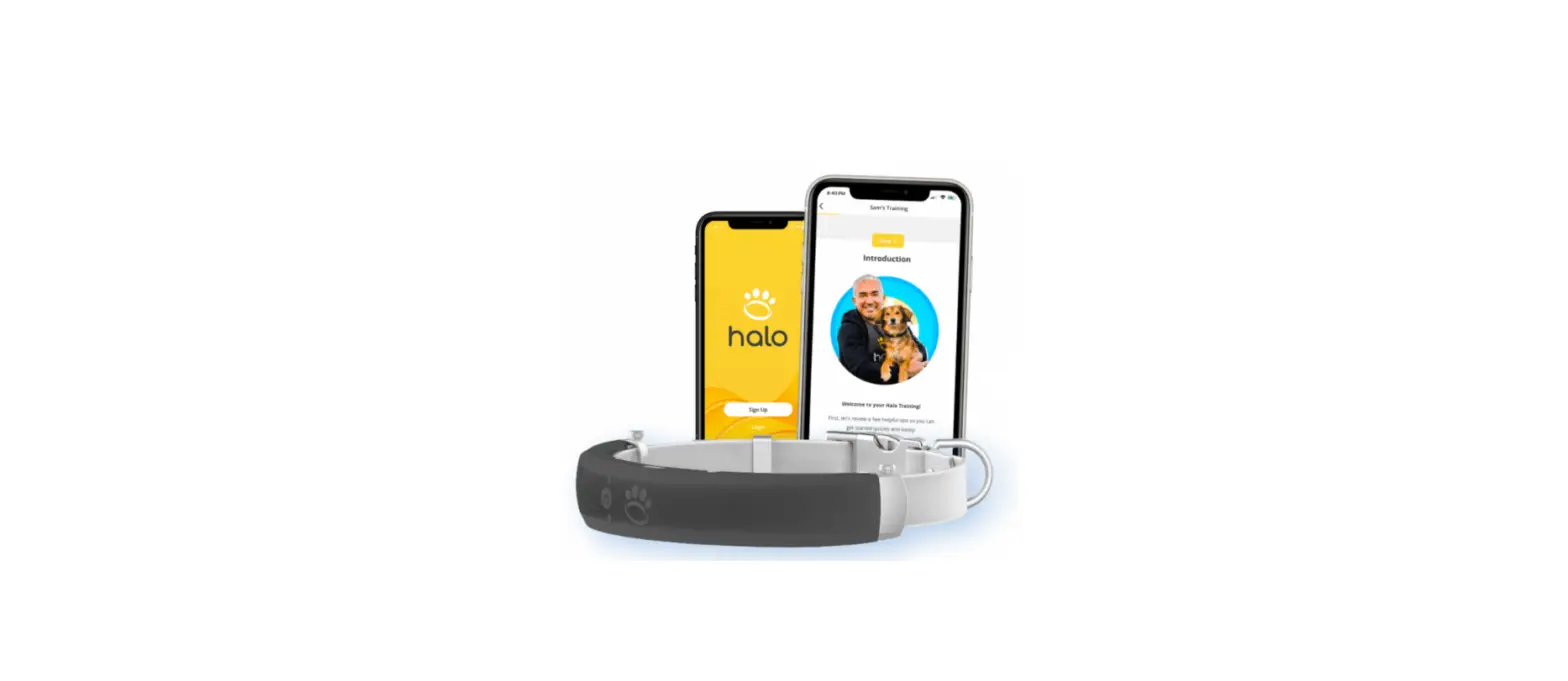
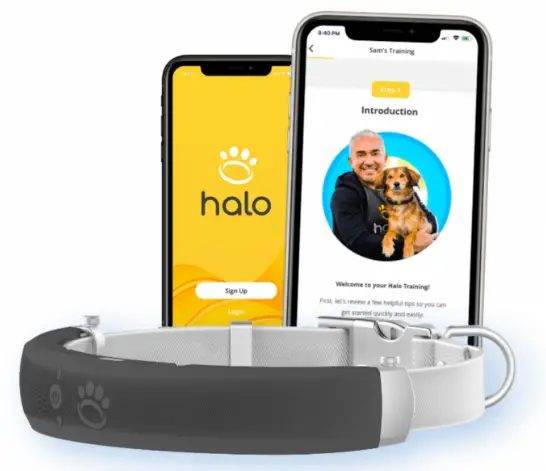
Halo Collar dog Training App
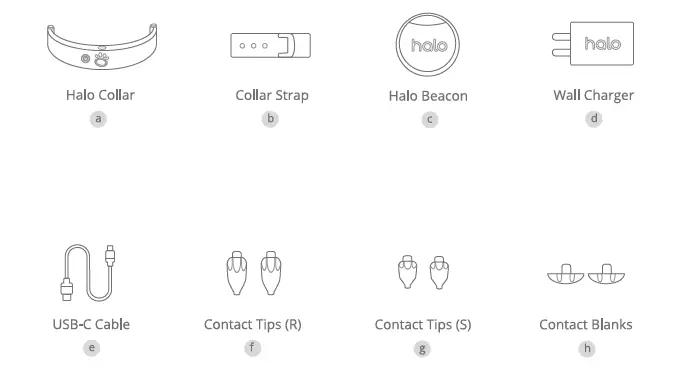
Kit Contents
App Setup
- Download The App
Download the Halo Collar app from your official app store to begin your setup process. - Log In or Create an Account
If you don’t already have an account, create your account in the Halo Collar app by tapping the
The “Sign Up” button at the bottom of the screen. If you already have an account, tap “Log In”. - User Profile
Next, add your user profile information to your account, like your name and a photo of yourself. - Enable Location Services
When prompted to “Allow ‘Halo’ to use your location”, select “Allow While Using App”. This will enable you to view your dog’s location data, create fences, and much more. - Important Note: Location Services
Your dog’s Halo Collar and Halo Fences work autonomously, even if your phone’s location services are off, your app is closed, or your phone is powered down. Location services are only required when you want to view location updates on the map, and to create or edit Halo Fences. - Enable Notifications
When prompted with the message, “‘Halo’ would like to Send You Notifications,” tap “OK” or “Allow”. - Important Note: Notifications
Your phone may receive notifications after a delayed period of time. This DOES NOT mean that your dog’s Halo Collar provided Prevention Feedback at the incorrect time! The time at which you receive a notification is subject to your cell phone’s network connection. Your dog’s Halo Collar provides instant, automatic feedback in real time. Unlike other wearable pet tech, the Halo Collar doesn’t require you to act of these notifications to keep your dog safely contained. If you would like to review the exact time when your dog received feedback, please check the timestamp associated with the notification in your “Notifications” tab in the app. - Changing App Permissions
If you have accidentally tapped “No” in response to any of your app permissions, you can change them at any time in your phone’s “Settings” under “App Settings”. Instructions may vary by phone type, OS, or manufacturer. Please check your phone manufacturer’s instructions for more detail. - Viewing My Map
You will now see your “My Map” screen. This is your default view in the app, where you can find and manage Pets, Fences, and view status information. - Important Note: Satellite View
Similar to Google Maps, satellite view DOES NOT show real-time surveillance of your location. Satellite images have been taken by satellite technology in advance, and are updated periodically by the service provider. For your privacy and safety, satellite images do not capture, record, or display passing pedestrians or other live-streaming imagery.
Collar Setup
- Important Note: Assembly
Please DO NOT assemble your Halo Collar or put the collar on your dog yet. Instructions are provided in the app under “User Training”. - Important Note: A Place to Charge
Find a wall outlet in a convenient location, where it is within good range of your home WiFi connection. This is required for Firmware Updates. - Start Charging Your Collar
Turn the Halo Collar upside-down, then lift the USB flap with your fingernail to open (do not unscrew or use tools). Then, use the wall charger (d) and USB-C cable (e) included in your Halo Kit to charge. Your Halo Collar will automatically turn ON while charging, but it will revert back to its original state when it is unplugged again. This typically takes appx. 2 hours to fully charge. While charging, your Battery LED will BLINK GREEN. Once fully charged, your Battery LED will stop blinking and remain ON. - Add Your First Pet
Tap “Add Pet” on your “Find Navigation” card, and provide your dog’s information to create their Pet Profile. This will prepare you for the next step. - Connect Your Collar to the App
While your collar is charging, tap
Settings Collars Add Collar in your app to view your Collars List. Scan your Halo Collar’s QR code, or enter the serial number provided. You can find your QR code on the side of your Halo Kit box, or on the inside/back of your Halo Collar. Follow the steps in the app to set up your collar and link it to a Pet Profile. - Connect Collar to WiFi
During this process, you will be prompted to connect your collar to your home WiFi. If you have issues, follow the in-app troubleshooting tips. - Firmware Updates
While charging and connected to WiFi, your Halo Collar will automatically update to the latest firmware. Your Battery LED will BLINK RED while a firmware update is in progress. Firmware updates will automatically pause if interrupted (due to a WiFi connection or being removed from charger), and will resume when plugged back in to charge and reconnected to WiFi. - Important Note: Collar Mode Buttons
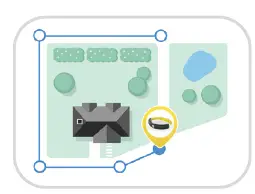
Navigate to the My Map tab, then tap on your pet’s profile photo in your Pets List. This will bring up your Pet Card, which allows you to manage the collar modes and preferences for this pet. Make sure that your pet’s collar mode buttons are set to “Fences OFF” and “Beacons OFF” until you have both a) calibrated your collar’s GPS and b) trained your dog to use these features. Further instructions included in future steps. - Begin Your In-App Training Content
Before attempting to use your Halo Collar or create a Halo Fence, please immediately visit the “Training” tab in your app, and tap “User Training”. Do not begin using the Halo Collar until you proceed through User Training. Essential safety information and guidelines are included in this training content! In it, Cesar will walk you through everything you need to know, step-by-step. - Follow In-App Instructions to Attach Strap
Please follow the steps in your Training tab to learn how to select the right contact attachments for your dog, how to attach your Halo Collar to the detachable collar strap, and how to properly position the collar on your dog.
An overview of your 21-Day Training program can be found on the next page.
Training Program
Now comes the fun part!
Next, begin your 21-Day Training Program in your Halo Collar app. Tap on the Training tab, then tap on your User Profile to access your training.
This is where you will learn everything you need to know to operate your Halo Collar and safely train your best friend. Want a preview of what you’ll be learning? Check out the overview below!
- Day 1
Setup & User Training
Follow the app’s User Training to create your first Halo Fence, and learn the expert methods you need to become a Pack Leader - Day 2
Introducing the Collar
Start your dog’s Pet Training by properly fitting the collar strap, and learning to build a positive association with the Halo Collar - Day 3-10
Indoor Training
Customize your dog’s feedback, and teach them to keep away from indoor boundaries (Halo Beacons), then come back to safety - Day 11-21
Outdoor Training
Use the same simple methods you’ve safely learned indoors to master outdoor boundaries with your Halo Fence(s)
Calibrating GPS
- Confirm Firmware is Up-to-Date
Before calibrating your GPS, please check your Collars List (found under Settings Collars) to ensure your firmware is up-to-date. Tap on the collar in your Collars List to expand that collar’s details. Look for the section titled “Collar Update” to see if your collar is using the latest firmware. If it is not up-to-date, please double-check that your collar is connected to WiFi and plug it back in to charge. Your Halo Collar may need more time to complete the remaining updates, and will do this automatically. - Calibrate Your Collar
Turn your Halo Collar ON and take it outside for at least 15 minutes, so that it can auto-calibrate its location accuracy. Please make sure you choose an “open sky” (unobstructed) location—free of trees or roofs—to ensure best accuracy during this calibration process. - Periodic Recalibration
You may need to recalibrate your collar after long periods of indoor disuse or after new firmware updates. If this is required, your collar’s GPS LED icon (located underneath the power button) will BLINK RED. - Completing Calibration
After calibration is complete, the GPS LED icon will switch to BLINKING BLUE. Once properly calibrated, your GPS LED will blink BLUE while outdoors, and will not blink while indoors. To learn how to test your Halo Collar’s calibration, please visit support.halocollar.com. - Your Phone’s Location
You may periodically see a BLUE dot on the My Map screen. This is your phone’s location, and it uses your phone’s internal GPS system. As a result, it may jump around on your map, or report your phone’s location with much less accuracy than your Halo Collar. - Regular Location Updates
You will see your dog’s collar location accurately update appx every 15-30 seconds on the My Map screen, in order to save battery life. However, this DOES NOT mean that your dog’s Halo Collar only connects to GPS every 15 seconds! Your dog’s Halo Collar is constantly connected to GPS, and will provide feedback at exactly the right time. The Halo Collar uses an additional battery to send updates from the collar to your phone because this requires a network connection. This is why location updates occur every 15-30 seconds on your My Map screen. - Live Location Updates
If a) your phone and collar are in range and paired via Bluetooth, and b) you are actively viewing your dog’s Pet Card, then you will see this dog’s location update in “real time”, every second. This is because your phone is nearby, and can easily receive Bluetooth location updates without draining battery life.
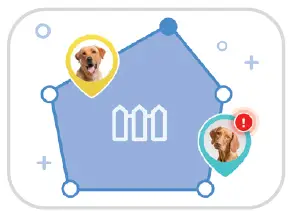
Creating Fences
- Important Note: Re-Check Collar Modes
DO NOT enable Fences ON or Beacons ON collar mode buttons (found on your dog’s Pet Card) until after you have a) calibrated each dog’s collar, and b) trained each dog to keep away from beacons and fences during Beacon and Fence Training. - Adding Your First Fence
After your collar has been properly calibrated, you can add your first Halo Fence. To do this, navigate to the My Map screen, drag the Navigation card UP, and tap “Add Fence” underneath “Find & Manage Fences”. Follow the instructions to properly set up your Halo Fence. You can review the tips provided to the right - Proper Preparation
Please never use a Halo Fence before completing your dog’s Fence Training using the methods described in the Training tab of the app. Leave Fences OFF and Beacons OFF until your in-app training instructions ask you to change your dog’s collar mode. - What is a Halo Fence?
Halo Fences are fully-closed virtual safe areas that allow your dog to safely roam off-leash. They are stored on your dog’s Halo Collar and provide instantaneous Feedback, reminding your dog that the outside area is off-limits.
- Fence Boundary Tips
Halo Fences are created using world-class GPS, so there’s no installation or digging required. Terrain limitations won’t affect your fences, so streams or driveways can be crossed with ease. If you have an existing fence or wall in your yard, you can set up your Halo Fence boundary alongside it to help your dog understand the boundary!
- Fence Spacing Tips
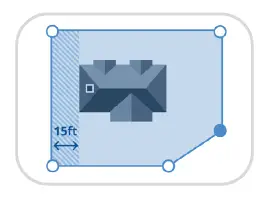
There is a 7-10 ft warning area inside your fence boundary. Please ensure there are at least 15 ft between the outermost edges of your home and the border of your Halo Fence. And don’t forget to include your entire home inside the Halo Fence you create, so that your dog will be able to go back inside with wearing their Halo Collar!
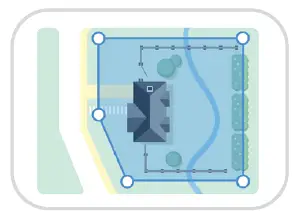
- How to Create Halo Fences
You can create a Halo Fence using up to 20 Fence Posts. Fence Posts can be created by tapping directly on your map…or for best accuracy, tap the collar icon to put your Halo Collar into Fence Creation mode. Then simply walk and tap + Add (GPS)!
- Where to Create Halo Fences
Since Halo Fences can be created anywhere… your dog should always be inside a Halo Fence if they aren’t with you, in the car, or on a walk. You can create Halo Fences at home, or while you roam—the possibilities are virtually endless!
To The Halo Pack,
We feel unbelievably grateful to have the opportunity to build a community
of trailblazers, pioneers, and dog lovers who want to revolutionize safety for their best friends.
Thank you to all of our Early Adopters, Premiere Pack Leaders, and new Pack Members
for your help and support of our shared mission to build a better world for dogs.


