
Saulcy 1 Dog Training Collar
Specifications
- Product Dimensions
6 x 5 x 1 inches; 8.78 Ounces - Material
Nylon - Closure Type
Button - Brand
Saulcy
Packing List for 1 to 1
- 1X Remote Control
- 1X Receiver
- 1X Collar
- 1 X USB Cable
- 1X Static Shock Test Bulb
- 1X Wrist Strap
- 1X Instruction Manual
- 2 Pair Contact Points
- 2 Pair Conductive Silicone Covers
Packing List for 1 to 2
- 1X Remote Control
- 2X Receiver
- 2X Collar
- 1 X USB Cable
- 1X Static Shock Test Bulb
- 1X Wrist Strap
- 1X Instruction Manual
- 4 Pair Contact Points
- 4 Pair Conductive Silicone Covers
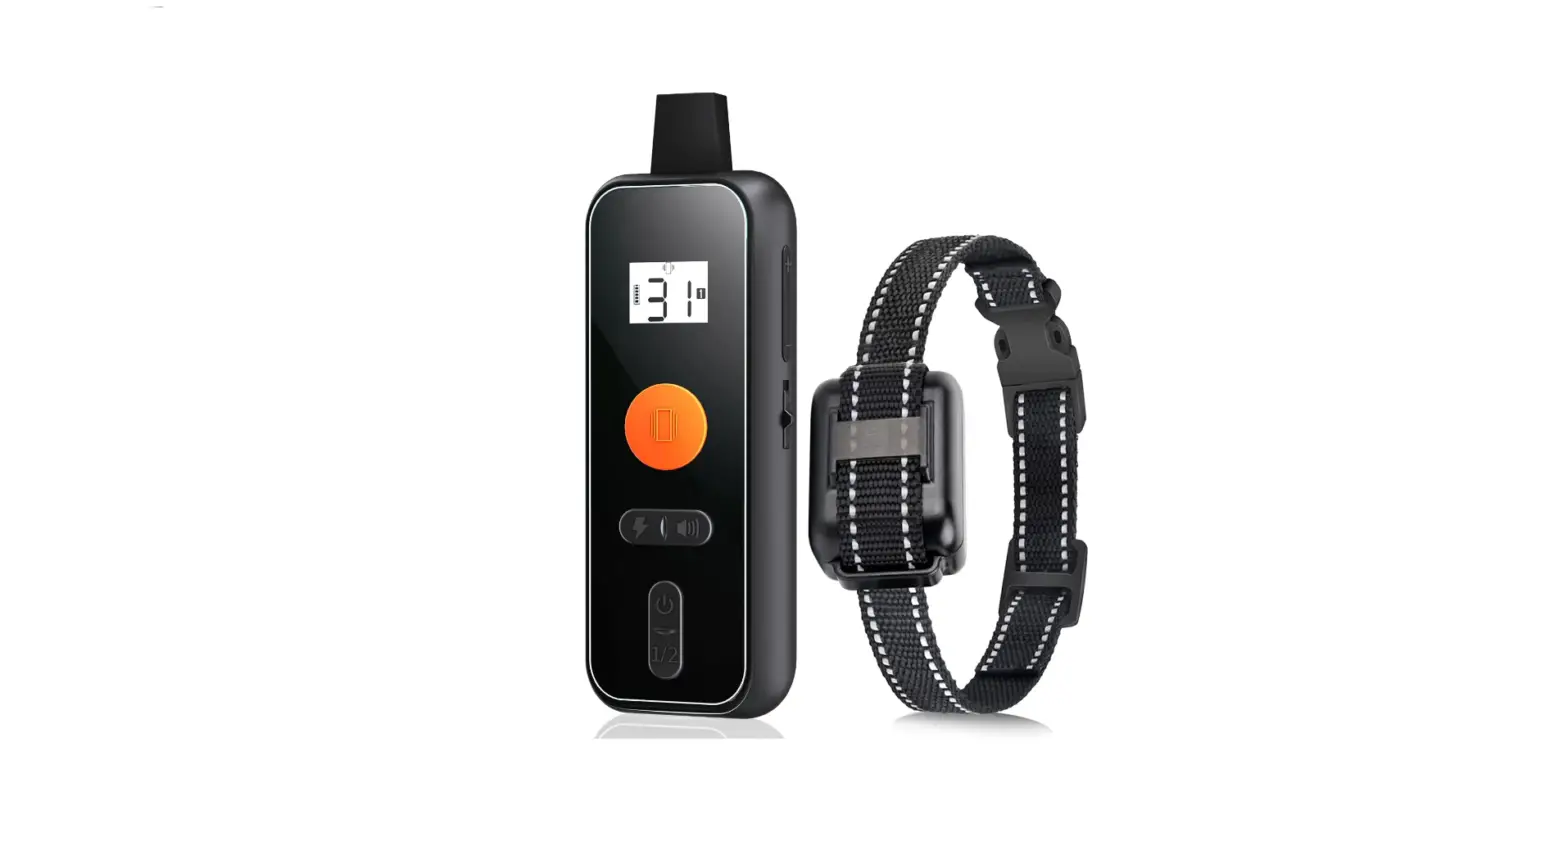
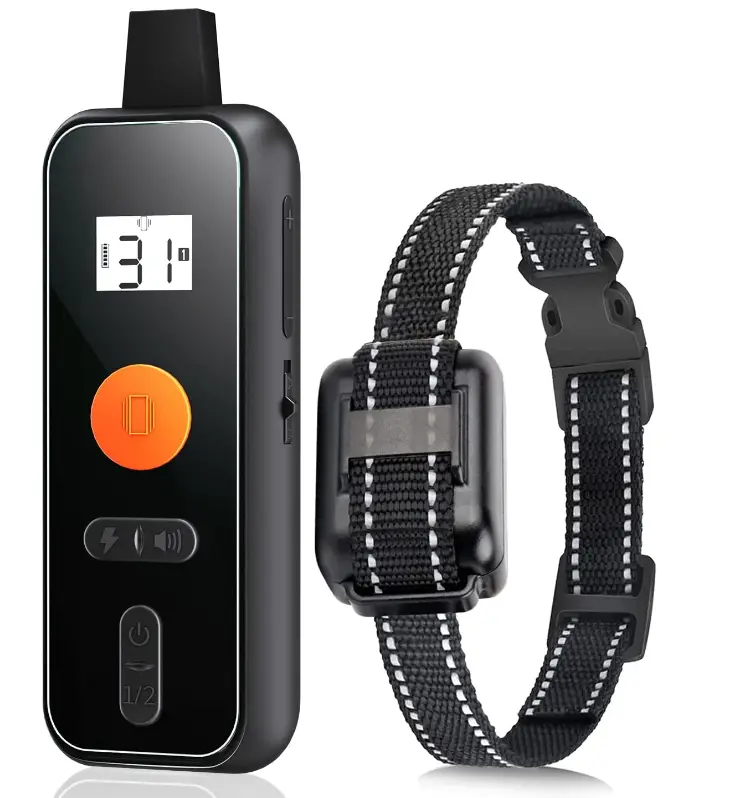
Product Function
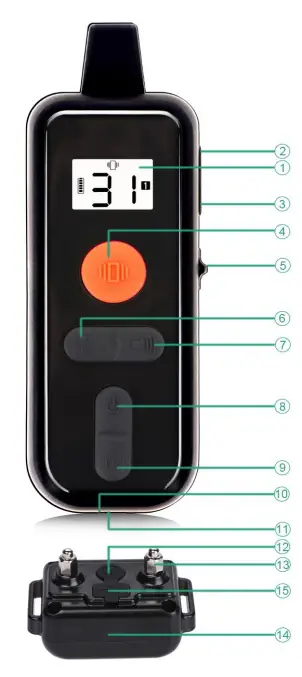
- Screen: Screen will display icons of dog, static shock, vibration, beep, Intensity, indication of battery and channel 1/2. NOTE: If no operations on the remote within 10 seconds, the back lit of screen will be off, and no operations within 20 seconds, the remote being sleep mode, the screen display will be shut off. Pressing any buttons can activate the remote.
- Intensity Up Button: Press the button, you can turn up the level of intensity of static shock, vibration.
- Intensity Down Button: Press the button, you can turn down the level of intensity of static shock, vibration.
- Vibration Button: Press the button, the receiver will emit vibrate.
- Static Shock Lock Switch: Press the button, you can lock or unlock the Static shock button, avoid pressing the shock button by accident and hurts your dog.
- Static Shock Button: Press the button, the receiver will emit Static shock.
- Beep Button: Press the button, the receiver will emit the sound “beeps”
- Power button: Press the button to turn on the remote control.
- Channel 1/2 Button: Press the button, you can select the dog you want to control between the first dog and the second dog.
- USB Charging Port: Insert charging cable into charging port to charge the remote control.
- Lanyard Hole: Put the wrist strap into it, you will be convenient to carry the remote control.
- Receiver Power Button: Long Pressing the button, you can turn on or off the training collar.
Note: If no signal in the Receiver within 5 minute, it will go into standby mode; you could long press Static shock or vibration or beep button for 2 seconds to activate it. - Conductor: It includes contact point and conductive silicone cover.
Note: Conductive silicone cover also can conductive. - Led Indicator: It will light when you pair, turn on/off, press vibration, beep or Static shock button.
- USB Charging Port: Insert charging cable into charging port to charge the receiver.
How to Pair remote and receiver
- Charge the remote control:
- Connect the charger cable to the charging port.
- Plug the charger into a standard outlet.
- The icon of battery will flash. After charged fully, it will stop flashing.
- Charge the remote control for about 2-3 hours for the first charge or until the icon of battery stops flashing.
- There will be showing empty battery icon on the screen of the remote if it’s low power.
Charge the collar receiver
- Open the rubber cover of the receiver’s charging hole, connect the charger cable to the charging port.
- Plug the charger into a standard wall outlet.
- The indicator light will be flashing until the receiver being charged fully.
- Charge the receiver for about 2-3 hours for the first charge or until the indicator light stop flashing and always on.
- When the Receiver charge, it’s in sleep mode, and can’t receive the signal from the Remote.
- If the Receiver running out of power, the indicator light will be on per second.
Pair remote control and receiver
- Turn on the remote control, and press “1/2” button to choose channel 1 for pairing. Adjust the level by pressing + or — button , make sure the level above 01.
- Press the power button of the receiver for 3 seconds, you will hear a sound like Bee〜, and the indicator light is flashing quickly. Then quickly press the vibration button or Static Shock button within 10 seconds ,you will hear a sound Bee~ again , it means the pairing successfully.
- If the pairing were not successful please repeat the 1-2 steps.
- To encode the second receiver, press the “1/2” button and select for the second receiver and follow the same procedure.
Operation Steps
- After pairing well, turn on the remote control and receiver.
- Choose the right channel on the remote control for the receiver.
- Press any function button you want, beep, vibration or Static shock.
Note
The level of static shock and vibration can not be 0 during the test and using.
How to use two receivers at the same time
- Press the “1/2” button to select the channel 1 to be paired and then you can use.
- Press the “1/2” button to select channel 2 to be paired and then you can use.
WARNING
Do not use this product for your aggressive dog, or if your dog prone to aggressive behavior. Aggressive dogs may cause damage to the people or things around. If you are unsure whether this product is appropriate for your dog. Please consult your veterinarian or certified trainers.
Important Information
- Place the collar on your dog at the beginning without starting to allow your dog to adapt.
- Keep one finger between the dog’s neck and collar to avoid strangling the dog’s neck when running, moving or shaking.
- Avoid wearing the collar on the dog for more than 12 hours per day. if possible reposition the collar every 1 to 2 hours.
- Never connect the dog rope to the collar, it will cause excessive pressure on the contact area.
- Wash the neck area of your dog and the contact area of the collar weekly with a damp cloth.
- Examine the contact area of dog daily, lest rash or sore appears. These cautions will help to keep your pet safe and comfortable.
General Training Tips
The following tips will show you how to get the best performance out of your Dog Training Collar.
- Training one dog each time is recommended.
- During the first initial training sessions, keep the dog in a fan in outdoor environment. Training in a place that the dog is not familiar with may make the dog become distracted
- For basic obedience training, vibration is more useful.
- During the training, look for any positive behavioral changes in the dog and do not forget to encourage in time.
- When you put on the collar, be careful not to tighten it too tightly around your neck, but make sure it is still tight enough. For optimal function, it is essential to check that the conductor are in contact with your dog’s skin. if your dog has long hair, you will probably meed to trim his hair slightly so that the contact area is well adhered to the skin of your dog.
- It is important to start your collar with the lowest level to avoid shocking your dog. You can start by putting the collar on your dog without turning it on so that he can get used to wearing it and that he understands that the collar is not there to disturb him.
FAQs
Your pet should be able to recognize basic obedience commands such as “Sit” or “Stay” This product may be too large for pets under 10 pounds.
Hello, please adjust the appropriate level of Vibration, Static Shock and Beep based on your dog’s characteristics such as character, type, age, weight, and so on.
Hello, under the neck.
Hello, the remote can not close the training collar, it does not work like your TV remote Please close the training collar via receiver power button.
Yes. you can simply add one more receiver collar to the system.
The effective range of the Training Collar means the straight-line distance between Remote Control and Receiver Collar without obstacles in between. Range may be variable according to terrain, weather, vegetation, battery capability as well as the transmission from other radio devices.
Discontinue to use the product for a few days. if the condition persists beyond 48 hours. consult your veterinarian for help. Once the skin recovers, check the skin condition of you pet frequently.
The Collar is not designed to be worn constantly. We recommend the Collar not be worn for more than 12 hour of every 24-hour period.
Training sessions should be kept positive and short, it is better for about 10-15 minutes each time.
We provide 12 monthes warranty, anything, please feel free to contact, we will answer within 24 hours.
First time, please charge 5 hours to fully activate the batteries. And next time, 2-3hours charging is enough for remote and receiver.
Yes, our bark collar with remote is adjustable, fits well for dogs between 15-100 lbs.
the remote is 5.4 x 1.8 x 0.9 inch,smaller than iPhone 8,can hold and use by one hand easily.
And the receiver is 2.4 x 1.4 x 1 inch.
Yes, this collar is IPX7 waterproof, no problem to use when swimming or bathing, raining.
Please kindly note: make sure the receiver’s charging port covered completely before into the water.
To me, it seems like it is going into standby mode to save battery life. If I push the beep button a couple of time it “wakes” it up.


 Instruction Manual")

