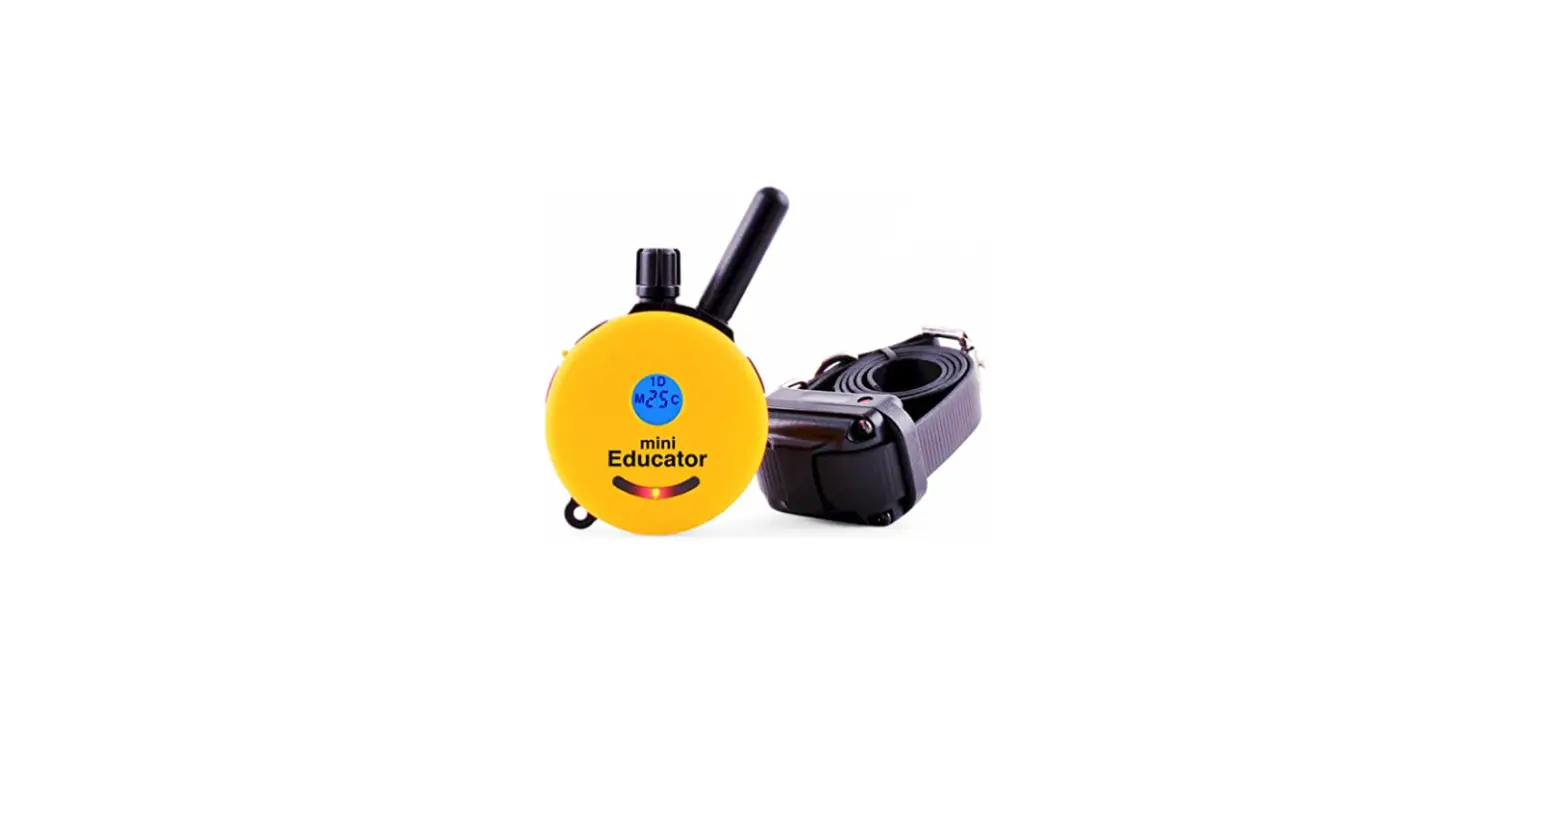
 Educator E-Collar Humane Dog Training Collar
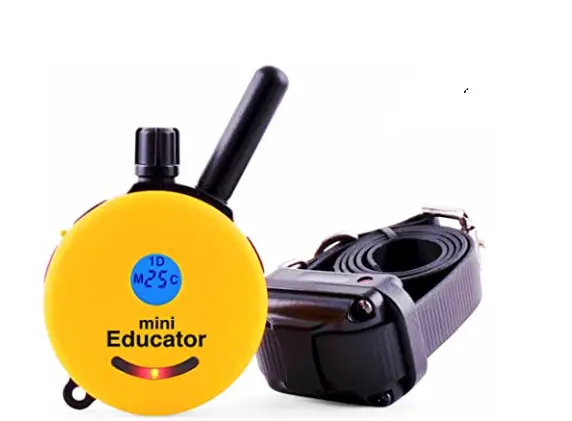
Important Notice
Caution
This product is intended to be used on DOGS ONLY.
E-Collar Technologies, Inc. is not responsible for any misuse of this product including damages from dog bites and lost items. Seek an evaluation by the professional trainer before use on aggressive dogs. It is not uncommon for aggressive dogs to associate the stimulation with the handler and take action against the handler. Sometimes dogs put under e-collar pressure during a fight can exhibit redirected aggression and become more aggressive.
The use of high levels of stimulation should only be used as a last resort and in life-threatening situations.
To prevent giving stimulation to your dog by accident, keep the stimulation level below 5 while not in use.
The range of the 300/302 may vary according to terrain, weather conditions, foliage, and power lines as well as radio transmissions from other devices.
CHARACTERISTICS
- Range : ½ Mile
- Three Stimulation Modes Supported (Momentary, Continuous, and Combo Mode)
- Tapping Sensation or Tone/Stimulation (Pavlovian Conditioning)
Tapping Sensation: Alternative to Stimulation (gives vibration similar to a Cell Phone)
Tone Stimulation: After 1.2 seconds of tone, the collar will send stimulation as long as button is pressed (up to 10 seconds), leads to “Pavlovian Conditioning” whereby the dog responds to the tone. - Quick Charge Li-Polymer Batteries
- Convenient Intensity Dial for Quick Adjustment Stimulation Levels Adjustable from 0 to 100
- Collar Receiver Light for locating your dog at night
- Lock and Set Stimulation Safety Feature
- Stimulation Boosting Mode provides instant control when normal stimulation is ignored – great for emergency situations.
- User Adjustable Boosting Levels from 1 to 60 Levels
- Completely Waterproof
- Convertible from 1-Dog 300 to 2-Dog 302
Package CONTENTS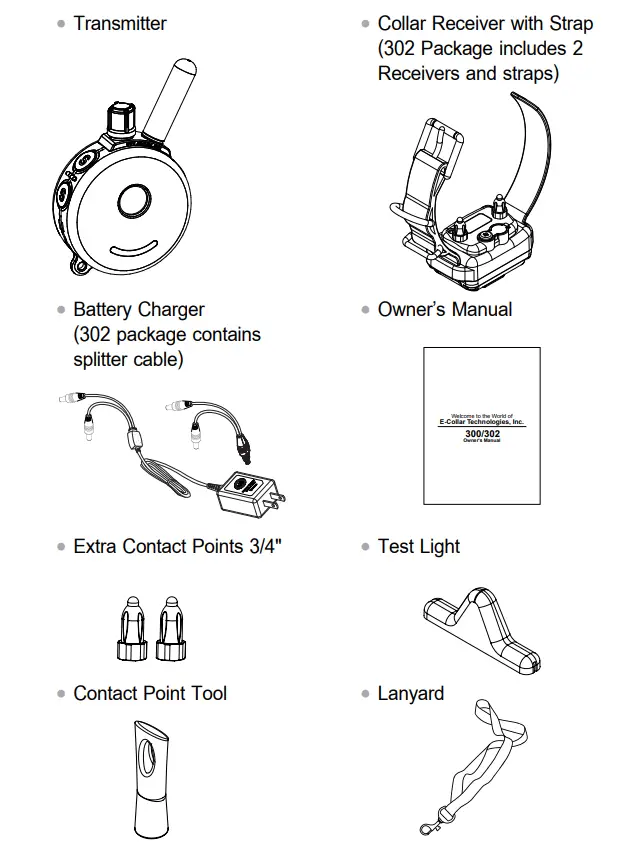
DEVICE OPERATION
CHARGING THE BATTERIES
Indicator Light is blinking “Green” under normal operation.
solid “Red” when stimulation is applied.
blinking “Red” when recharging is required.
Do not allow the batteries to get hot or be fully discharged, store at room temperature and 50% capacity charge.
- Transmitter Battery Charging
- Receptacle and Rubber Cover
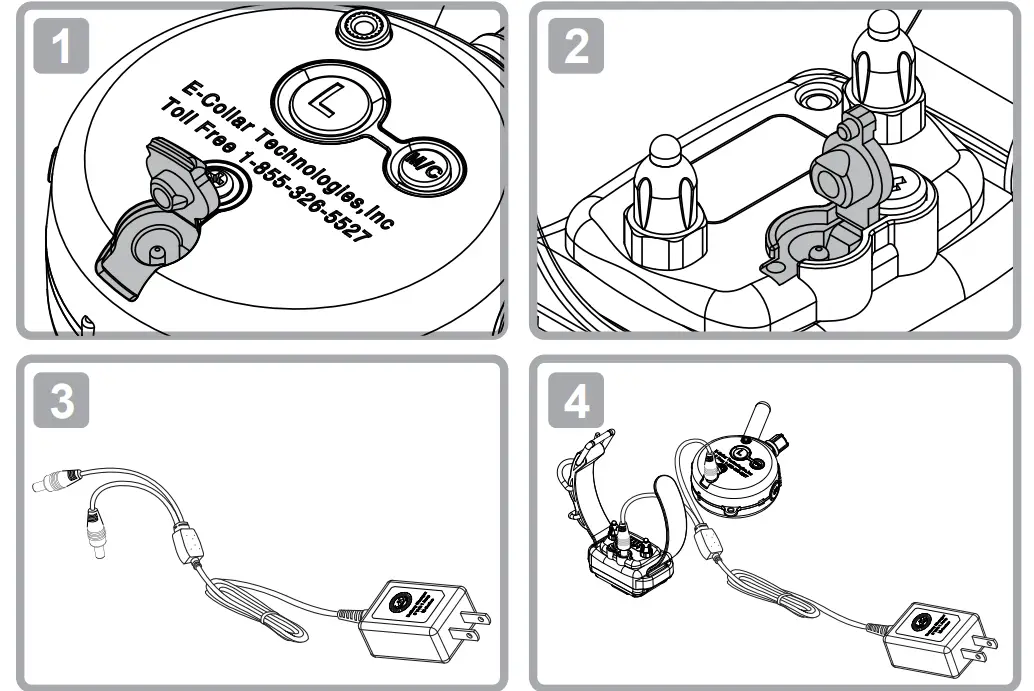
- Collar Receiver Battery Charging
- Receptacle and Rubber Cover
The indicator light will turn solid red during charge cycles and turn green if it is fully charged. (approximately 2 hours)
Special Not About Battery Care:
Your e-collar is outfitted with Li-Polymer batteries which require specific care to assure longevity. It is best not to let the battery be fully discharged and if it does recharge immediately or irreversible damage may occur. Keep the units away from extreme heat and cold temperatures.
TURNING YOUR E-COLLAR ON/OFF
- To turn the Collar Receiver On or Off :
Place the small red dot on the Transmitter against the small red dot on the Collar Receiver.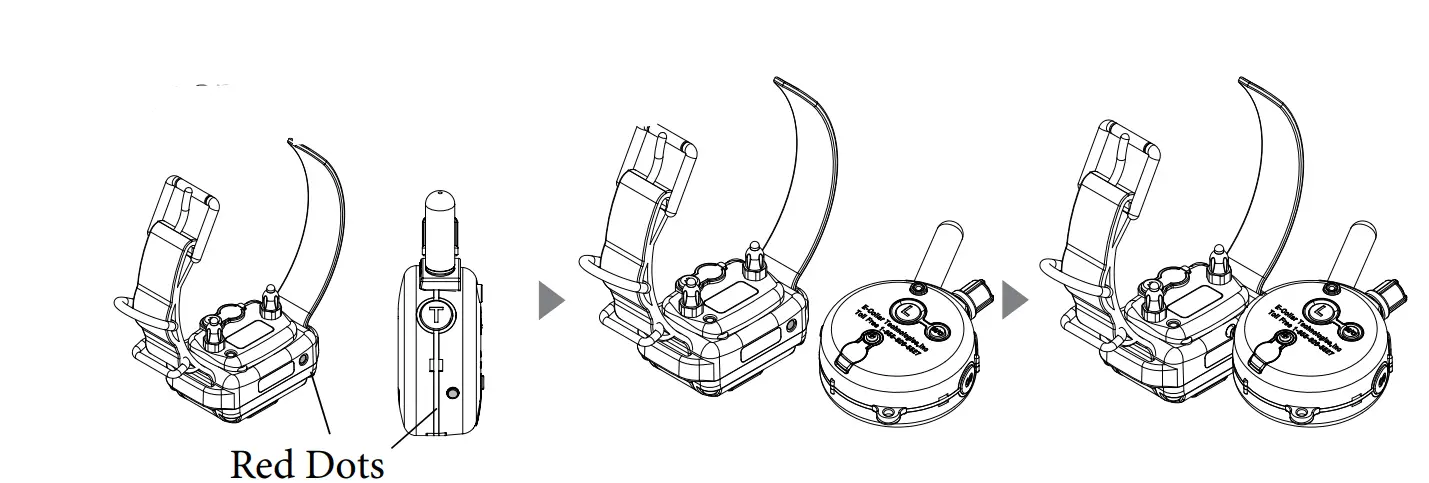
- To turn the Transmitter On or Off :
Press the “L” button for more than 2 seconds.
If the Transmitter is turned on, a short press of the “L” button will activate the tracking light of the collar receiver. Press and hold for 2 seconds to turn Transmitter off.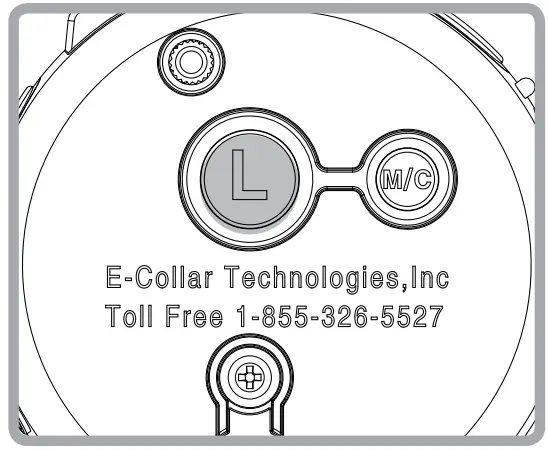
- Holding the Transmitter
To obtain the maximum range hold the transmitter like the torch on the Statue of Liberty. Keep the antenna away from your body or fingers at all times, touching the antenna will greatly reduce the range.
CORRECTLY FITTING THE COLLAR
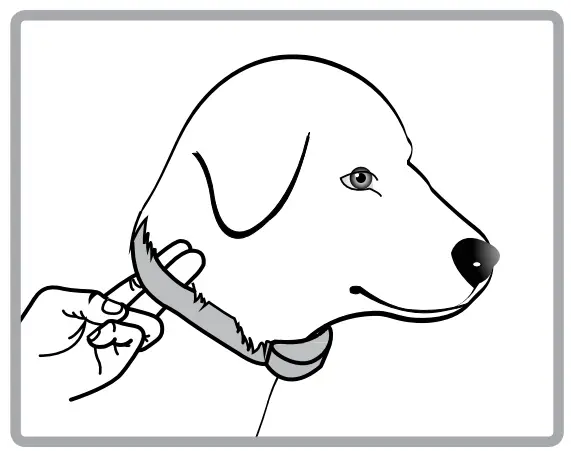
The collar should be adjusted to allow the “contact points” to have direct contact with the skin. You should be able to fit a couple of fingers between the collar strap and your dog’s skin. Too tight poses the risk of skin irritation and discomfort. Too loose and the contact points will not be able to administer the stimulation reliably and can cause skin irritation due to chafing. Short hair breeds may need the 3/8″ microprobes offered as an accessory item, contact customer service for details. The optimal position for the collar receiver is on either side of the dog’s windpipe. If the factory installed 5/8” contact points are not making good contact due to thick fur, see page 24 for changing contact point.
IMPORTANT NOTICE
To prevent the occurrence of skin irritations the Collar Receiver should never be worn for more than 12 hours per day. Should your dog experience skin irritations from over exposure to the contact points remove the collar receiver unit immediately and stop using your
e-collar until all skin irritations are completely healed. Antibiotic ointment will aid in the healing process. Some dog breeds have extra thick fur or extra short fur that requires special contact points. Please contact our customer service or visit www.ecollar.com for more information.
THE LCD DISPLAY DESCRIPTION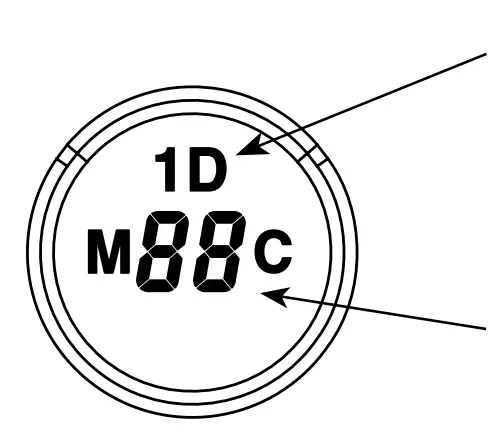
Flashing “1D” indicates the stimulation is ready for adjustment.
Solid “1D” indicates stimulation is “Locked”
Displays the Stimulation Level :
“0” means no stimulation and “HI” means the highest stimulation level(100 )
Momentary / Continuous Button “M/C”– M/C Button on the backside of the transmitter allows the user to easily switch between the three stimulation modes. Function of the stimulation button changes by mode.
| Button | Stimulation (1D or 2D) | TS(Vibration)
or Tone Stimulation | |
| M/C Button | Momentary Mode | Continuous Mode | N/A |
Display |  |  |  |
| S (Black) | Dog 1 Momentary | Dog 1 Continuous | Dog 1 TS (Vib) or Tone Stimulation |
| S(Black) + S(Red) | Dog 1 Momentary
Booster | Dog 1 Continuous
Booster | N/A |
| S (Red) | Dog 2 Momentary | Dog 2 Continuous | Dog 2 TS (Vib) or Tone Stimulation |
| S(Red) + S(Black) | Dog 2 Momentary Booster | Dog 2 Continuous Booster | N/A |
| L | “L” in Dog 1 set mode will control Dog 1 light “L” in Dog 2 set mode will control Dog 2 light | N/A | |
- Momentary Stimulation
Sends a single pulse of stimulation at the set level when you press the stimulation button. - Continuous Stimulation
Sends pulses of stimulation for as long as the button is pressed, timing out after 10 seconds (this is a safety feature designed to prevent accidental over-stimulation of your dog). The stimulation can be increased or decreased while the button is being pressed. - Tapping Sensation
Vibration is specifically designed to distract your dog, great for deaf dogs and stimulating sensitive dogs. - Tone/Stimulation (Pavlovian Stimulation)
After 1.2 seconds of tone, the collar will send continuous stimulation for as long as the button is pressed. Release before 1.2 seconds for tone only. - Stimulation Button S (Black)
- Sends momentary or continuous stimulation to the collar receiver based on the state of Momentary/Continuous Mode.
- Stimulation Button S (Red)
- Sends momentary or continuous boosted stimulation.
- If the stimulation level is 10, boosted stimulation sends [10 + boost level ]
- The default value of the boosted level is 5, it can be adjusted to any value between 1 and 60. Smaller and more sensitive breeds should use levels 1 through 20, larger more stubborn breeds may need more of a boost, maximum boost is 60.
- Boosting Stimulation in Combo Mode
Momentary Boosting is accomplished by first sending a momentary stimulation pulse “S (Black)” to the dog and then pressing the “S (Red)” button without releasing “S (Black)” button. (PLEASE PRACTICE) Continuous Boosting is accomplished by first administering continuous stimulation “S (Red)” to the dog and then pressing the “S (Black)” button without releasing the “S (Red)” button. - Tapping Sensation (Vibration) or Tone/Stimulation “T”
Sends Tapping Sensation or Tone/Stimulation to the collar receiver.
(Default setting is tapping sensation).
To toggle between tapping sensation and tone stimulation, press the “L” and “T” buttons simultaneously when the intensity level is “0”.- A single beep and “A” icon indicate 1.2 S of Tone followed by the Stimulation setting.
- Double beeps and the “T” icon indicate Tapping Sensation (Vibration).
Tapping Sensation Pavlovian Tone/Stimulation
- Light Button “L” (ON/OFF Center Button on Back)
When pressed less than a 1/2 second, it will turn on the night tracking light, pressing it again the light will enter the solid mode and pressing one more time turns the light off. Flashing -> Solid -> OFF Great for locating your dog after dark. (PLEASE PRACTICE)
HOW TO FIND THE PROPER STIMULATION LEVEL
Rotating clockwise increases the stimulation level, and rotating counter-clockwise lowers the stimulation level.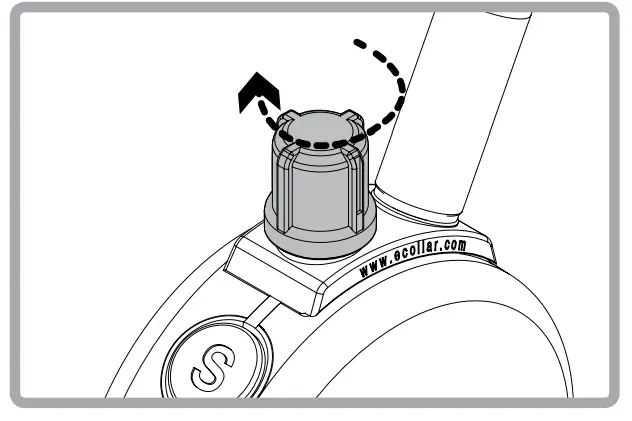
It is highly recommended that the user practice changing levels and modes before putting the collar receiver on a dog.
Setting the correct stimulation level for your dog is very important. To set your “conditioning” stimulation level, correctly put the collar receiver on your dog (see page 9 for instructions). Let him/her get used to the collar receiver for a couple of hours.
While watching your dog, turn the level to “0” and press the continuous stimulation button. Slowly turn the stimulation up at a rate of approximately 2-3 levels per second. When your dog first perceives the stimulation, usually between 5 and 20, release the button. This is your “conditioning” stimulation level. You may need to increase the
“conditioning” level a few levels to get your dog to respond at first, some dogs are more stubborn and need more stimulation. The boosted level is typically 5 to 20 levels higher than the “conditioning” level.
LOCK/UNLOCK THE STIMULATION LEVEL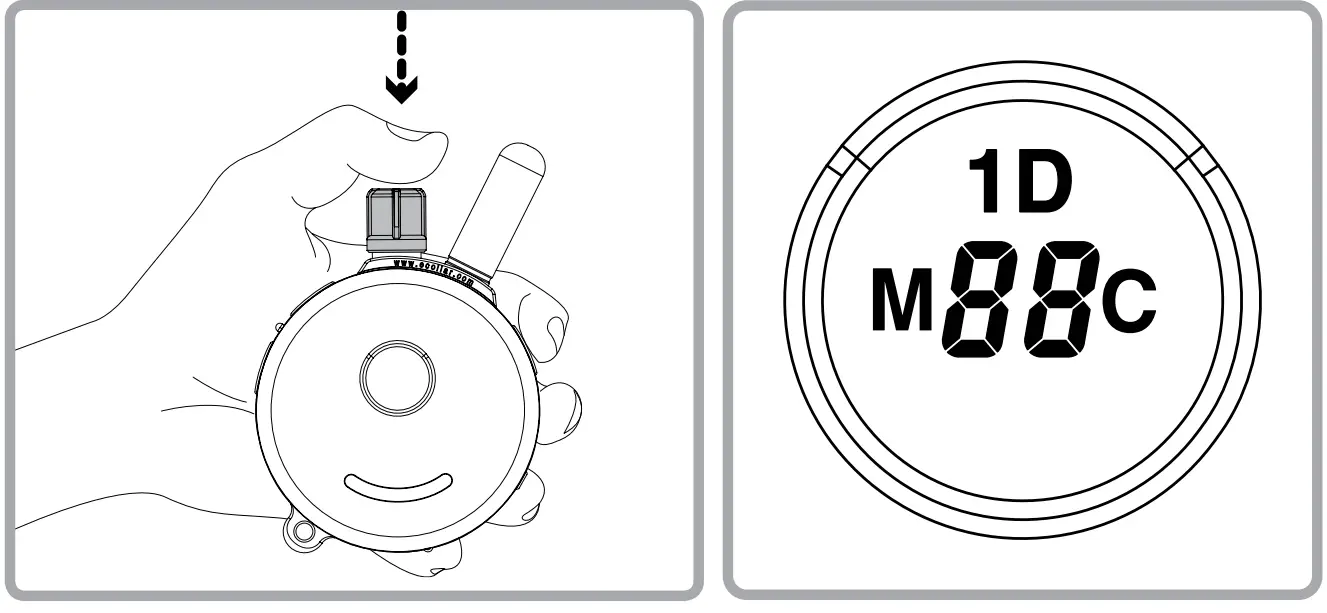
How to Lock/Unlock the Stimulation Level
Set the desired stimulation level and then push down on the top of the stimulation dial until you see “1D” light up on the top portion of the LCD display. Flashing “1D” indicates unlocked stimulation and Solid “1D” indicates locked stimulation.
If the stimulation level doesn’t change when you rotate the stimulation knob, you have successfully locked the stimulation level.
To unlock the stimulation level simply press the stimulation knob again and hold it for 1 second until the “1D” icon flashes.
HOW TO SET THE BOOST
Boosted Stimulation adds the set boost level to the stimulation level, great for those situations when your dog doesn’t respond to the working level. Determining the Boosted stimulation level is a little more difficult than stimulation level setting due to the wide differences in temperaments and stimulation tolerance among the many breeds of dogs. On average, it is normally 5 to 20 levels higher than the “Conditioning” level. It is important to have it set high enough to get the desired response from your dog.
- Change the mode to Momentary Mode. (Press M/C button until “M” is displayed)
- Change the intensity level to “0”.
- Press S(Black) button for more than 5 seconds.
- The intensity level will change from “0” to a flashing “1”.
- Rotate the dial to the desired boost level (1 to 60).
- Press S(Black) button again to save and exit the boost level changing mode.
“Instructional Videos available on our Youtube Channel”
LOST TRANSMITTER MODE
Your 300/302 transmitter allows the user to turn on a 6 hour timer. After 6 hours the transmitter will begin beeping providing the ability to locate the transmitter in tall grass.
Lost transmitter mode is activated by pressing the light (L) button and then simultaneously pressing the stimulation button (Black “S”) when the intensity level is set to zero. Three short beeps will sound confirming the activation of the locator timer.
Lost transmitter mode is turned off by turning your transmitter off and back on again.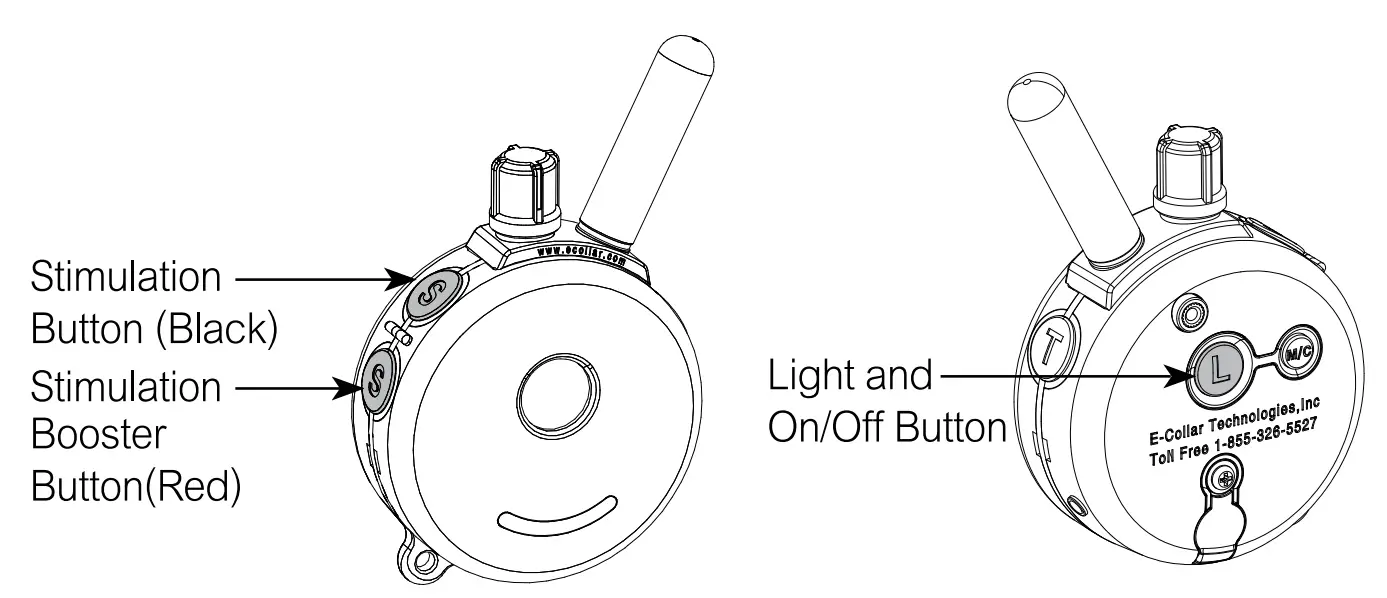 Turn off the lost transmitter beeper by simply turning the transmitter off and back on.
REPLACE/ADD A COLLAR
Occassionally, it is necessary to pair/sync a transmitter to a collar receiver, the following procedure will accomplish this:
- Turn on the Transmitter
- Turn intensity dial to “0”
- Make sure the collar eceiver is turned off.
- Put the Red Dot on Transmitter against the Red Dot on collar receiver for more than 5 seconds until the green light changes from solid to a rapidly flashing green light.
- While the indicator light on collar receiver is rapidly blinking press the Black S Button first followed by the Red S Button simultaneously for more than 2 seconds or until you hear the confirmation sound from the collar receiver.
HOW TO CHANGE THE TRANSMITTER TO A 2 DOG TRANSMITTER
The button functions will change. The changes are described on pages 18 through 22. You can change the transmitter back to the 300 one-dog system at any time.
- Turn on the Transmitter.
- Press the Red “S” followed by the Black “S” followed by the “T” Button simultaneously for more than 2 seconds until you hear the confirmation beeps.
- Repeat step 2 to return back to a 1 dog system.
ADD/REPLACE COLLAR FOR SECOND DOG
- Turn on the Transmitter
- Turn intensity dial to “0”
- Make sure the Receiver is turned off.
- Place the Red Dot on the Transmitter against the Red Dot on Collar Receiver for more than 5 seconds until the solid green light begins to flash rapidly.
- While the indicator light on the receiver is blinking rapidly, press the Red “S” Button and then the Black “S” Button simultaneously for more than 2 seconds until you hear the confirmation sound from Transmitter.
302 LCD DESCRIPTION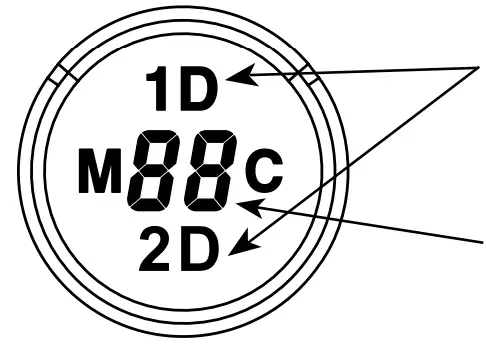
Flashing 1D and 2D icons indicate the stimulation is ready for adjustment. Solid indicates stimulation locked.
Displays the Stimulation Level: “0” means no stimulation and “HI” means the highest stimulation level(100)
Momentary / Continuous Button “M/C”- M/C Button on the backside of the transmitter allows the user to easily switch between two stimulation modes either momentary or continuous.
| Button | Stimulation (1D or 2D) | TS(Vibration)
or Tone Stimulation | |
| M/C Button | Momentary Mode | Continuous Mode | N/A |
Display |  |  |  |
| S (Black) | Dog 1 Momentary | Dog 1 Continuous | Dog 1 TS (Vib) or Tone Stimulation |
| S(Black) + S(Red) | Dog 1 Momentary
Booster | Dog 1 Continuous
Booster | N/A |
| S (Red) | Dog 2 Momentary | Dog 2 Continuous | Dog 2 TS (Vib) or Tone Stimulation |
| S(Red) + S(Black) | Dog 2 Momentary Booster | Dog 2 Continuous Booster | N/A |
| L | “L” in Dog 1 set mode will control Dog 1 light “L” in Dog 2 set mode will control Dog 2 light | N/A | |
Mode Button “T”
Mode button allows the user to change modes as shown in the diagram
- dog Set Mode – LCD display shows 1D
- Dog Set Mode – LCD display shows 2D
Tapping Sensation or Tone Stimulation – LCD display a “T”
Light Button(On Back) “L”
When the “L” button is pressed, “L” will be displayed.
If you press L while in Dog 1 Mode, Dog 1’s Light will activate.
If you press L while in Dog 2 Mode, Dog 2’s Light will activate. Tracking Light will Cycle: Flashing -> Solid -> OFF when L is pressed.
Tapping Sensation or Tone/Pavlovian Stimulation “T”
To toggle between tapping sensation and pavlovian tone/stimulation press “L” and “T” buttons simultaneously for 2 seconds when the intensity level is “0”.
- Single beep and “A” icon indicates pavlovian tone/stimulation
- Two beeps and “T” icon indicate tapping sensation.
Boosting Stimulation
To boost Dog 1, press the “S” (Black) button followed by the “S” (Red) button boosted stimulation will be applied until you release both buttons.
To boost Dog 2, press the “S” (Red) button followed by the “S” (Black)
Momentary Stimulation
Sends a single pulse of stimulation at the set level when you press the stimulation button.
Continuous Stimulation
Sends continuous pulses as long as the stimulation button is pressed, timing out after 10 seconds (this is a safety feature designed to prevent accidental over-stimulation of your dog). You may change the stimulation level while the button is depressed if it is not locked.
Tapping Sensation
Vibration is specifically designed to distract your dog.
Tone followed by Stimulation (Pavlovian Conditioning) After 1.2 seconds of tone, the collar will administer continuous stimulation for as long as the button is pressed (up to 10 seconds). Release before 1.2 seconds for tone only.
HOW TO LOCK/UNLOCK THE STIMULATION LEVEL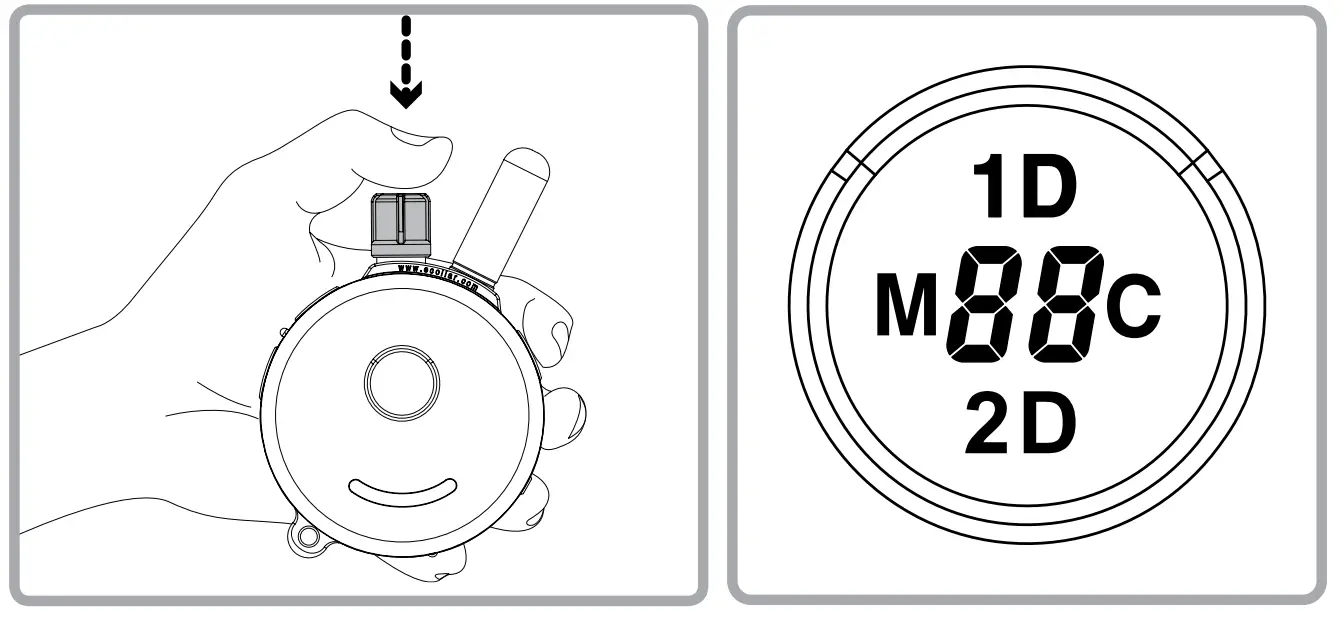
How to Lock/Unlock the Stimulation Level
See page 13 for help finding the proper stimulation level.
You can lock each dog to a different level.
In 1D Mode, if you see 1D icon is blinking (unlocked)
Set the desired stimulation level and then push down the stimulation dial for1 second until the 1D icon stops flashing.
In 2D Mode, if you see 2D icon is blinking (unlocked)
Set the desired stimulation level and then push down the stimulation dial until you see 2D icon stops flashing.
If the stimulation level doesn’t change when you rotate the stimulation knob, you have successfully locked the stimulation level.
To unlock the stimulation level simply press the stimulation knob again at 1D/2D mode and it will unlock the stimulation level.
If stimulation level is 10, boosted stimulation sends [10 + boost level ] The default value of the boosted level is 5, it can be adjusted to any value between 1 and 60.
Determining the Boosted stimulation level is a little more difficult than stimulation level setting due to the wide differences in temperaments and stimulation tolerance among the many breeds of dogs. On average, it is normally 5 to 20 levels higher than the “Conditioning” level.
How to Setup Boost Level for Dog 1 (Black Collar Dog)
- Change the mode to Momentary Mode (Press M/C button until “M” is displayed)
- Change the intensity level to “0”
- Press S(Black) button for more than 5 seconds
- The intensity level will change 0 to 1 and start to blink.
- Rotate the dial to change the boost level (up to 60).
- Press S(Black) button again to save and exit from
Boost Level Change Mode. If any other button is pressed or is idle for 20 sec, Boost Level Change Mode will be canceled.
If you want to change boost level for Dog 2 (Red Collar Dog), Press S(Red) instead of black on step #3, and #6
TESTING YOUR E-COLLAR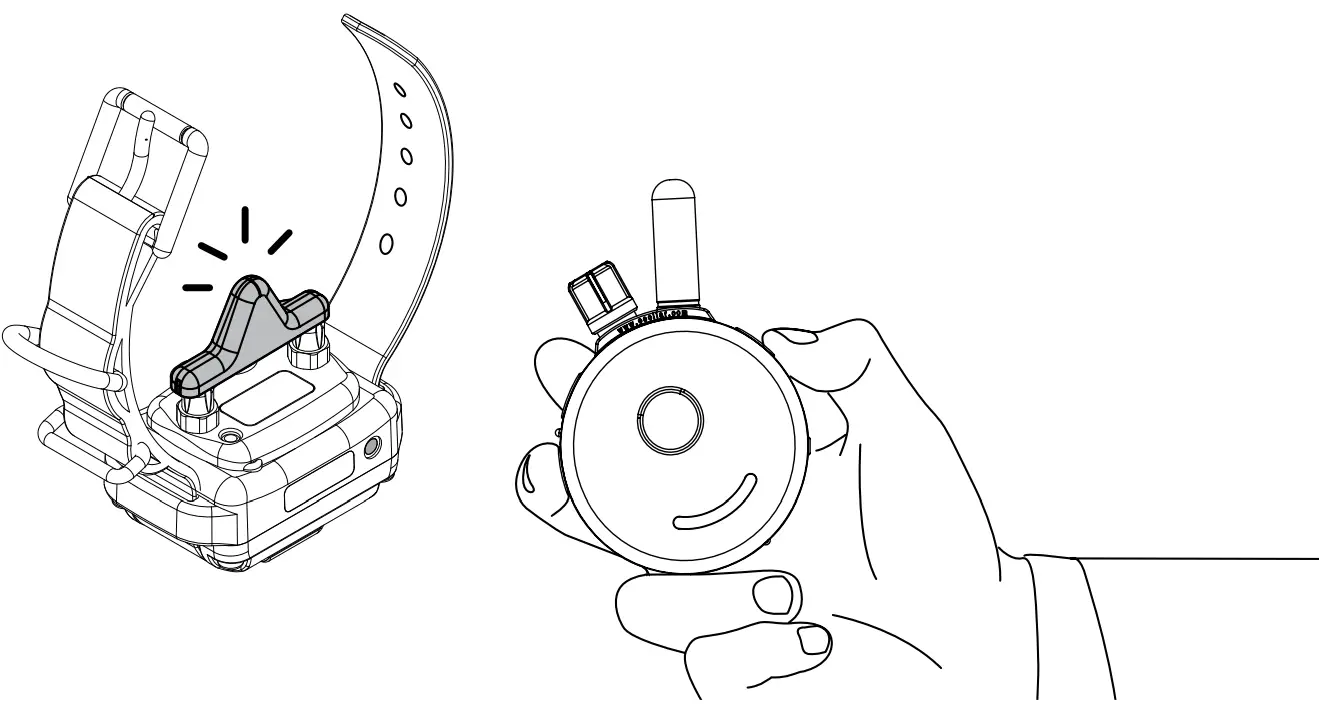
If you need to check your unit, hold the test light against the contact points on the collar receiver. This test will let you know that the collar receiver is generating the proper sensation to the dog, it should brighten in a smooth fashion as the dial is turned up.
Some people find it easier to hold the collar receiver in the palm of their hand and slowly turn the stimulation up using the continuous mode, typical humans feel it between 8 and 25 depending on the dryness of their hands.
Feel free to contact us if you have need help, at 1-855-326-5527.
REPLACING THE CONTACT POINTS
The standard 5/8” contact points are used for most dogs. Thicker fur breeds require longer 3/4” contact points. Replace the 5/8” contact points by following the instructions below using the enclosed contact point tool.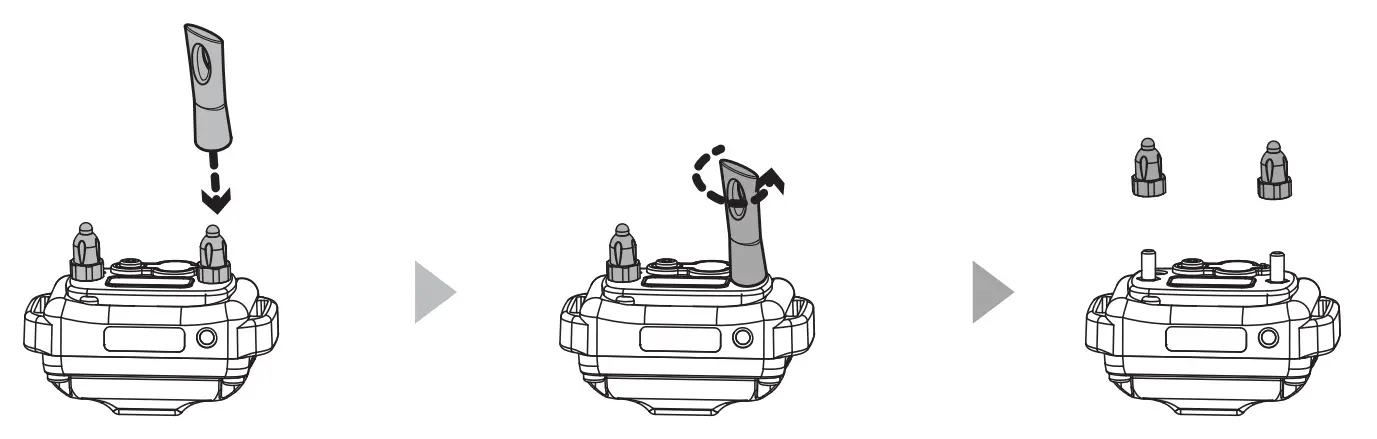
- Loosen both contact points by rotating the contact point counter-clockwise using the contact point tool.
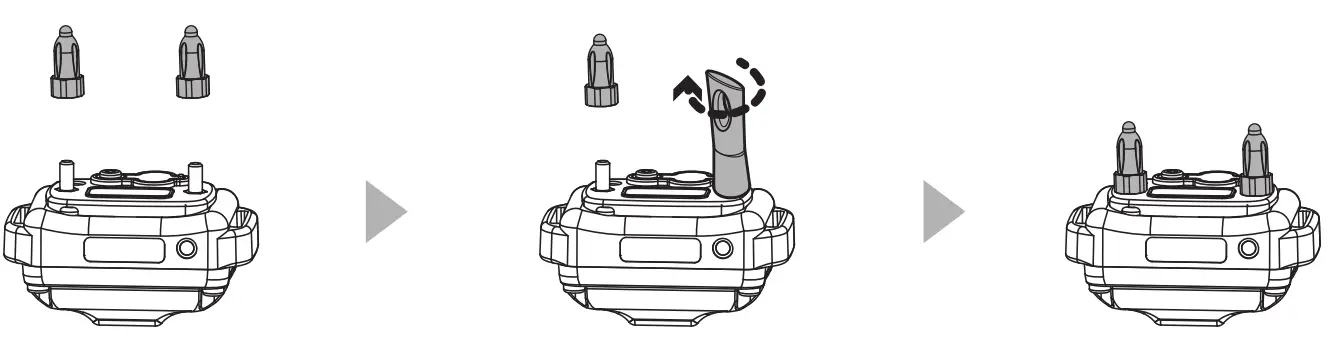
- Install the 3/4” contact points onto the bolt and tighten the contact points by rotating them clockwise with the contact point tool.
* For short-haired breeds such as boxers, dachshund, pit bulls, etc, and thick fur breeds please visit our website or contact us to inquire about special contact points for your dog.
TRAINING TIP
IMPORTANT TRAINING TIPS
E-Collars can be used to reinforce commands your dog already knows or as a learning sensation when paired with leash pressure. It is not a replacement for basic leash obedience training, but a tool to allow you to better communicate with your dog. For best results, use the least amount of stimulation required to get the attention of your dog. A calm and consistent approach to training will always produce better long term results. It is highly recommended that aggressive dogs be taken to a professional trainer for evaluation before e-collar use. There are many different e-collar training techniques recommended by a variety of professional trainers. We believe you, the owner of the dog, can best determine the most successful technique for your dog. We recommend first time users to emerse themselves in learning about the proper techniques or seek a professional e-collar trainer.
The technique used in the initial introduction of the e-collar is very important to the success of e-collar training. Search E-Collar Technologies on youtube and subscribe to our channel, new training videos are posted weekly. Also “Like” and subscribe to our Facebook page to receive more training advice and connect with other e-collar users.
Good Luck with your training from your friends at E-Collar Technologies
TROUBLESHOOTING
My Receiver / Transmitter is not turning on.
Make sure the collar receiver is fully charged. The Collar receiver light should turn green when the battery is connected to the charger.
My Receiver is not responding.
Check Receiver’s indicator light is blinking green and Transmitter LCD is on. Check to make sure the collar receiver’s indicator light is red when the stimulation button is pressed
Try pairing/syncing the transmitter to the receiver. (Page 17)
The receiver doesn’t seem to provide stimulation to the dog.
Remove Contact points from Receiver. Connect the Test Light to the receiver and test for stimulation. If the test light is blinking, the receiver is providing stimulation.
Max the range of devices been decreased?
Check Transmitter’s battery condition. The working range decreases when the battery level is low.
Keep your fingers from touching the antenna. See the bottom of page 8 for the proper technique to maximize range.
You cannot change the stimulation level for of the remote
Make sure 1D or 2D on the transmitter LCD is blinking. If 1D or 2D icons are solid, you cannot change the stimulation. You can unlock the stimulation
at any time by pressing the stimulation knob fo 2 seconds.
TWO YEAR WARRANTY
To register your 300/302 product, please log onto our website at www.ecollar.com, click on the warranty registration link and fill out the required information. Please register your product within 30 days of your purchase. If you do not have access to a computer, please call our toll-free number of 1-855-326-5527 and one of our customer service representatives will register your product for you. In the event the product is not properly registered proof of purchase is not required to obtain a warranty, we will estimate your purchase date by the serial number. Misuse, improper maintenance, and lost units are not covered by this warranty. Your complete satisfaction is our only concern.
The 300/302 mini Educator you have is our most recent design, it is different from the previous 300TS and 302TS, so please let us know that you have the new mini Educator design when communicating with us.
“Making Bad Dogs Good and Good Dogs Better!”
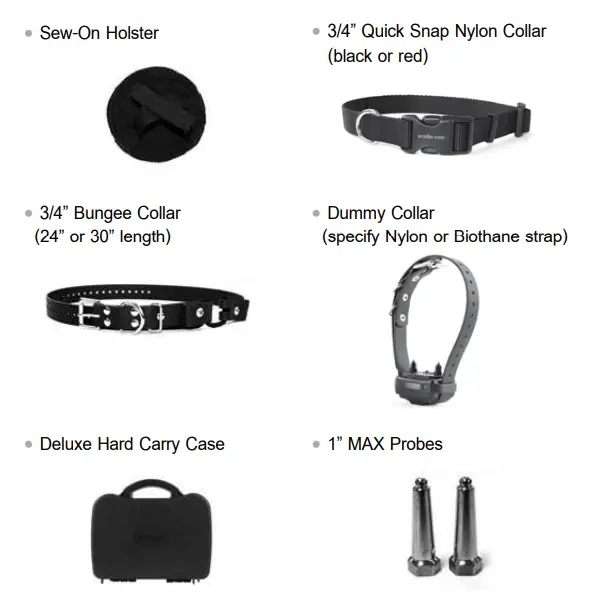
ACCESSORIES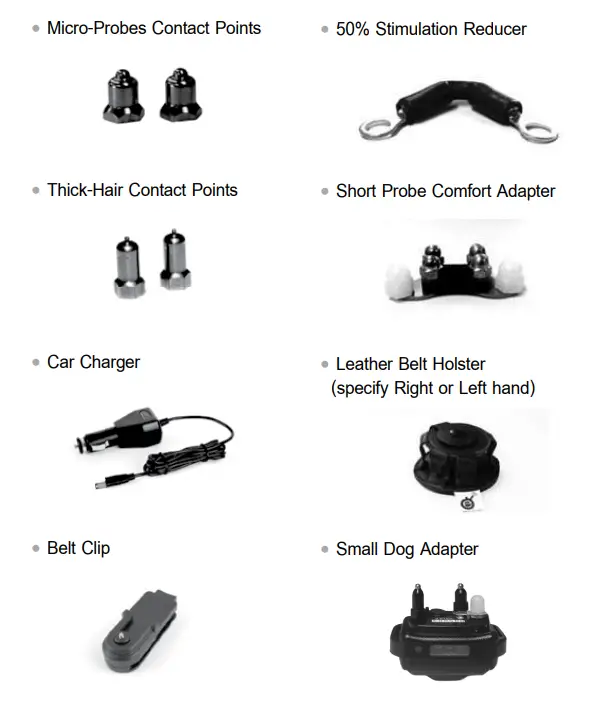
 SAFETY AND GENERAL INFORMATION
- The 300/302 Education Collar complies with all National and International Standards and Guidelines for human exposure to radiofrequency electromagnetic energy.
- Nearly all electronic devices are susceptible to electromagnetic interference (EMI) if inadequately shielded or designed without precautions to EMI.
300/302 e-collar transmitters manufactured by E-Collar Technolo-gies, Inc. comply with Article 15 of the FCC rules and operate under Part 95 of FCC regulations. CE approved for use in Europe.
IMPORTANT NOTICE
- To avoid Electromagnetic Interference and/or compatibility conflicts, please turn off your transmitter and collar receiver in any facility where posted notices instruct you to do so. Never use your equipment in close proximity of a Hospital or Health Care Facility or enter the facility without turning off both units.
- An FCC license is not needed to operate 300/302 remote e-collar transmitters. However, any change or modification made to the transmitter, including the supplied antenna, without the expressed written approval of E-Collar Technologies, Inc. could void your authority to operate.
FAQS
Another really important thing to do with this collar is make sure the dog does NOT equate this collar with the stimulation. It is suggested to put it on in the morning and take it off before bed, not just put it on before/after walks or events with them especially when first training them with it. When I was training my dog I had a specific whistle which gave him about 3 seconds to respond before the vibration went off. Now when I make that sound he responds immediately without the need to send a signal. My hope is that in his head I was warning him of the sensation prior to it happening, not the one causing it. I still use his collar after a year but have only used the vibration a handful of times this last year—depending on the dog and trainer the collar might only need to be used temporarily.
Yes, although described as a “mini” this e-collar will work for most dogs if used correctly. You might need to shave a small patch for the collar to make contact. If you haven’t done so, please watch the Leesburg videos on using the e-collar, particularly the one by Micheal Ellis. The dog needs to learn behavior that stops the stimulation. If introduced correctly, i.e., the dog learns that he has control of the stimulation, the e-collar works for most dogs.
I have used this collar on several large dogs including several Golden Retrievers and Labradors with success.
Peace and Be Well
Yes! My dog is around 25 lbs and I cut about 10 inches off of the adjustable collar-almost enough to make another collar. I have only had to use the correction levels up to 26, so there are plenty of levels higher for those bigger or more stubborn dogs. I’ve been working with a dog trainer to help me give the correction at the right time and used a leash for the first 3 weeks. Using the leash helped me guide my dog into the preferred behavior immediately after the correction so she was not confused as to why she was just corrected. It has completely transformed my dog’s behavior and I’m very pleased with the product. If this is your fist electronic collar please make sure you get some tips or work with a trainer. If you do not guide your dog into the behavior you want you will get a very anxious dog afraid to move or do anything. That was my only complaint with this product-in needed some tips for newbies like me. You will love your “new” dog!
Looks like K9 400 collar might be the best. I have a boxer with short hair so the contacts that came with the mini educator were fine. I think if you have the right fit, it would work as well. Burrow it down to the skin level, obviously not too tight. The K9 400 model is for training tactical dogs like German Shepherds
This is not a shock collar. This collar is actually shock resistant. It is similar to a TENS unit to where it creates basically a muscle spasm. No reputable trainer will recommend a shock collar, as they are painful for dogs.
The 300 has a 1/2 mile range, the 800 has a 1-mile range and has a larger/stronger receiver
It has one charging cord with 3 connection points on the same cord.
We do not ship internationally.
As long as you hang on to your invoice.
Only bought the single collar, but have another brand and whatever the setting is on is what both dogs will feel. Assuming Educator collars would be the same?
The antenna has a male threaded screw. Maybe a 1/4-20 thread? Whatever it is, it’s beefy enough to hold the 3/8″ antenna.
Yes, the ET-302 comes with 2 collars.
Just press and hold the dial down for a few seconds. It’s a safety feature, meant to help you not accidentally bump the dial up or down. Press and hold again to lock it down on the number you want.
The manufacturer offers a full 2-year warranty on the e-collars.
No it’s not normal. It may be his fur. They have longer prongs you can order. (Different lengths for different fur). I’d also make sure it’s working properly take it off your dog and test it on the palm of your hand. Grip it tight and start with a low number.
Nope.
Yes it does. it works great on my 10lbs dog and it would probably be fine on an even smaller dog.
Yes.


 Instruction Manual")


