Zennio ZNIO-QUADP QUAD Plus Analogue/Digital Input Module
DOCUMENT UPDATES
| Version | Changes | Page(s) |
|
[1.6]_a | Changes in the application program:
· Optimisation of the thermostat and motion detector modules. |
– |
| [1.5]_a | Changes in the application program: · Minor corrections. | – |
| [1.3]_a | Changes in the application program:
· Optimisation of the temperature probe module. | – |
|
[1.2]_a | Changes in the application program:
· Optimisation of the binary inputs, thermostat and motion detector modules. |
– |
INTRODUCTION
QUAD PLUS
QUAD Plus is an updated, small-size version of the popular QUAD from Zennio. This module incorporates four digital / analogue separate inputs, each configurable as:
Binary Input.
Temperature probe, either models provided by Zennio or other NTC temperature probes from other suppliers, being in that case possible to configure their parameters in ETS.
Motion detector.
Moreover, QUAD Plus implements four independent thermostats, which can be enabled and configured separately, as well as the Heartbeat function or periodical “still-alive” notification.
INSTALLATION
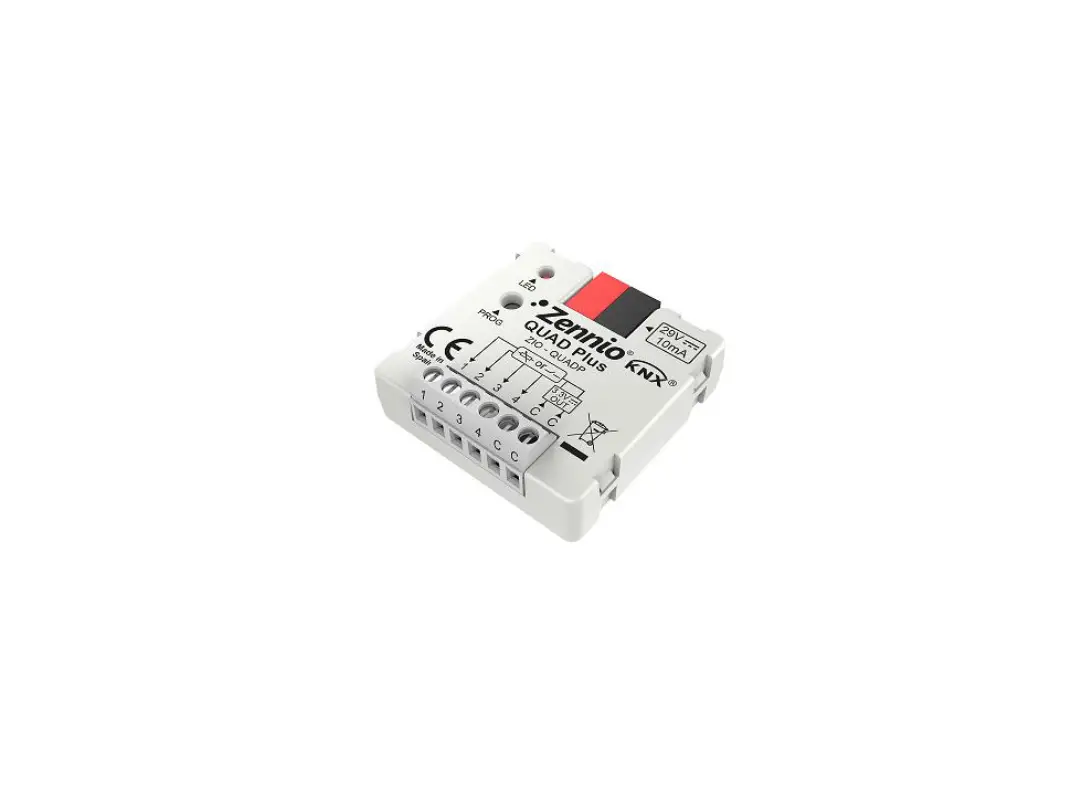
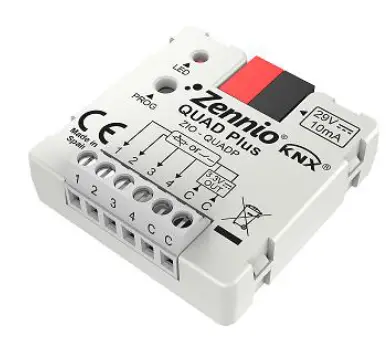
QUAD is connected to the KNX bus through the incorporated terminal connector, while the input lines need to be connected to QUAD Plus through the screw terminal block bundled in the device packaging. Once powered through the KNX bus, the device may be downloaded both an individual address or the application program.
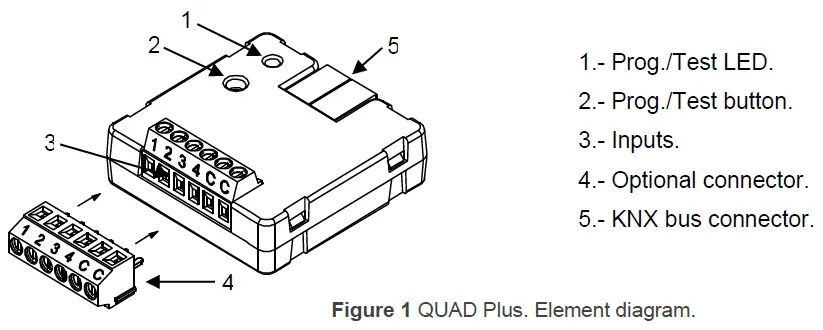
The main elements are described next:
Prog./Test Button (2): a short press on this button sets the device into the programming mode, making the associated LED (2) light in red. If this button is held at the same time of applying bus power to the device, the device will enter the Safe Mode. In such case, the LED will intermit in red.
Slots for the Input Lines (3): slots for the insertion of the optional inputs terminal block (4). Alternatively, the stripped cables of the input lines can be directly screwed into the slots. Each accessory should be connected to one of the slots labelled 1 to 4 and, on the other hand, to any of the common slots, labelled as “C”.
To obtain further information about the technical features of QUAD Plus and on security and installation procedures, please refer to the Datasheet of the device, bundled with the original packaging and also available at the Zennio website, http://www.zennio.com.
CONFIGURATION
GENERAL
After importing the corresponding database in ETS and adding the device into the topology of the desired project, the configuration process begins by entering the Parameters tab of the device.
ETS PARAMETERISATION
The only parameterisable screen available by default is General. From this screen it is possible to activate/deactivate all the required functionality.
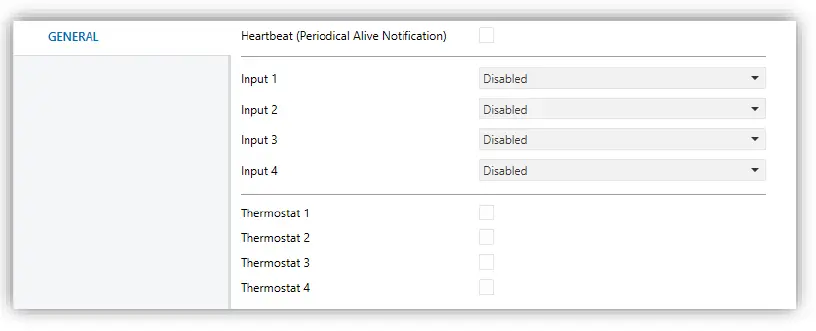
Heartbeat (Periodical Alive Notification): this parameter lets the integrator incorporate a 1-Bit object to the project (“[Heartbeat] Object to Send ‘1’”) that will be sent periodically with value “1” to notify that the device is still working (still alive).

Note: The first sending after download or bus failure takes place with a delay of up to 255 seconds, to prevent bus overload. The following sendings match the period set
Input x: sets the type of input number “x”: “Binary Input”, “Temperature Probe” or “Motion Detector”. If such input is not required, it can be left as “Disabled”.
Thermostat x: enables or disables thermostat number “x”.
One entry per input or thermostat will be included into the tab tree on the left.
INPUTS
QUAD Plus incorporates four analogue/digital inputs, each configurable as a:
Binary input, for the connection of a pushbutton or a switch/sensor.
Temperature probe, to connect a temperature sensor from Zennio or NTC probes from third parties (the latter requires configuring their parameters in ETS).
Motion detector, to connect a motion detector from Zennio.
BINARY INPUT
Please refer to the specific user manual “Binary Inputs”, available in the QUAD Plus product section at the Zennio website, http://www.zennio.com.
TEMPERATURE PROBE
Please refer to the specific user manual “Temperature Probe”, available in the QUAD Plus product section at the Zennio website, http://www.zennio.com.
MOTION DETECTOR
It is possible to connect motion detectors from Zennio to the input ports of QUAD Plus. This brings the device with the possibility of monitoring motion and presence in the room, as well as the light level. Depending on the detection, different response actions can be parameterised.
Please refer to the “Motion Detector” user manual, available under the QUAD Plus product section at the Zennio website (www.zennio.com), for detailed information about the functionality and the configuration of the related parameters.
Notes:
The ZN1IO-DETEC-P motion detector is compatible with a variety of Zennio devices. However, depending on the device it is actually being connected to, the functionality may differ slightly. Therefore, please refer specifically to the aforementioned user manual.
When connected to QUAD Plus, the rear micro-switch of model ZN1IO- DETEC-P should be set to position “Type B”.
THERMOSTATS
QUAD Plus allows independently enabling and configuring up to four thermostat functions, with independence of the number of the inputs that have been configured.
Please refer to the specific “Zennio Thermostat” user manual available under the QUAD Plus product section at the Zennio homepage (www.zennio.com) for detailed information about the functionality and the configuration of the related parameters.
ANNEX I. COMMUNICATION OBJECTS
“Functional range” shows the values that, with independence of any other values permitted by the bus according to the object size, may be of any use or have a particular meaning because of the specifications or restrictions from both the KNX standard or the application program itself.
| Number | Size | I/O | Flags | Data type (DPT) | Functional Range | Name | Function |
| 1 | 1 Bit | C T – – – | DPT_Trigger | 0/1 | [Heartbeat] Object to Send ‘1’ | Sending of ‘1’ Periodically | |
| 2 | 1 Byte | I | C – – W – | DPT_SceneControl | 0-63; 128-191 | [Thermostat] Scene Input | Scene Value |
| 3, 33, 63, 93 | 2 Bytes | I | C – – W – | DPT_Value_Temp | -273.00º – 670760.00º | [Tx] Temperature Source 1 | External Sensor Temperature |
| 4, 34, 64, 94 | 2 Bytes | I | C – – W – | DPT_Value_Temp | -273.00º – 670760.00º | [Tx] Temperature Source 2 | External Sensor Temperature |
| 5, 35, 65, 95 | 2 Bytes | O | C T R – – | DPT_Value_Temp | -273.00º – 670760.00º | [Tx] Effective Temperature | Effective Control Temperature |
|
6, 36, 66, 96 |
1 Byte |
I |
C – – W – |
DPT_HVACMode | 1=Comfort 2=Standby 3=Economy 4=Building Protection |
[Tx] Special Mode |
1-byte HVAC Mode |
| 7, 37, 67, 97 | 1 Bit | I | C – – W – | DPT_Ack | 0/1 | [Tx] Special Mode: Comfort | 0 = Nothing; 1 = Trigger |
| 1 Bit | I | C – – W – | DPT_Switch | 0/1 | [Tx] Special Mode: Comfort | 0 = Off; 1 = On | |
| 8, 38, 68, 98 | 1 Bit | I | C – – W – | DPT_Ack | 0/1 | [Tx] Special Mode: Standby | 0 = Nothing; 1 = Trigger |
| 1 Bit | I | C – – W – | DPT_Switch | 0/1 | [Tx] Special Mode: Standby | 0 = Off; 1 = On | |
| 9, 39, 69, 99 | 1 Bit | I | C – – W – | DPT_Ack | 0/1 | [Tx] Special Mode: Economy | 0 = Nothing; 1 = Trigger |
| 1 Bit | I | C – – W – | DPT_Switch | 0/1 | [Tx] Special Mode: Economy | 0 = Off; 1 = On | |
| 10, 40, 70, 100 | 1 Bit | I | C – – W – | DPT_Ack | 0/1 | [Tx] Special Mode: Protection | 0 = Nothing; 1 = Trigger |
| 1 Bit | I | C – – W – | DPT_Switch | 0/1 | [Tx] Special Mode: Protection | 0 = Off; 1 = On | |
| 11, 41, 71, 101 | 1 Bit | I | C – – W – | DPT_Window_Door | 0/1 | [Tx] Window Status (Input) | 0 = Closed; 1 = Open |
| 12, 42, 72, 102 | 1 Bit | I | C – – W – | DPT_Ack | 0/1 | [Tx] Comfort Prolongation | 0 = Nothing; 1 = Timed Comfort |
|
13, 43, 73, 103 |
1 Byte |
O |
C T R – – |
DPT_HVACMode | 1=Comfort 2=Standby 3=Economy 4=Building Protection |
[Tx] Special Mode Status |
1-byte HVAC Mode |
| 14, 44, 74, 104 | 2 Bytes | I | C – – W – | DPT_Value_Temp | -273.00º – 670760.00º | [Tx] Setpoint | Thermostat Setpoint Input |
| 2 Bytes | I | C – – W – | DPT_Value_Temp | -273.00º – 670760.00º | [Tx] Basic Setpoint | Reference Setpoint | |
| 15, 45, 75, 105 | 1 Bit | I | C – – W – | DPT_Step | 0/1 | [Tx] Setpoint Step | 0 = -0.5ºC; 1 = +0.5ºC |
| 16, 46, 76, 106 | 2 Bytes | I | C – – W – | DPT_Value_Tempd | -670760.00º – 670760.00º | [Tx] Setpoint Offset | Float Offset Value |
| 17, 47, 77, 107 | 2 Bytes | O | C T R – – | DPT_Value_Temp | -273.00º – 670760.00º | [Tx] Setpoint Status | Current Setpoint |
| 18, 48, 78, 108 | 2 Bytes | O | C T R – – | DPT_Value_Temp | -273.00º – 670760.00º | [Tx] Basic Setpoint Status | Current Basic Setpoint |
| 19, 49, 79, 109 | 2 Bytes | O | C T R – – | DPT_Value_Tempd | -670760.00º – 670760.00º | [Tx] Setpoint Offset Status | Current Setpoint Offset |
| 20, 50, 80, 110 | 1 Bit | I | C – – W – | DPT_Reset | 0/1 | [Tx] Setpoint Reset | Reset Setpoint to Default |
| 1 Bit | I | C – – W – | DPT_Reset | 0/1 | [Tx] Offset Reset | Reset offset | |
| 21, 51, 81, 111 | 1 Bit | I | C – – W – | DPT_Heat_Cool | 0/1 | [Tx] Mode | 0 = Cool; 1 = Heat |
| 22, 52, 82, 112 | 1 Bit | O | C T R – – | DPT_Heat_Cool | 0/1 | [Tx] Mode Status | 0 = Cool; 1 = Heat |
| 23, 53, 83, 113 | 1 Bit | I | C – – W – | DPT_Switch | 0/1 | [Tx] On/Off | 0 = Off; 1 = On |
| 24, 54, 84, 114 | 1 Bit | O | C T R – – | DPT_Switch | 0/1 | [Tx] On/Off Status | 0 = Off; 1 = On |
| 25, 55, 85, 115 | 1 Byte | O | C T R – – | DPT_Scaling | 0% – 100% | [Tx] Control Variable (Cool) | PI Control (Continuous) |
| 26, 56, 86, 116 | 1 Byte | O | C T R – – | DPT_Scaling | 0% – 100% | [Tx] Control Variable (Heat) | PI Control (Continuous) |
| 27, 57, 87, 117 | 1 Bit | O | C T R – – | DPT_Switch | 0/1 | [Tx] Control Variable (Cool) | 2-Point Control |
| 1 Bit | O | C T R – – | DPT_Switch | 0/1 | [Tx] Control Variable (Cool) | PI Control (PWM) | |
| 28, 58, 88, 118 | 1 Bit | O | C T R – – | DPT_Switch | 0/1 | [Tx] Control Variable (Heat) | 2-Point Control |
| 1 Bit | O | C T R – – | DPT_Switch | 0/1 | [Tx] Control Variable (Heat) | PI Control (PWM) | |
| 29, 59, 89, 119 | 1 Bit | O | C T R – – | DPT_Switch | 0/1 | [Tx] Additional Cool | Temp >= (Setpoint+Band) => “1” |
| 30, 60, 90, 120 | 1 Bit | O | C T R – – | DPT_Switch | 0/1 | [Tx] Additional Heat | Temp <= (Setpoint-Band) => “1” |
| 31, 61, 91, 121 | 1 Bit | O | C T R – – | DPT_Switch | 0/1 | [Tx] PI State (Cool) | 0 = PI signal 0%; 1 = PI signal greater than 0% |
| 32, 62, 92, 122 | 1 Bit | O | C T R – – | DPT_Switch | 0/1 | [Tx] PI State (Heat) | 0 = PI signal 0%; 1 = PI signal greater than 0% |
| 123, 127, 131, 135 | 2 Bytes | O | C T R – – | DPT_Value_Temp | -273.00º – 670760.00º | [Ix] Current Temperature | Temperature Sensor Value |
| 124, 128, 132, 136 | 1 Bit | O | C T R – – | DPT_Alarm | 0/1 | [Ix] Overcooling | 0 = No Alarm; 1 = Alarm |
| 125, 129, 133, 137 | 1 Bit | O | C T R – – | DPT_Alarm | 0/1 | [Ix] Overheating | 0 = No Alarm; 1 = Alarm |
| 126, 130, 134, 138 | 1 Bit | O | C T R – – | DPT_Alarm | 0/1 | [Ix] Probe Error | 0 = No Alarm; 1 = Alarm |
| 139, 145, 151, 157 | 1 Bit | I | C – – W – | DPT_Enable | 0/1 | [Ix] Input Lock | 0 = Unlock; 1 = Lock |
|
140, 146, 152, 158 | 1 Bit | C T – – – | DPT_Switch | 0/1 | [Ix] [Short Press] 0 | Sending of 0 | |
| 1 Bit | C T – – – | DPT_Switch | 0/1 | [Ix] [Short Press] 1 | Sending of 1 | ||
| 1 Bit | I | C T – W – | DPT_Switch | 0/1 | [Ix] [Short Press] 0/1 Switching | Switching 0/1 | |
| 1 Bit | C T – – – | DPT_UpDown | 0/1 | [Ix] [Short Press] Move Up Shutter | Sending of 0 (Up) | ||
| 1 Bit | C T – – – | DPT_UpDown | 0/1 | [Ix] [Short Press] Move Down Shutter | Sending of 1 (Down) | ||
| 1 Bit | C T – – – | DPT_UpDown | 0/1 | [Ix] [Short Press] Move Up/Down Shutter | Switching 0/1 (Up/Down) | ||
| 1 Bit | C T – – – | DPT_Step | 0/1 | [Ix] [Short Press] Stop/Step Up Shutter | Sending of 0 (Stop/Step Up) | ||
| 1 Bit | C T – – – | DPT_Step | 0/1 | [Ix] [Short Press] Stop/Step Down Shutter | Sending of 1 (Stop/Step Down) |
| 1 Bit | C T – – – | DPT_Step | 0/1 | [Ix] [Short Press] Stop/Step Shutter (Switched) | Switching of 0/1 (Stop/Step Up/Down) | ||
|
4 Bit |
C T – – – |
DPT_Control_Dimming | 0x0 (Stop) 0x1 (Dec. by 100%) 0x2 (Dec. by 50%) 0x3 (Dec. by 25%) 0x4 (Dec. by 12%) 0x5 (Dec. by 6%) 0x6 (Dec. by 3%) 0x7 (Dec. by 1%) 0x8 (Stop) 0x9 (Inc. by 100%) 0xA (Inc. by 50%) 0xB (Inc. by 25%) 0xC (Inc. by 12%) 0xD (Inc. by 6%) 0xE (Inc. by 3%) 0xF (Inc. by 1%) |
[Ix] [Short Press] Brighter |
Increase Brightness | ||
|
4 Bit |
C T – – – |
DPT_Control_Dimming | 0x0 (Stop) 0x1 (Dec. by 100%) … 0x8 (Stop) 0x9 (Inc. by 100%) … 0xF (Inc. by 1%) |
[Ix] [Short Press] Darker |
Decrease Brightness | ||
|
4 Bit |
C T – – – |
DPT_Control_Dimming | 0x0 (Stop) 0x1 (Dec. by 100%) … 0x8 (Stop) 0x9 (Inc. by 100%) … 0xF (Inc. by 1%) |
[Ix] [Short Press] Brighter/Darker |
Switch Bright/Dark | ||
| 1 Bit | C T – – – | DPT_Switch | 0/1 | [Ix] [Short Press] Light On | Sending of 1 (On) | ||
| 1 Bit | C T – – – | DPT_Switch | 0/1 | [Ix] [Short Press] Light Off | Sending of 0 (Off) | ||
| 1 Bit | I | C T – W – | DPT_Switch | 0/1 | [Ix] [Short Press] Light On/Off | Switching 0/1 | |
| 1 Byte | C T – – – | DPT_SceneControl | 0-63; 128-191 | [Ix] [Short Press] Run Scene | Sending of 0 – 63 | ||
| 1 Byte | C T – – – | DPT_SceneControl | 0-63; 128-191 | [Ix] [Short Press] Save Scene | Sending of 128 – 191 | ||
| 1 Bit | I/O | C T R W – | DPT_Switch | 0/1 | [Ix] [Switch/Sensor] Edge | Sending of 0 or 1 | |
| 1 Byte | C T – – – | DPT_Value_1_Ucount | 0 – 255 | [Ix] [Short Press] Constant Value (Integer) | 0 – 255 | ||
| 1 Byte | C T – – – | DPT_Scaling | 0% – 100% | [Ix] [Short Press] Constant Value (Percentage) | 0% – 100% | ||
| 2 Bytes | C T – – – | DPT_Value_2_Ucount | 0 – 65535 | [Ix] [Short Press] Constant Value | 0 – 65535 |
| (Integer) | |||||||
| 2 Bytes | C T – – – | 9.xxx | -671088.64 – 670760.96 | [Ix] [Short Press] Constant Value (Float) | Float Value | ||
| 141, 150, 156, 162 | 1 Byte | I | C – – W – | DPT_Scaling | 0% – 100% | [Ix] [Long Press] Dimming Status (Input) | 0% – 100% |
| 1 Byte | I | C – – W – | DPT_Scaling | 0% – 100% | [Ix] [Long Press] Shutter Status (Input) | 0% = Top; 100% = Bottom | |
|
142, 148, 154, 160 | 1 Bit | C T – – – | DPT_Switch | 0/1 | [Ix] [Long Press] 0 | Sending of 0 | |
| 1 Bit | C T – – – | DPT_Switch | 0/1 | [Ix] [Long Press] 1 | Sending of 1 | ||
| 1 Bit | I | C T – W – | DPT_Switch | 0/1 | [Ix] [Long Press] 0/1 Switching | Switching 0/1 | |
| 1 Bit | C T – – – | DPT_UpDown | 0/1 | [Ix] [Long Press] Move Up Shutter | Sending of 0 (Up) | ||
| 1 Bit | C T – – – | DPT_UpDown | 0/1 | [Ix] [Long Press] Move Down Shutter | Sending of 1 (Down) | ||
| 1 Bit | C T – – – | DPT_UpDown | 0/1 | [Ix] [Long Press] Move Up/Down Shutter | Switching 0/1 (Up/Down) | ||
| 1 Bit | C T – – – | DPT_Step | 0/1 | [Ix] [Long Press] Stop/Step Up Shutter | Sending of 0 (Stop/Step Up) | ||
| 1 Bit | C T – – – | DPT_Step | 0/1 | [Ix] [Long Press] Stop/Step Down Shutter | Sending of 1 (Stop/Step Down) | ||
| 1 Bit | C T – – – | DPT_Step | 0/1 | [Ix] [Long Press] Stop/Step Shutter (Switched) | Switching of 0/1 (Stop/Step Up/Down) | ||
|
4 Bit |
C T – – – |
DPT_Control_Dimming | 0x0 (Stop) 0x1 (Dec. by 100%) … 0x8 (Stop) 0x9 (Inc. by 100%) … 0xF (Inc. by 1%) |
[Ix] [Long Press] Brighter |
Long Pr. -> Brighter; Release -> Stop | ||
|
4 Bit |
C T – – – |
DPT_Control_Dimming | 0x0 (Stop) 0x1 (Dec. by 100%) … 0x8 (Stop) 0x9 (Inc. by 100%) … 0xF (Inc. by 1%) |
[Ix] [Long Press] Darker |
Long Pr. -> Darker; Release -> Stop | ||
|
4 Bit |
C T – – – |
DPT_Control_Dimming | 0x0 (Stop) 0x1 (Dec. by 100%) … 0x8 (Stop) 0x9 (Inc. by 100%) … 0xF (Inc. by 1%) |
[Ix] [Long Press] Brighter/Darker |
Long Pr. -> Brighter/Darker; Release -> Stop | ||
| 1 Bit | C T – – – | DPT_Switch | 0/1 | [Ix] [Long Press] Light On | Sending of 1 (On) | ||
| 1 Bit | C T – – – | DPT_Switch | 0/1 | [Ix] [Long Press] Light Off | Sending of 0 (Off) |
| 1 Bit | I | C T – W – | DPT_Switch | 0/1 | [Ix] [Long Press] Light On/Off | Switching 0/1 | |
| 1 Byte | C T – – – | DPT_SceneControl | 0-63; 128-191 | [Ix] [Long Press] Run Scene | Sending of 0 – 63 | ||
| 1 Byte | C T – – – | DPT_SceneControl | 0-63; 128-191 | [Ix] [Long Press] Save Scene | Sending of 128 – 191 | ||
| 1 Bit | O | C T R – – | DPT_Alarm | 0/1 | [Ix] [Switch/Sensor] Alarm: Breakdown or Sabotage | 1 = Alarm; 0 = No Alarm | |
| 2 Bytes | C T – – – | 9.xxx | -671088.64 – 670760.96 | [Ix] [Long Press] Constant Value (Float) | Float Value | ||
| 2 Bytes | C T – – – | DPT_Value_2_Ucount | 0 – 65535 | [Ix] [Long Press] Constant Value (Integer) | 0 – 65535 | ||
| 1 Byte | C T – – – | DPT_Scaling | 0% – 100% | [Ix] [Long Press] Constant Value (Percentage) | 0% – 100% | ||
| 1 Byte | C T – – – | DPT_Value_1_Ucount | 0 – 255 | [Ix] [Long Press] Constant Value (Integer) | 0 – 255 | ||
| 143, 149, 155, 161 | 1 Bit | C T – – – | DPT_Trigger | 0/1 | [Ix] [Long Press/Release] Stop Shutter | Release -> Stop Shutter | |
|
144, 147, 153, 159 | 1 Byte | I | C – – W – | DPT_Scaling | 0% – 100% | [Ix] [Short Press] Shutter Status (Input) | 0% = Top; 100% = Bottom |
| 1 Byte | I | C – – W – | DPT_Scaling | 0% – 100% | [Ix] [Short Press] Dimming Status (Input) | 0% – 100% | |
| 163 | 1 Byte | I | C – – W – | DPT_SceneNumber | [Motion Detector] Scene Input | Scene Value | |
| 164 | 1 Byte | C T – – – | DPT_SceneControl | 0-63; 128-191 | [Motion Detector] Scene Output | Scene Value | |
| 165, 194, 223, 252 | 1 Byte | O | C T R – – | DPT_Scaling | 0% – 100% | [Ix] Luminosity | 0-100% |
| 166, 195, 224, 253 | 1 Bit | O | C T R – – | DPT_Alarm | 0/1 | [Ix] Open Circuit Error | 0 = No Error; 1 = Open Circuit Error |
| 167, 196, 225, 254 | 1 Bit | O | C T R – – | DPT_Alarm | 0/1 | [Ix] Short Circuit Error | 0 = No Error; 1 = Short Circuit Error |
| 168, 197, 226, 255 | 1 Byte | O | C T R – – | DPT_Scaling | 0% – 100% | [Ix] Presence State (Scaling) | 0-100% |
|
169, 198, 227, 256 |
1 Byte |
O |
C T R – – |
DPT_HVACMode | 1=Comfort 2=Standby 3=Economy 4=Building Protection |
[Ix] Presence State (HVAC) | Auto, Comfort, Standby, Economy, Building Protection |
| 170, 199, 228, 257 | 1 Bit | O | C T R – – | DPT_Occupancy | 0/1 | [Ix] Presence State (Binary) | Binary Value |
| 1 Bit | O | C T R – – | DPT_Ack | 0/1 | [Ix] Presence: Slave Output | 1 = Motion Detected | |
| 171, 200, 229, 258 | 1 Bit | I | C – – W – | DPT_Window_Door | 0/1 | [Ix] Presence Trigger | Binary Value to Trigger the Presence Detection |
| 172, 201, 230, 259 | 1 Bit | I | C – – W – | DPT_Ack | 0/1 | [Ix] Presence: Slave Input | 0 = Nothing; 1 = Detection from slave device |
| 173, 202, 231, 260 | 2 Bytes | I | C – – W – | DPT_TimePeriodSec | [Ix] Presence: Waiting Time | 0-65535 s. | |
| 174, 203, 232, 261 | 2 Bytes | I | C – – W – | DPT_TimePeriodSec | [Ix] Presence: Listening Time | 1-65535 s. | |
| 175, 204, 233, 262 | 1 Bit | I | C – – W – | DPT_Enable | 0/1 | [Ix] Presence: Enable | According to parameters |
| 176, 205, 234, 263 | 1 Bit | I | C – – W – | [Ix] Presence: Day/Night | According to parameters | ||
| 177, 206, 235, 264 | 1 Bit | O | C T R – – | DPT_Occupancy | 0/1 | [Ix] Presence: Occupancy State | 0 = Not Occupied; 1 = Occupied |
| 178, 207, 236, 265 | 1 Bit | I | C – – W – | DPT_Ack | 0/1 | [Ix] External Motion Detection | 0 = Nothing; 1 = Motion detected by an |
| external sensor | |||||||
| 179, 184, 189, 208, 213, 218, 237, 242, 247, 266, 271, 276 | 1 Byte | O | C T R – – | DPT_Scaling | 0% – 100% | [Ix] [Cx] Detection State (Scaling) | 0-100% |
| 180, 185, 190, 209, 214, 219, 238, 243, 248, 267, 272, 277 |
1 Byte |
O |
C T R – – |
DPT_HVACMode | 1=Comfort 2=Standby 3=Economy 4=Building Protection |
[Ix] [Cx] Detection State (HVAC) | Auto, Comfort, Standby, Economy, Building Protection |
| 181, 186, 191, 210, 215, 220, 239, 244, 249, 268, 273, 278 | 1 Bit | O | C T R – – | DPT_Switch | 0/1 | [Ix] [Cx] Detection State (Binary) | Binary Value |
| 182, 187, 192, 211, 216, 221, 240, 245, 250, 269, 274, 279 | 1 Bit | I | C – – W – | DPT_Enable | 0/1 | [Ix] [Cx] Enable Channel | According to parameters |
| 183, 188, 193, 212, 217, 222, 241, 246, 251, 270, 275, 280 | 1 Bit | I | C – – W – | DPT_Switch | 0/1 | [Ix] [Cx] Force State | 0 = No Detection; 1 = Detection |
| Join and send us your inquiries about Zennio devices: |
| https://support.zennio.com |
Zennio Avance y Tecnología S.L. C/ Río Jarama, 132. Nave P-8.11 45007 Toledo (Spain).
Tel. +34 925 232 002


