![]()
MAGNETIC ELLIPTICAL TRAINER
MAGNETISCHER ELLIPTISCHER TRAINER
INSTRUCTION MANUAL
E20 Magnetic Elliptical Trainer
![]() IMPORTANT: Read all instructions carefully before using this product. Retain this owner’s manual for future reference. The specifications of this product may vary from his photo, subject to change without notice.
IMPORTANT: Read all instructions carefully before using this product. Retain this owner’s manual for future reference. The specifications of this product may vary from his photo, subject to change without notice.
USER MANUAL
![]()
PLEASE DO NOT RETURN THIS PRODUCT TO THE STORE.
STOP. Contact customer service if you have any questions regarding assembly or proper operation of the machine.
SERVICE
For damaged or defective product, questions, replacement parts or any other service support, please contact our customer service department by the below methods:
For The Best Service, please Email [email protected]
Response Time: 1-2 Business Days
Emailing us with the information above will be the best method to receive a response during peak business hours
Enter into below website to find more innovation products:
www.amazon.com/snode
Hot-Line:
1-323-510-1818
(8:00 AM – 5:00 PM Pacific Standard Time, Daily)
Response time may vary via calling Please have the following information ready when requesting for service:
- Your name
- Phone number
- Model number
- Part number
- Proof of Purchase
For damaged or defective product please contact our customer service before returning to the store.
IMPORTANT SAFETY INFORMATION
Safety Precautions — Please Read the Instruction before Using!
We thank you for chosing our product. To guarantee your safety and health ,please use this equipment correctly, Please read the information as below carefully before using this equipment.
- It is important to read this entire manual before assembling and using the equipment. Safe and effective use can only be achieved if the equipment is assembled, maintained and used properly.
- Before starting any exercise program you should consult your doctor to determine if you have any medical or physical conditions that could put your health and safety at risk, or prevent you from using the equipment properly. Your doctor’s advice is essential if you are taking medication that affects your heart rate, blood pressure or cholesterol level.
- Be aware of your body’s signals. Incorrect or excessive exercise can damage your health. Stop exercising if you experience any of the following symptoms: pain, tightness in your chest, irregular heartbeat, extreme shortness of breath, lightheadedness, dizziness or feelings of nausea. If you do experience any of these conditions you should consult your doctor before continuing with your exercise program.
- Keep children and pets away from the equipment. The equipment is designed for adult use only.
- Use the equipment on a solid, flat level surface with a protective cover for your floor or carpet. To ensure safety, the equipment should have at least 0.6 meters of free space all around it.
- Before using the equipment, check that the nuts and bolts are securely tightened. Always use the equipment as indicated. If you find any defective components while assembling or checking the equipment, or if you hear any unusual noises coming from the equipment during use, stop immediately. Do not use the equipment until the problem has been rectified.
- There are many functions of the computer, which value will show when using the equipment according the amount of exercise ,here warmly remind you that the value of heart pulse just give you some reference.
- Wear suitable clothing while using the equipment. Avoid wearing loose clothing that may get caught in the equipment or that may restrict or prevent movement.
- This equipment is designed for indoor and family use only. Maximum weight of user: 120kg/265lbs.
- Care must be taken when lifting or moving the equipment so as not to injure your back.
- The equipment is not suitable for therapeutic use.
- Please save this manual and assembling tools well
EXPLODED VIEW
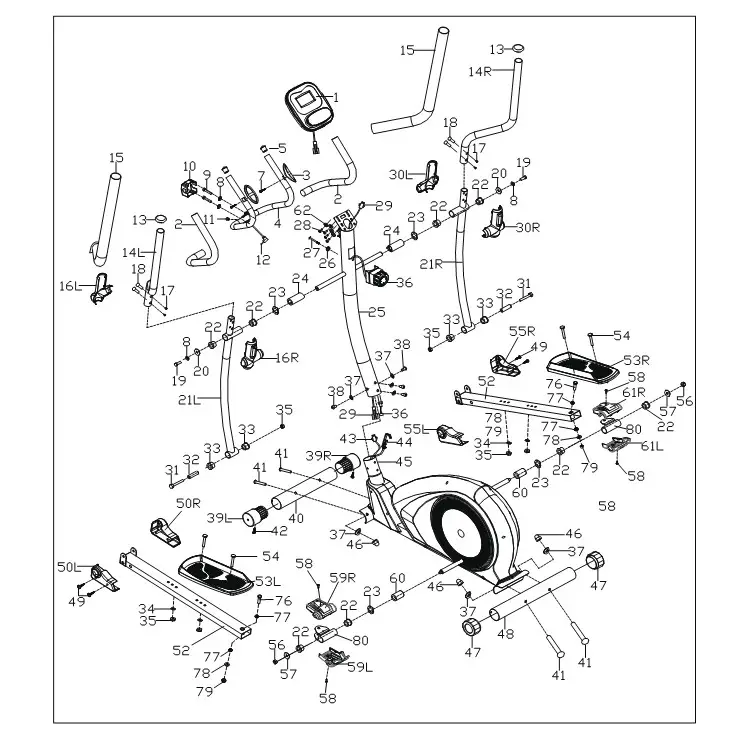
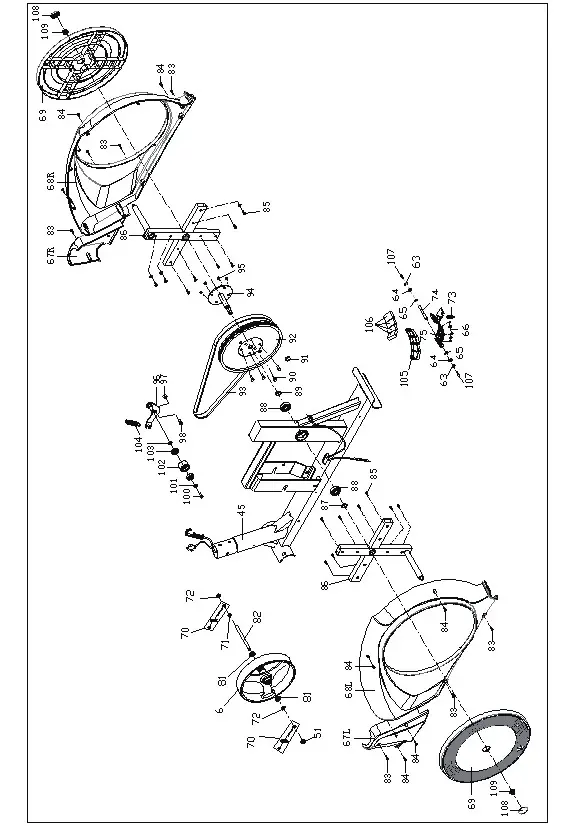
PARTS LIST
| No | Description | Qty |
| 1 | Computer | 1 |
| 2 | Foam Φ23’5’500 | 2 |
| 3 | Hand Pulse Grip Φ25 | 2 |
| 4 | Mid-handlebar Join | 1 |
| 5 | End Cap 025’16 | 2 |
| 6 | Inertial Wheel Combination | 1 |
| 7 | Bolt St4*19 | 2 |
| 8 | Washer D8 | 4 |
| 9 | Bolt M8’30’s6 | 2 |
| 10 | Clamp 71*58*40 | 1 |
| 11 | Plug Φ12’11’Φ3 | 1 |
| 12 | Handle Pulse Wire | 1 |
| 13 | End Cap Φ32*46*Φ50 | 2 |
| 14L/R | Handle Bar | 2 |
| 15 | Foam Φ30’5’670 | 2 |
| 16L/R | Swing Rod Cover | 2 |
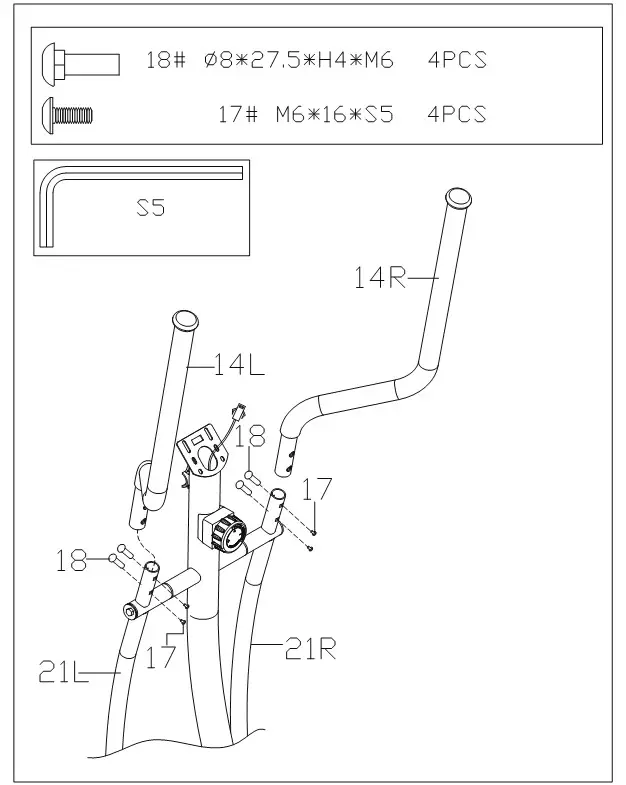
| 17 | Bolt M6*16’*55 | 4 |
| 18 | Bolt Φ8*27.5*h4*m6 | 4 |
| 19 | Bolt M8*16*s14 | 2 |
| 20 | Washer D8*Φ32*2 | 2 |
| 21L/R | Swing Rod | 2 |
| 22 | Alloy Wrap 2 Φ32*3*Φ28*21*Φ19.4 | 8 |
| 23 | Washer D19*Φ25*0.3 | 4 |
| 24 | Spacer | 2 |
| 25 | Handle Bar Post | 1 |
| 26 | Washer D5*Φ20*R30*1.5 | 1 |
| 27 | Bolt M5*55 | 1 |
| 28 | Bolt M4*10 | 4 |
| 29 | Trunk Wire | 1 |
| 30L/R | Swing Rod Cover (R/I) | 2 |
| 31 | Bolt M8*75*13*s14 | 2 |
| 32 | Spacer Φ14*Φ3*59 | 2 |
| 33 | Alloy Wrap 1Φ32*3*Φ28*16*Φ14.3 | 4 |
| 34 | Washer D8*Φ16*1.5 | 4 |
| 35 | Nut M8*h7.5*s13 | 5 |
| 36 | 8-tension Control | 1 |
| 37 | Washer Φ8*Φ20*2*r30 | 8 |
| 38 | Bolt M8*16*s6 | 4 |
| 39L/R | End Cap Φ60*Φ70*95 | 2 |
| 40 | Front Bottom Tube | 1 |
| 41 | Bolt M8*73*20*h5 | 4 |
| 42 | Bolt St3*10 | 2 |
| 43 | Sensor Wire | 1 |
| 44 | Lower Tension Wire | 1 |
| 45 | Main Frame | 1 |
| 46 | Nut M8*h16*s13 | 4 |
| 47 | End Cap Φ60 | 2 |
| 48 | Rear Bottom Tube | 1 |
| 49 | Screw St4.2*19 | 4 |
| 50L/R | Rod Cover L | 2 |
| 51 | Nut | 1 |
| 52L/R | Connecting Rod | 2 |
| 53L/R | Pedal | 2 |
| 54 | Bolt M8*45*20*s14 | 4 |
| 55L/R | Rod Cover L | 2 |
| 56 | Nut M10*1.25*h9.5*s17 | 2 |
| 57 | Washer D10*Φ32*2 | 2 |
| 58 | Bolt M5*10*Φ8 | 4 |
| 59L/R | Rod Covert. | 2 |
| 60 | Spacer Φ32*Φ19.2*30 | 2 |
| 61L/R | Rod Cover R | 2 |
| 62 | Washer D4*Φ12*1 | 4 |
| 63 | Spring Washer D6 | 2 |
| 64 | Washer D6 | 2 |
| 65 | Stop Collar D12 | 2 |
| 66 | Bolt St3*15 | 5 |
| 67LR | Cover | 2 |
| 68LR | Cover | 2 |
| 69 | Cover | 2 |
| 70 | Bolt Group | 2 |
| 71 | Nut M10*1*h2 | 1 |
| 72 | Nut M10*l*h5 | 2 |
| 73 | Tension Spring | 1 |
| 74 | Axle | 1 |
| 75 | Magnetic Board | 1 |
| 76 | Bolt M10*55*20*s17 | 2 |
| 77 | Alloy Wrap Φ18*3*Φ14 | 4 |
| 78 | Washer D10*Φ20*2 | 4 |
| 79 | Nut M10*h9.5*s17 | 4 |
| 80 | Connecting Rod Joint | 2 |
| 81 | Bearing | 2 |
| 82 | Axle | 1 |
| 83 | Bolt St4.2*16*Φ8 | 6 |
| 84 | Bolt St4.2*19*Φ8 | 9 |
| 85 | Bolt St4.2*16*Φ8 | 16 |
| 86 | Crank | 2 |
| 87 | Stop Collar | 1 |
| 88 | Bearing | 2 |
| 89 | Spacer Bush Φ22*Φ18*4 | 1 |
| 90 | Bolt M6’*16*s10 | 4 |
| 91 | Magnet | 1 |
| 92 | Belt Pulley | 1 |
| 93 | Bel T | 1 |
| 94 | Axle | 1 |
| 95 | Nut M6*h6*s10 | 4 |
| 96 | Connecting Rod | 1 |
| 97 | Nut M8*h7.5*s13 | 2 |
| 98 | Bolt M8*16 | 1 |
| 99 | Washer D12*Φ17*0.5 | I |
| 100 | Bolt M6*10*s10 | 1 |
| 101 | Washer D6*Φ16*1.5 | 1 |
| 102 | Pinch Roller | 1 |
| 103 | Bearing | 2 |
| 104 | Tension Spring | 1 |
| 105 | Plastic Lattice | 1 |
| 106 | Magnet | 4 |
| 107 | Bolt M6*20 | 2 |
| 108 | Cover | 2 |
| 109 | Nut M10*1.25 | 2 |
ASSEMBLY STEPS

STEP 1
Secure front bottom tube (40) and rear bottom tube (48) to main frame (45) with bolt (41), washer(37) and nut(46).
STEP 2
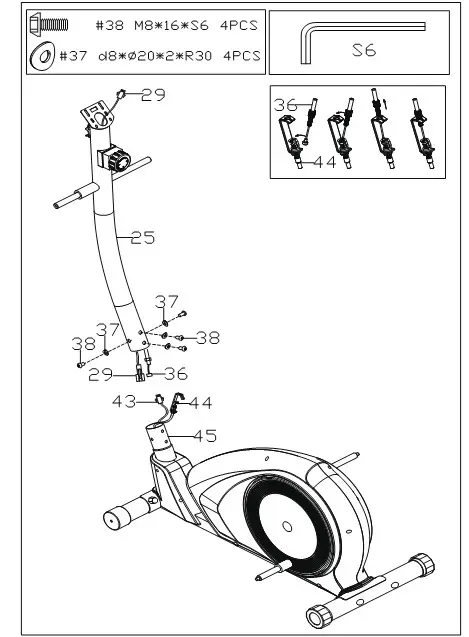
- Connect well the 8-tension control(36) with lower tension wire (44); connect trunk wire(29) with sensor wire (43) ;
- Insert handle bar post(25) into main frame(45), then secure them with bolt(38) and washer(37).
STEP 3
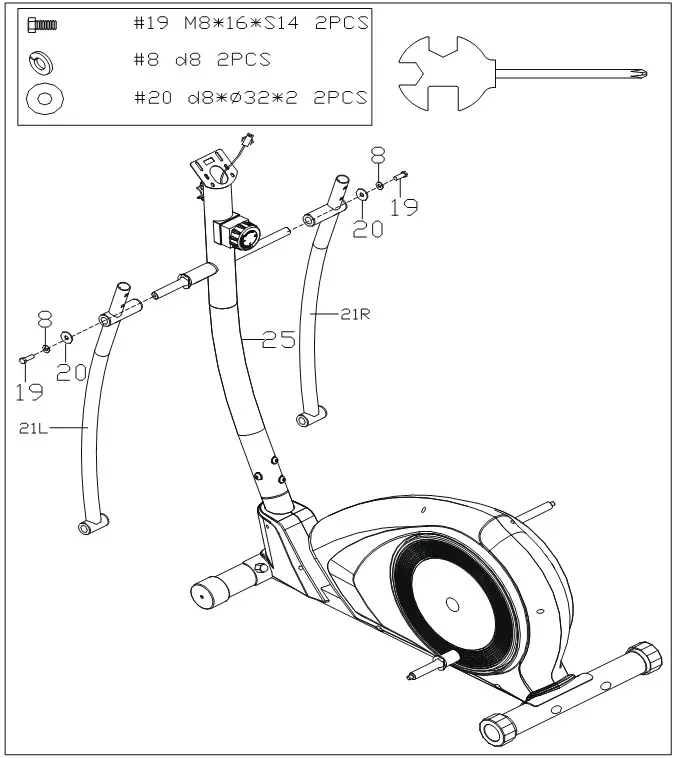
Attach swing rod(21L/R) to handle bar post(25),then secure them with bolt(19), washer(8) and washer(20).
STEP 4
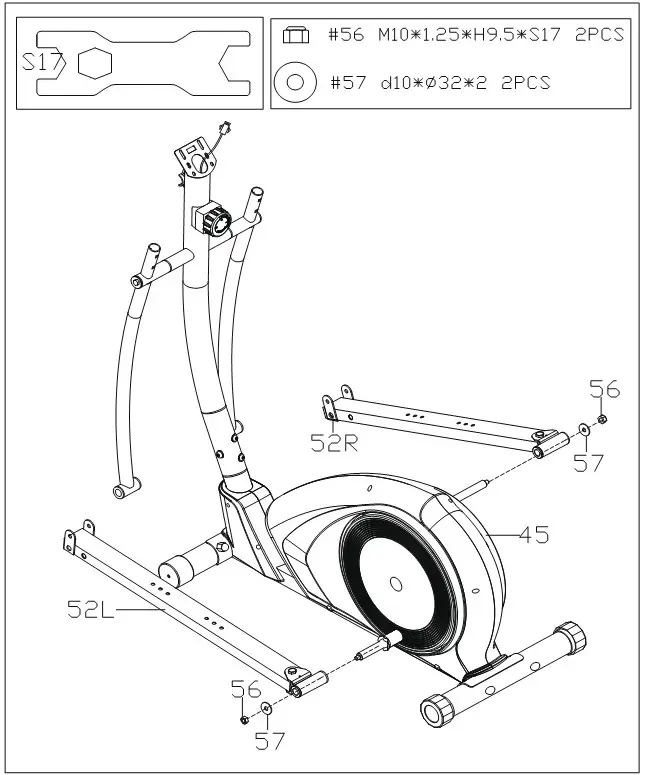
Secure connecting rod (52L/R) on the main frame (45) with nut(56) and washer(57) .
STEP 5
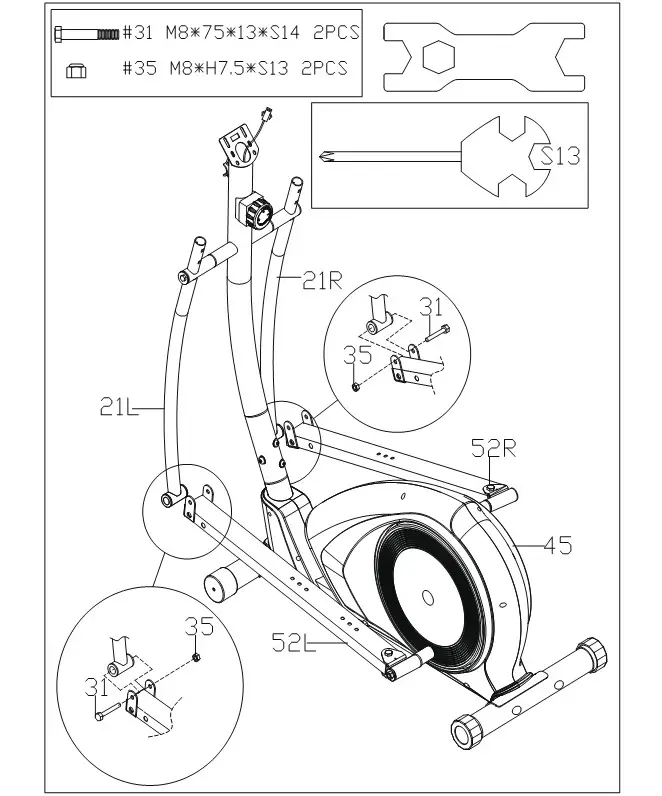
Secure swing rod(21L/R) on connecting rod(52L/R) with bolt(31), and nut(35).
STEP 6
Secure handle bar(14L/R) to swing rod(21L/R) with bolt(18) and bolt(17).
STEP 7
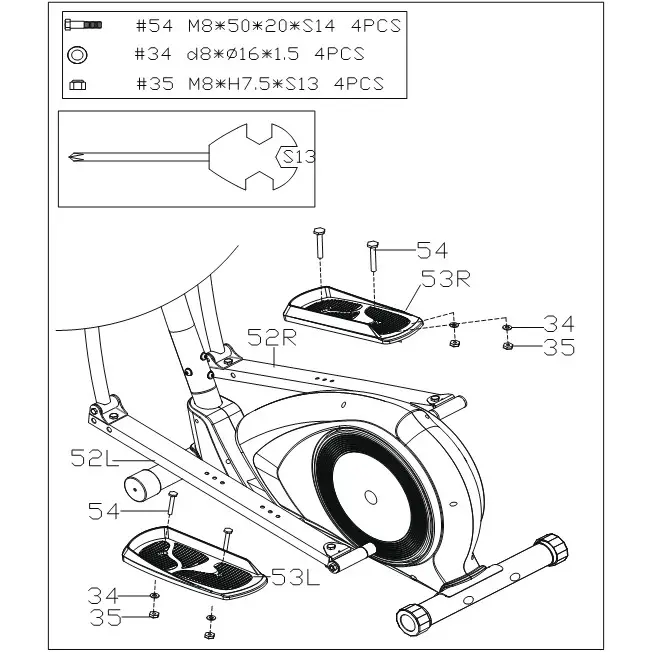
Secure pedal(53L/R) to connecting rod(52L/R) with bolt(54), washer(34) and nut(35).
STEP 8
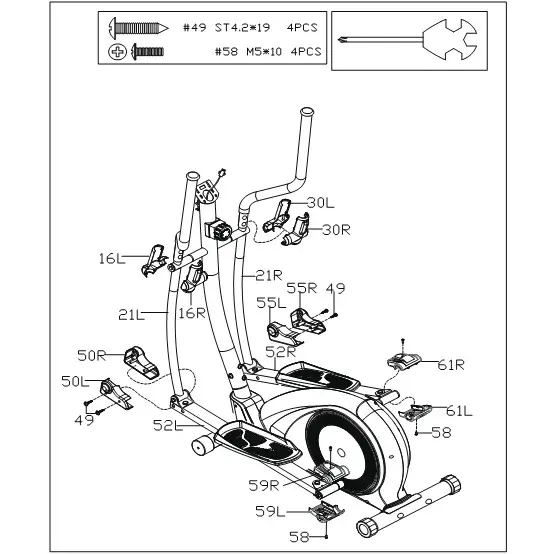
- Attach rod cover(59L/R) and rod cover(61L/R) to connecting rod(52L/R) with screw(58);
- Attach rod cover(50L/R) and rod cover(55L/R) to connecting rod(52L/R) with screw(49);
- Attach swing rod cover(16L/R) (30L/R) to swing rod(21L/R).
STEP 9
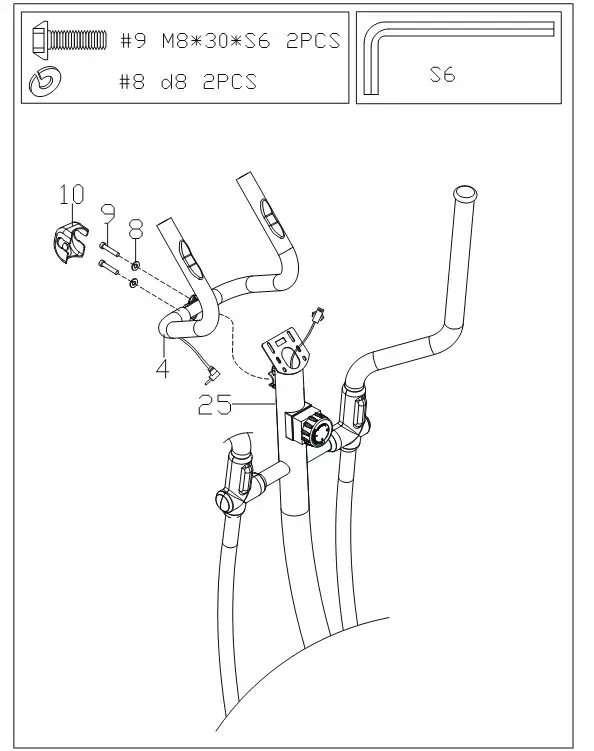
Secure mid-handle bar join(4) to handle bar post(25) with bolt(9) and washer (8), then cover the handlebar clamp(10).
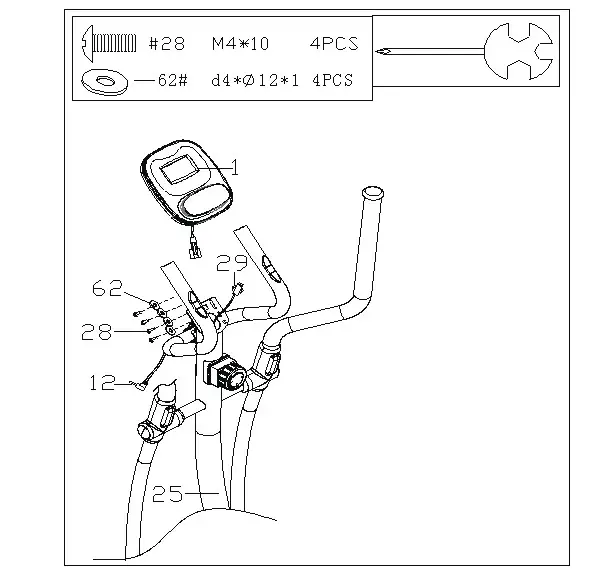
STEP 10
- Connect the link wire of computer(1) and trunk wire(29);
- Lock computer(1) on the handle bar post(25) with bolt(28)and washer(62) ,then insert the handle pulse wire(12) into the hole on the back of the computer(‘1).
EXERCISE MONITOR

SPECIFICATIONS:
TIME (TMR)………………………………0:00—99:59 HOUR
SPEED(SPD)…………………………………0.0—99.9 KM/H
DISTANCE(DIST)………………………..0.00—999.99 KM
CALORIE(CAL)…………………………..0.00—999.9 KCAL
※ TOTAL DISTANCE(ODO)………….0.00—999.99 KM
※ PULSE(PUL)……………………………………40—240BPM
FUNCTIONAL BUTTONS:
MODE – Press to select functions.
SET(IF HAVE) -To set the values of time, distance and calories when not in scan mode.
RESET (IF HAVE) -Press to reset time, distance and calories.
KEY FUNCTION:
SCAN: step into auto scan mode,show every function in turn. in this mode, each function can not be set; hold this key ,the computer will be reset, each function will return zero except total diastance function.
TIEM: show current time you exercise, in the mode, you can press up or down key to set the time you will exercise.
SPEED: show current speed you exercise.
DIST: show current distances you exercise, you can press up or down key to set the distance you will exercise.
CAL: show current calories you exercise, you can press up or down key to set the calories you will exercise.
ODO: show the total distances you exercise from the computer work. this mode can not be set.
step into the pulse test: place the palms of your hands on both of the contact pads an for 30 seconds, then the computer will show current heart rate to you. Computer power on ,the monitor will show full screen for 1 second to enter the scan mode: in the scan mode, if not key operation, it will auto scan into each mode for every 6 seconds. if key operation, it will step into the funtion.
When exercise, the time speed calorie distance odo functions will work, calculate the values of each function. when you stop, the computer will stop work, the time mode will stop for 4 seconds. if there is not singal input for 4 minutes, the computer will step into sleep mode—–the screen will power off until singal input or key operation wake it up.
BATTERY:
lf There Is A Possibility To See An Improper Display On The Monitor, Please Replace The Batteries To Have A Good Result. This Monitor Use Two “Aa” Batteries. You Can Replace The Batteries An The Same Time.
MANUFACTURER’S LIMITED WARRANTY
SNODE FITNESS warrants to the original purchaser that this product is free from defects inmaterial
and workmanshipwhen used for the purpose intended, under the conditions that it has been installed
and operated in accordance with SNODE’s Owner’s Manual. SNODE’s obligation under this warranty
applies to the following:
COMPONENT LENGTH OF WARRANTY
SNODE FITNESS warrants to the original purchaser that this product is free from defects inmaterial and workmanshipwhen used for the purpose intended, under the conditions that it has been installed and operated in accordance with SNODE’s Owner’s Manual. SNODE’s obligation under this warranty applies to the following:
| COMPONENT | LENGTH OF WARRANTY |
| Structural Frame All Other Components | 1 year 1 year |
(computer display, electronics, upholstery, foam, ball bearings, pulleys, belts, cables, wires, shocks, covers, tension, internal mechanism, wheels, pedals, Knobs, accessories and hardware)
Exclusions from Warranty Coverage:
SNODE does not warrant against and is not responsible for, and no implied warranty shall be deemed to cover, any product failure, product malfunction, or damages attributable to:
- Improper installation and/or failure to bide by Paradigm’s installation guidelines;
- Use of this product beyond normal home use, or in an application for which it was not designed;
- Cosmetic items such as scratches, dents or discolorations;
- Damage caused by normal wear and tear, vandalism, accidental or by animals;
- Any act of Nature (such as fire. flooding, snow. ice, hurricane. earthquake. lightning or other natural disaster), environmental condition (such as air pollution, mold, mildew, etc.), or staining from foreign substances (such as dirt, grease, oil, etc.);
- Normal weathering due to exposure to sunlight, weather and atmosphere among other things, flake, chalk, accumulate dirt or stains. which can cause colored surfaces to.
- Improper operation, alteration, handling, storage, abuse or neglect of the products.
This warranty is offered only to the original purchaser and is not transferable. Purchase Proof of original is required.
Ordering Replacement Parts
Replacement parts can be ordered by emailing our customer service department: [email protected]
Open Daily 8:00 AM – 5:00 PM (PST).
When ordering replacement parts please have the following information ready:
- Owner’s Manual
- Model Number
- Description of Parts
- Part Number
- Date of Purchase
PARTS REQUEST FORM
SNODE GROUP, Inc.
EMAIL THIS FORM WITH YOUR RECEIPT OF PURCHASE TO [email protected] *
NAME:……………………………………………………
ADDRESS:………………………………………………
CITY: ……………………………………………………..
STATE:……………………………………………………
ZIP:………………………………………………………….
TELEPHONE:
(Day)………………………………………………………
(Night)……………………………………………………
MODEL#:……………………………………………..
PURCHASE DATE:……………………………….
PLACE OF PURCHASE:……………………….
| PART # | DESCRIPTION | QTY |
“YOUR ORDER WILL BE PROCESSED WITHIN 3 BUSINESS DAYS”
ASSEMBLY INSTRUCTION VIDEO

https://www.youtube.com/channel/UCRku67EpT2L9lxwi58IUWTg?view_as=subscriber
Assembly Instruction Video
You can scan this QR code to enter into our Youtube page to follow the product assembly videos.
Hope it will be helpful for you.
![]()


