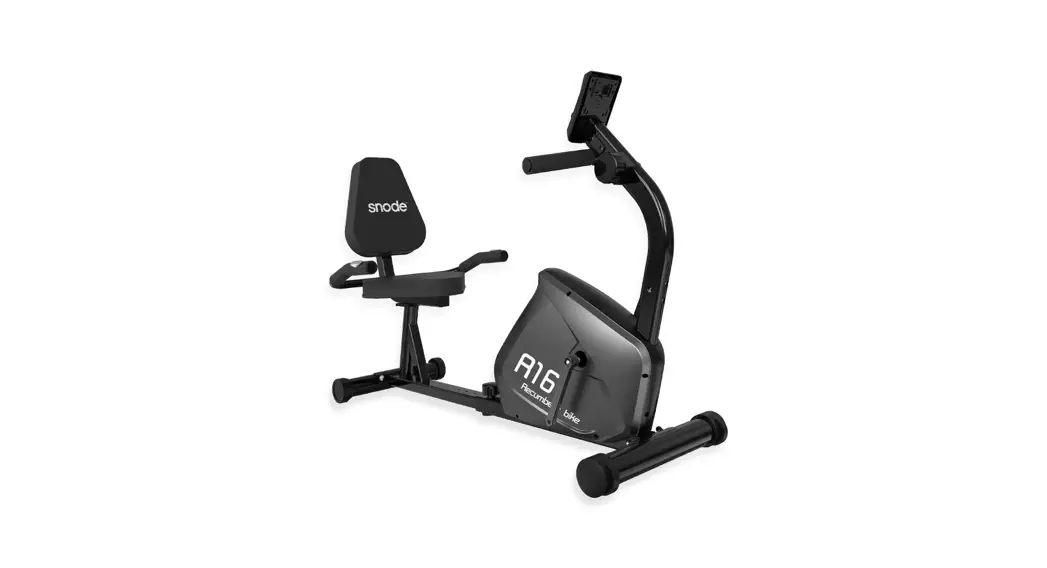
![]() R16 Magnetic Recumbent Exercise Bike
R16 Magnetic Recumbent Exercise Bike
Instruction Manual
R16 Magnetic Recumbent Exercise Bike
![]() IMPORTANT: Read all instructions carefully before using this product. Retain this owner’s manual for future reference. The specifications of this product may vary from his photo, subject to change without notice.
IMPORTANT: Read all instructions carefully before using this product. Retain this owner’s manual for future reference. The specifications of this product may vary from his photo, subject to change without notice.
ATTENTION
 https://www.youtube.com/channel/UCRku67EpT2L9lxwi58IUWTg?view_as=subscriber
Assembly Instruction Video
You can scan this QR code to enter into our Youtube page to follow the product assembly videos. Hope it will be helpful for you.
PLEASE DO NOT RETURN THIS PRODUCT TO THE STORE.
STOP. Contact customer service if you have any questions regarding assembly or proper operation of the machine.
IMPORTANT SAFETY INFORMATION
Please keep the instruction manual properly to facilitate future inquiries.
- It is important to read this entire manual before assembling and using the equipment. Safe and effective use can only be achieved if the equipment is assembled, maintained and used properly.
2. Before starting any exercise program you should consult your doctor to determine if you have any medical or physical conditions that could put your health and safety at risk, or prevent you from using the equipment properly. Your doctor’s advice is essential if you are taking medication that affects your heart rate, blood pressure or cholesterol level. - Be aware of your body’s signals. Incorrect or excessive exercise can damage your health. Stop exercising if you experience any of the following symptoms: pain, tightness in your chest, irregular heartbeat, extreme shortness of breath, lightheadedness, dizziness or feelings of nausea. If you do experience any of these conditions you should consult your doctor before continuing with your exercise program.
- Keep children and pets away from the equipment. The equipment is designed for adult use only.
- Use the equipment on a solid, flat level surface with a protective cover for your floor or carpet. To ensure safety, the equipment should have at least 0.6 meters of free space all around it.
- Before using the equipment, check that the nuts and bolts are securely tightened.Always use the equipment as indicated. If you find any defective components while assembling or checking the equipment, or if you hear any unusual noises coming from the equipment during use, stop immediately. Do not use the equipment until the problem has been rectified.
- There are many functions of the computer, which value will show when using the equipment according the amount of exercise, here warmly remind you that the value of heart pulse just give you some reference.
- Wear suitable clothing while using the equipment. Avoid wearing loose clothing that may get caught in the equipment or that may restrict or prevent movement.
- This equipment is designed for indoor and family use only. Maximum weight of user: 120 KG.
- Care must be taken when lifting or moving the equipment so as not to injure your back.
- The equipment is not suitable for therapeutic use.
- Please save this manual and assembling tools well.
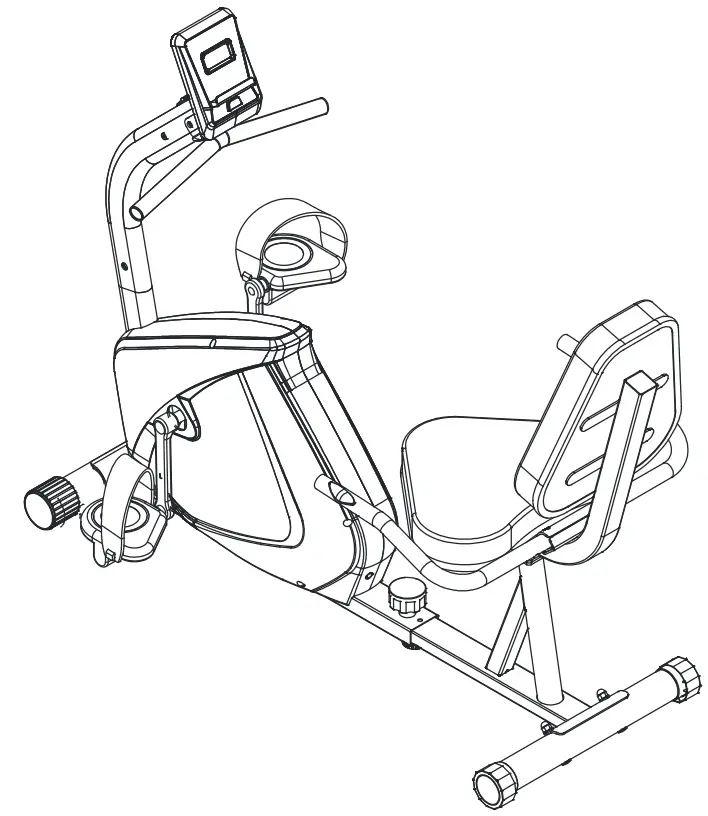
EXPLODED – VIEW & PARTS LIST

PARTS LIST
| No. | Description | Qty. | No. | Description | Qty. |
| 1 | Computer | 1 | 32 | Spring Washer D8 | 4 |
| 2 | ScrewM5″10 | 2 | 33 | Screw M6’16 | 8 |
| 3 | Domed Nut M8 | 6 | 34 | Plastic Cover | 2 |
| 4 | Arc Washer D8x020x1.5XR30 | 4 | 35 | Cushion Post | 1 |
| 5 | Bolt M5’25 | 1 | 36 | End Cap F38 | 2 |
| 6 | Arc Washer D8x020x1XR25 | 1 | 37 | Back Cushion | 1 |
| 7 | Upping Post | 1 | 38 | Foam Grip | 2 |
| 8 | Tension Control Wire 1 | 1 | 39 | Pulse 022 | 2 |
| 9 | Screw M8’16 | 12 | 40 | Handlebar | 1 |
| 10 | Handle Wire 1 | 1 | 41 | Screw | 2 |
| 11 | Sensor Wire | 1 | 42 | Carriage bolt M8*45 | 2 |
| 12 | End Cap | 4 | 43 | Cover Plate | 1 |
| 13 | Handlebar | 1 | 44 | Seat | 1 |
| 14 | Foam Grip | 2 | 45 | Sensor Line | 1 |
| 15 | Arc Washer D8x016x1.5XR16 | 2 | 46 | Washer | 2 |
| 16 | Tension Control Line 2 | 1 | 46L/R | Cover | 2 |
| 17L/R | Pedal (L/R) | 2 | 47 | Bearing | 2 |
| 18 | Sensor Line | 1 | 48 | Bolt M6’15 | 4 |
| 19 | Middle Wire | 1 | 49 | Nut M6 | 4 |
| 20 | Main Frame | 1 | 50 | Axle | 1 |
| 21 | End Cap | 2 | 51 | Nut 1 | 1 |
| 22 | Front Stabilizer | 1 | 52 | Washer | 1 |
| 23 | Carriage Bolt M8’62 | 4 | 53 | Belt | 1 |
| 24 | Spring Knobs M16x1.5 | 1 | 54 | Crank | 1 |
| 25 | Foot Pad | 1 | 55 | Belt Pulley | 1 |
| 26 | Square Bushing | 1 | 56 | Hexagon Flange Nut M10*1.0 | 2 |
| 27 | Handle Wire2 | 1 | 57 | Bolt | 1 |
| 28 | Back Bracket | 1 | 58 | Flywheel | 1 |
| 29 | Rear Stabilizer | 1 | 59 | Hexagon thin nut M10’1.0 | 2 |
| 30 | End Cap | 2 | 60 | Bearing | 2 |
| 31 | Washer D8x016x1.5 | 12 | 61 | Axle | 1 |
| No. | Description | Qty. | No. | Description | Qty. |
| 62 | Pinch Roller | 1 | 73 | Plastic Lattice | 1 |
| 63 | Screw M8*19 | 1 | 74 | Bolt M6’30 | 1 |
| 64 | Tension Spring | 1 | 75 | Nut M6 | 2 |
| 65 | Steel Bracket | 1 | 76 | Tension Spring | 1 |
| 66 | Snap Spring | 2 | 77 | Nylon Nut M8 | 2 |
| 67 | Washer D6x016x1.5* | 2 | 78 | Screw | S |
| 68 | Spring Washer D6 | 2 | 79 | Screw | 7 |
| 69 | Bolt M6’20 | 2 | 80 | Short tube | 1 |
| 70 | Axle | 1 | 81 | End Cap | 2 |
| 71 | Magnetic Board | 1 | Solid Wrench S13-14-15 | 1 | |
| 72 | Magnet | 4 | Hexagon wrench S6 | 1 |
ASSEMBLY INSTRUTIONS
STEP 1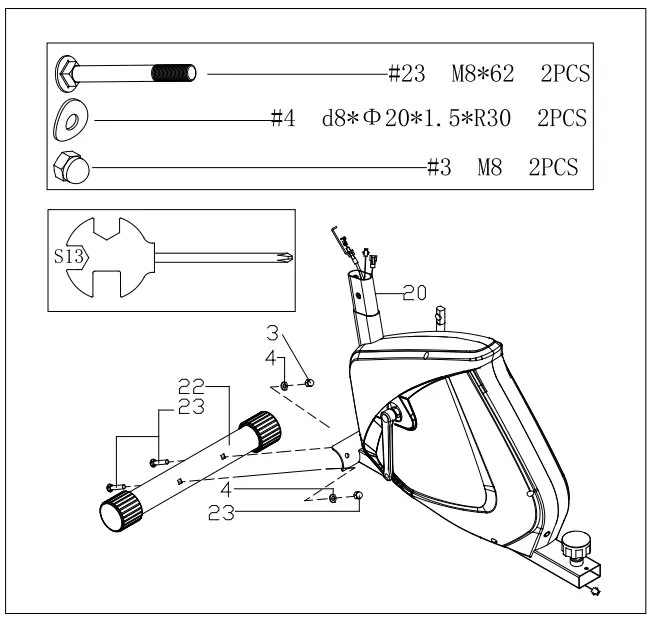 A. Attach the front stabilizer (22) to the main frame (20) with carriage bolt (23), domed nut (3) and arc washer (4).
STEP 2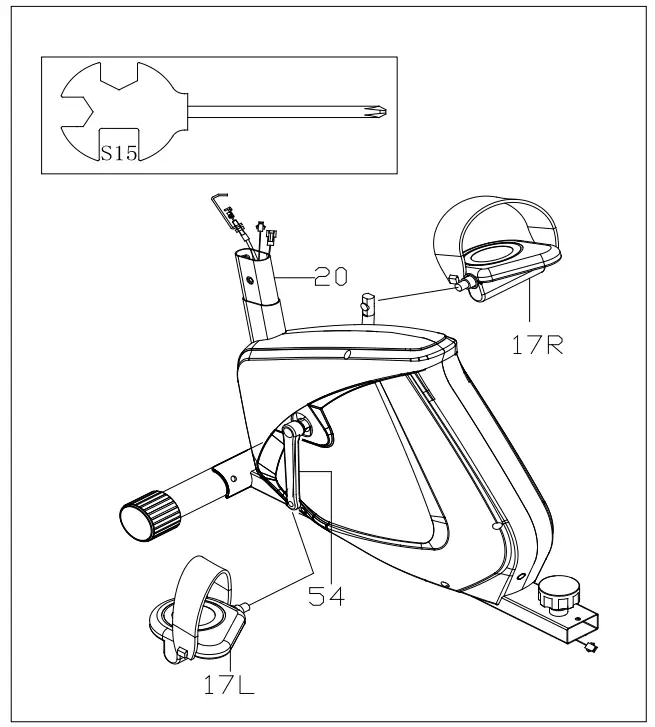 A. Install left & right pedal (171./R) to crank (54). Then, lock the left pedal (17L) tightly in counterclockwise direction. In addition, lock the right pedal (17R) tightly in clockwise direction.
STEP 3 A. Attach the rear stabilizer (29) to the back bracket (28) with carriage bolt (23), domed nut (3) and arc washer (4).
STEP 4 A. Connect the sensor 19 & 27, and slide the back bracket (28) to the main frame (20). You will have to fixing the Adjustment Knob (24). You can adjust the distance based on your height.
STEP 5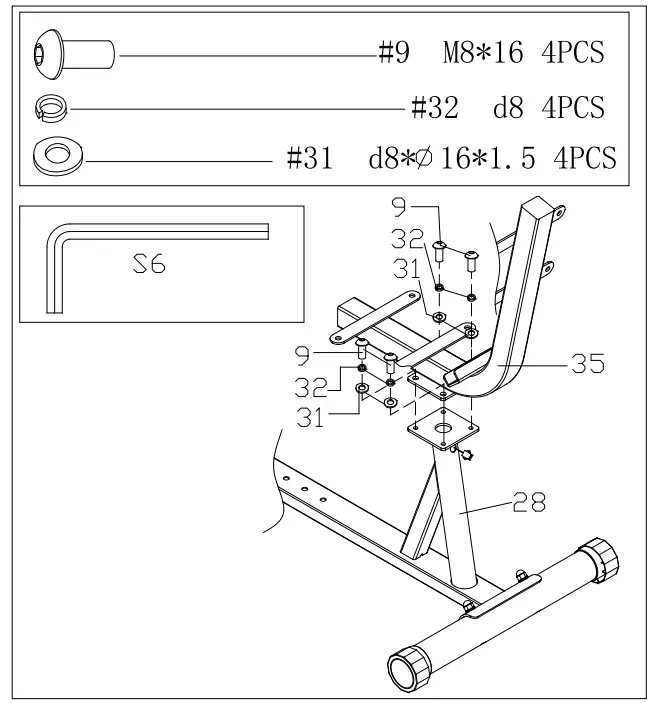 A. Attach the cushion post (35) to the back bracket (28) with the washer (31), spring washer (32) and bolt (9).
STEP 6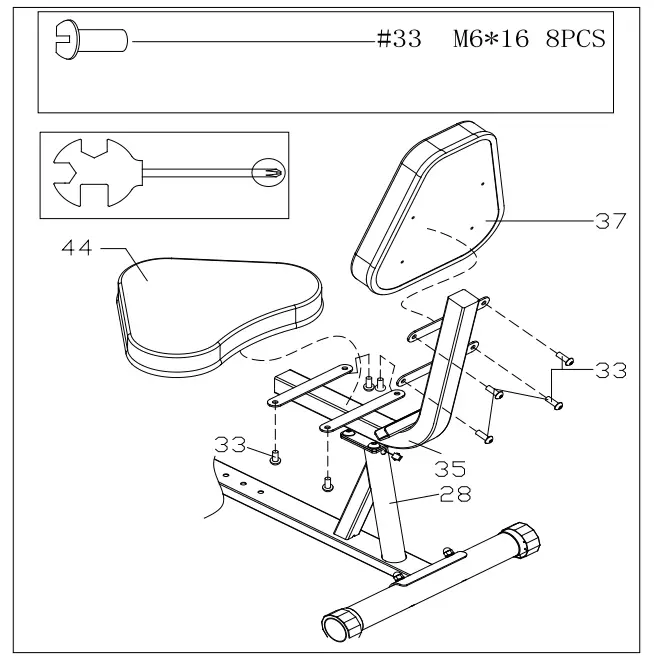 A. Attach the back cushion (37) and the cushion (44) to the cushion post (35) with the bolt (33) and washer (34).
STEP 7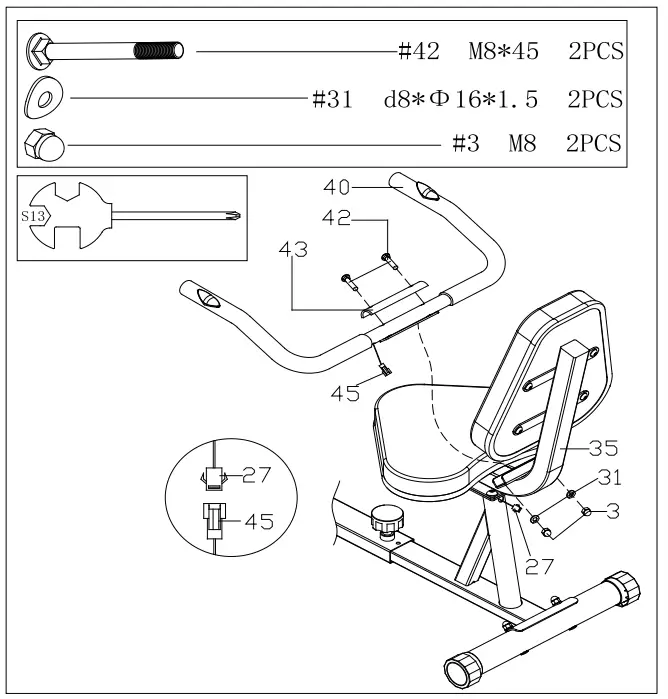 A. Connect handle wire (45) with pulse wire (27). Then, fix cover plate (43) and handlebar (40) onto seat tube (35) with carriage bolt (42), flat washer (31) and domed nut (3).
STEP 8 A. Connect the sensor line 11&18, handle wire 10&19, and tension control wire 8&16, attach the tension control (8) to the upping post with nut (5) and arc washer (6). Install the support tube (7) on the main frame (20) with arc washer (15) and bolt (9) and washer (31).
STEP 9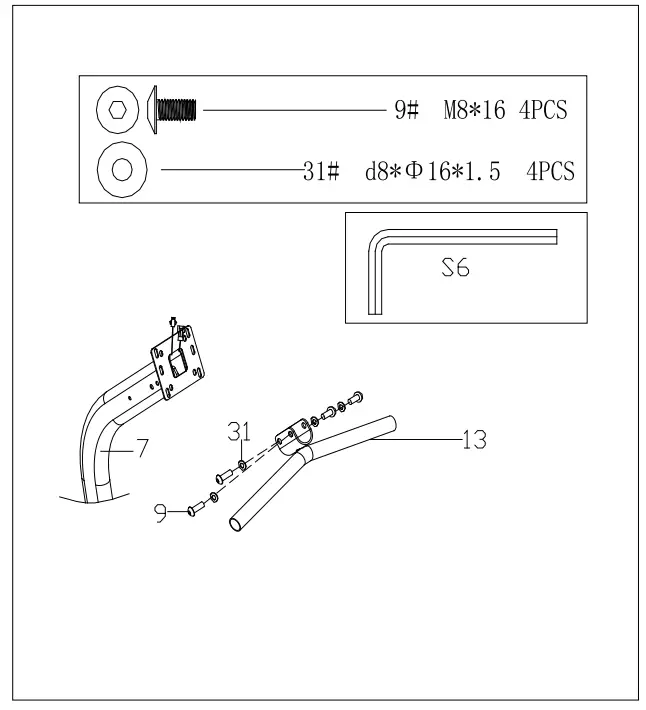 A. Attach handlebar 03) onto support tube (7) with bolt (9), flat washer (31).
STEP 10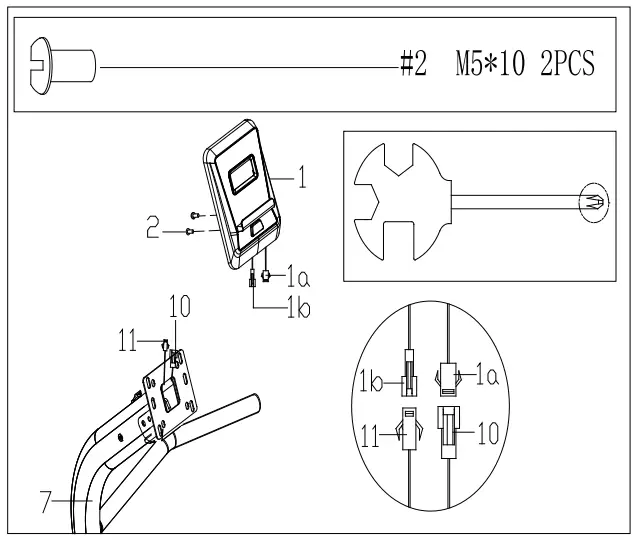 A. Connect the sensor line (11), handle wire (10) with computer line (lb, la) separately. Fix computer (1) onto support tube (7) with Screw (2).
QUICK START GUIDE
STRETCH EXERCISE
No matter how you do sports, please do some stretch at lint,The warm muscle will extend easily, so warm up yourself with 5-10minutes. Then We suggest the following stretch exercise, five times. 10counts for each time or longer do these exercise again after sports.
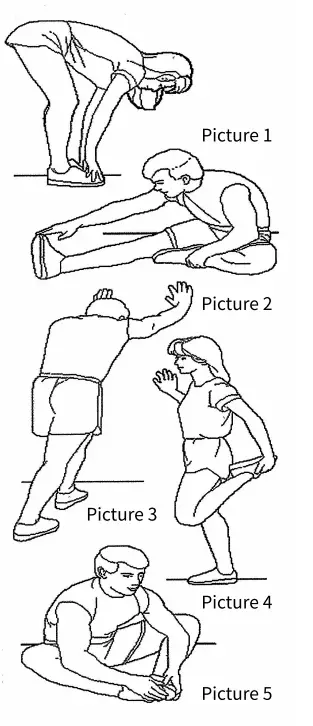
- TOE TOUCH Slow bend forward from your waist, letting your back and shoulders relax as you stretch toward your toes, Reach down as far as you can and hold for 15 counts.And then relax, repeat 3 times. (Picture 1).
- HAMSTRING STRETCH Slow bend forward from your waist, letting your back and shoulders relax as you stretch toward your toes, Reach down as far as you can and hold for 15 counts. And then relax, repeat 3 times. (Picture 2).
- CALF-ACHILLES STRETCH Lean against a wall with your kit leg in front of the right and your arms forward.Keep your right leg straight and the left foot on the floor, then bend the left legend lean forward by moving your hips toward the wall, Hold, then repeat on the other side for 15 counts. Then relax and repeat 3 times for each leg (Picture 3).
- QUADRICEPS STRETCH With one hand against a wall for balance, reach behind you and pull your right foot up. Bring your heel as close to your buttocks. hold for 10-15counts.relax. Repeat three times for each foot(Picture 4).
- INNER THIGH STRETCH Sit with the soles of your feet together with your knees pointing outward. Pull your feet as close into your groin as possible. Gently push your knees towards the floor. Hold for 15 counts. Then relax and repeat 3 times. (Picture 5).
INSTRUCTION MANUAL
SPECIFICATIONS:
| TIME | 00410-9959 |
| SPEED(SPD) | 0.0-99.9KM/lf (HUH) |
| DISTANCE(DIST) | 0.00-999.9KM (ML) |
| CALORIE(CAL) | 0.00-9999KCAL |
| ODOMETER(000) | 0.0-9999KCL (ML) |
| PULSE (PUL) | 0, 40-240BPSI |
KEY FUNCTIONS:
MODE(SELECT/RESET): This key lets you to select and lock on to a particular function you want
OPERATION PROCEDURES:
- AUTO ON/OFF
(1)The system turns on when any key is pressed or when it sensor an input from the Weed sensor.
(2)The system turns off automatically when the speed has no signal input or no key are pressed for approximately 4 minutes. 2. RESET (1)11* unit can be reset by either changing battery or pressing the MODE key for 3 seconds. - MODE
(1)To choose the SCAN or LOCK if you do not want the scan mode, press the MODE key when the pointer on the function you want which begins blinking. FUNCTIONS: 1. TIME: Press the MODE key until pointer lock on to SI ME.11* total working time will be shown when starting exercise.
2. SPEED: Press the MODE key until the pointer advance to SPEED. The current speed will be shown. - DISTANCE: Press the MODE key until the pointer advance to DISTANCE. The distance of each workout will be displayed.
- CALORIE: Press the MODE key until pointer lock on to CALORIE. The calorie burned will be displayed when starting exercise.
- ODOMETER (IF HAVE): Press the MODE key until the pointer advance to ODEMETER. The total accumulated distance will be shown.
- PULSE (IF HAVE): Press the MODE key until the pointer advance to PULSE. User’ scurrent heart rate will be displayed in beats per minute. Place the palms of your hands on both of the contact pads(or put ear-clip to earhand wait for 30 seconds for the most accurate reading.
SCAN:
Automaticallydisplay changes every 4 seconds.
BATTERY: If Improper display on monitor, please reinstall the batteries to have a good result.
PARTS REQUEST FORM
SNODE GROUP, Inc.
EMAIL THIS FORM WITH YOUR RECEIPT OF PURCHASE TO [email protected] *
NAME …………..
ADDRESS: …………….
CITY: ……………. STATE:……………….. ZIP: ……………….
TELEPHONE (Day):……… (Night)…………..
MODEL#……………..
PURCHASE DATE……….
PLACE OF PURCHASE…………………
| PART # | DESCRIPTION | QTY |
“YOUR ORDER WILL BE PROCESSED WITHIN 3 BUSINESS DAYS”
![]() Email us at: snodefitnessoutlook.com
Email us at: snodefitnessoutlook.com
Or call us at: 1-323-510-1818
Hours: 8:00 am to 5:00 pm (PST) Daily


