![]() Floor Heating Thermostat
Floor Heating Thermostat
P5601UF
P5601UF Floor Heating Thermostat
 |  |
 |  |
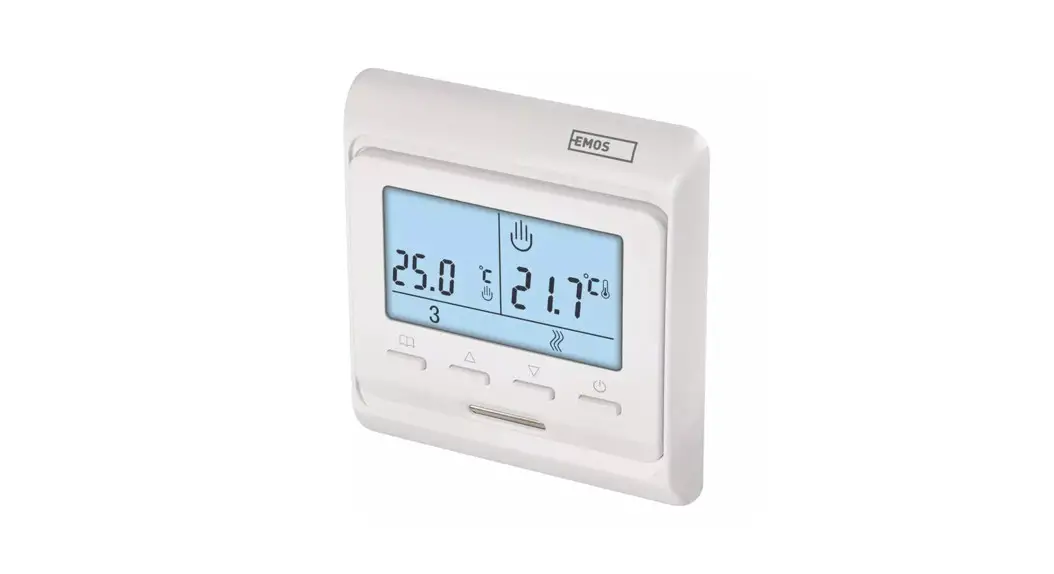
The P5601UF thermostat is designed for controlling underfloor heating.
Important
- Read the thermostat manual carefully before using the device for the first time.
- Turn off power before installing the thermostat!
- Installation and power connection of the thermostat may only be done by a qualified person.
- Follow prescribed standards during installation.
Technical specifications:
Switched load: max. 230 V AC; 16 A for resistive load; 16 A for inductive load
Temperature measurement: 0 °C to 99 °C, 0.1 °C resolution
Temperature setting: 5 °C to 95 °C, in 0.5 °C increments
Temperature differential setting: 1 °C to 10 °C, in 1 °C increments
Power supply: 230 V
Enclosure rating: IP20
Accessories: thermostat, floor sensor 3 m
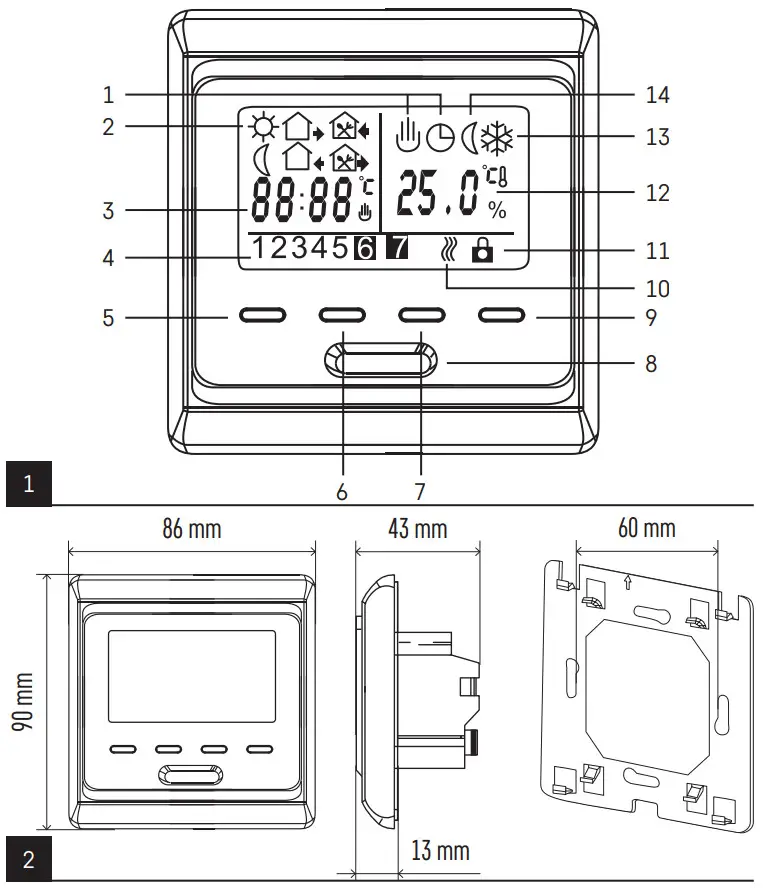
Dimensions and weight: 43 × 86 × 90 mm; 211 g (see fig. 2)
Description of Control Elements and Screen (See Fig. 1)
| 1 – 2 – 6 time slots 3 – time/set temperature 4 – day of the week 5 – mode 6 – UP button 7 – DOWN button | 8 – internal room sensor 9 – on/off button 10 – heating mode 11 – button lock 12 – room temperature 13 – low temperature protection mode 14 – programme mode |
INSTALLATION
Attention:
Before changing the thermostat, disconnect the heating/air-conditioning system from the mains power in your flat. This will prevent potential injury by electric current.
Thermostat Placement
Thermostat placement significantly affects its functioning. Choose a location where members of the family spend most of their time, preferably on the inside wall where air circulates freely, with no direct sunlight. Do not place the thermostat in the vicinity of heat sources (such as TV sets, radiators, fridges), or close to a door (due to frequent shocks or vibrations). If you do not follow these recommendations, the thermostat will not maintain room temperature correctly.
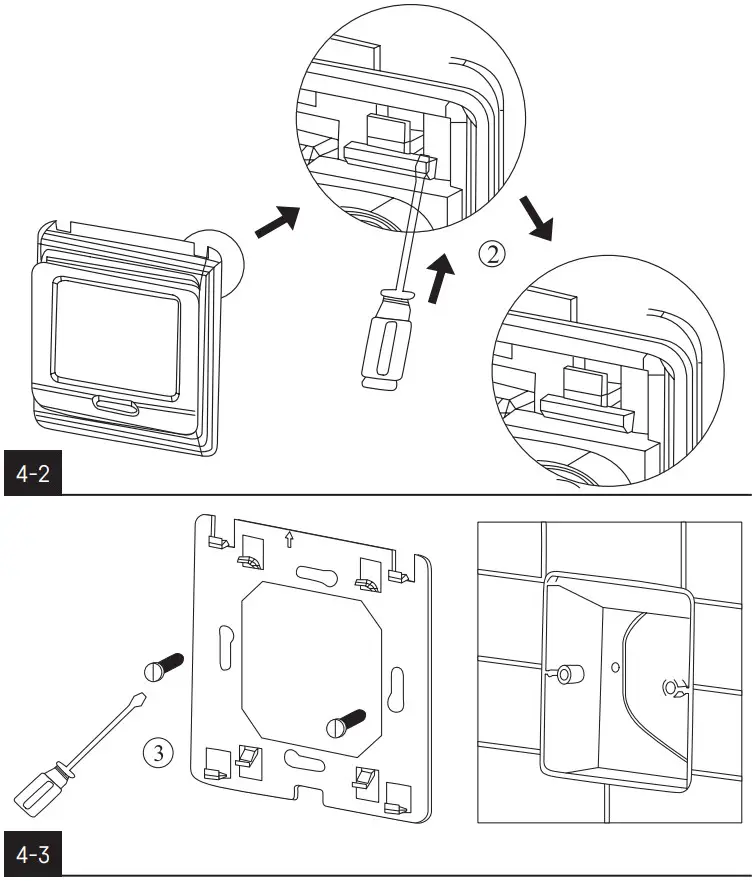
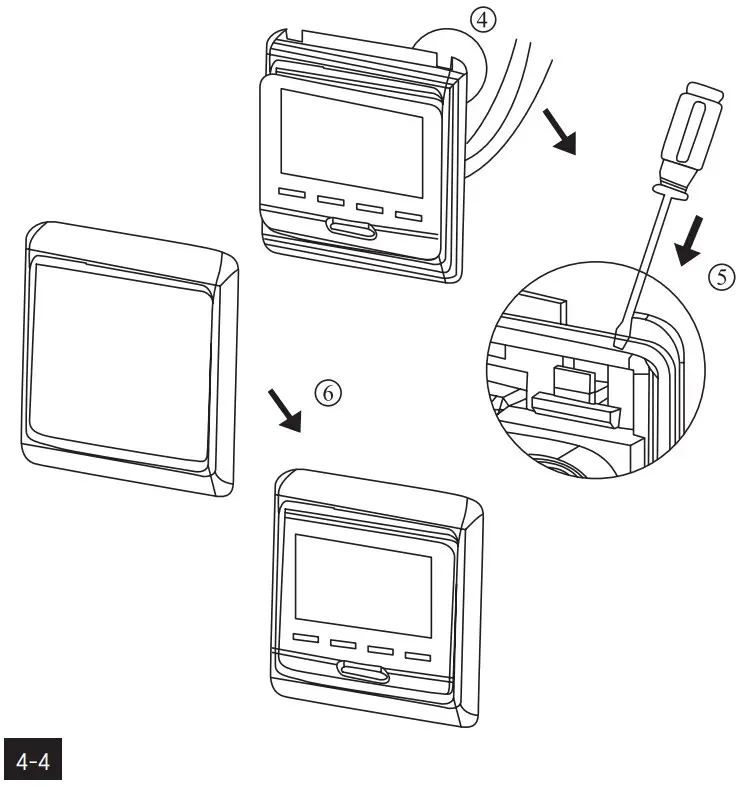
Thermostat Installation (See Fig. 4)
- Slide a screwdriver into the bottom of the thermostat and remove the front cover.
- Use the screwdriver to loosen the metal frame of the mounting plate.
- Mount the mounting plate onto a suitable junction box, e.g. KU 68.
- Connect the wires leading out of the junction box to the marked terminals on the thermostat in accordance with the wiring diagram. Fit the thermostat back onto the mounting plate, secure it with the metal frame and replace the front cover.
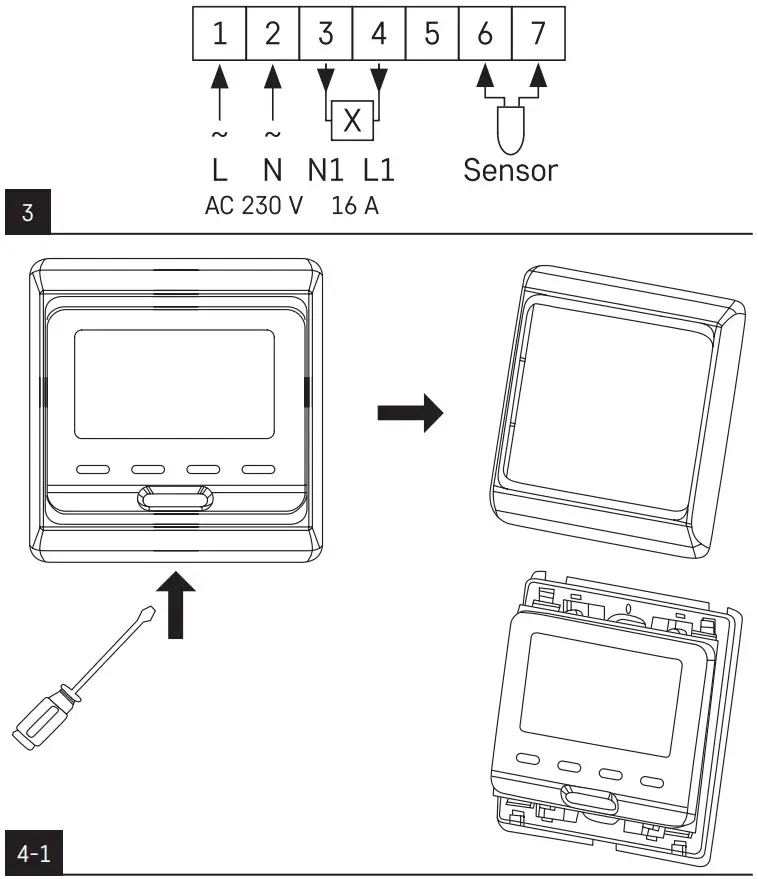
Wiring Diagram (See Fig. 3)
| L | 230 V AC power connection |
| N | neutral wire |
| N1, L1 | connected device (e.g. heating mat) |
| Sensor | floor sensor |
Putting the Device into Operation
Press the![]() button.
button.
The thermostat turns on and the screen will activate.
Setting Day and Time
Long press the![]() button and up arrow
button and up arrow![]() simultaneously; the minute value will start flashing.
simultaneously; the minute value will start flashing.
Use the up![]() or
or ![]() down arrows to set minutes and confirm with
down arrows to set minutes and confirm with![]() .
.
Then use the up/down arrows to set hours and confirm with![]() .
.
Then use the up/down arrows to set day (1 – Monday to 7 – Sunday) and confirm with![]() .
.
Screen Illumination
Pressing any button activates screen illumination for 5 seconds.
Factory Preset Programmes![]()
The programmable indoor thermostat was designed to be easy to use and require minimal user input.
Table of Preset Programmes
| Icon | Time | Temperature | ||
| monday – friday | 1st change | 6:00 | 20 °C | |
| 2nd change | 8:00 | 15 °C | ||
| 3rd change | 11:30 | 15 °C | ||
| 4th change | 12:30 | 15 °C | ||
| 5th change | 17:00 | 22 °C | ||
| 6th change | 22:00 | 15 °C |
| Icon | Time | Temperature | ||
| saturday – sunday | 1st change | 8:00 | 22 °C | |
| 2nd change | 23:00 | 15 °C | ||
Programme Settings
The entire working day is divided into 6 time slots = 6 temperature changes.
Weekend days are divided into 2 time slots = 2 temperature changes (the number of slots cannot be changed).
If the factory preset programmes do not suit your needs, you can adjust their timing and temperatures.
You can also set Saturday and Sunday to be included among working days – with this setting, Saturday and Sunday will also be split into 6 time slots.
Note: In both automated and manual temperature mode, field 3 on the screen automatically alternates between displaying the set temperature and time every 5 seconds – this setting cannot be changed.
First, select the days you wish to programme.
- Turn off the thermostat by pressing
 ; OFF will appear on the screen.
 - Long-press the
 and buttons simultaneously.
 - Select the 6. PRG function by repeatedly pressing the button and use the up
 and down
 arrows to select the days of choice:
programming off, manual mode only – OFF
5 working days + 2 weekend days mode 12345
6 working days + 1 weekend day mode123456
7 working days mode1234567
Once you have selected the days, press the![]() button 2× and continue programming:
button 2× and continue programming:
- Long press the button.
- will
 appear on the screen; you are now setting the time of the 1st temperature change within the day and the preset days.
 - Use the and buttons to set time (1 minute resolution) when the 1st temperature change should start and confirm with the button.
- Temperature will appear on the screen; use the and buttons (0.5 °C resolution) to set the temperature and confirm with.
 will appear on the screen; you are now setting the time of the 2nd temperature change within the day.
- Use the and buttons to set time (1 minute resolution) when the 2nd temperature change should start and confirm with the button.
- Temperature will appear on the screen; use the and buttons (0.5 °C resolution) to set the temperature and confirm with.
 will appear on the screen; you are now setting the time of the 3rd temperature change within the day.
- Repeat the process for the remaining temperature changes (3/4/5/6) in the day.
Short-Term Manual Change of Temperature![]()
When in automatic mode, where temperature is controlled by the selected programme, it is possible to make a short-term change to the current temperature setting.
Use the up![]() and down
and down![]() arrows to set a new temperature and wait a few seconds. The value will be automatically saved.
arrows to set a new temperature and wait a few seconds. The value will be automatically saved.
The screen will display both the![]() and
and![]() icon in the top right.
icon in the top right.
Upon the next scheduled temperature change, the hand icon ![]() will disappear and the
will disappear and the ![]() icon will appear instead; temperature will change according to the automated programme.
icon will appear instead; temperature will change according to the automated programme.
The manual change can also be cancelled prematurely by pressing the ![]() button 2×.
button 2×.
Manual Temperature Setting Mode![]()
- Repeatedly press the button to select the
 icon on the top right of the screen.
 - Use the up and down arrows to set temperature and wait a few seconds. The value will be automatically saved.
In this mode, the thermostat always maintains the manually set temperature and preset programmes are not active.
This mode is ended by pressing the![]() button; the thermostat switches tu automatic mode
button; the thermostat switches tu automatic mode![]() .
.
Advanced Thermostat Settings
Turn off the thermostat by pressing![]() , OFF will appear on the screen.
, OFF will appear on the screen.
Long-press the![]() and
and![]() buttons simultaneously.
buttons simultaneously.
This will open advanced thermostat settings.
Press the![]() button repeatedly to select the function of choice, adjust the value using the up
button repeatedly to select the function of choice, adjust the value using the up![]() and down
and down![]() arrows.
arrows.
| Symbol on the screen | Function | Setting with up and down arrows |
| 1.ADJ | Temperature calibration The temperature sensor in the thermostat is calibrated from production. but further calibration can be done to optimise the thermostat further. for instance by com- paring the measured room temperature with a reference thermometer. Example: The thermostat shows room temperature of 22 °C. setting calibration to +1 °C will cause the thermostat to display 23 °C instead. | temperature change from -9.9 °C to +9.9 °C, 0.1 °C resolution |
| 2.SEN | Temperature sensor selection | IN internal room sensor OUT: underfloor sensor ALL: both sensors Note: if the underfloor sensor is not connected, selecting OUT or ALL will result in “Er” appearing on the screen. |
| Symbol on the screen | Function | Setting with up and down arrows |
| 3. LIT | Limitation of underfloor sensor temperature Sets a temperature limit for the underfloor sensor. | can be set to +5 °C to +60 °C, 1 °C resolution |
| 4. DIF | Temperature differential The differential (hysteresis) is the difference in temperature required for switching the system on and off. If, for example, you set the temperature in the heating system to 20 °C and differential to 0.4 °C, the thermostat activates heating as soon as room temperature drops to 19.6 °C and switches heating off when temperature reaches 20.4 °C. | can be set to 1 °C to 10 °C, with 1 °C resolution |
| 5. LTP | Low temperature protection The preset temperature for this mode is 5 °C. | Turned on or off ( |
| 6. PRG | Days of the week setting | programming off, manual mode only — OFF 5 wo2345rking dgs + 2 weekend days mode12345 6 working dgs + 1 weekend day mode 123456 7 working dgs mode 1234567 |
| 7. RLE | This function is not available for this thermostat | |
| 8. DLY | This function is not available for this thermostat |
| Symbol on the screen | Function | Setting with up and down arrows |
| 9. HIT | Highest temperature in the room Setting for the highest possible tempera- ture that can be set on the thermostat. | 35 °C to 95 °C |
| AFAC | Factory reset If the thermostat is not working properly, you can reset it to factory settings. | long-press (ca. 5 seconds) the up arrow |
Upkeep and Maintenance
The product is designed to serve reliably for many years if used properly.
Here are some tips for proper operation:
- Read the manual carefully before using this product.
- Do not expose the product to direct sunlight, extreme cold or humidity, and sudden changes in temperature. This would reduce measuring accuracy.
- Do not place the product in locations prone to vibrations and shocks – these may cause damage.
- Do not subject the product to excessive force, impacts, dust, high temperatures or humidity – doing so may cause malfunction, shorten battery life, damage the batteries or deform the plastic parts.
- Do not expose the product to rain or high humidity, dropping or splashing water.
- Do not place any open flame sources on the product, e.g. a lit candle, etc.
- Do not place the product in places with inadequate air flow.
- Do not insert any objects in the product‘s vents.
- Do not tamper with the internal electric circuits of the product – doing so may damage the product and will automatically void the warranty. The product should only be repaired by a qualified professional.
- To clean the product, use a slightly moistened soft cloth. Do not use solvents or cleaning agents – they could erode the plastic parts and cause corrosion of the electric circuits
- Do not immerse the product in water or other liquids.
- In the event of damage or defect of the product, do not make any repairs by yourself. Have it repaired in the shop where you bought it.
- This device is not intended for use by persons (including children) whose physical, sensory or mental disability or lack of experience and expertise prevents safe use, unless they are supervised or instructed in the use of the appliance by a person responsible for their safety. Children must always be supervised to ensure they do not play with the device.
![]() Do not dispose with domestic waste. Use special collection points for sorted waste. Contact local authorities for information about collection points. If the electronic devices would be disposed on landfill, dangerous substances may reach groundwater and subsequently food chain, where it could affect human health.
Do not dispose with domestic waste. Use special collection points for sorted waste. Contact local authorities for information about collection points. If the electronic devices would be disposed on landfill, dangerous substances may reach groundwater and subsequently food chain, where it could affect human health.
![]()


