Contents hide
GKBD400BKFR Mechanical Gaming Keyboard
User Manual
Preface
Thank you for purchasing the Nedis GKBD400BKFR.
This document is the user manual and contains all the information for correct, efficient and safe use of the product.
This user manual is addressed to the end user. Read this information carefully before installing or using the battery.
Always store this information with the product for use in the future.
Product description
The Nedis GKBD400BKFR is a mechanical gaming keyboard.
Intended use
The product is exclusively intended as a keyboard and is specialized for gaming.
Any modification of the product may have consequences for safety, warranty and proper functioning.
Specifications
Product | Mechanical Gaming Keyboard |
Article number | GKBD400BKFR |
Dimensions (l x w x h) | 478 x 257 x 41 mm |
Voltage | 5 VDC |
Current | ≤ 300 mA |
Cable type | Braided |
Cable length | 1.7 m |
Connection input | USB |
Number of keys | 105 keys |
Type of key switch | Plugable Outemu Blue |
Key pressure | 60 g ± 10 g |
N-key (all-key) anti-ghosting | Yes |
6-key anti-ghosting | Yes |
Keyswitch lifetime | Up to 50,000,000 strikes |
Backlight | LED light Rainbow colour 21 modes |
System requirements | Windows 2000 / XP / Vista / 7 / 8 / 10 |
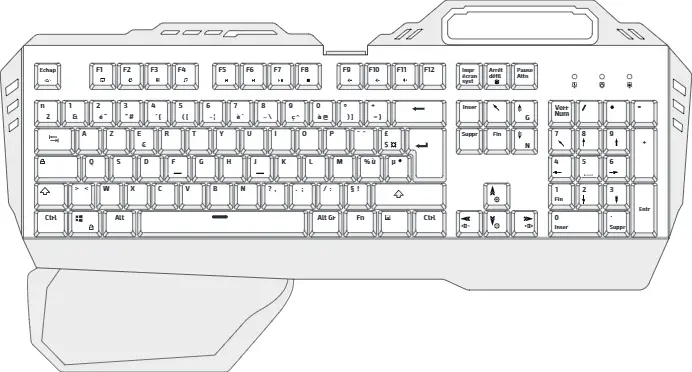
Main parts (image A)
 |
A |
1. Function keys |
2. Cable |
3. USB connector |
4. Smartphone holder |
5. Status lights |
6. ZQSD keys |
7. FN key |
8. Palm rest (detachable) |
9. Connection plate for palm rest |
10. Sscrews (3x) |
11. Key puller |
12. Spare mechanical switches (6x) |
Safety instructions
WARNING
- Do not use the product if a part is damaged or defective. Replace a damaged or defective device immediately.
- Do not drop the product and avoid bumping.
- Do not expose the product to water or moisture.
- Do not place heavy objects on top of the product.
- Do not repeatedly pound keys harder than necessary or hit the keyboard with your fist or any other object.
- Avoid heat and direct sunlight.
Installation
- Check the contents of the package
- Check that all parts from the parts list are present and that no damage is visible on the parts. If parts are missing or damaged, contact the Nedis B.V. service desk via the website: www.nedis.com.
Installing the keyboard
1. Plug in the USB connector of your keyboard in an USB port of your computer.
2. The operating system automatically detects the keyboard.
- The keyboard is now ready for use.
Use
You can control the basic functions of the keyboard by using the FN key A7 in combination with another key as shown in the following tables:
Backlight control
Key combination | Function |
FN + Echap | Turn backlight on and off |
FN + A16 | Shift backlight mode from mode 1 until mode 4 |
FN + A17 | Shift backlight mode from mode 5 until mode 8 |
FN + A18 | Shift backlight mode from mode 9 until mode 12 |
FN + A19 | Shift backlight mode from mode 13 until mode 16 |
FN + A21 | Shift backlight mode from mode 17 until mode 20 |
FN + A22 | Increase backlight |
FN + A24 | Dim backlight |
FN + A25 | Increase backlight speed |
FN + A23 | Decrease backlight speed |
FN + A14 | 6-key anti-ghosting |
FN + A15 | N-key (all-key) anti-ghosting |
FN + Windows | Lock or unlock your windows |
FN + Backspace + F1 + F3 + F5 | Restore to default settings |
- Control of the backlight of the ZQSD-keys and the Arrow-keys
1. Press FN and A20 together to switch on the backlight of the ZQSD-keys A6 and the Arrow-keys A22, 23, 24, 25.
2. Press FN and A20 together again and the status lights will flash.
3. Turn on and off the backlight of each key separately by pressing them.
4. Press FN and A20 together again or wait 30 seconds to save and exit the settings of the backlight of the ZQSD-keys and the Arrow-keys.
Multimedia functions
Key combination | Function |
FN + F1 | My computer |
FN + F2 | Web/Home |
FN + F3 | Calculator |
FN + F4 | Media play |
FN + F5 | Previous track |
FN + F6 | Next track |
FN + F7 | Play / Pause |
FN + F8 | Stop |
FN + F9 | Mute |
FN + F10 | Decrease volume |
FN + F11 | Increase volume |
- Customization with the driver software
Introduction
 |
B |
1. Backlight configurations |
2. Presets |
3. Create and edit macro’s |
4. Onscreen keyboard |
5. Apply all made changes |
6. Exit the driver |
7. Save and exit the driver |
8. Reset the preset to the default settings |
1. Download the driver software from www.ned.is/gkbd400bkfr.
2. Install the driver software.
- Make sure the keyboard is connected to the computer when editing the settings.
3. Open the program by clicking on Mechanical Keyboard in the Programs menu from Windows.
- Image B will appear.
- 4. You can create 3 different configurations of key lightings and key assignments called presets. Select preset M1, M2 or M3 B2 to customize a preset.
5. Click B5 to apply the customization.
6. Click B6 to exit the software.
7. Click B7 to save the customized preset and exit the software.
- Select a backlight setting in a preset
 |
C |
1.Select preset M1, M2 or M3 B2.
2.Click B1 and select one of the 20 existing light configurations from the drop down menu that appears.
Adjust Brightness and Speed by clicking on the line next to it.
3.Select Coastal from the drop down menu that appears to create a customized light configuration.
 |
D |
1. Extinguish all keys |
2. Enlight all keys. |
3. Adjust Brightness by clicking on the line next to it. |
4. Click and select a key to enlight the key. |
5. Click and select a key to extinguish the key. |
6. Save as one of 10 different light configurations by selecting USER_MODE1 – USER_MODE10 from the drop down menu. |
7. Set current preset back to default. |
Define your key customization in a preset
1. Select preset M1, M2 or M3 B2.
2. Select a key you want to customize by clicking on it on B4.
- The Key Setting dialog box appears with 4 options:
 |
E |
- Single key: Remap a key: Assign a different single key-command by pressing the key on the mechanical gaming keyboard you want as the command. Click OK.
 |
F |
1. Navigate up in the key action sequence. |
2. Navigate to the first action. |
3. Keys: shows the sequence of actions of keys; |
Action: press down a key shows as an arrow down and relieve a key shows as an arrow up; |
Delay: determine the time of action in ms. |
4. Edit the name of the macro. |
5. Add a new macro. |
6. Delete a macro. |
7. Record a macro by typing the key sequence on your mechanical gaming keyboard. |
8. Delete row. |
9. Clear the macro. |
10. Specify the number of cycles of a predefined sequence. |
11. Exit the macro dialog box. |
12. Save the macro and exits the Macro dialog box. |
13. Record actions in real time. |
14. Navigate to the last action. |
15. Navigate down in the key action sequence. |
- Macro setting: Assign a macro. Click this option to open the Macro Editor (image F). You can record a macro or choose a previously defined macro F4. Click OK.
- Multimedia: Assign a multimedia function by selecting this function from the drop down menu. Click OK.
 |
G |
- Function key: Assigns a function key by selecting this function from the drop down menu. Click OK.
 |
H |
3. Repeat this procedure for every key you want to assign.
Maintenance
To clean the product:
1. Unplug the product.
2. Clean the product regularly with a soft, clean, dry cloth. Avoid abrasives that can damage the surface.
- Do not use aggressive chemical cleaning agents such as ammonia, acid or acetone when cleaning the product.
- Do not immerse the product in water.
3. Regularly remove deposits of dust and fluff from the holes between the keys with a vacuum cleaner or a dusting brush.
- Accumulation will shorten the lifetime of the switches.
To replace a mechanical switch of a key:
1. Pull off the key from the underlying switch using the key puller.
2. Check the postition of the switch.
3. Pull out the switch using the key puller.
4. Place the new switch in the hole, in the same position as the old switch.
5. Push it in tight.
6. Install the key.
7. Check if the new switch works properly.
8. If not repeat this procedure.
Warranty
Any changes and/or modifications to the product will void the warranty. We accept no liability for damage caused by improper use of the product.
Disclaimer
Designs and specifications are subject to change without notice. All logos, brands and product names are trademarks or registered trademarks of their respective owners and are hereby recognized as such.
Disposal
 | This symbol indicates that this product should not be thrown away with other household waste throughout the EU. To prevent possible harm to the environment or human health by uncontrolled waste disposal, you are responsible for recycling it so that it can promote the sustainable reuse of raw materials. To return your used product, you can use the regular return and collection systems or contact the store where the product was purchased. They can recycle this product for the environment. |


