LUPINE SL AF StVZO Canyon Aero Front Light Set User Manual
Assembly Instructions
For a centric montage at 50mm stems: SL AF 50mm stem kit (Art. No.: 5355) available.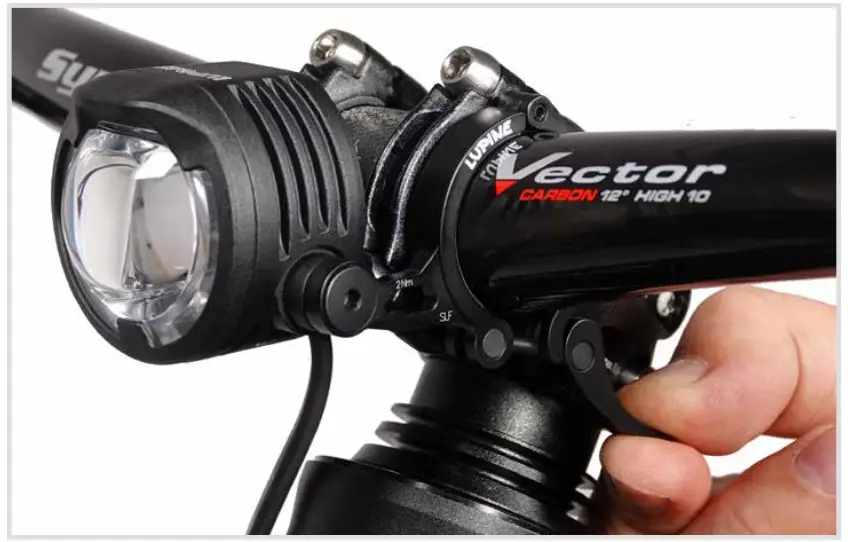
For proper setup screw on the lever of the quick release mount.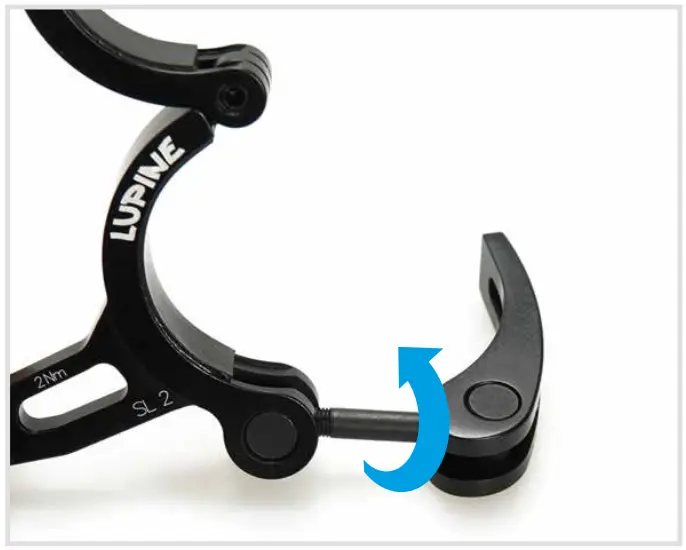
Position the SL centric at the handlebar. Now close the bracket of the quickrelease so the SL is mounted tight in its position.
Important: The beam must be at least inclined so that its center is only half as high as 5 m away from the headlamp. For this, it may be necessary to adjust the inclination of the mounts.
Battery mounting
Battery type:
The battery is mounted with a velcro as shown here. They also come with a capacity indicator.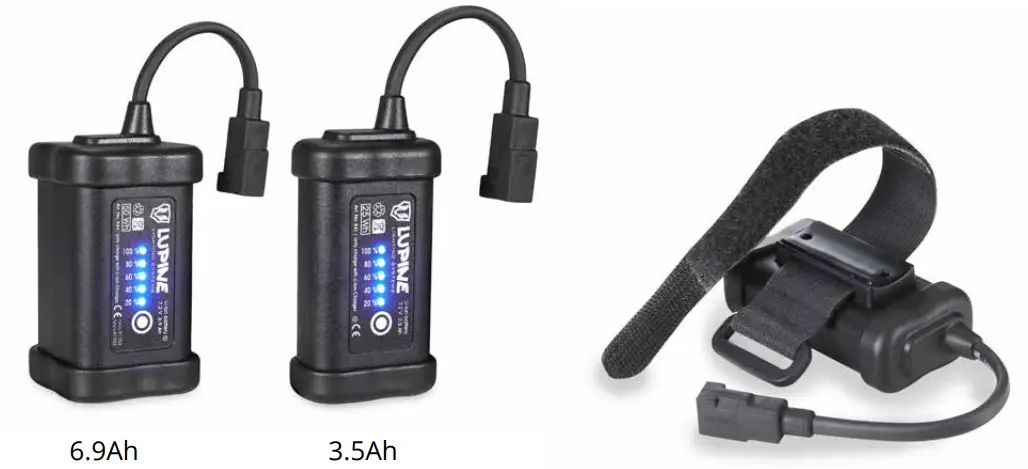
Battery mounting:
Your battery is supplied with a velcro strap, coated with an anti-slip material to ensure a secure mount. Use the strap which most closely matches your tube size.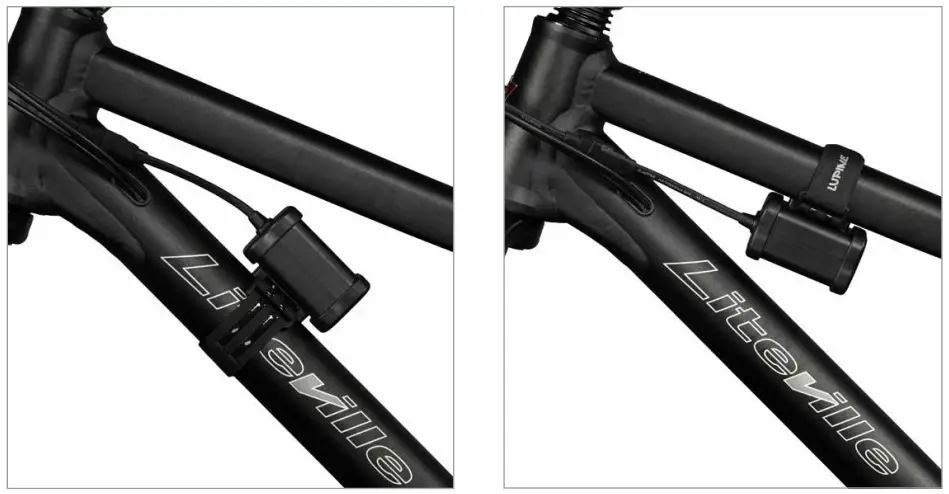
Operation
Initialization:
After connecting the lamp to the battery, the software runs a selftest; the lamp itself as well as the blue „SL“ on the back of the lamp light up once.
Turn on:
By shortly pressing the button (lamphead or remote) you can turn on the light. Depending on the ambient light, the SL starts lighting either with low beam or daytime running light. Note: Only when the low beam is activated, it‘s possible to switch into high beam.
Turn off:
To turn off the lamp, keep the button (lamphead or remote) pressed.
Note: The light outputs the maximum amount of light only if airflow lowers the temperature of the light sufficiently. If the light is not cooled by airflow, its power is reduced incrementally to prevent the LEDs and electronic elements from overheating.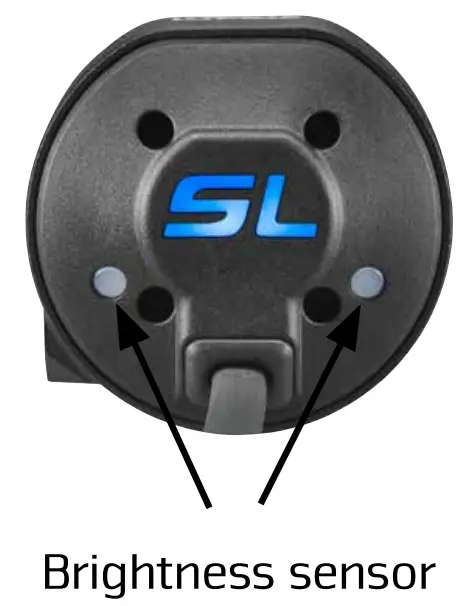
Light mode:
A brightness sensor automatically switches between daytime- and nighttime running light.
| Brightness sensor | Operation of the remote control | |
| Mode (Factory) | The sensor is activated. | Big Button: If low beam is activated, switching to high beam possible. Small Button: Dimming the low beam to 5W. |
Customizing the settings at the lamphead:
| Keep the button pressed (let go to select) until SL lights up | Available settings | Explanation |
| Lights up 1x | Delay (3 sec / 16 sec.) Factory setting: about 3 sec. | The sensor controlled switchover from night- to daytime running light occurs as required in either 3 or 16 sec. |
| Lights up 2x | Sensor calibration Only in the assembled state! Improper calibration may greatly affect the functionality of the light! Calibrate only outdoors. No artificial light or close to reflective objects! | Saves the measured brightness value as a switching point from daytime-to nighttime running light. The successful sensor calibration is confirmed by a short illumination of the daytime running light. |
| Lights up 3x | Factory setting: High beam: 16W, Low beam: 10W, Dimmed low beam: 5W, Daytime running light: 1.5W | |
| Lights up 4x | High beam: 16W, Low beam: 16W, Dimmed low beam: 8W, Daytime running light: 1.5W | |
| Lights up 5x | High beam: 12W, Low beam: 10W, Dimmed low beam: 5W, Daytime running light: 1.5W | |
| Lights up 6x (Combinable with all other light modes) | In contrast to all other light programs, there is no automatic sensor controlled change between low beam and daytime running light. By pushing the small button of the remote you can dim the low beam. By pushing the small button a little longer (about 2 sec.) the daytime running light is activated. If low beam is activated in the dark you can switch to high beam by pushing the big button of the remote. You can only switch off the lamp by pushing the big button of the remote control. | |
| Lights up 7x | Early „battery low warning“ | |
| Lights up 8x | Late „battery low warning“ | |
| Lights up 9x | Bluetooth Connect | |
| Lights up 10x | Reset to factory settings | |
Lamphead informations
At the lamphead:
SL on the back of the lamp lights up blue
High beam is activated.
At the remote: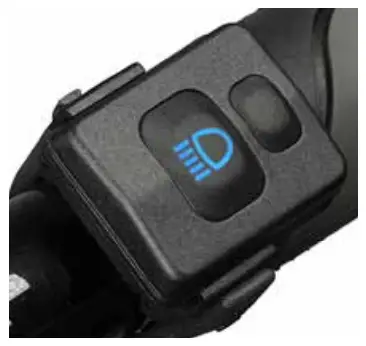
The „high beam symbol“ of the remote lights blue
High beam is activated.
Battery warning at the lamphead in operation:
| Lamp lights up 1x: | 1. Battery Warning, low capacity remaining. |
| Lamp lights up several times:
| Warning! The lamp flashes several times. Stop immediately! The light will be switched off. |
Operation Smartcore battery
Capacity indicator
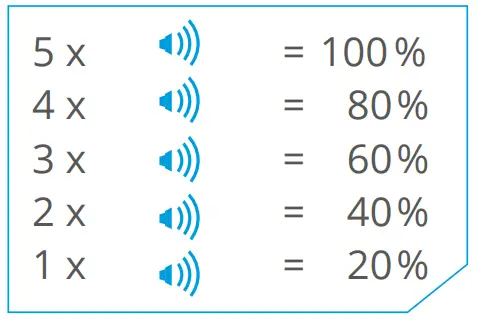
Audible:
To check the capacity, simply press the touch-pad once. At first an audible signal will sound to give a quick reading in 20% steps.
Visible:
The visible indicator uses 5 red LEDs. The LEDs can operate in two different operating states: blinking and continuous. LED meanings:
A blinking LED is indicating a 10% step and a continuously glowing LED a 20% step.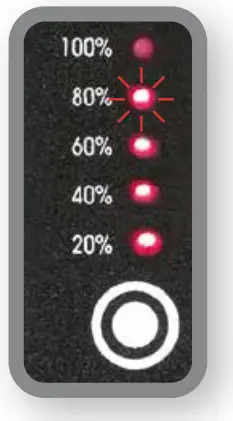
Example:
3 LEDs steady glow (20 %, 40 %, 60 %)
1 LED blinking (80 %) = 70 % remaining capacity
Taillight:
To run the taillight simply press the touch pad two times and the 5 LEDs will operate continuously.
To switch off the taillight, simply press the pad again.
Moving light:
Press the touch pad three times to activate the moving light. To switch it off press the button another time.
Bluetooth remote control
The Bluetooth Remote comes together with the Peppi V5 barmount. On the bike, the best way to mount the remote is directly next to your grips so you have full control and don’t need to take off your hands while riding.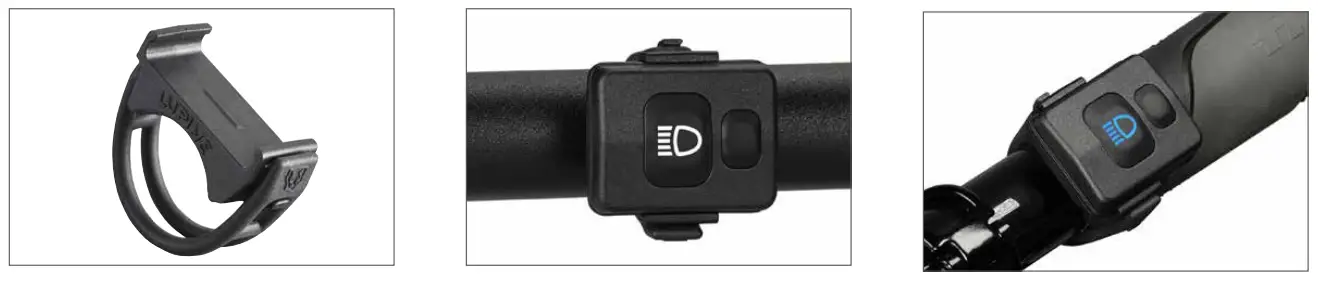
Peppi V5 also available for 32mm, Art. No.: 1086
Connecting the transmitter to the light:
By default, your lamp has already been connected to the transmitter.
For establishing a connection, the receiving mode in the lamp has to be activated.
Keep the lamp’s button depressed until it lights up nine times, let the button go. The receiving mode is active for 30 seconds.
During this time, press the remote control’s big button for about 5 seconds, until the remote confirms by lighting up blue. Release the button immediately.
Factory setting:
Big Button: Turning the lamp on and off. When low beam is activated, switch to high beam.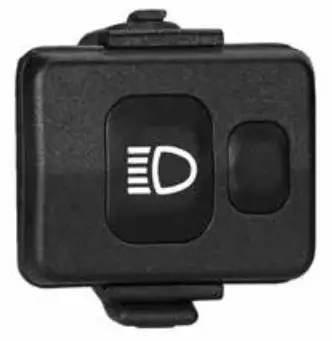
Small button: When low beam is activated, possibility to dim it.
Manual mode:
(Lamp lights up 6x)
Big button: Turning the lamp on and off. In the darkness, when low beam is activated, switch to high beam.
Small button: When low beam is activated, dimming. Keep pressed for about 2 sec., switch to daytime running light.
Low button cell:
With decreasing voltage, the remote control LEDs will shine less bright. Also cold temperature does reduce the battery voltage.
Transmitter battery change:
To change the transmitter button cell a T5 star drive key is needed.
Insert the new CR 2032 button cell as shown and close the transmitter again.
Tighten the screws until the blue sealing is visibly squeezed.
T5 star drive key: (Art.No. 137)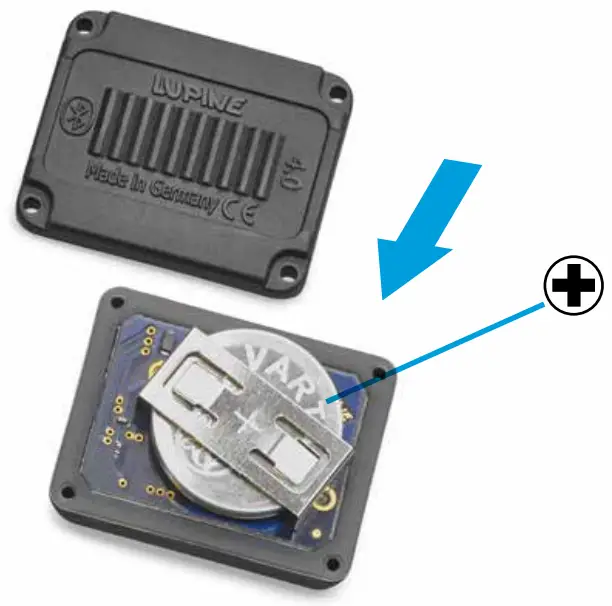
Product Care, Storage and Charging
Product Care and Storage
Light:
After use in dirty areas clean the lamp and the cables externally with warm water and some mild detergent. Important! Because of the delicate sealings, we do not recommend to open the lamp.
A leakage in consequence of opening the light is excluded from warranty! Before you try to repair something on your own get in touch with our helpful Service Team.
Transport:
Important: Always keep the battery separate from the light, because otherwise the small amount of power used by the electronics will discharge the battery, and the lamp may switch on accidently. Important!
Moreover, the consequent uncontrolled heat buildup could cause a fire or melt the adjacent plastic material.
Battery:
If you intend not to use the lamp for a longer period of time, fully charge and store it at a cold and dry place.
Charging batteries:
- Plug the included Wiesel charger into an outlet
- Connect the charger to the battery, charging starts automatically the LED turns red
- When the battery is fully charged the LED on charger turns green
 Warning! This charger is to be used to charge rechargeable Li-Ion batteries only.
It is NOT suitable for charging NiMH batteries!- Do NOT use non-rechargeable batteries. – Risk of explosion!
- This charger may be opened ONLY by the manufacturer!
Troubleshooting
| Problem | Cause | Solution |
| The light does not come on and the power LEDs do not flash when the battery is plugged into the lamp. |
|
|
| With the battery plugged in, the power LEDs do not come on, but the PCS LEDs flash. |
|
|
| The runtime is too short |
|
|
| Even after charging only the 20% LED will light up at the Smartcore battery. |
|
|
| The sensor does not respond. |
|
|
| The lamp does not recognize the transmitter. |
|
|
Technical data
Light Output:
Runtime:
SL AF 4
SL AF 7
| 16 W | 1300 Lumens (High beam) | 1.5 h | 3 h |
| 10 W | 850 Lumens (Low beam) | 2.5 h | 5 h |
| 5 W | 450 Lumens | 5 h | 10 h |
| 1.5 W | Daytime running light | 17 h | 33 h |
Weight:
SL AF lamphead: 100 g
SL AF 4 with battery 250 g
SL AF 7 with battery: 360 g
Charging time:
SL AF 4: 1h 50Min
SL AF 7: 3h 40 Min
Battery capacity/nominal voltage:
SL AF 4: 3.5 Ah / 7.2 V Li-Ion
SL AF 7: 6.9 Ah / 7.2 V Li-Ion
Approval:
StVZO![]() K1552
K1552
Protection class:
IP68
Charger Wiesel:
Input voltage: 100 – 240 V~, 50 – 60 Hz
Charging current: 1.9 A max.
Compatible batteries: Li-Ion 7.2 V
Operating temperature:
-25 °C to +70 °C
| High beam | 16 Watt max. |
| Daytime running light | 1.5 Watt * |
| Operation | At lamphead or bluetooth remote control |
| Lamp | 18x Osram Compact CL |
| Lens system | Dual Aspheric Lens System |
| Dimensions LxWxH | 49x50x48 mm |
* To comply with the StVZO guidelines, the daytime running light is also supported by a slight low beam.
More informations at www.lupine.de
EC Declaration of Conformity: www.lupine.de/ce/
Miscellaneous
Regulations:
The laws governing the allowable application domain for this lighting system may vary from one country to another. We recommend that you inform yourself about the relevant laws in this domain in your country.
Changes:
Rights for improvements and modifications of our products reserved.
Warranty:
The product’s two year warranty applies to all components, as well as any manufacturing defect.
The warranty does not include the battery, however. In addition, any modification or improper use of the product will void the warranty.
Declaration of conformity
Declaration of confirmity Canada:
This device complies with part 15 of the FCC Rules and Industry Canada license exempt RSS standard(s).
Operation is subject to the following two conditions:
- This device may not cause harmful interference, and
- this device must accept any interference received, including interference that may cause undesired operation.
Declaration of confirmity USA:
This device complies with part 15 of the FCC Rules. Operation is subject to the following two conditions:
- This device may not cause harmful interference, and
- this device must accept any interference received, including interference that may cause undesired operation.
Changes or modifications not expressly approved by the party responsible for compliance could void the user’s authority to operate the equipment.
Lupine Lighting Systems GmbH
Im Zwiesel 9
92318 Neumarkt
Germany
Phone: +49 (0) 91 81 – 50 94 90
Fax: +49 (0) 91 81 – 50 94 915
E-mail: [email protected]
www.lupine.de


