DARTWOOD DWKIDCameraPrinterPNKUS Instant Print Camera for Kids
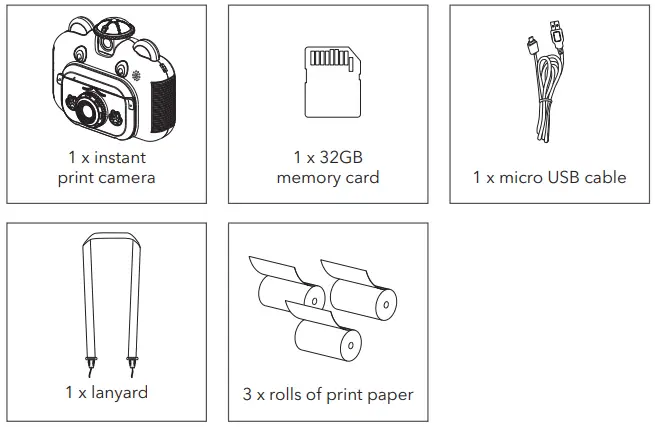
In the Box
Safety Information
- Read this manual carefully and keep it in a safe place for future reference.
- This camera contains small parts. To avoid the danger of choking or suffocation, keep away from small children.
- This camera is not suitable for children under 3 years old.
- Do not immerse the camera or any of its parts into water.
- Do not get close to a fire or heat source while using the camera.
- Do not disassemble or modify the battery without authorization.
- This product must be used under adult supervision.
- Only use the recommended parts with this camera. Fully charge the battery before storage.
Introduction to Parts
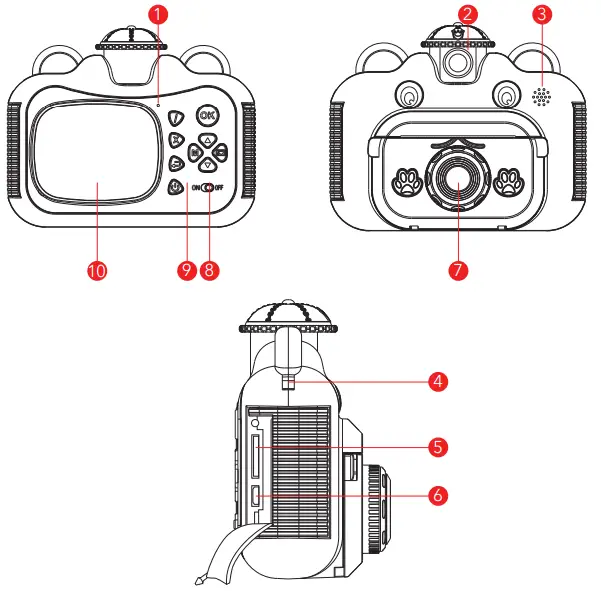
- microphone
- rotatable camera lens
- speaker
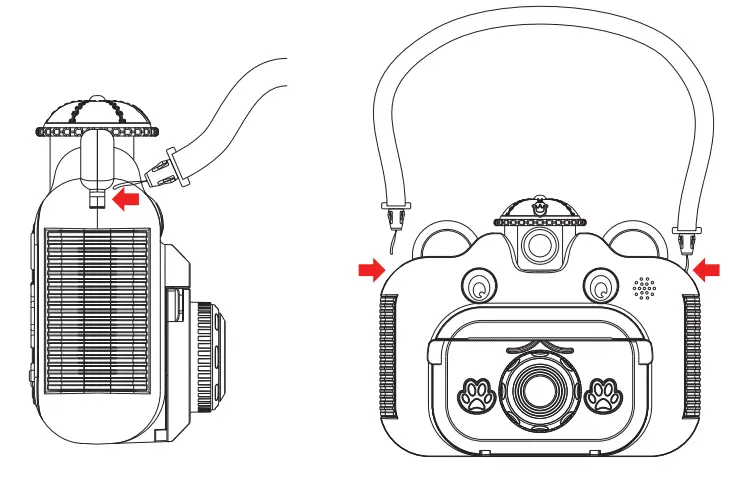
- lanyard eyelets
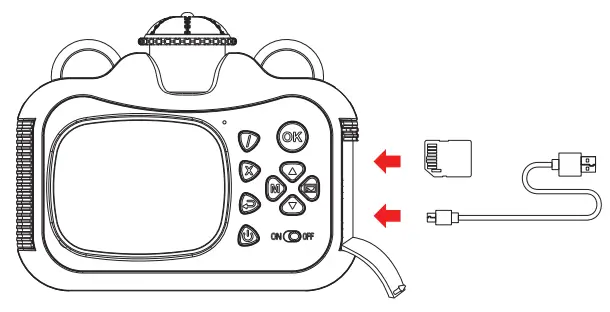
- SD card slot (32GB max.)
- USB port
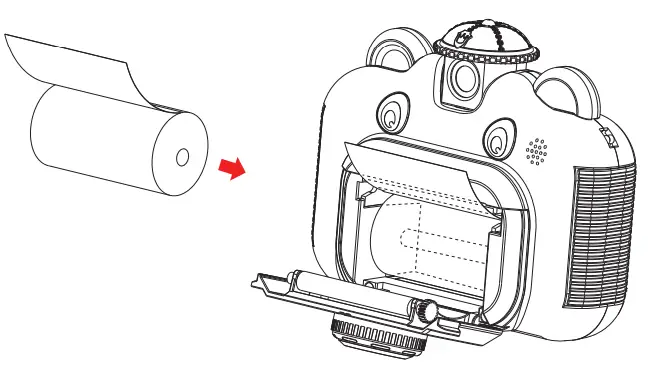
- print paper door
- print on/off switch
- button panel
- screen
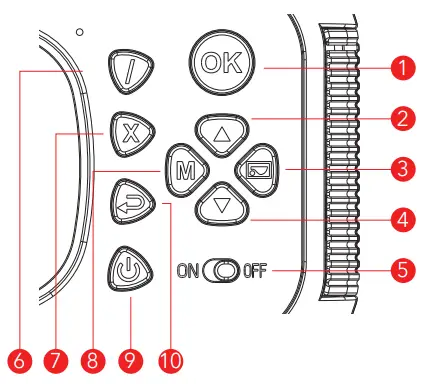
- shutter button / confirm
- up / zoom out
- right / photo album
- down / zoom in
- print on / off switch
- photo / video mode switch
- delete
- left / photo sticker moded
- power
- return
Before You Use
- Remove the protective film on the screen, lens, and other packaging materials.
- Insert the SD card into the slot. Charge the camera before first use. Use only the provided cable with the camera.
(Note: do not use adapter output above 5V 2A)
- Insert the print paper as shown. Make sure the paper outside faces up. It will not print in the opposite direction.

- Connect the lanyard to both sides of the camera. We recommended using the lanyard at all times when children are playing with the camera.

How to Use
- Turn on / off and main menu
Press and hold the button to turn the camera on/off. Press once to return to the main menu.
 - Take photos / videos
Press the button to switch between photo/video mode. Then, press OK the button to take photos / videos.
 - Printing
To print photos, flip on the print switch before taking photos. To print from the album, press the button. Then click the OK button and select print from the screen.
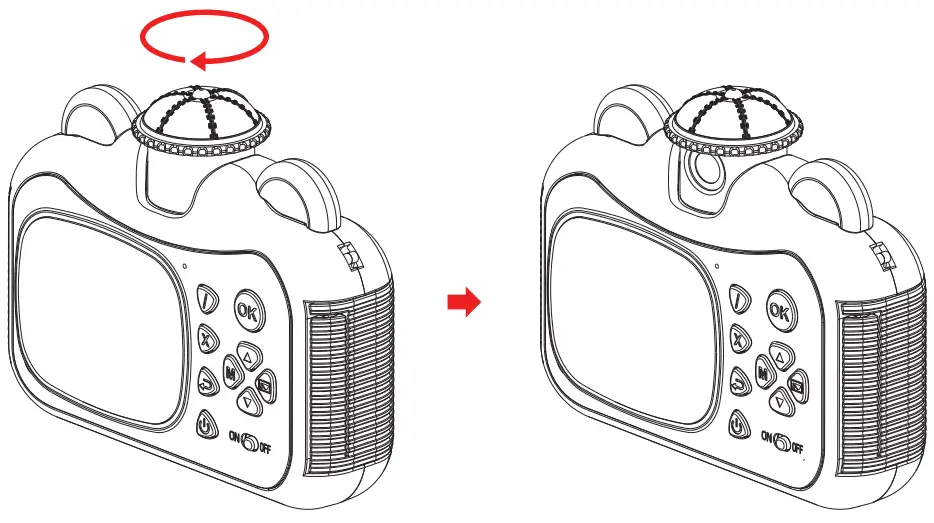
 - Take selfie
On the top of the camera, gently turn the lense 180 degrees, so it clicks into place and is facing behind the camera.
- User cartoon frame
Press the button to use the frame. Use the up/ down button to select a frame.
- Settings
Press the button to enter the main menu then select the setting icon to enter the menu.
Setting Menu Language setting select the system language Resolution adjust the resolution Image quality select the image size Delay photo set the shutter delay time Cycle record set the cycle of loop recording Print shade select the density of printing Audio turn the audio recording on/off Date tag turn time stamp on/off Beep sound turn beep sound on/off Time setting set the system date and time Auto power-off select the timer for auto power-off Format format your SD card and erase all data Reset system factory reset all settings


Tips
- After you turn on the camera, print 1 – 2 times to let the printer warm up.
- A picture with higher contrast (nearly black and white) will have better printing results.
- Only refill with thermal print paper size 2.25 x 1.2 in (57 x 30mm).
Specifications
- Display Screen: 2.4 in LCD screen
- Print Paper Size: 2.25 × 1.2 in
- Picture Resolution: 1-5M, 8M, 10M, 12M
- Video resolution: 720P / 1080P
- Print Shade: Low / Medium / High
- Battery: 1,200 mAh lithium battery
- Charging input: DC 5V 2A
- Charging time: 140 mins
- Memory card: Micro SD card 32 GB (Max)
- Operating temperature: 23 °F to 104 °F
- Size: 5.1 x 4.1 x 2.3 in
- Weight: 0.58 lb
Get More Support
Scan the QR code below or email us at [email protected]